CS001-50-depth
目录
深度图
如何写入深度图
长什么样子
copy depth pass
z反转
如何读取深度图&还原世界坐标
深度图
深度图,是记录离物体离摄像机最近的图。
如何写入深度图
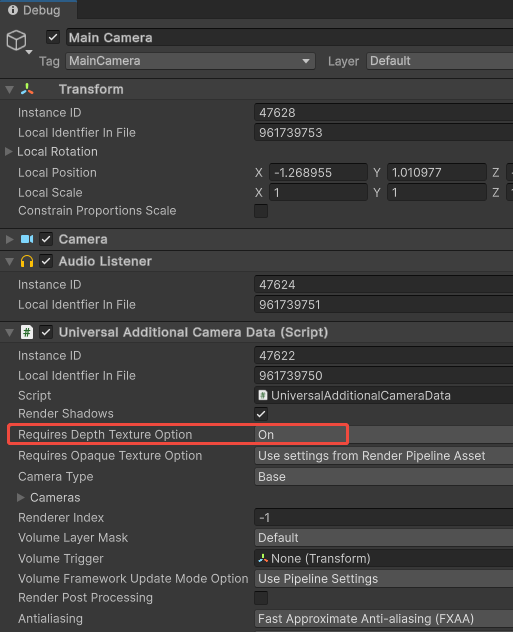
深度图,在urp中,如果相机开启了需要深度图的话,会自动在写color之后,写一个深度图。此外urp还提供一个depth only pass的,他和免费提供的写深度互斥使用。
申请深度图
RenderingUtils.ReAllocateIfNeeded(ref m_CameraDepthAttachment, depthDescriptor, FilterMode.Point, TextureWrapMode.Clamp, name: "_CameraDepthAttachment");
cmd.SetGlobalTexture(m_CameraDepthAttachment.name, m_CameraDepthAttachment.nameID);
长什么样子
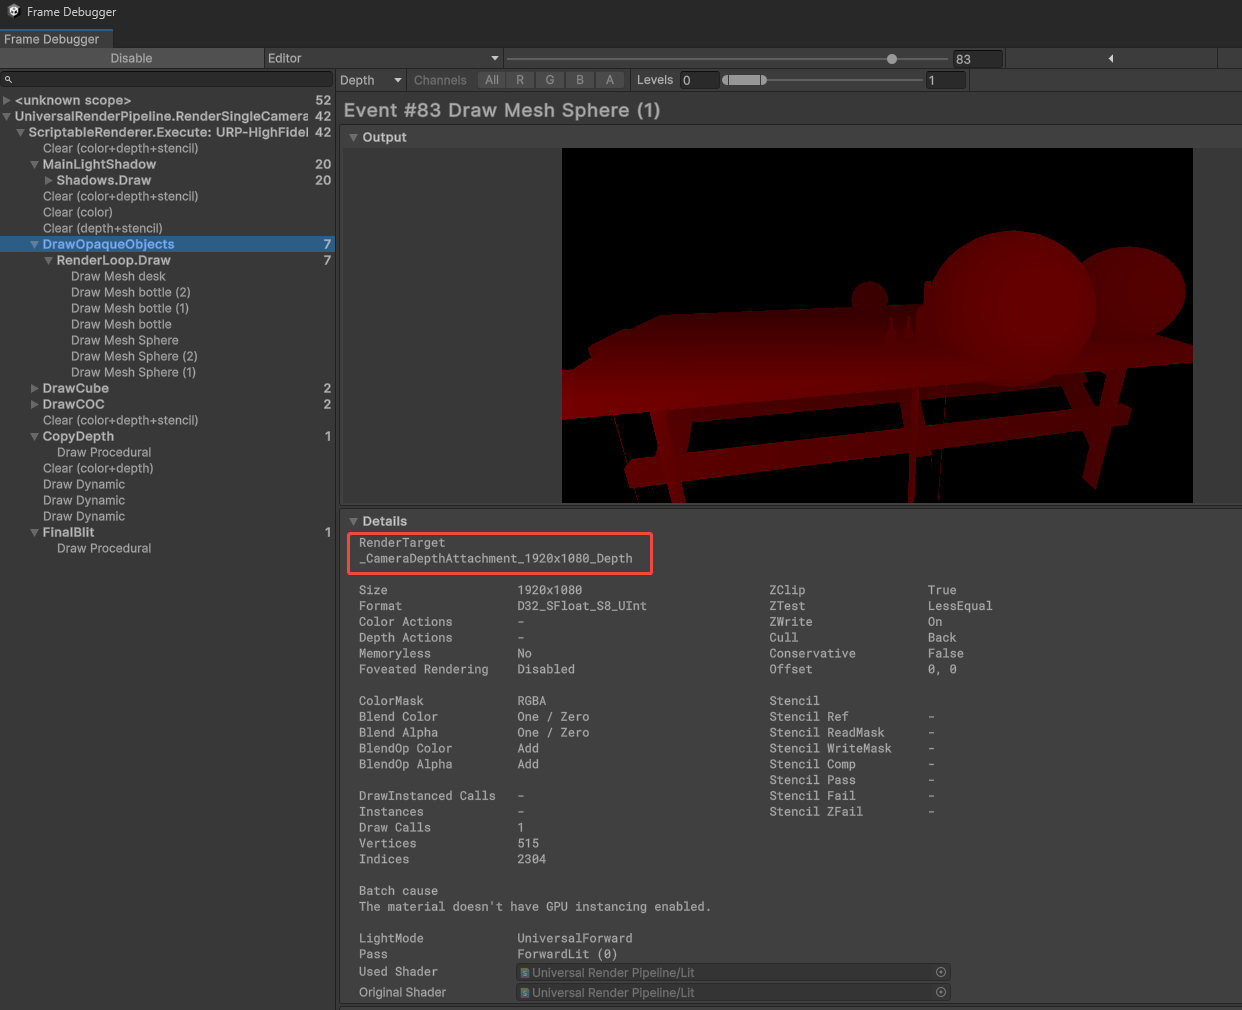
copy depth pass
为啥urp有个copydepth,还有个depthonly。
depthonly存在的原因,我的猜测是为了先得到深度图,earlyz的剔除功能,但是会增加drawcall。
copydepth存在的原因,我不知道:原始的_CameraDepthAttachment能用读取呀,为啥不直接用呢???
C#代码中申请_CameraDepthTexture的地方,然后将_CameraDepthAttachment拷贝到_CameraDepthTexture。
// Allocate m_DepthTexture if used
if ((this.renderingModeActual == RenderingMode.Deferred && !this.useRenderPassEnabled) || requiresDepthPrepass || requiresDepthCopyPass)
{var depthDescriptor = cameraTargetDescriptor;if (requiresDepthPrepass && this.renderingModeActual != RenderingMode.Deferred){depthDescriptor.graphicsFormat = GraphicsFormat.None;depthDescriptor.depthStencilFormat = k_DepthStencilFormat;depthDescriptor.depthBufferBits = k_DepthBufferBits;}else{depthDescriptor.graphicsFormat = GraphicsFormat.R32_SFloat;depthDescriptor.depthStencilFormat = GraphicsFormat.None;depthDescriptor.depthBufferBits = 0;}depthDescriptor.msaaSamples = 1;// Depth-Only pass don't use MSAARenderingUtils.ReAllocateIfNeeded(ref m_DepthTexture, depthDescriptor, FilterMode.Point, wrapMode: TextureWrapMode.Clamp, name: "_CameraDepthTexture");cmd.SetGlobalTexture(m_DepthTexture.name, m_DepthTexture.nameID);context.ExecuteCommandBuffer(cmd);cmd.Clear();
}
shader中拷贝深度图的地方:
float SampleDepth(float2 uv)
{
#if MSAA_SAMPLES == 1return SAMPLE(uv);
#elseint2 coord = int2(uv * _CameraDepthAttachment_TexelSize.zw);float outDepth = DEPTH_DEFAULT_VALUE;UNITY_UNROLLfor (int i = 0; i < MSAA_SAMPLES; ++i)outDepth = DEPTH_OP(LOAD(coord, i), outDepth);return outDepth;
#endif
}#if defined(_OUTPUT_DEPTH)
float frag(Varyings input) : SV_Depth
#else
float frag(Varyings input) : SV_Target
#endif
{UNITY_SETUP_STEREO_EYE_INDEX_POST_VERTEX(input);return SampleDepth(input.texcoord);
}
z反转
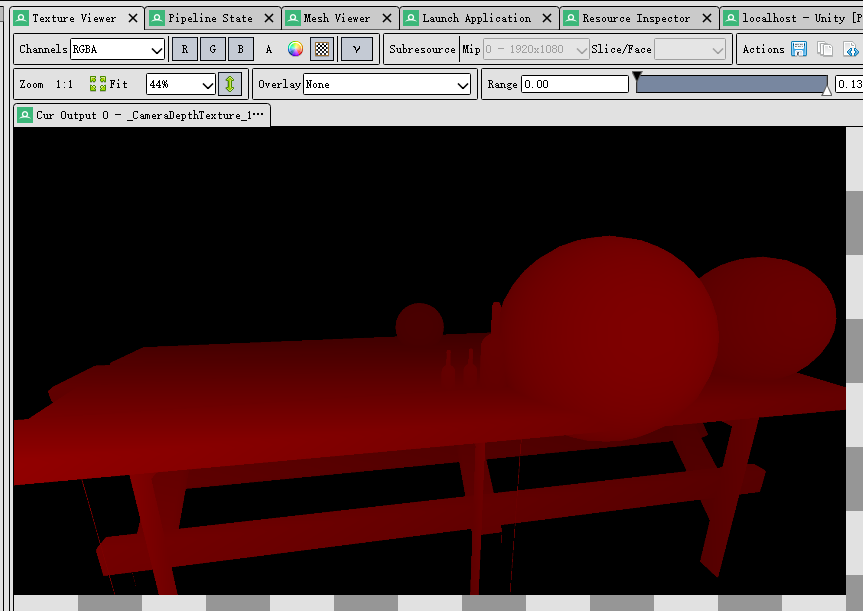
截取到的图,单通道r,近处是红色,远处为黑色,说明使用了z反转。z的反转是为解决浮点数精度的问题。提高远处的精度,避免zfighting的问题。
近处的物体本身就是占很大块,不会被剔除,所以精度要求不高。
如何读取深度图&还原世界坐标
读取深度图很简单,就是采样图即可:
SAMPLE_TEXTURE2D_X(_CameraDepthTexture, sampler_PointClamp, input.texcoord.xy).r;
而难点或者经常出错的点在于用uv和深度反推世界坐标,而反推世界坐标又是各种奇巧淫记的关键步骤,所以搞清楚这个至关重要,而搞清楚这个,又得搞清楚mvp矩阵。
在unity中,如何正确使用mvp矩阵呢?不同平台又有什么差别呢?这将是接下来讨论的重点。
先说结论:
1)dx平台+vulkan平台+opengl es平台
这些平台的原始透视矩阵都是将z映射到(-1,1)范围内,也即是这行代码:Camera.main.projectionMatrix
Matrix4x4 p = Camera.main.projectionMatrix; Debug.Log("p=" + p);
你会发现,各个平台的输出都是一样的,都是基于这个公式,他是将xyz,都映射到(-1,1)的立方体中。
而上面这个公式的推导参考:
unity里的正交投影和透视投影_unity的正交投影-CSDN博客
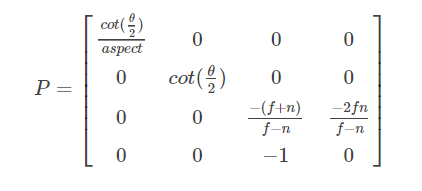
简单介绍下矩阵中的参数,其中角度theta,是摄像机的垂直fov的值,如下图:
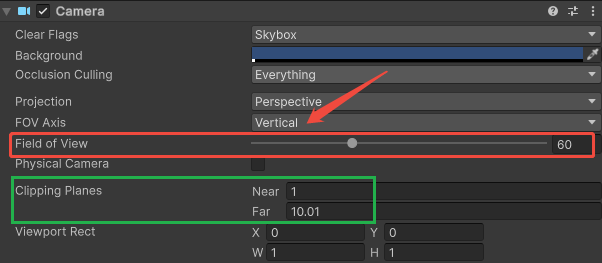
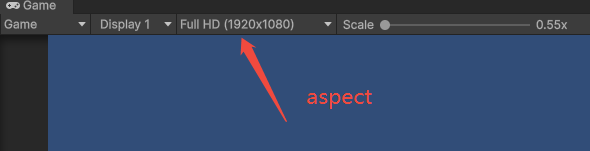
n和f是上图绿色框里设置的值,即近平面和远平面,然后aspect为你设置的屏幕的宽高比,即width/height=aspect。
顺便这里提下:如果使用C#测试这个代码,将n不要设置的太小,将f不要设置的太大,否则大于看不出明显的z值变化,可以参考上面的将
n设置为1,将f设置为10.01,能够拖拽测试物体,观察ndc坐标的变化,开始我将f设置为1000,z值输出基本都是0,误以为推导不正确。
而问题到这里,并没有真正结束,我们发现C#中的投射矩阵和shader中的投射矩阵的值不同,原因是shader中使用的投射矩阵是下面这行代码:
Matrix4x4 p = GL.GetGPUProjectionMatrix(Camera.main.projectionMatrix, true);
这个又是啥,这个unity为了屏蔽平台差异,提供的获取最终投射矩阵的api,其源码如下:
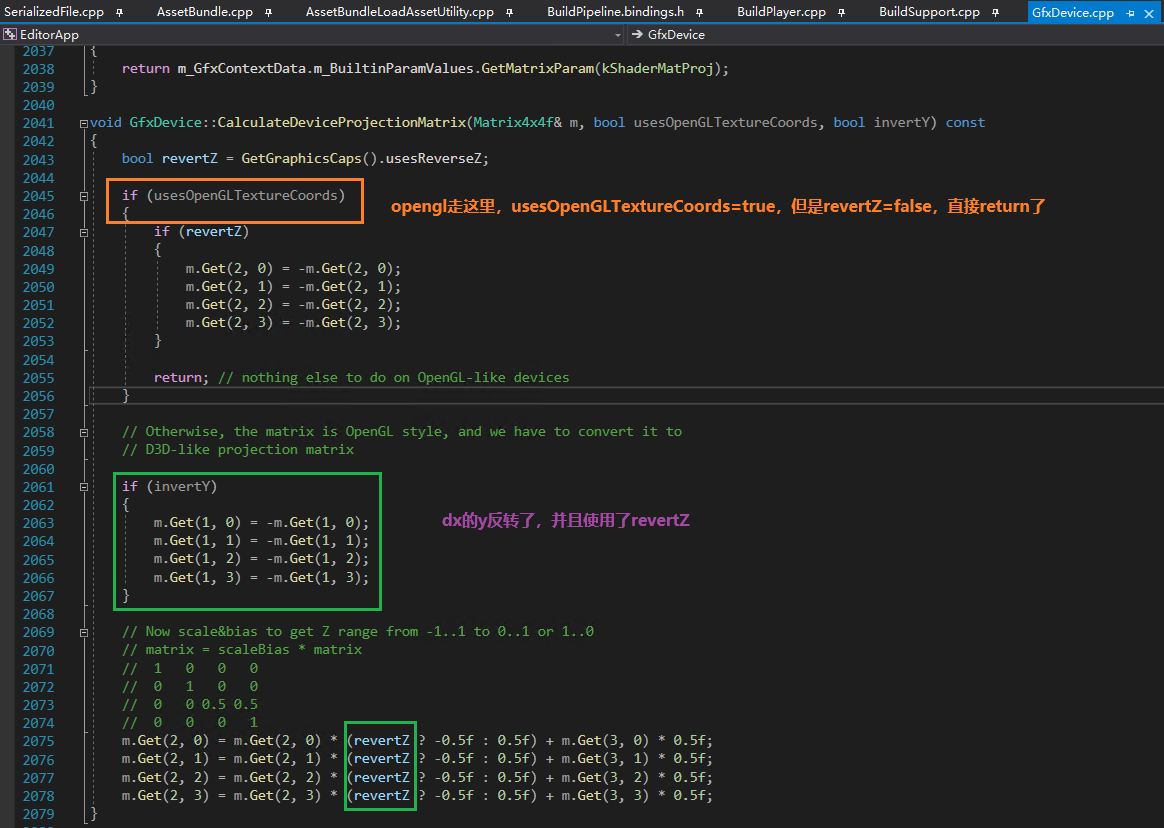
结论2)unity dx平台+vulkan平台
在使用了GL.GetGPUProjectionMatrix(Camera.main.projectionMatrix, true);之后,最终将z映射到(1,0)范围内,写入到深度图中的深度是(1,0)范围内。
结论3)opengl es平台
在使用了GL.GetGPUProjectionMatrix(Camera.main.projectionMatrix, true);之后,最终将z映射到(-1,1)范围内,但是写入到深度图中的深度是(0,1)范围内。
写入的过程我们不可控,也许unity自己将(-1,1)的深度,转到(0,1)范围内了。
结论4)最终shader中用到的proj矩阵是:GL.GetGPUProjectionMatrix(Camera.main.projectionMatrix, true);矩阵。
结论是:对于z反转的,采样出来的深度范围是(1,0)近大远小,直接用于齐次坐标的z,参与世界坐标的转换。
对于z不反转的,此时采样出来的深度范围是(0,1)近小远大,要将其转到(-1,1)范围内z',参与世界坐标的转换。
以上可以在C#中测试:
using System.Collections;
using System.Collections.Generic;
using UnityEngine;public class ReadDepthTexture : MonoBehaviour
{public GameObject cube;// Update is called once per framevoid Update(){Matrix4x4 proj = GL.GetGPUProjectionMatrix(Camera.main.projectionMatrix, true);Matrix4x4 view = Camera.main.worldToCameraMatrix;Vector4 woldPos = new Vector4(cube.transform.position.x, cube.transform.position.y, cube.transform.position.z, 1);Vector4 hPos = proj * view * woldPos;Vector4 ndcPos = new Vector4(hPos.x / hPos.w, hPos.y / hPos.w, hPos.z / hPos.w, 1);//Debug.Log("ndcPos=" + ndcPos);// dx+vulkanVector4 dxAndVolkanScreenNDC = new Vector4(ndcPos.x * 0.5f + 0.5f, 1 - (ndcPos.y * 0.5f + 0.5f), ndcPos.z, 1);Debug.Log("dxAndVolkanScreenNDC=" + dxAndVolkanScreenNDC);// openglesVector4 openglESScreenNDC = new Vector4(ndcPos.x * 0.5f + 0.5f, ndcPos.y * 0.5f + 0.5f, ndcPos.z, 1);//Debug.Log("openglESScreenNDC=" + openglESScreenNDC);}
}
然后说下,两种情况下反推世界坐标的方法:
case1)对于dx+vulkan反推世界坐标
经过proj*view*worldPos之后,然后透视除法得到ndc坐标,然后将uv的(-1,1)转为到(0,1),然后y轴在用1-y即可。而对于z就是ndcPos.z即可,深度图中也是存储的这个值。
所以,如果是反着推,知道uv和采样处理的深度depth,怎么得到worldPos呢?
首先将uv变为(-1,1),然后y反转,直接取负号即可,而对于采样的depth不做任何处理,直接造一个齐次坐标(uv.x,uv.y,depth,1),然后乘以pv矩阵的逆矩阵,然后除以w分量即可得到世界坐标。
case2)对于openges平台
经过proj*view*worldPos之后,然后透视除法得到ndc坐标,uvz都是在(-1,1)之间,将uvz都转到(0,1)范围,uv.y不反转。深度图记录的是(0,1)的深度值。
所以,如果是反着推,知道uv和采样处理的深度depth,怎么得到worldPos呢?
首先将uv变为(-1,1),然后y不反转,而对于采样出来的depth是(0,1)范围内的(近小,远大)将其变为(-1,1)内,即2*depth-1,得到depth',造一个齐次坐标(uv.x,uv.y,depth',1),然后乘以pv矩阵的逆矩阵,然后除以w分量即可得到世界坐标。
shader中正确写法1:
#if UNITY_REVERSED_Zfloat deviceDepth = SAMPLE_TEXTURE2D_X(_CameraDepthTexture, sampler_PointClamp, input.texcoord.xy).r;
#elsefloat deviceDepth = SAMPLE_TEXTURE2D_X(_CameraDepthTexture, sampler_PointClamp, input.texcoord.xy).r;deviceDepth = deviceDepth * 2.0 - 1.0;
#endiffloat3 wpos = ComputeWorldSpacePosition(input.texcoord.xy, deviceDepth, unity_MatrixInvVP);
shader中正确写法2:
如下,这里UNITY_NEAR_CLIP_VALUE在没有使用UNITY_REVERSED_Z的时候,UNITY_NEAR_CLIP_VALUE是-1。lerp(-1,1,depth),等价于depth*2-1。
所以两种写法等价,任选其一。
#if UNITY_REVERSED_Zhalf depth = SampleSceneDepth(uv.xy).x;#elsehalf depth = lerp(UNITY_NEAR_CLIP_VALUE, 1, SampleSceneDepth(uv.xy).x);#endiffloat4 worldPos = float4(ComputeWorldSpacePosition(uv.xy, depth, UNITY_MATRIX_I_VP), 1.0);