提示:文章写完后,目录可以自动生成,如何生成可参考右边的帮助文档
文章目录
- 前言
- 一、制作空洞骑士独有的EventSystem和InputModule
- 总结
前言
hello大家好久没见,之所以隔了这么久才更新并不是因为我又放弃了这个项目,而是接下来要制作的工作太忙碌了,每次我都花了很长的时间解决完一个部分,然后就没力气打开CSDN写文章就直接睡觉去了,现在终于有时间整理下我这半个月都做了什么内容。
那么这一期的标题是什么意思呢?就是我之前漏讲了UI当中非常关键的EventSystem和InputModule,没有这两个组件Unity的UI是不会自动进行UI的导航,点击后的事件啥的,而你创建一个canvas,unity会自动生成了一个eventsystem,但是Input Module则是绑定的是Unity最传统的Input Manager,如果你用过前两三年前unity推出的input system的话,你知道它们是要求你替换到input system独有的input module的,
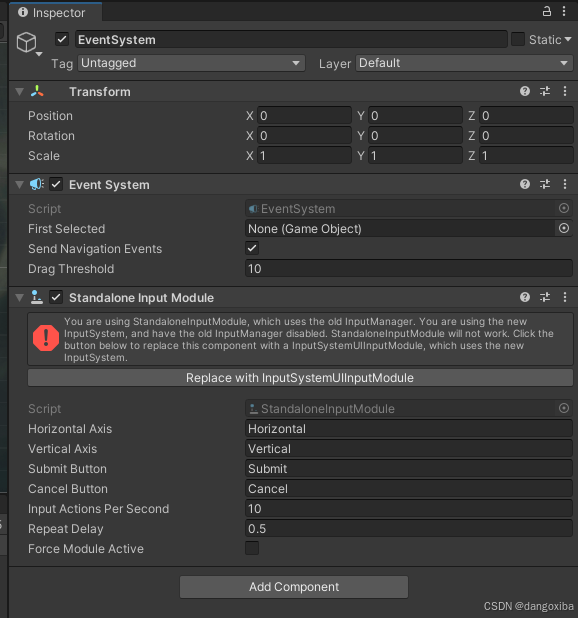
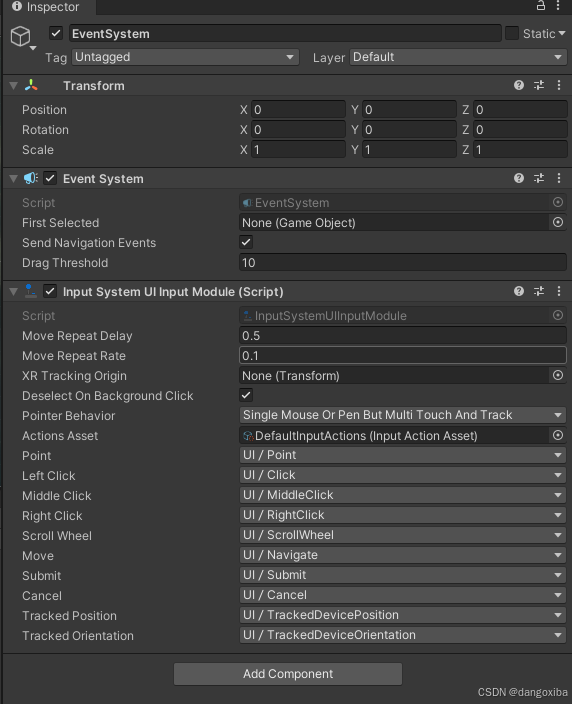
既然我们是使用插件InControl来作为输入控制,我们也要生成一个空洞骑士独有的UI输入木块。
一、pandas是什么?
首先来创建一个类名字叫HollowKnightInputModule.cs,然后它的代码逻辑整体是根据UnityEngine.EventSystems里面的StandaloneInputModule.cs来写的,如果不了解的话建议先了解一下unity自带的input module的源码。
using System;
using UnityEngine;
using UnityEngine.EventSystems;
using UnityEngine.Serialization;namespace InControl
{[AddComponentMenu("Event/Hollow Knight Input Module")]public class HollowKnightInputModule : StandaloneInputModule{public HeroActions heroActions;public PlayerAction SubmitAction {get{return InputHandler.Instance.inputActions.menuSubmit;}set{}}public PlayerAction CancelAction {get{return InputHandler.Instance.inputActions.menuCancel;}set{}}public PlayerAction JumpAction {get{return InputHandler.Instance.inputActions.jump;}set{}}public PlayerAction CastAction {get{return InputHandler.Instance.inputActions.cast;}set{}}public PlayerAction AttackAction {get{return InputHandler.Instance.inputActions.attack;}set{}}public PlayerTwoAxisAction MoveAction {get{return InputHandler.Instance.inputActions.moveVector;}set{}}[Range(0.1f, 0.9f)]public float analogMoveThreshold = 0.5f;public float moveRepeatFirstDuration = 0.8f;public float moveRepeatDelayDuration = 0.1f;[FormerlySerializedAs("allowMobileDevice")]public new bool forceModuleActive;public bool allowMouseInput = true;public bool focusOnMouseHover;private InputDevice inputDevice;private Vector3 thisMousePosition;private Vector3 lastMousePosition;private Vector2 thisVectorState;private Vector2 lastVectorState;private float nextMoveRepeatTime;private float lastVectorPressedTime;private TwoAxisInputControl direction;public HollowKnightInputModule(){heroActions = new HeroActions();direction = new TwoAxisInputControl();direction.StateThreshold = analogMoveThreshold;}public override void UpdateModule(){lastMousePosition = thisMousePosition;thisMousePosition = Input.mousePosition;}public override bool IsModuleSupported(){return forceModuleActive || Input.mousePresent;}public override bool ShouldActivateModule(){if (!enabled || !gameObject.activeInHierarchy){return false;}UpdateInputState();bool flag = false;flag |= SubmitAction.WasPressed;flag |= CancelAction.WasPressed;flag |= JumpAction.WasPressed;flag |= CastAction.WasPressed;flag |= AttackAction.WasPressed;flag |= VectorWasPressed;if (allowMouseInput){flag |= MouseHasMoved;flag |= MouseButtonIsPressed;}if (Input.touchCount > 0){flag = true;}return flag;}public override void ActivateModule(){base.ActivateModule();thisMousePosition = Input.mousePosition;lastMousePosition = Input.mousePosition;GameObject gameObject = eventSystem.currentSelectedGameObject;if (gameObject == null){gameObject = eventSystem.firstSelectedGameObject;}eventSystem.SetSelectedGameObject(gameObject, GetBaseEventData());}public override void Process(){bool flag = SendUpdateEventToSelectedObject();if (eventSystem.sendNavigationEvents){if (!flag){flag = SendVectorEventToSelectedObject();}if (!flag){SendButtonEventToSelectedObject();}}if (allowMouseInput){ProcessMouseEvent();}}private bool SendButtonEventToSelectedObject(){if (eventSystem.currentSelectedGameObject == null){return false;}if (UIManager.instance.IsFadingMenu){return false;}BaseEventData baseEventData = GetBaseEventData();Platform.MenuActions menuAction = Platform.Current.GetMenuAction(SubmitAction.WasPressed, CancelAction.WasPressed, JumpAction.WasPressed, AttackAction.WasPressed, CastAction.WasPressed);if (menuAction == Platform.MenuActions.Submit){ExecuteEvents.Execute<ISubmitHandler>(eventSystem.currentSelectedGameObject, baseEventData, ExecuteEvents.submitHandler);}else if (menuAction == Platform.MenuActions.Cancel){PlayerAction playerAction = AttackAction.WasPressed ? AttackAction : CastAction;if (!playerAction.WasPressed || playerAction.FindBinding(new MouseBindingSource(Mouse.LeftButton)) == null){ExecuteEvents.Execute<ICancelHandler>(eventSystem.currentSelectedGameObject, baseEventData, ExecuteEvents.cancelHandler);}}return baseEventData.used;}private bool SendVectorEventToSelectedObject(){if (!VectorWasPressed){return false;}AxisEventData axisEventData = GetAxisEventData(thisVectorState.x, thisVectorState.y, 0.5f);if (axisEventData.moveDir != MoveDirection.None){if (eventSystem.currentSelectedGameObject == null){eventSystem.SetSelectedGameObject(eventSystem.firstSelectedGameObject, GetBaseEventData());}else{ExecuteEvents.Execute(eventSystem.currentSelectedGameObject, axisEventData, ExecuteEvents.moveHandler);}SetVectorRepeatTimer();}return axisEventData.used;}protected override void ProcessMove(PointerEventData pointerEvent){GameObject pointerEnter = pointerEvent.pointerEnter;base.ProcessMove(pointerEvent);if (focusOnMouseHover && pointerEnter != pointerEvent.pointerEnter){GameObject eventHandler = ExecuteEvents.GetEventHandler<ISelectHandler>(pointerEvent.pointerEnter);eventSystem.SetSelectedGameObject(eventHandler, pointerEvent);}}private void Update(){direction.Filter(Device.Direction, Time.deltaTime);}private void UpdateInputState(){lastVectorState = thisVectorState;thisVectorState = Vector2.zero;TwoAxisInputControl twoAxisInputControl = MoveAction ?? direction;if (Utility.AbsoluteIsOverThreshold(twoAxisInputControl.X, analogMoveThreshold)){thisVectorState.x = Mathf.Sign(twoAxisInputControl.X);}if (Utility.AbsoluteIsOverThreshold(twoAxisInputControl.Y, analogMoveThreshold)){thisVectorState.y = Mathf.Sign(twoAxisInputControl.Y);}if (VectorIsReleased){nextMoveRepeatTime = 0f;}if (VectorIsPressed){if (lastVectorState == Vector2.zero){if (Time.realtimeSinceStartup > lastVectorPressedTime + 0.1f){nextMoveRepeatTime = Time.realtimeSinceStartup + moveRepeatFirstDuration;}else{nextMoveRepeatTime = Time.realtimeSinceStartup + moveRepeatDelayDuration;}}lastVectorPressedTime = Time.realtimeSinceStartup;}}public InputDevice Device{get{return inputDevice ?? InputManager.ActiveDevice;}set{inputDevice = value;}}private void SetVectorRepeatTimer(){nextMoveRepeatTime = Mathf.Max(nextMoveRepeatTime, Time.realtimeSinceStartup + moveRepeatDelayDuration);}private bool VectorIsPressed{get{return thisVectorState != Vector2.zero;}}private bool VectorIsReleased{get{return thisVectorState == Vector2.zero;}}private bool VectorHasChanged{get{return thisVectorState != lastVectorState;}}private bool VectorWasPressed{get{return (VectorIsPressed && Time.realtimeSinceStartup > nextMoveRepeatTime) || (VectorIsPressed && lastVectorState == Vector2.zero);}}private bool MouseHasMoved{get{return (thisMousePosition - lastMousePosition).sqrMagnitude > 0f;}}private bool MouseButtonIsPressed{get{return Input.GetMouseButtonDown(0);}}}
}
这里涉及到我们InputActions.cs和InputHandler.cs代码相关的:
我们先来到HeroActions.cs,创建好menuUI的按键输入:
using System;
using InControl;public class HeroActions : PlayerActionSet
{public PlayerAction left;public PlayerAction right;public PlayerAction up;public PlayerAction down;public PlayerAction menuSubmit;public PlayerAction menuCancel;public PlayerTwoAxisAction moveVector;public PlayerAction attack;public PlayerAction jump;public PlayerAction dash;public PlayerAction cast;public PlayerAction focus;public PlayerAction quickCast;public PlayerAction openInventory;public HeroActions(){menuSubmit = CreatePlayerAction("Submit");menuCancel = CreatePlayerAction("Cancel");left = CreatePlayerAction("Left");left.StateThreshold = 0.3f;right = CreatePlayerAction("Right");right.StateThreshold = 0.3f;up = CreatePlayerAction("Up");up.StateThreshold = 0.3f;down = CreatePlayerAction("Down");down.StateThreshold = 0.3f;moveVector = CreateTwoAxisPlayerAction(left, right, down, up);moveVector.LowerDeadZone = 0.15f;moveVector.UpperDeadZone = 0.95f;attack = CreatePlayerAction("Attack");jump = CreatePlayerAction("Jump");dash = CreatePlayerAction("Dash");cast = CreatePlayerAction("Cast");focus = CreatePlayerAction("Focus");quickCast = CreatePlayerAction("QuickCast");openInventory = CreatePlayerAction("Inventory");}
}
来到InputHandler.cs当中,我们要做的功能如下,首先当然是添加新的按键绑定AddKeyBinding,还有添加新的默认绑定AddDefaultBinding,特别是我们新建的两个行为PlayerAction的menuCancel和menuSubmit
private void MapKeyboardLayoutFromGameSettings(){AddKeyBinding(inputActions.menuSubmit, "Return");AddKeyBinding(inputActions.menuCancel, "Escape");AddKeyBinding(inputActions.up, "UpArrow");AddKeyBinding(inputActions.down, "DownArrow");AddKeyBinding(inputActions.left, "LeftArrow");AddKeyBinding(inputActions.right, "RightArrow");AddKeyBinding(inputActions.attack, "Z");AddKeyBinding(inputActions.jump, "X");AddKeyBinding(inputActions.dash, "D");AddKeyBinding(inputActions.cast, "F");AddKeyBinding(inputActions.quickCast, "Q");AddKeyBinding(inputActions.openInventory, "I");}private void SetupNonMappableBindings(){inputActions = new HeroActions();inputActions.menuSubmit.AddDefaultBinding(new Key[]{Key.Return});inputActions.menuCancel.AddDefaultBinding(new Key[]{Key.Escape});inputActions.up.AddDefaultBinding(new Key[]{Key.UpArrow});inputActions.down.AddDefaultBinding(new Key[]{Key.DownArrow});inputActions.left.AddDefaultBinding(new Key[]{Key.LeftArrow});inputActions.right.AddDefaultBinding(new Key[]{Key.RightArrow});inputActions.attack.AddDefaultBinding(new Key[]{Key.Z});inputActions.jump.AddDefaultBinding(new Key[]{Key.X});inputActions.dash.AddDefaultBinding(new Key[]{Key.D});inputActions.cast.AddDefaultBinding(new Key[]{Key.F});inputActions.quickCast.AddDefaultBinding(new Key[]{Key.Q});inputActions.openInventory.AddDefaultBinding(new Key[]{Key.I});}private static void AddKeyBinding(PlayerAction action, string savedBinding){Mouse mouse = Mouse.None;Key key;if (!Enum.TryParse(savedBinding, out key) && !Enum.TryParse(savedBinding, out mouse)){return;}if (mouse != Mouse.None){action.AddBinding(new MouseBindingSource(mouse));return;}action.AddBinding(new KeyBindingSource(new Key[]{key}));}还有就是解决上期忘记讲到的两套Input输入一个是游戏内的输入,一个是过场的输入,当在过场UI阶段,我们就使用过场的输入,屏蔽游戏内的输入,然后是决定UI界面的输入和停止UI界面的输入,完整的代码如下:
using System;
using System.Collections;
using System.Collections.Generic;
using UnityEngine.UI;
using GlobalEnums;
using InControl;
using UnityEngine;
using UnityEngine.EventSystems;public class InputHandler : MonoBehaviour
{[SerializeField] public bool pauseAllowed { get; private set; }public bool acceptingInput = true;public bool skippingCutscene;private float skipCooldownTime;private bool isGameplayScene;private bool isMenuScene;public static InputHandler Instance;private GameManager gm;private PlayerData playerData;public InputDevice gameController;public HeroActions inputActions;public BindingSourceType lastActiveController;public InputDeviceStyle lastInputDeviceStyle;public delegate void CursorVisibilityChange(bool isVisible); //指针显示变化时发生的委托public event CursorVisibilityChange OnCursorVisibilityChange;//指针显示变化时发生的事件public bool readyToSkipCutscene;public SkipPromptMode skipMode { get; private set; }public delegate void ActiveControllerSwitch();public event ActiveControllerSwitch RefreshActiveControllerEvent;public void Awake(){Instance = this;gm = GetComponent<GameManager>();inputActions = new HeroActions();acceptingInput = true;pauseAllowed = true;skipMode = SkipPromptMode.NOT_SKIPPABLE;}public void Start(){playerData = gm.playerData;SetupNonMappableBindings();MapKeyboardLayoutFromGameSettings();if(InputManager.ActiveDevice != null && InputManager.ActiveDevice.IsAttached){}else{gameController = InputDevice.Null;}Debug.LogFormat("Input Device set to {0}.", new object[]{gameController.Name});lastActiveController = BindingSourceType.None;}private void Update(){UpdateActiveController();if (acceptingInput){if(gm.gameState == GameState.PLAYING){PlayingInput();}else if(gm.gameState == GameState.CUTSCENE){CutSceneInput();}}}public void UpdateActiveController(){if (lastActiveController != inputActions.LastInputType || lastInputDeviceStyle != inputActions.LastDeviceStyle){lastActiveController = inputActions.LastInputType;lastInputDeviceStyle = inputActions.LastDeviceStyle;if (RefreshActiveControllerEvent != null){RefreshActiveControllerEvent();}}}private void PlayingInput(){}private void CutSceneInput(){if (!Input.anyKeyDown && !gameController.AnyButton.WasPressed){return;}if (skippingCutscene){return;}switch (skipMode){case SkipPromptMode.SKIP_PROMPT: //确认跳过过场if (!readyToSkipCutscene){//TODO:gm.ui.ShowCutscenePrompt(CinematicSkipPopup.Texts.Skip);readyToSkipCutscene = true;CancelInvoke("StopCutsceneInput");Invoke("StopCutsceneInput", 5f * Time.timeScale);skipCooldownTime = Time.time + 0.3f;return;}if(Time.time < skipCooldownTime){return;}CancelInvoke("StopCutsceneInput");readyToSkipCutscene = false;skippingCutscene = true;gm.SkipCutscene();return;case SkipPromptMode.SKIP_INSTANT://立刻跳过过场skippingCutscene = true;gm.SkipCutscene();return;case SkipPromptMode.NOT_SKIPPABLE: //不准跳过过场return;case SkipPromptMode.NOT_SKIPPABLE_DUE_TO_LOADING: //在过场视频加载的时候不准跳过过场gm.ui.ShowCutscenePrompt(CinematicSkipPopup.Texts.Skip);CancelInvoke("StopCutsceneInput");Invoke("StopCutsceneInput", 5f * Time.timeScale);break;default:return;}}private void StopCutsceneInput(){readyToSkipCutscene = false;gm.ui.HideCutscenePrompt();}private void MapKeyboardLayoutFromGameSettings(){AddKeyBinding(inputActions.menuSubmit, "Return");AddKeyBinding(inputActions.menuCancel, "Escape");AddKeyBinding(inputActions.up, "UpArrow");AddKeyBinding(inputActions.down, "DownArrow");AddKeyBinding(inputActions.left, "LeftArrow");AddKeyBinding(inputActions.right, "RightArrow");AddKeyBinding(inputActions.attack, "Z");AddKeyBinding(inputActions.jump, "X");AddKeyBinding(inputActions.dash, "D");AddKeyBinding(inputActions.cast, "F");AddKeyBinding(inputActions.quickCast, "Q");AddKeyBinding(inputActions.openInventory, "I");}private void SetupNonMappableBindings(){inputActions = new HeroActions();inputActions.menuSubmit.AddDefaultBinding(new Key[]{Key.Return});inputActions.menuCancel.AddDefaultBinding(new Key[]{Key.Escape});inputActions.up.AddDefaultBinding(new Key[]{Key.UpArrow});inputActions.down.AddDefaultBinding(new Key[]{Key.DownArrow});inputActions.left.AddDefaultBinding(new Key[]{Key.LeftArrow});inputActions.right.AddDefaultBinding(new Key[]{Key.RightArrow});inputActions.attack.AddDefaultBinding(new Key[]{Key.Z});inputActions.jump.AddDefaultBinding(new Key[]{Key.X});inputActions.dash.AddDefaultBinding(new Key[]{Key.D});inputActions.cast.AddDefaultBinding(new Key[]{Key.F});inputActions.quickCast.AddDefaultBinding(new Key[]{Key.Q});inputActions.openInventory.AddDefaultBinding(new Key[]{Key.I});}private static void AddKeyBinding(PlayerAction action, string savedBinding){Mouse mouse = Mouse.None;Key key;if (!Enum.TryParse(savedBinding, out key) && !Enum.TryParse(savedBinding, out mouse)){return;}if (mouse != Mouse.None){action.AddBinding(new MouseBindingSource(mouse));return;}action.AddBinding(new KeyBindingSource(new Key[]{key}));}public void SceneInit(){if (gm.IsGameplayScene()){isGameplayScene = true;}else{isGameplayScene = false;}if (gm.IsMenuScene()){isMenuScene = true;}else{isMenuScene = false;}}public void SetSkipMode(SkipPromptMode newMode){Debug.Log("Setting skip mode: " + newMode.ToString());if (newMode == SkipPromptMode.NOT_SKIPPABLE){StopAcceptingInput();}else if (newMode == SkipPromptMode.SKIP_PROMPT){readyToSkipCutscene = false;StartAcceptingInput();}else if (newMode == SkipPromptMode.SKIP_INSTANT){StartAcceptingInput();}else if (newMode == SkipPromptMode.NOT_SKIPPABLE_DUE_TO_LOADING){readyToSkipCutscene = false;StartAcceptingInput();}skipMode = newMode;}public void StopUIInput(){acceptingInput = false;EventSystem.current.sendNavigationEvents = false;UIManager.instance.inputModule.allowMouseInput = false;}public void StartUIInput(){acceptingInput = true;EventSystem.current.sendNavigationEvents = true;UIManager.instance.inputModule.allowMouseInput = true;}public void StopMouseInput(){UIManager.instance.inputModule.allowMouseInput = false;}public void StartMouseInput(){UIManager.instance.inputModule.allowMouseInput = true;}public void PreventPause(){}public void StopAcceptingInput(){acceptingInput = false;}public void StartAcceptingInput(){acceptingInput = true;}public void AllowPause(){pauseAllowed = true;}}
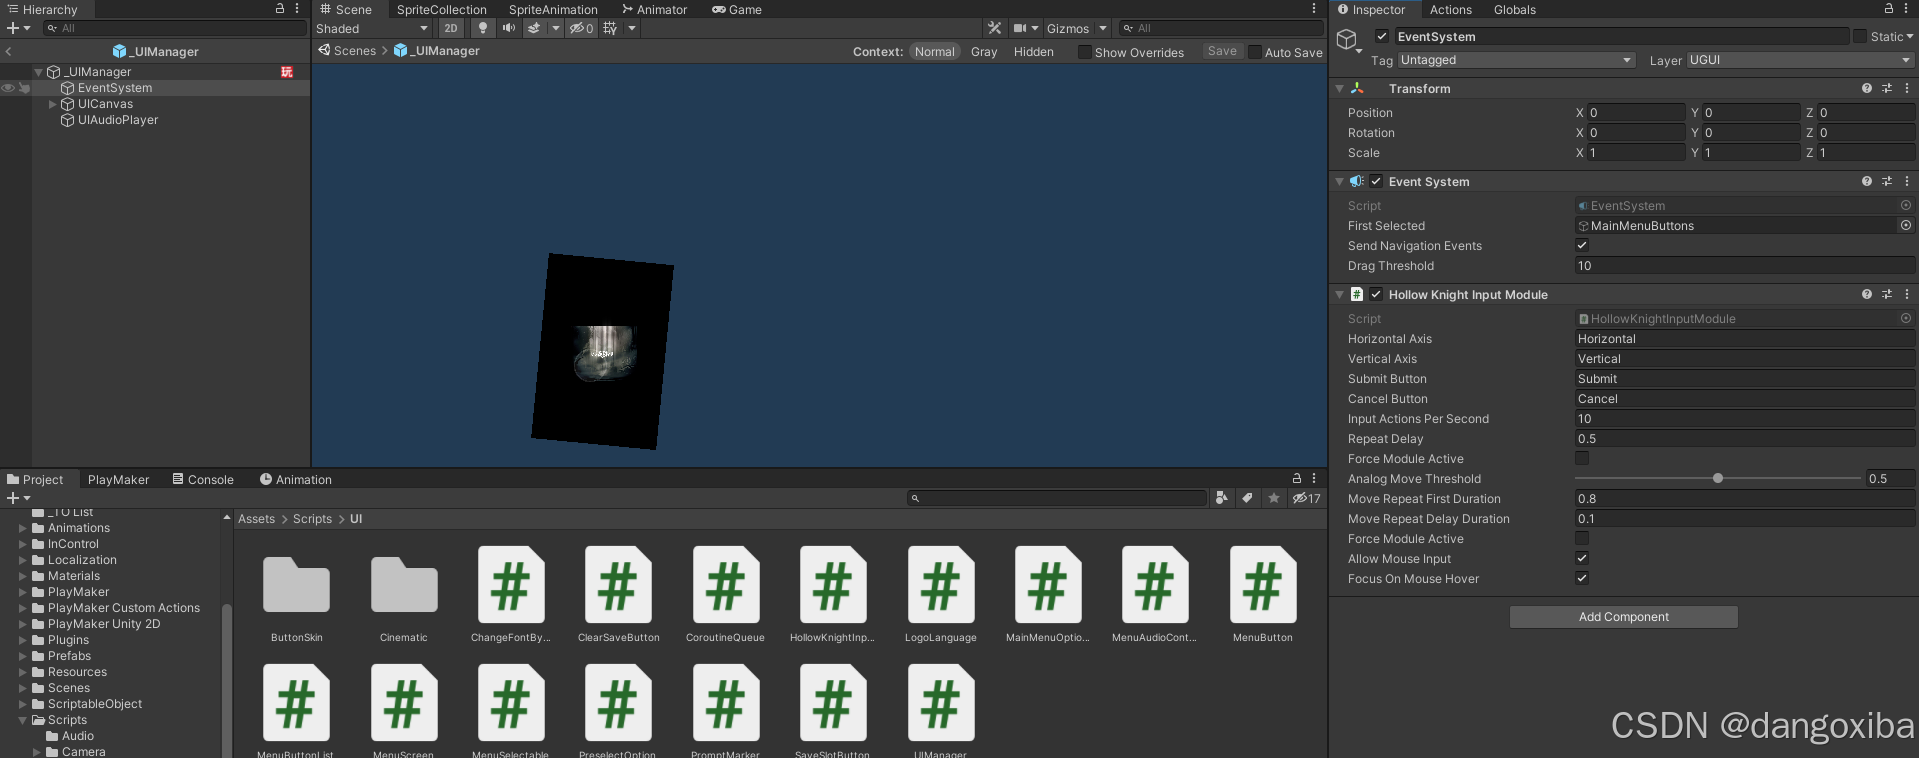
回到编辑器当中,我们来给UIManager的EventSystem添加上这两个脚本:
总结
OK大功告成,这期算是对前两期的补充内容了,如果你在前两期遇到bug的话可以在这里找下解决办法。

![[渲染层网络层错误] net::ERR_CONTENT_LENGTH_MISMATCH 问题解决](https://i-blog.csdnimg.cn/direct/96d65db8949f467d997dc85dfbbcda03.png)

