⭐本篇重点:STL中的list及其迭代器的模拟实现和测试
⭐本篇代码:c++学习 · 橘子真甜/c++-learning-of-yzc - 码云 - 开源中国 (gitee.com)
目录
一. list的节点
二. list的迭代器
2.1 迭代器框架
2.2 迭代器实现
三. list的实现
3.1 list的构造函数
3.2 insert
3.2 erase
3.3 begin和end
3.4 push_back和push_front
3.5 pop_back和pop_front
3.6 clear和析构函数
3.7 测试代码1
3.8 拷贝构造函数和赋值运算符重载
四. test.h 源代码
五. 测试自定义类型和类类型
5.1测试string类
5.2 测试自定义类
六. 下篇重点:stack和queue的使用与模拟实现
一. list的节点
我们知道,list是一个带头的双向循环链表。所以这个节点应该包含以下成员变量。
//表示链表的节点template<class T>struct ListNode{ListNode* _next;ListNode* _prev;T _data;//构造函数ListNode(const T& data = T()):_next(nullptr), _prev(nullptr), _data(data){};};二. list的迭代器
我们模拟过string和vector,它两的迭代器都用原生指针就能实现。但是list的迭代器使用原生指针无法实现。比如我们++it,不能简单的让指针+1就行。
2.1 迭代器框架
list迭代器结构体如下:
//迭代器,T为节点的data,Ptr表示data的地址,Ref表示data的引用template<class T, class Ptr, class Ref>struct ListIterator{typedef ListNode<T> Node;typedef ListIterator<T, Ptr, Ref> Self;Node* _node;//构造函数ListIterator(Node* node):_node(node){}//前置++Self& operator++(){}//后置++Self operator++(int){}//前置--Self& operator--(){}//后置--Self operator--(int){}//解引用,获取这个节点Ref operator*(){}//->,箭头获取的是节点的指针Ptr operator->(){}//判断是否相等bool operator==(const Self& self){}//判断是否不等bool operator!=(const Self& self){}};2.2 迭代器实现
operator++
在list中,++只需要让我们的指针指向当前节点的下一个节点即可
前置++
//前置++Self& operator++(){ //返回++后的结果_node = _node->_next;return *this; }后置++。后置++注意要用中间变量保存并且不能引用返回!
//后置++Self operator++(int){//返回++前的结果,需要保存++前的指针//注意这里不可使用引用返回,tmp在栈中。属于局部变量,出函数会销毁!Node* tmp = _node;_node = _node->_next;return tmp;}operator* 和 operator->
*返回当前节点的data,->返回当前节点data的地址(即一个指针)
比如: *it = data it-> = &data
//解引用,获取这个节点Ref operator*(){return _node->_data;}//->,箭头获取的是节点的指针Ptr operator->(){return &_node->_data;}根据上面的代码 --和== !=同理可以实现
迭代器的全部实现代码如下:
//迭代器,T为节点的data,Ptr表示data的地址,Ref表示data的引用template<class T, class Ptr, class Ref>struct ListIterator{typedef ListNode<T> Node;typedef ListIterator<T, Ptr, Ref> Self;Node* _node;//构造函数ListIterator(Node* node):_node(node){}//前置++Self& operator++(){ //返回++后的结果_node = _node->_next;return *this; }//后置++Self operator++(int){//返回++前的结果,需要保存++前的指针//注意这里不可使用引用返回,tmp在栈中。属于局部变量,出函数会销毁!Node* tmp = _node;_node = _node->_next;return tmp;}//前置--Self& operator--(){_node = _node->_prev;return *this;}//后置--Self operator--(int){Node* tmp = _node;_node = _node->_prev;return tmp;}//解引用,获取这个节点Ref operator*(){return _node->_data;}//->,箭头获取的是节点的指针Ptr operator->(){return &_node->_data;}//判断是否相等bool operator==(const Self& it){return it._node == _node;}//判断是否不等bool operator!=(const Self& it){return it._node != _node;}};三. list的实现
list的框架如下。位于 test.h中
template<class T>class list{typedef ListNode<T> Node; //typedef list的节点public://list 的迭代器typedef ListIterator<T, T*, T&> iterator;typedef ListIterator<T, const T*, const T&> const_iterator;private:Node* _head; //list的头节点};3.1 list的构造函数
list是带头双向循环链表。只要在堆中开辟一个头节点,然后让它的next和prev都指向自己即可。注意头节点的data不存储任何值。
//构造函数list():_head(new Node){_head->_next = _head;_head->_prev = _head;}3.2 insert
和vector一样,我们先定义出insert和erase。然后push_back和pop_back去复用insert和erase的代码可以提高代码的复用。
思考一下list的insert中的pos是什么? list没有下标,只能用迭代器表示pos
插入代码的逻辑图如下
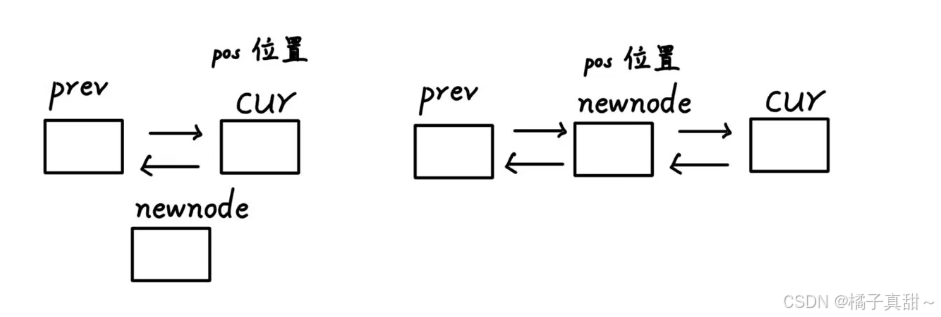
我们只要让prev链接号newnode,再让newnode链接好cur即可 (注意提前保存好cur)
代码如下:
//insert。在pos位置插入datavoid insert(const iterator& pos, const T& data){Node* newnode = new Node(data);Node* cur = pos._node;Node* pre = cur->_prev;//1.链接pre和newnodepre->_next = newnode;newnode->_prev = pre;//2.链接newnode和curnewnode->_next = cur;cur->_prev = newnode;}即便只有一个头节点上面代码也没问题。逻辑图如下
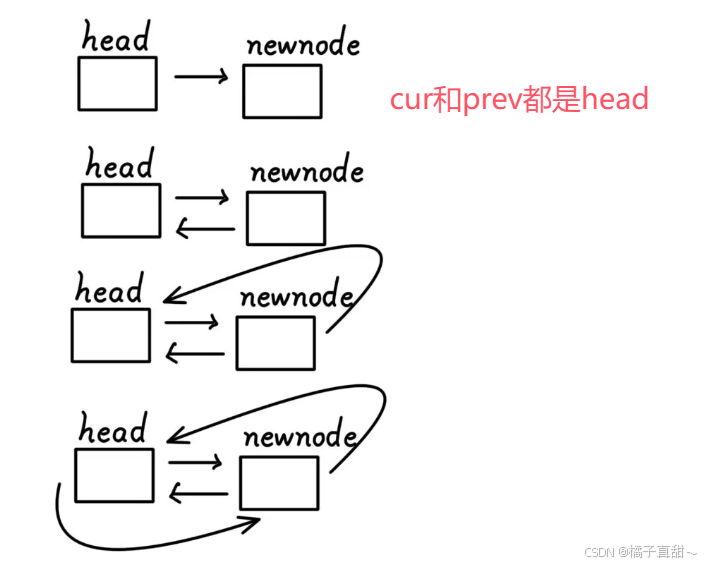
3.2 erase
erase比较简单。找到pos的前后节点pre和next,链接pre和next,然后删除cur即可
注意:返回的节点应该是next节点(即删除cur后,next处于pos的位置)
代码如下:
//erase,删除pos位置的节点iterator erase(const iterator& pos){Node* cur = pos._node;Node* pre = cur->_prev;Node* next = cur->_next;pre->_next = next;next->_prev = pre;delete cur;return next; //删除cur后,pos就处于next了}3.3 begin和end
begin返回第一个节点(头节点的next)的迭代器,end最后一个节点后一个的迭代器(就是头节点)
代码如下:
iterator begin(){return _head->_next;}iterator end(){return _head;}const_iterator begin()const{return const_iterator(_head->_next);}const_iterator end()const{return const_iterator(_head);}3.4 push_back和push_front
有了insert这两个函数就简单了。push_back直接在end()这个迭代器调用insert,push_front直接在begin()调用insert。
代码如下:
//尾插void push_back(const T& data){insert(end(), data);}//头插void push_front(const T& data){insert(begin(), data);} 3.5 pop_back和pop_front
同理。调用erase即可。不过注意尾删是删除最后一个节点不是头节点!
//头删void pop_front(){erase(begin());}//尾删void pop_back(){//erase(end()); //不是删除头节点,而是头节点的前一个节点(尾节点)erase(_head->_prev);}3.6 clear和析构函数
利用迭代器遍历链表,一个一个删除节点即可。clear不会删除头节点
//clear清空链表void clear(){iterator it = begin();while (it != end()){erase(it++); //后置++,it走到下一个节点后。返回前一个节点去删除即可}}析构函数。调用clear然后删除头节点即可。
~list(){clear();delete _head;_head = nullptr;}3.7 测试代码1
到此为止,整个链表基本实现了。我们来测试一下
测试代码 test.cpp
#define _CRT_SECURE_NO_WARNINGS 1
#include <iostream>
#include "test.h"
using namespace std;void test1()
{YZC::list<int> l1;for (int i = 0; i < 5; i++)		// 0 1 2 3 4 l1.push_back(i);for (int i = 10; i < 15; i++)	// 14 13 12 11 10 0 1 2 3 4l1.push_front(i);	l1.pop_back();	// 14 13 12 11 10 0 1 2 3l1.pop_front();	// 13 12 11 10 0 1 2 3YZC::list<int>::iterator it = l1.begin();while (it != l1.end()){cout << *it << " ";++it;}cout << endl;
}int main()
{test1();return 0;
}
运行结果如下
3.8 拷贝构造函数和赋值运算符重载
拷贝构造。遍历构造即可
//拷贝构造list(const list<T>& l):_head(new Node){//1.初始化头节点_head->_next = _head;_head->_prev = _head;//2.遍历l,尾插节点即可for (auto const& e : l){push_back(e);}}赋值运算符重载。利用临时变量出函数销毁的特性
//operator=list& operator=(list<T> l){swap(_head, l._head);return *this;}四. test.h 源代码
#pragma oncenamespace YZC
{//表示链表的节点template<class T>struct ListNode{ListNode* _next;ListNode* _prev;T _data;ListNode(const T& data = T()):_next(nullptr), _prev(nullptr), _data(data){};};//迭代器,T为节点的data,Ptr表示data的地址,Ref表示data的引用template<class T, class Ptr, class Ref>struct ListIterator{typedef ListNode<T> Node;typedef ListIterator<T, Ptr, Ref> Self;Node* _node;//构造函数ListIterator(Node* node):_node(node){}//前置++Self& operator++(){	//返回++后的结果_node = _node->_next;return *this;	}//后置++Self operator++(int){//返回++前的结果,需要保存++前的指针//注意这里不可使用引用返回,tmp在栈中。属于局部变量,出函数会销毁!Node* tmp = _node;_node = _node->_next;return tmp;}//前置--Self& operator--(){_node = _node->_prev;return *this;}//后置--Self operator--(int){Node* tmp = _node;_node = _node->_prev;return tmp;}//解引用,获取这个节点Ref operator*(){return _node->_data;}//->,箭头获取的是节点的指针Ptr operator->(){return &_node->_data;}//判断是否相等bool operator==(const Self& it){return it._node == _node;}//判断是否不等bool operator!=(const Self& it){return it._node != _node;}};template<class T>class list{typedef ListNode<T> Node;	//typedef list的节点public://list 的迭代器typedef ListIterator<T, T*, T&> iterator;typedef ListIterator<T, const T*, const T&> const_iterator;//构造函数list():_head(new Node){_head->_next = _head;_head->_prev = _head;}//拷贝构造list(const list<T>& l):_head(new Node){//1.初始化头节点_head->_next = _head;_head->_prev = _head;//2.遍历l,尾插节点即可for (auto const& e : l){push_back(e);}}//operator=list& operator=(list<T> l){swap(_head, l._head);return *this;}//析构函数~list(){clear();delete _head;_head = nullptr;}//clear清空链表void clear(){iterator it = begin();while (it != end()){erase(it++);	//后置++,it走到下一个节点后。返回前一个节点去删除即可}}//insert。在pos位置插入datavoid insert(const iterator& pos, const T& data){Node* newnode = new Node(data);Node* cur = pos._node;Node* pre = cur->_prev;//1.链接pre和newnodepre->_next = newnode;newnode->_prev = pre;//2.链接newnode和curnewnode->_next = cur;cur->_prev = newnode;}//erase,删除pos位置的节点iterator erase(const iterator& pos){Node* cur = pos._node;Node* pre = cur->_prev;Node* next = cur->_next;pre->_next = next;next->_prev = pre;delete cur;return next;	//删除cur后,pos就处于next了}//尾插void push_back(const T& data){insert(end(), data);}//头插void push_front(const T& data){insert(begin(), data);} //头删void pop_front(){erase(begin());}//尾删void pop_back(){//erase(end());			//不是删除头节点,而是头节点的前一个节点(尾节点)erase(_head->_prev);}iterator begin(){return _head->_next;}iterator end(){return _head;}const_iterator begin()const{return const_iterator(_head->_next);}const_iterator end()const{return const_iterator(_head);}private:Node* _head;	//list的头节点};
}
五. 测试自定义类型和类类型
5.1测试string类
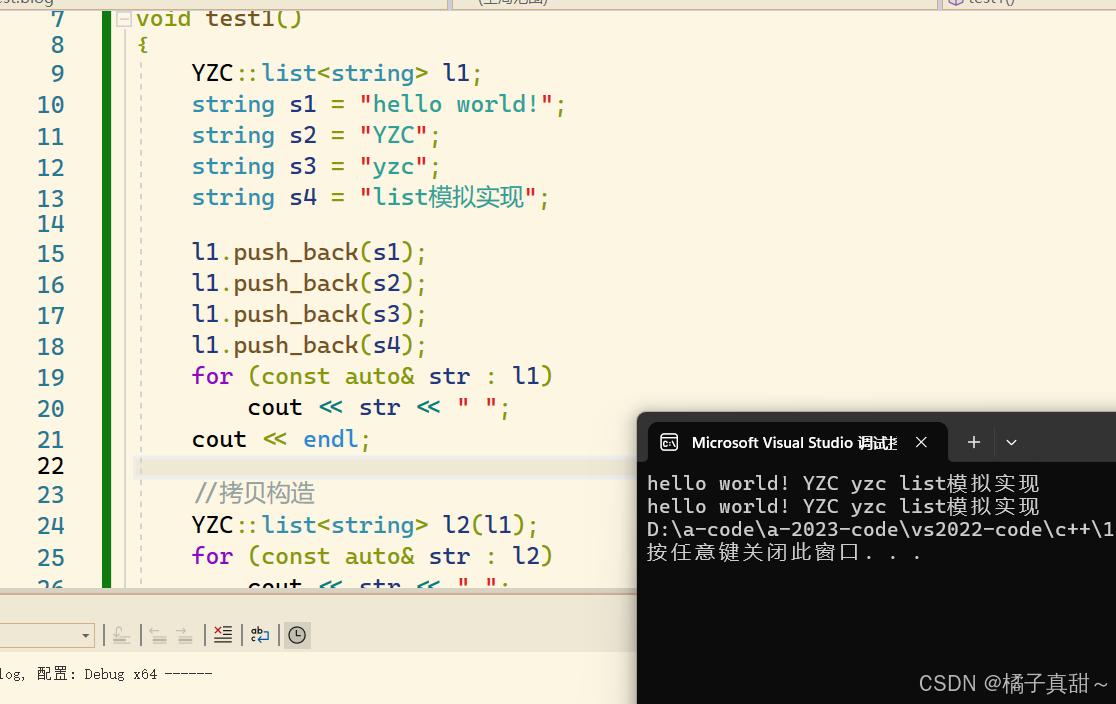
测试代码和结果如下:
#define _CRT_SECURE_NO_WARNINGS 1
#include <iostream>
#include <string>
#include "test.h"
using namespace std;void test1()
{YZC::list<string> l1;string s1 = "hello world!";string s2 = "YZC";string s3 = "yzc";string s4 = "list模拟实现";l1.push_back(s1);l1.push_back(s2);l1.push_back(s3);l1.push_back(s4);for (const auto& str : l1)cout << str << " ";cout << endl;//拷贝构造YZC::list<string> l2(l1);for (const auto& str : l2)cout << str << " ";
}int main()
{test1();return 0;
}
5.2 测试自定义类
#define _CRT_SECURE_NO_WARNINGS 1
#include <iostream>
#include "test.h"
using namespace std;struct Date
{int _year = 0;int _month = 1;int _day = 1;
};void test1()
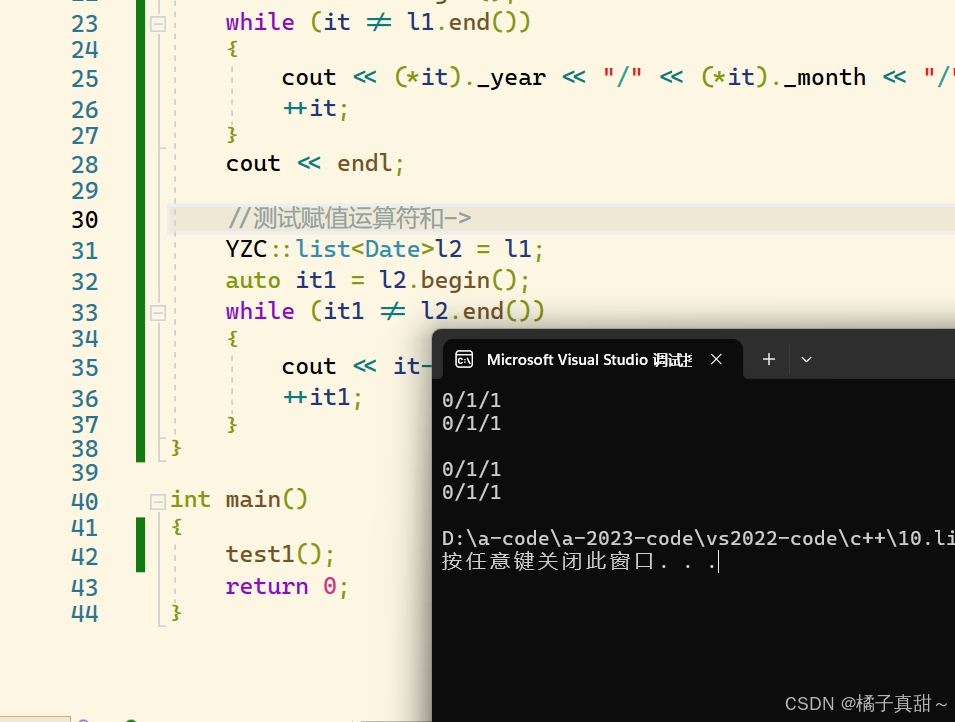
{YZC::list<Date> l1;Date d1;Date d2;l1.push_back(d1);l1.push_back(d2);//1 测试迭代器的解引用auto it = l1.begin();while (it != l1.end()){cout << (*it)._year << "/" << (*it)._month << "/" << (*it)._day << endl;++it;}cout << endl;//测试赋值运算符和->YZC::list<Date>l2 = l1;auto it1 = l2.begin();while (it1 != l2.end()){cout << it->_year << "/" << it->_month << "/" << it->_day << endl;++it1;}
}int main()
{test1();return 0;
}
测试结果如下:


![Vulhub:Shiro[漏洞复现]](https://i-blog.csdnimg.cn/direct/49e0a29570f64ac8abb316630f5241ec.png)
