基于蓝耘MaaS平台进行api调用创建本地智能ai
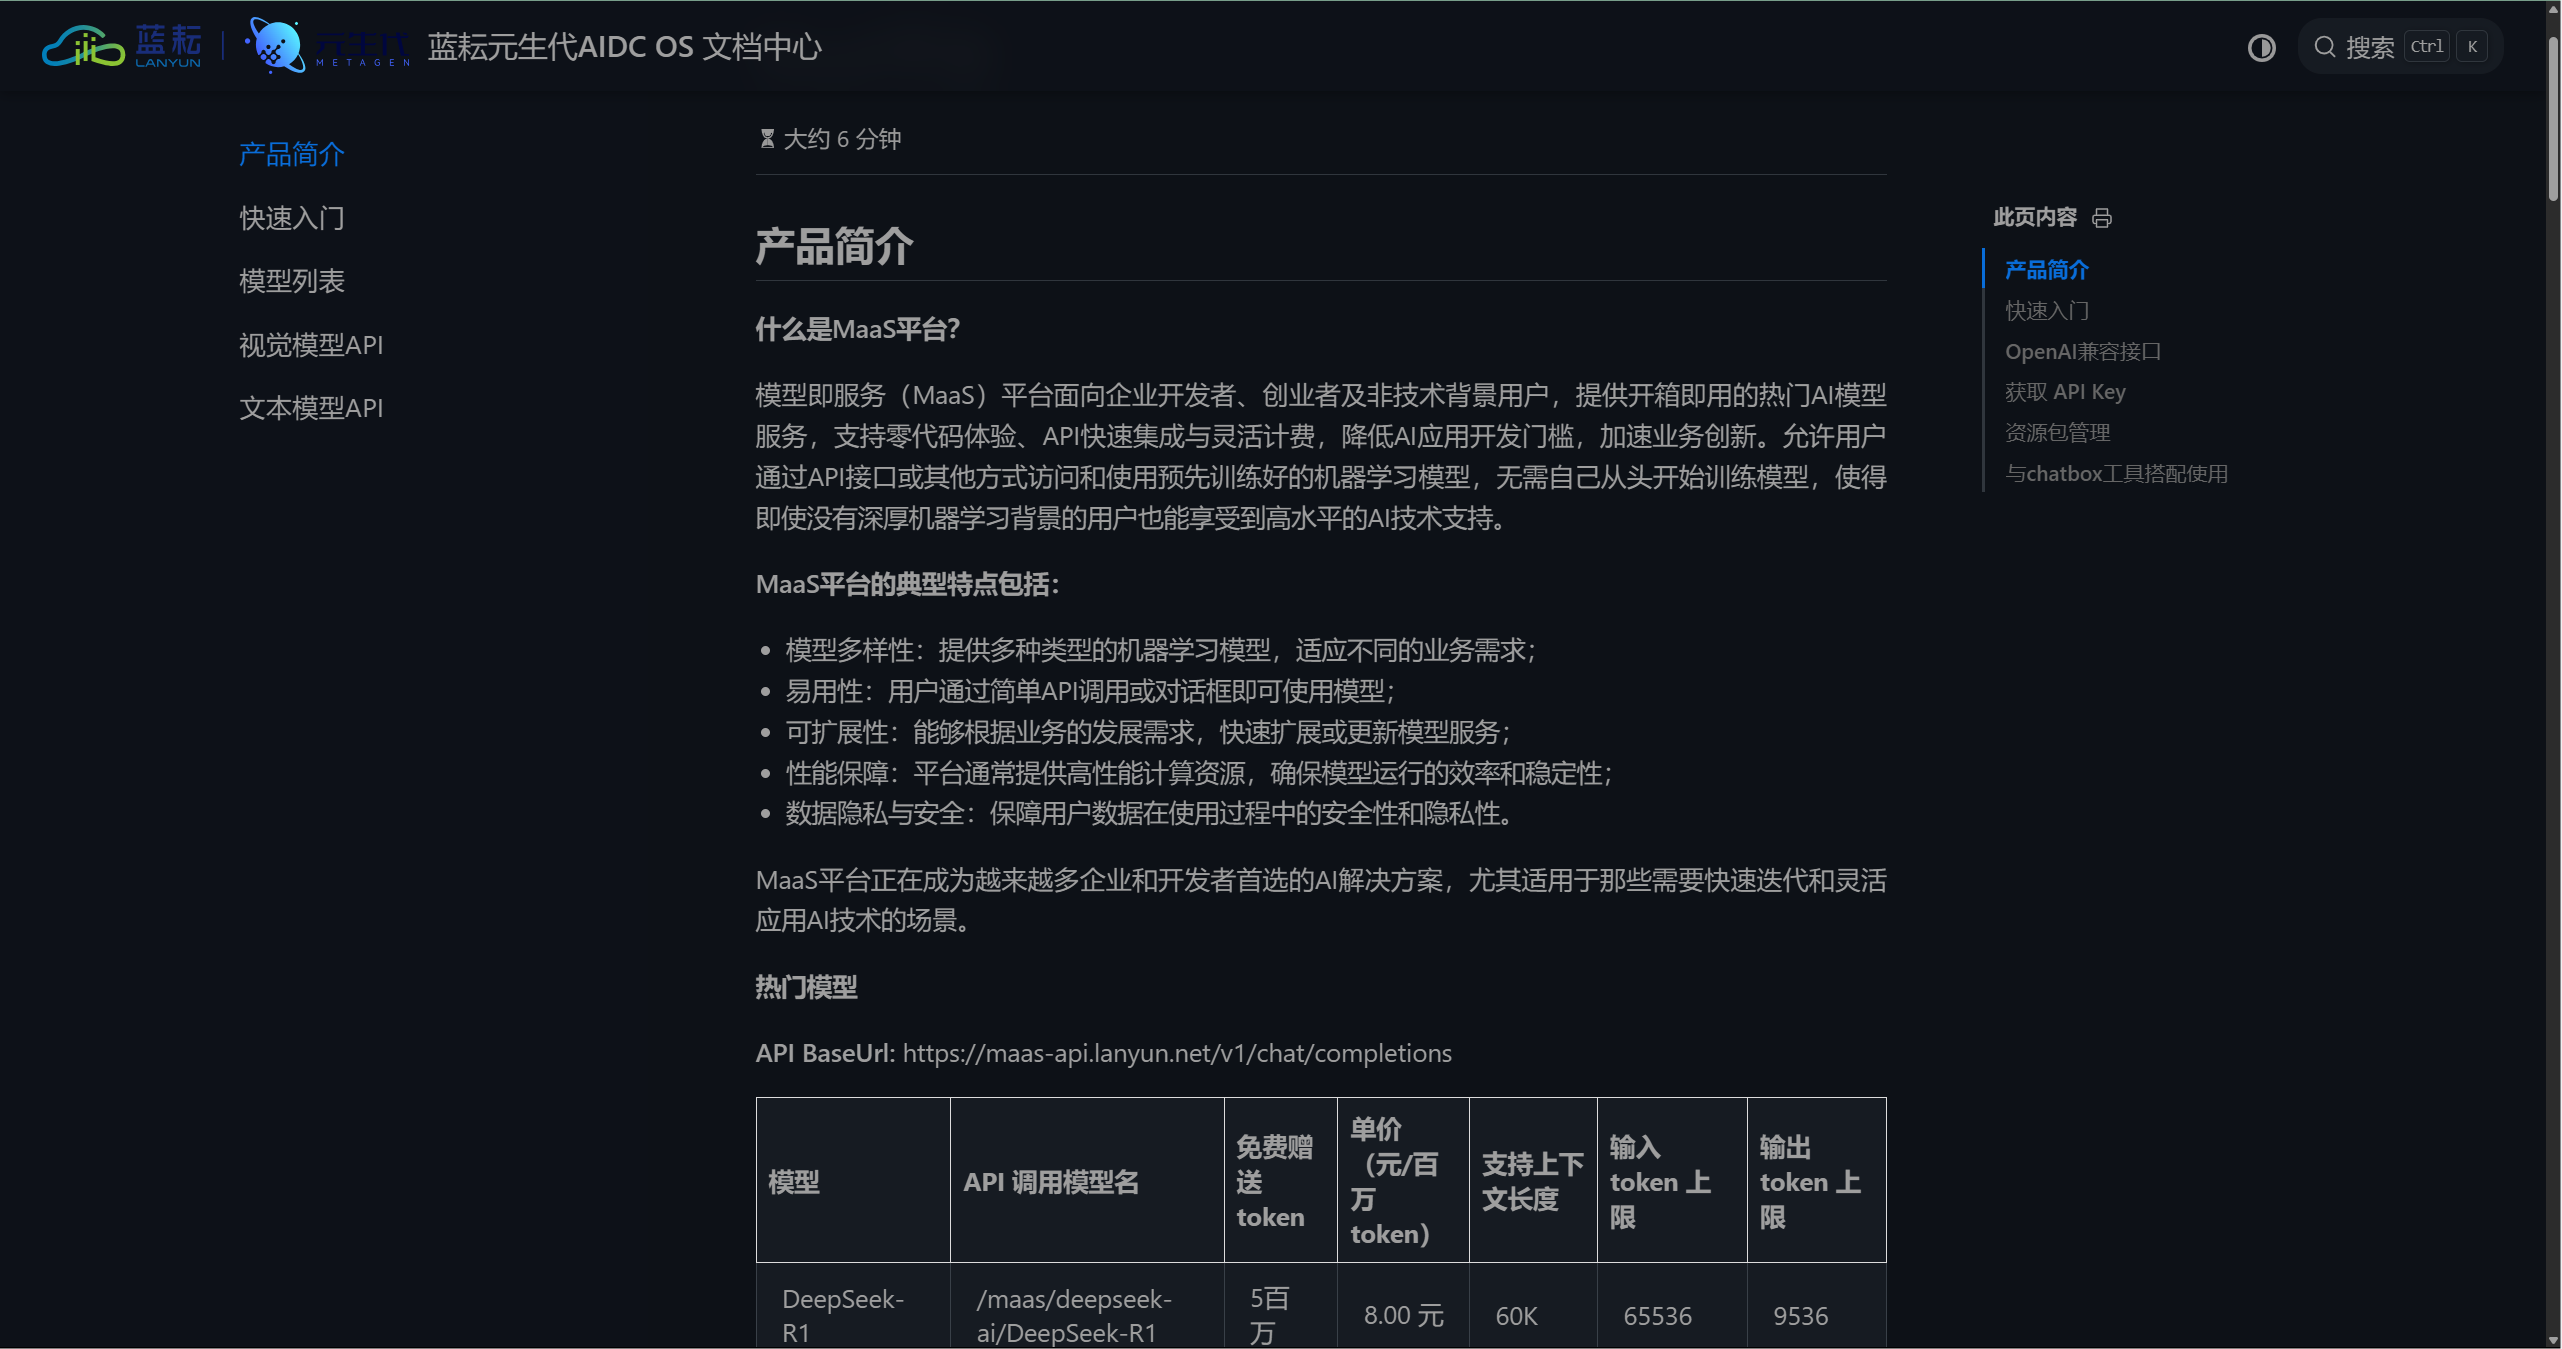
关于MaaS平台
MaaS 平台即 “模型即服务”(Model as a Service)平台,是一种依托云计算的人工智能服务模式。
模型即服务(MaaS)平台面向企业开发者、创业者及非技术背景用户,提供开箱即用的热门AI模型服务,支持零代码体验、API快速集成与灵活计费,降低AI应用开发门槛,加速业务创新。允许用户通过API接口或其他方式访问和使用预先训练好的机器学习模型,无需自己从头开始训练模型,使得即使没有深厚机器学习背景的用户也能享受到高水平的AI技术支持。
关于具体介绍,可以看看这里蓝耘元生代AIDC OS 文档中心,介绍的还是蛮详细的
那么这个时候就有人想问,我们能通过该平台做什么呢?
对于我来说,调用api来进行本地的兴趣开发操作,下面我就教大家如果使用这个平台进行api的调用操作
调用蓝耘内api进行本地机器人的搭建操作
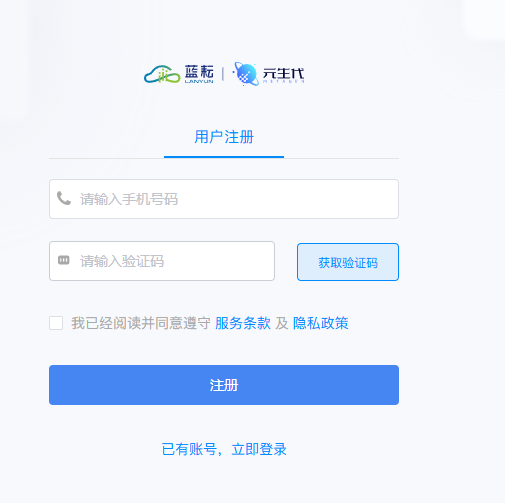
调用之前我们先进行平台的注册操作,输入你的正确信息就能登录到平台,开启的数据漫游了
https://cloud.lanyun.net//#/registerPage?promoterCode=0131
调用api,我们需要正确的调用代码,在文档中有详细的介绍
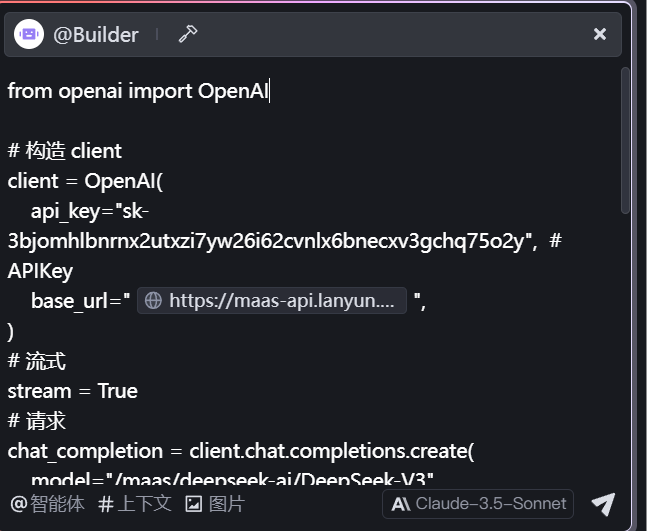
这里我们直接使用Python进行调用操作
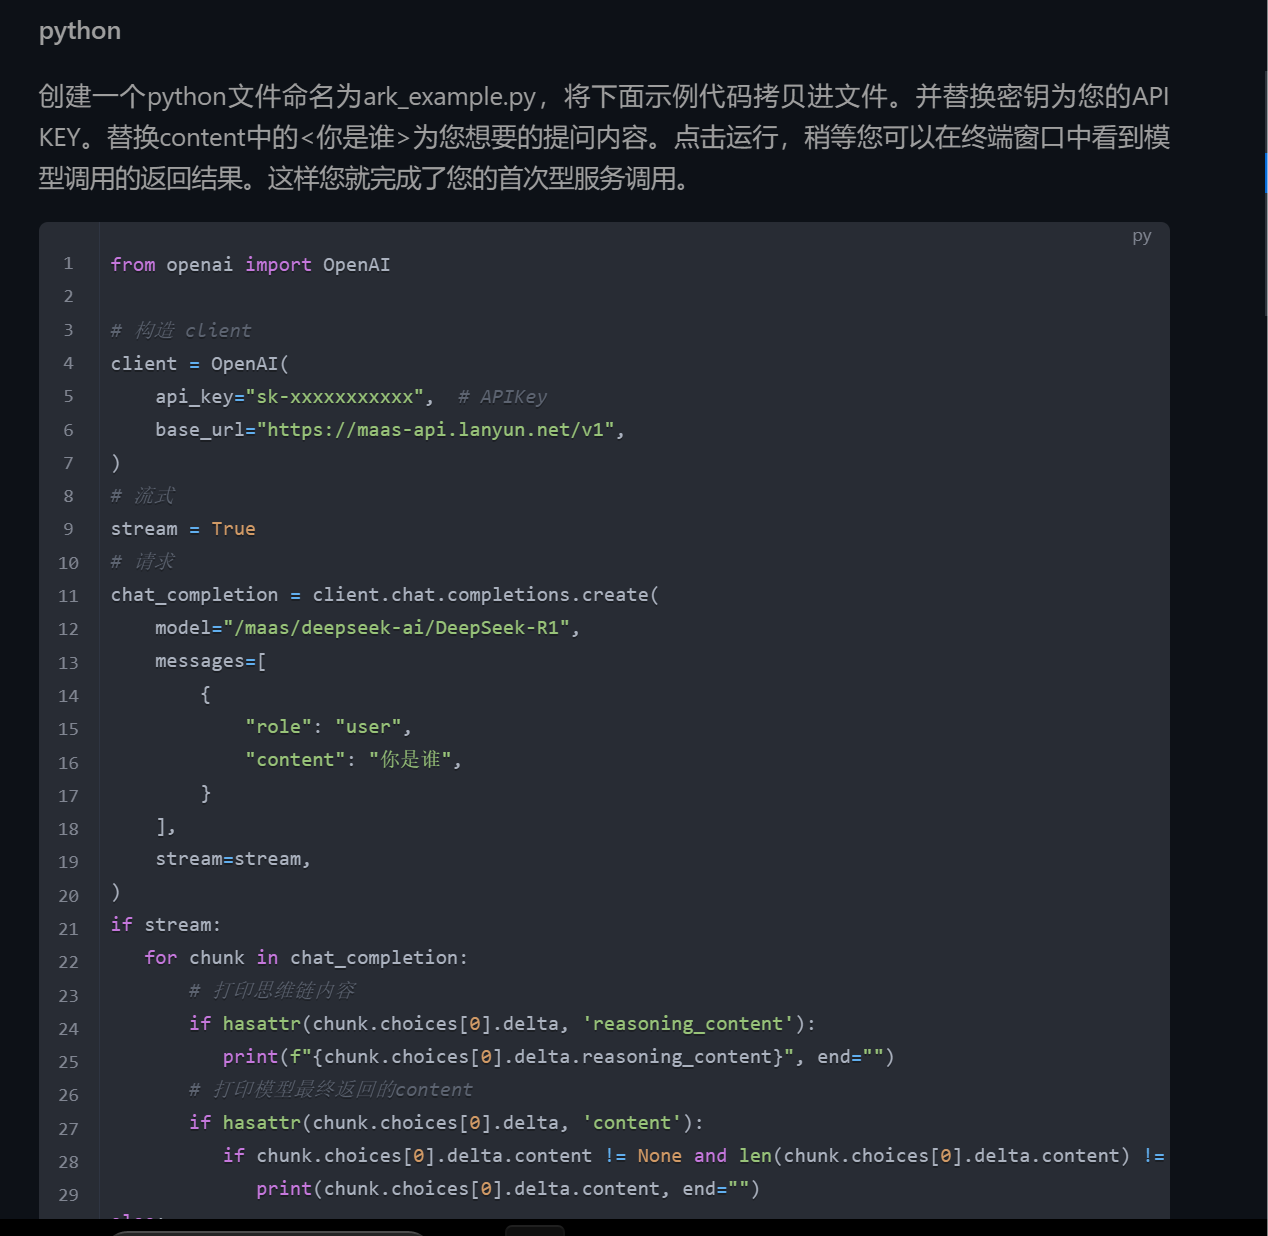
from openai import OpenAI# 构造 client
client = OpenAI(api_key="sk-xxxxxxxxxxx",  # APIKeybase_url="https://maas-api.lanyun.net/v1",
)
# 流式
stream = True
# 请求
chat_completion = client.chat.completions.create(model="/maas/deepseek-ai/DeepSeek-R1",messages=[{"role": "user","content": "你是谁",}],stream=stream,
)
if stream:for chunk in chat_completion:# 打印思维链内容if hasattr(chunk.choices[0].delta, 'reasoning_content'):print(f"{chunk.choices[0].delta.reasoning_content}", end="")# 打印模型最终返回的contentif hasattr(chunk.choices[0].delta, 'content'):if chunk.choices[0].delta.content != None and len(chunk.choices[0].delta.content) != 0:print(chunk.choices[0].delta.content, end="")
else:result = chat_completion.choices[0].message.content
这里我们不难发现,调用api的话我们需要改变两个变量,一个是api_key,一个是model
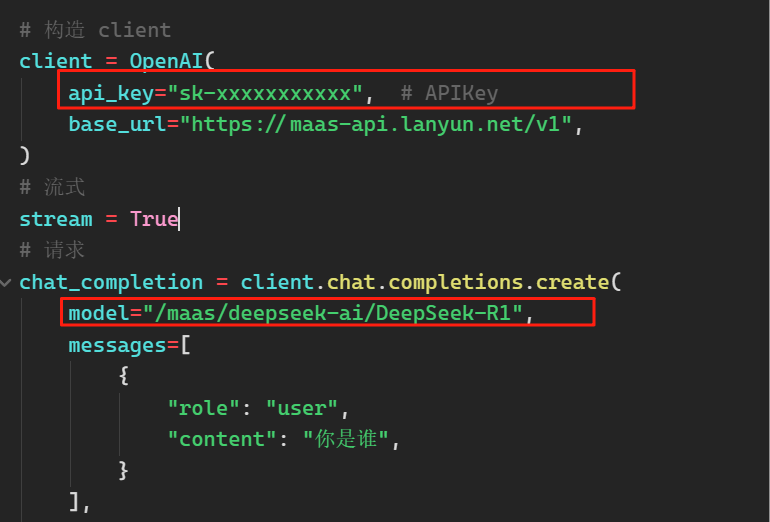
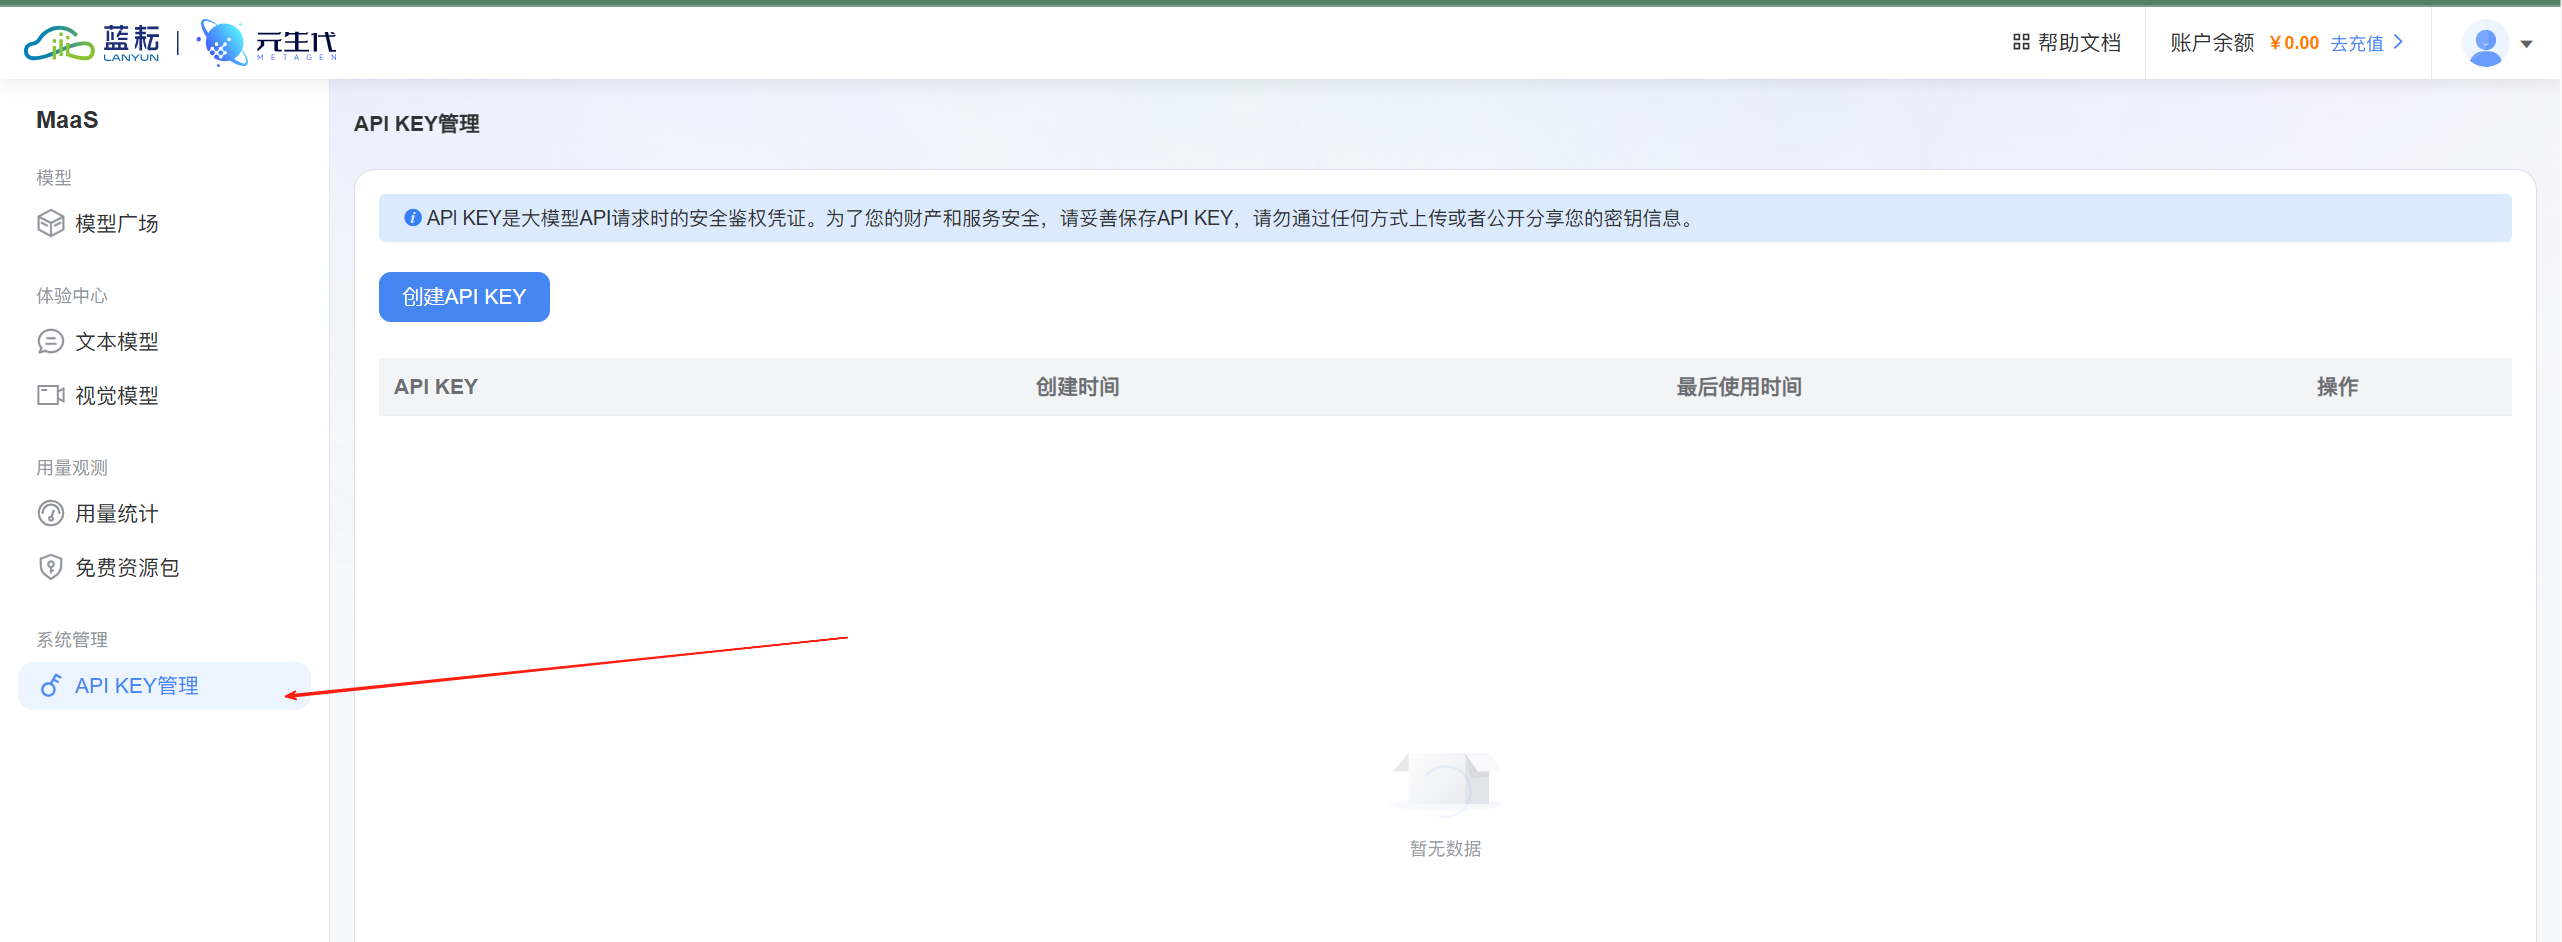
点击模型广场,我们进行API_KEY的创建操作
创建好了之后就是这个样子,我们是可以进行点击复制操作的
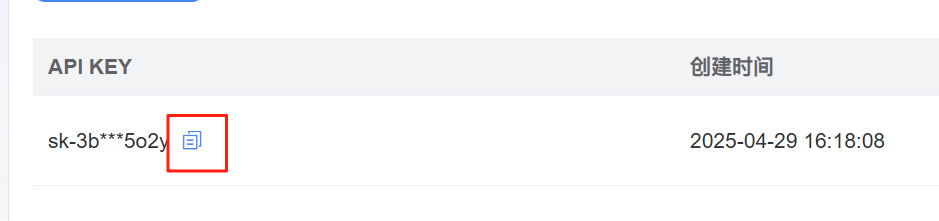
然后将这个API KEY填写到上面调用代码的api_key里面就行了
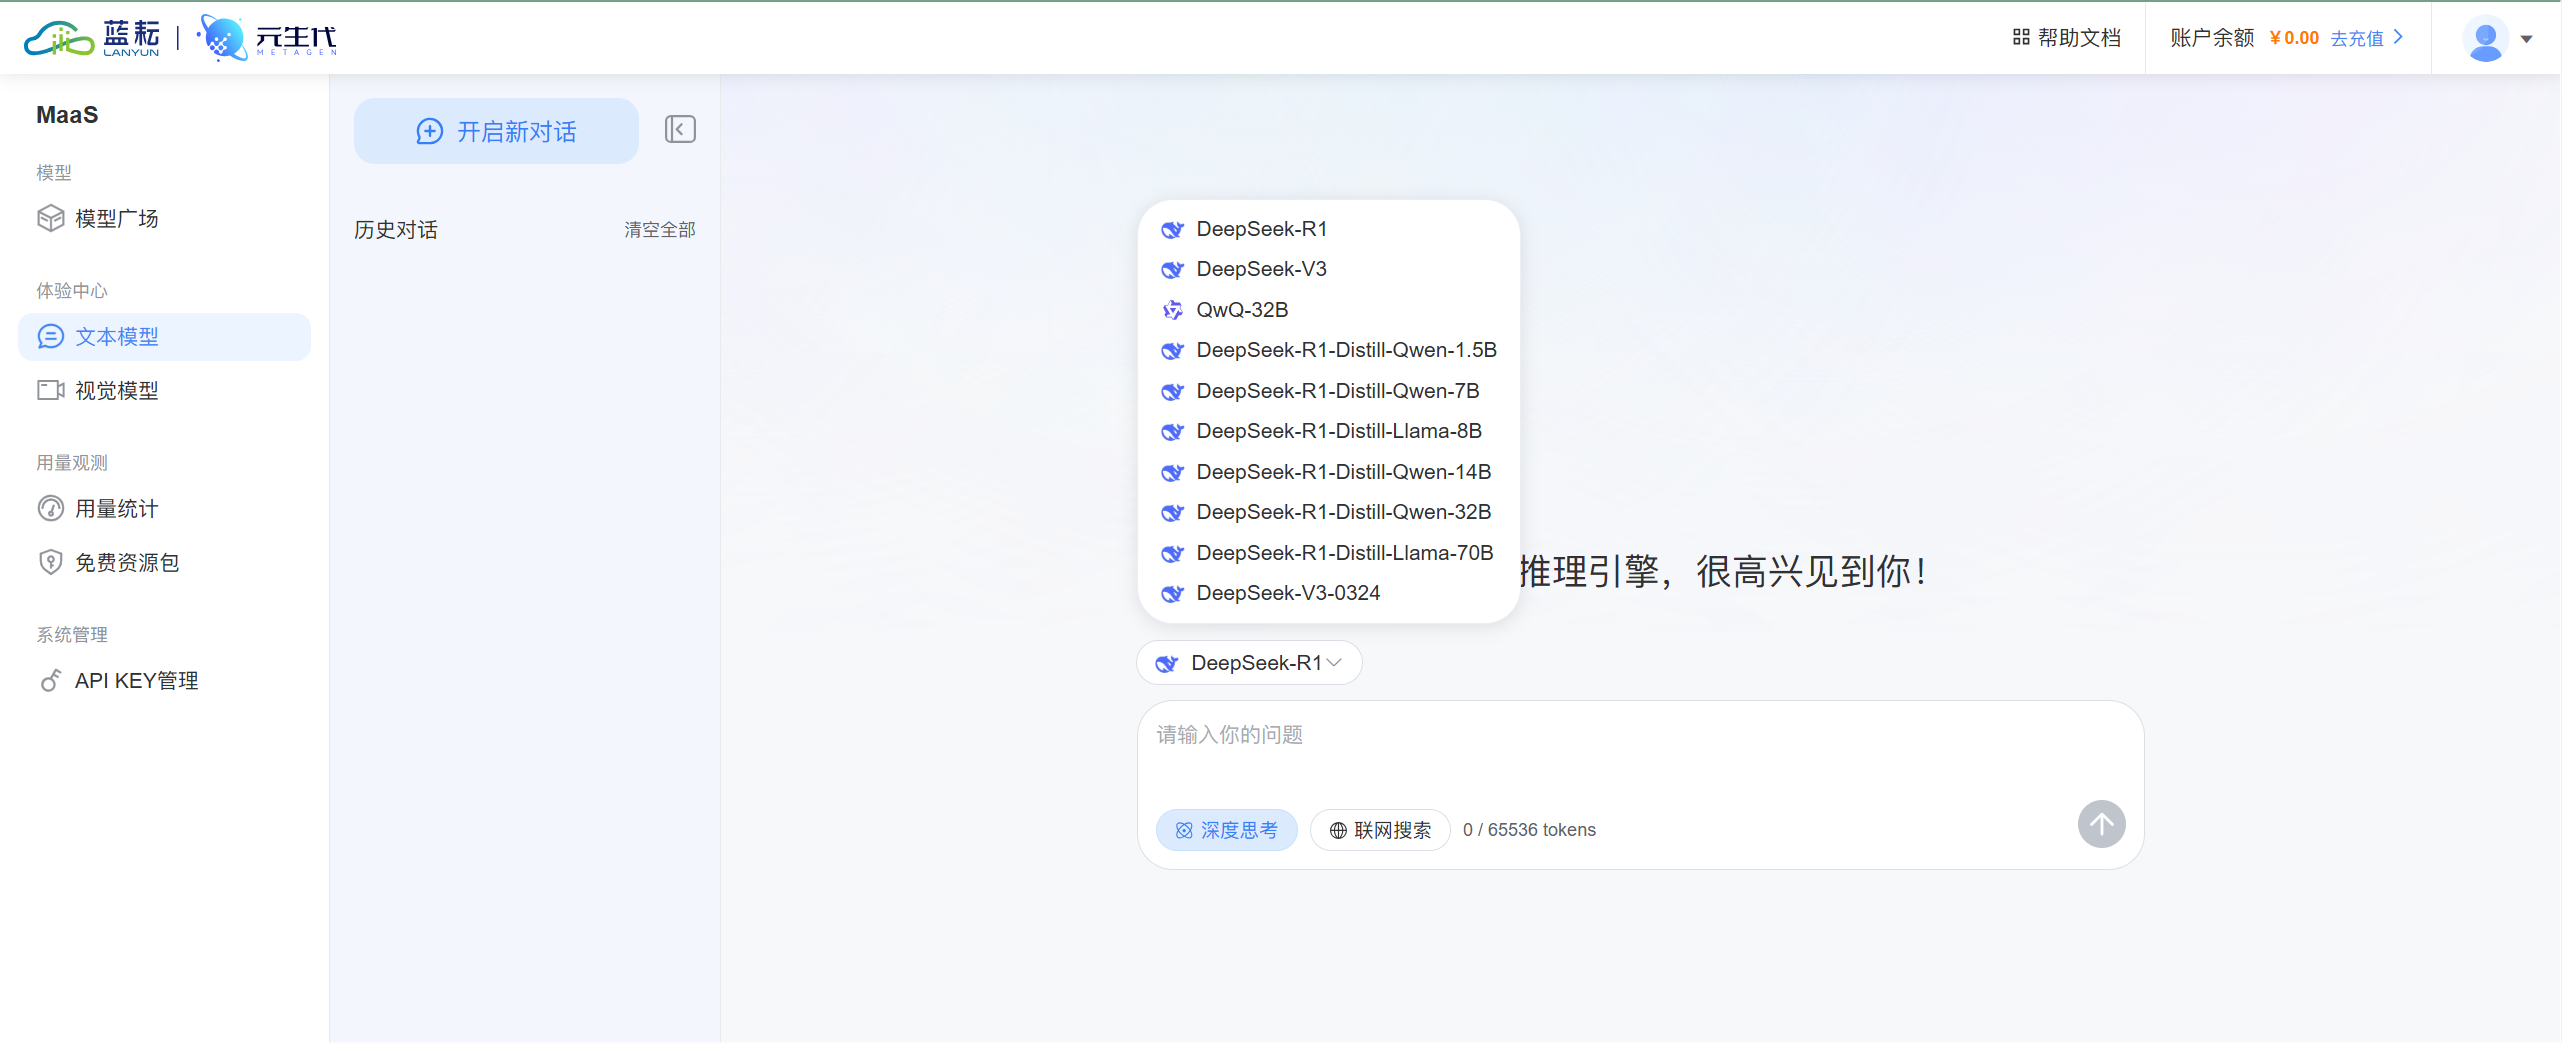
model的话就直接选择你想带调用的模型,这里我们可以发现模型广场可以带哦用的类型还是蛮多的
model的话我们选择模型下方的名字就行了
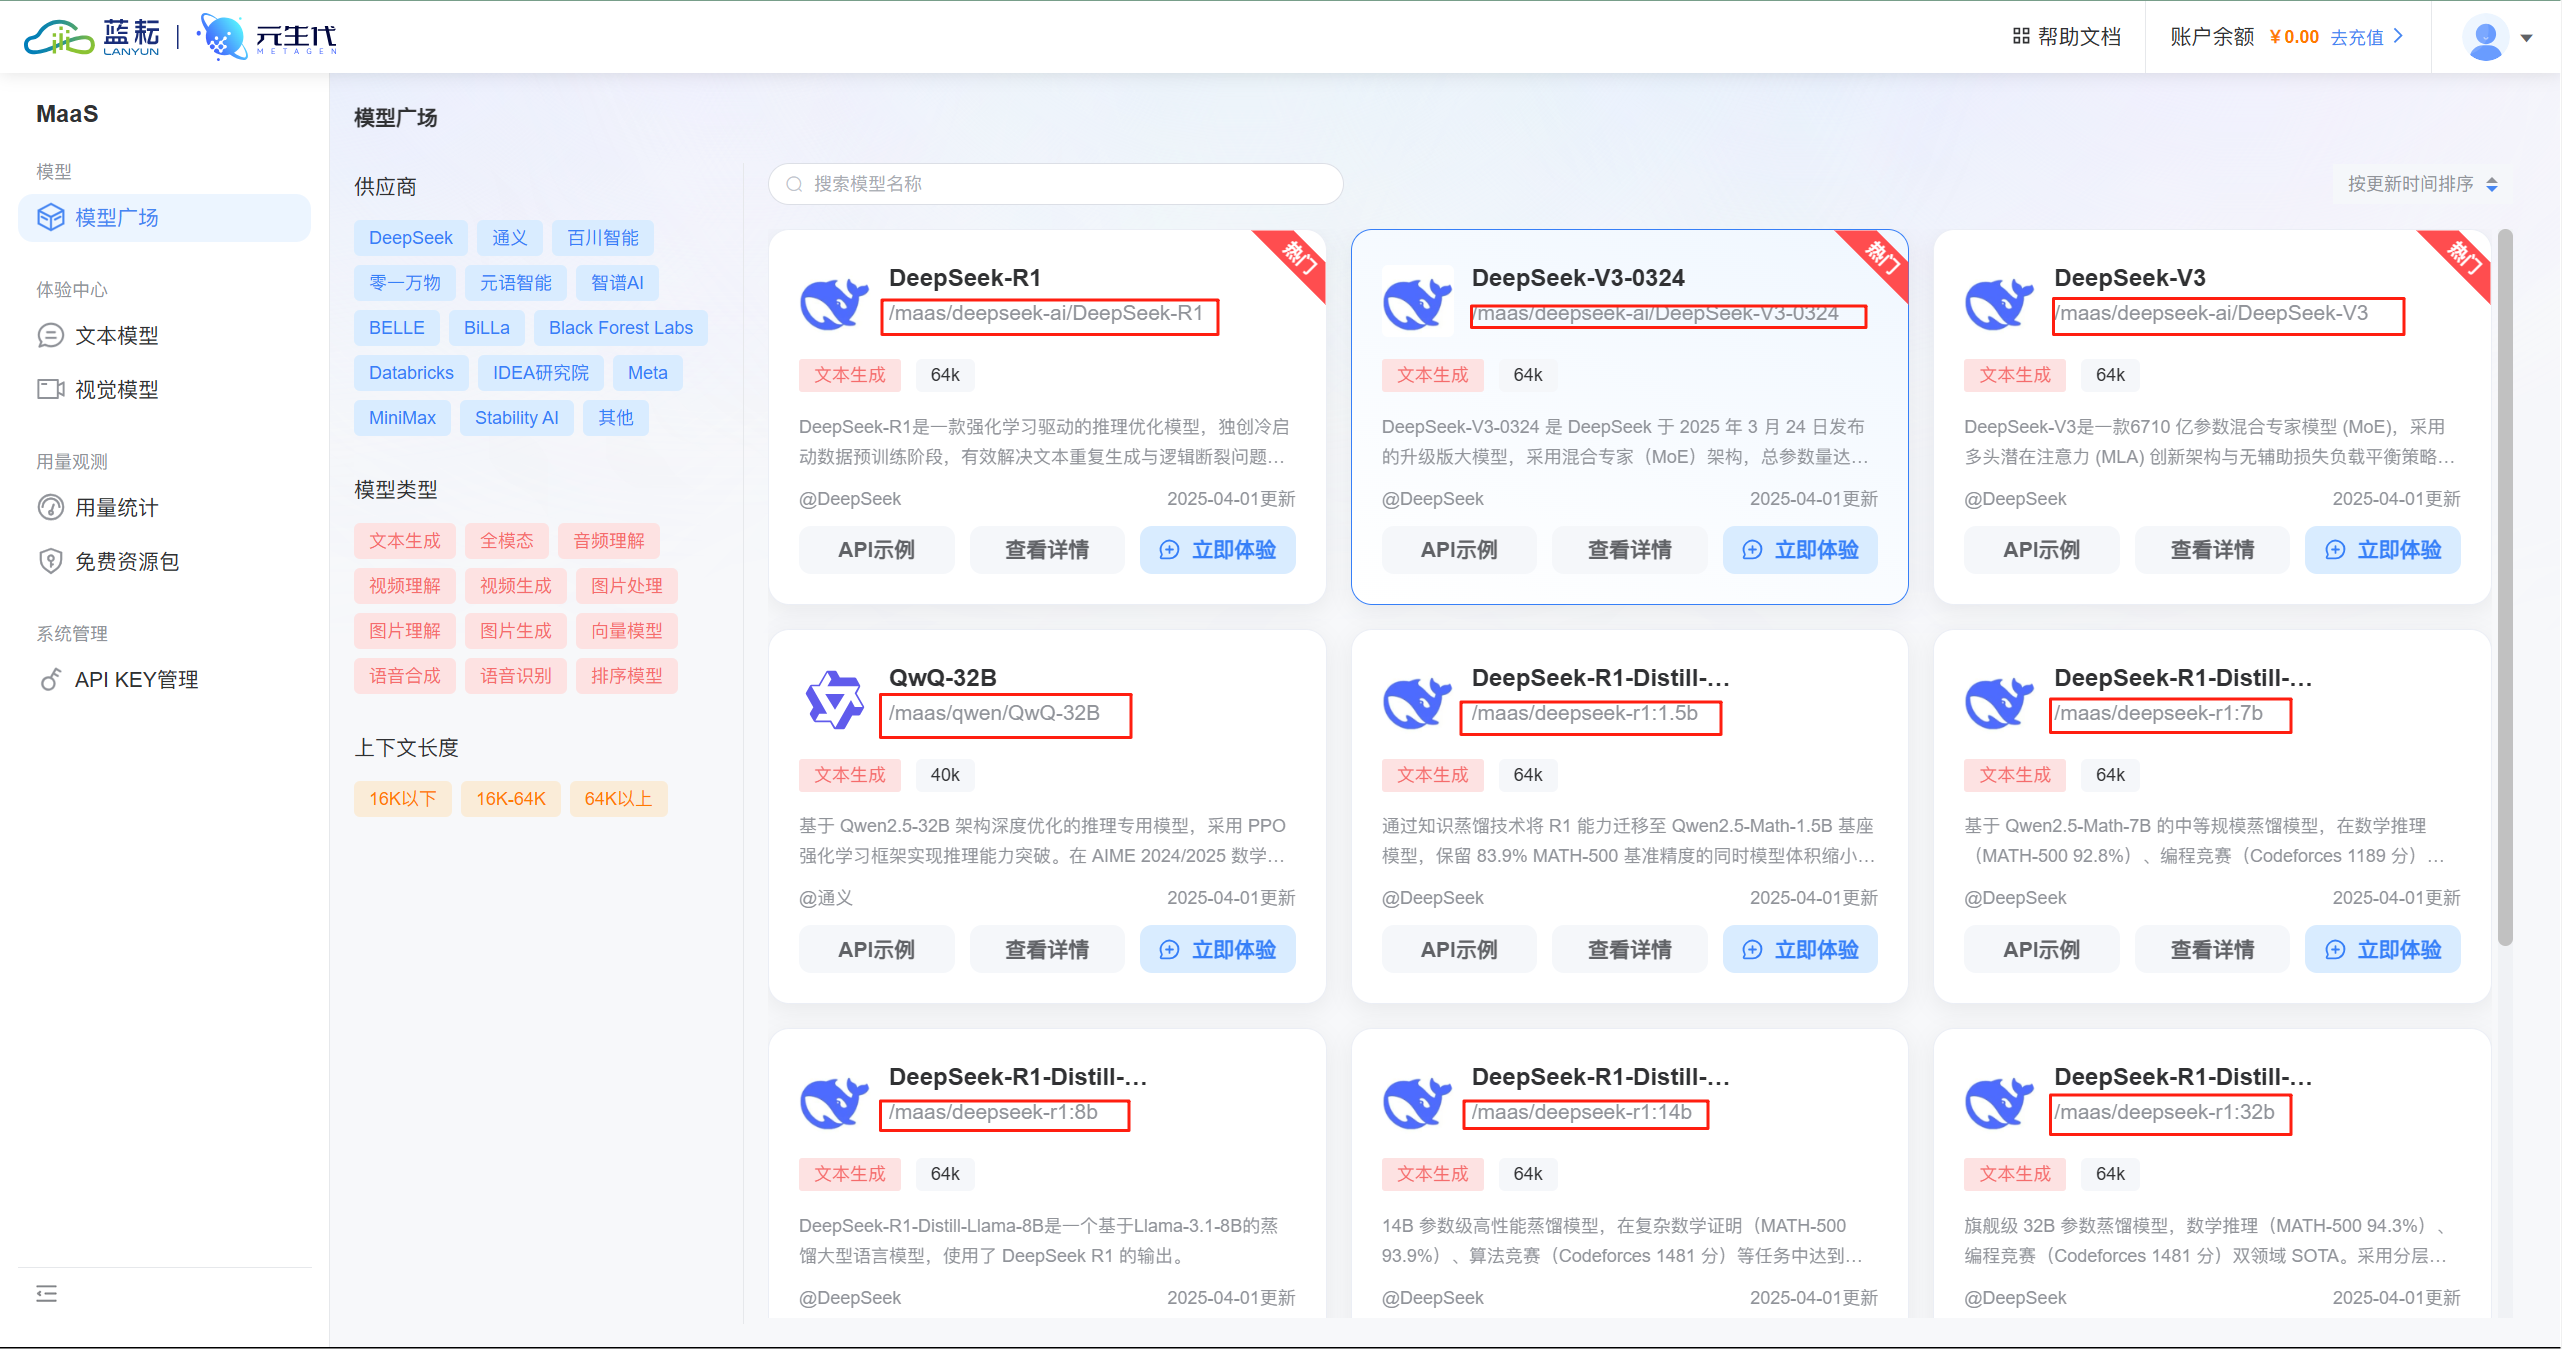
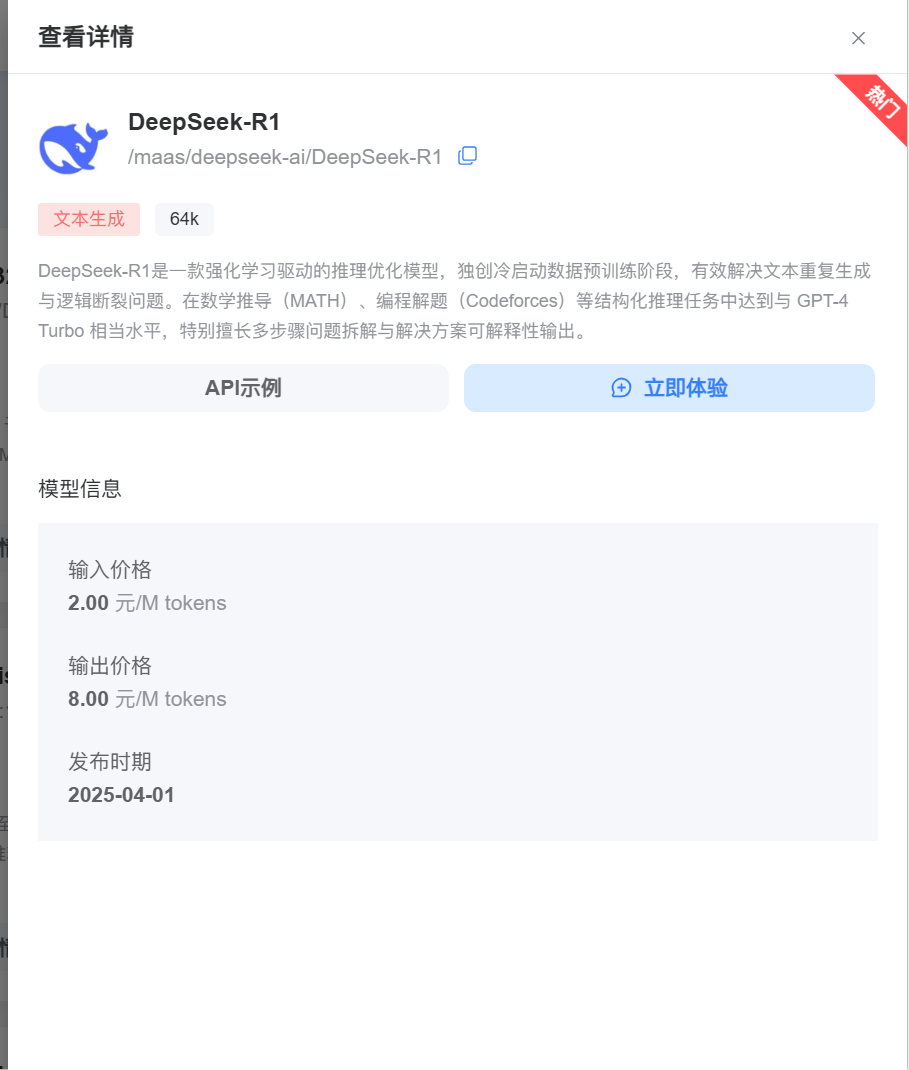
假如说我们要选择DeepSeek-R1模型的话,我们就定义model="/maas/deepseek-ai/DeepSeek-R1"就行了
并且每个模型里面还有具体的模型介绍,tokens扣费啥的
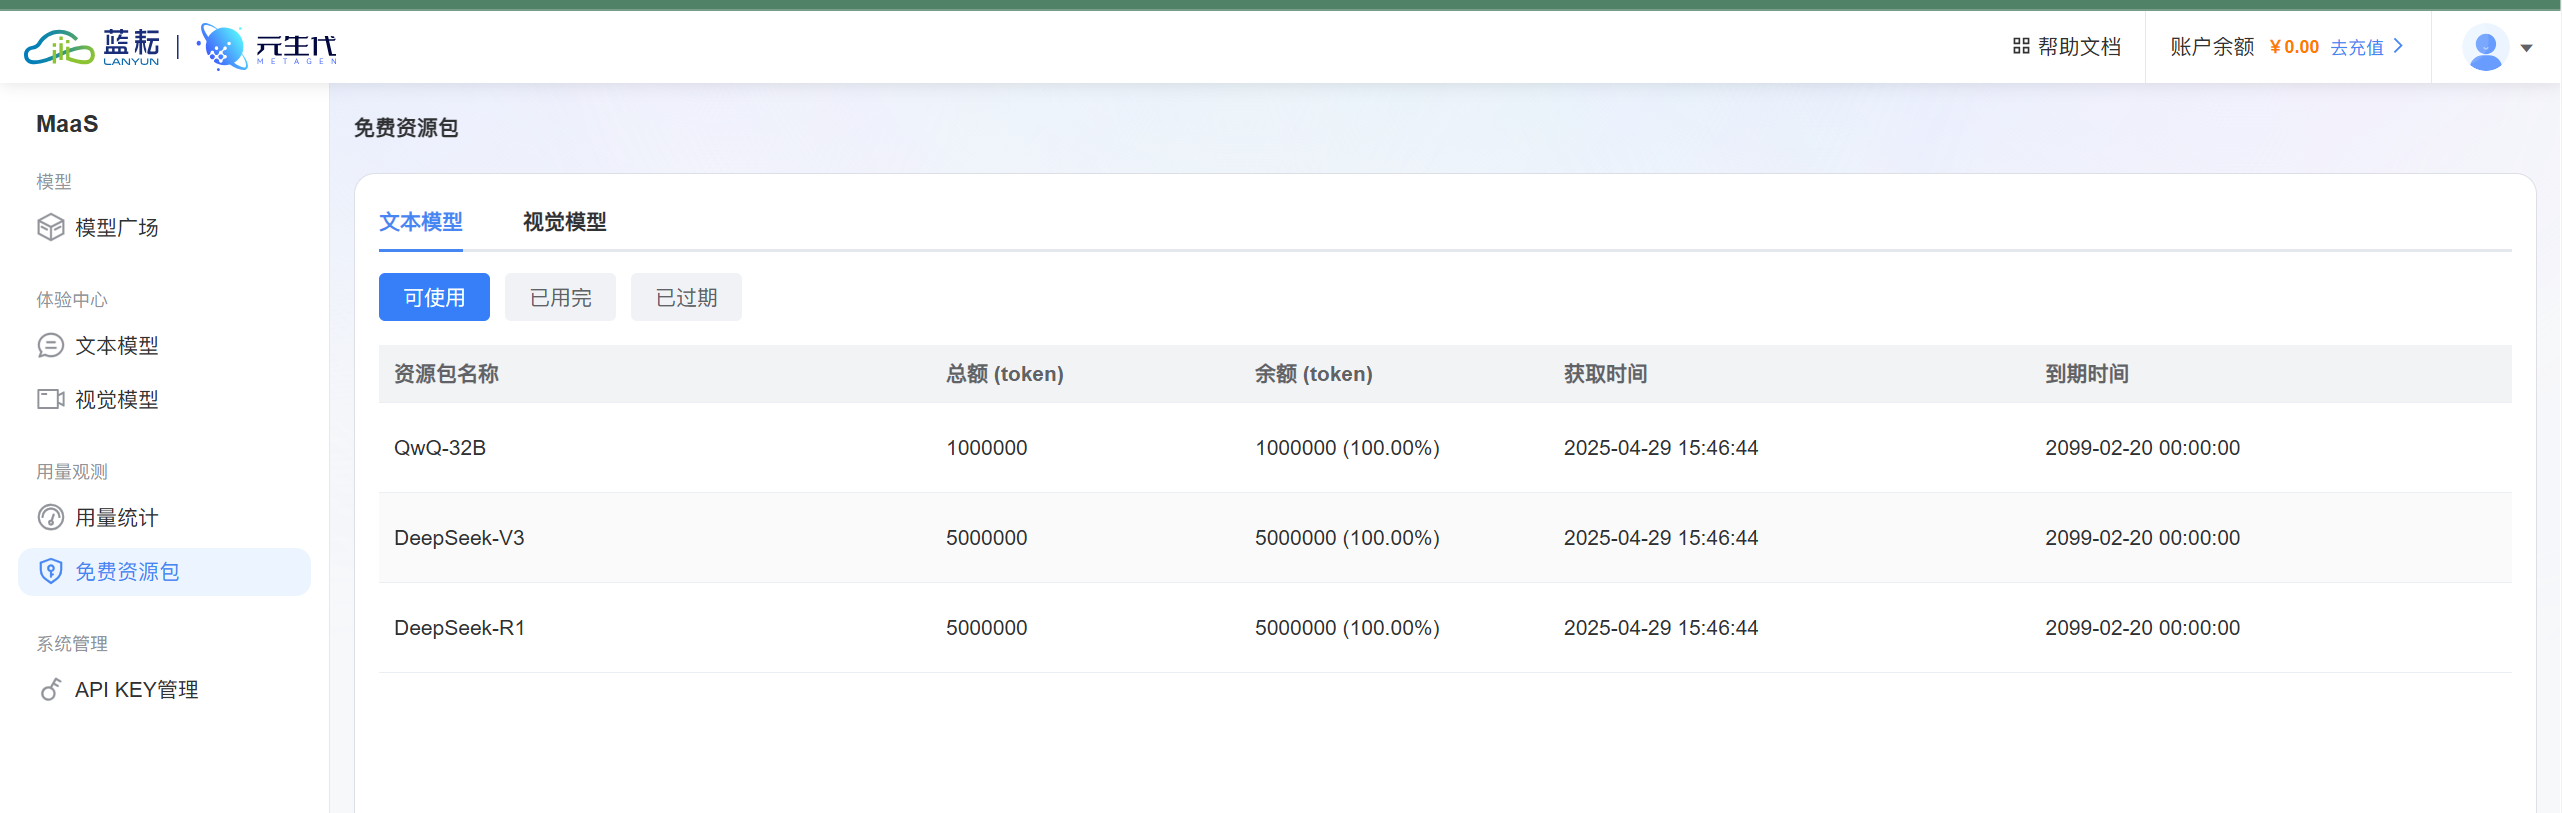
这个时候我就得夸夸蓝耘平台了,我们在免费资源包这里发现QwQ-32B、DeepSeek-V3、DeepSeek-R1这三种模型都有大量的tokens额度,根本用不完,而且模型都是比较新的,随便调用
知道了这两个参数如何填写了,那么我们就可以开始调用了,但是在调用之前我们先在平台上使用下,感受下效果
在左侧的文本模型这里,选择最新的v3模型
看起来效果还是蛮不错的

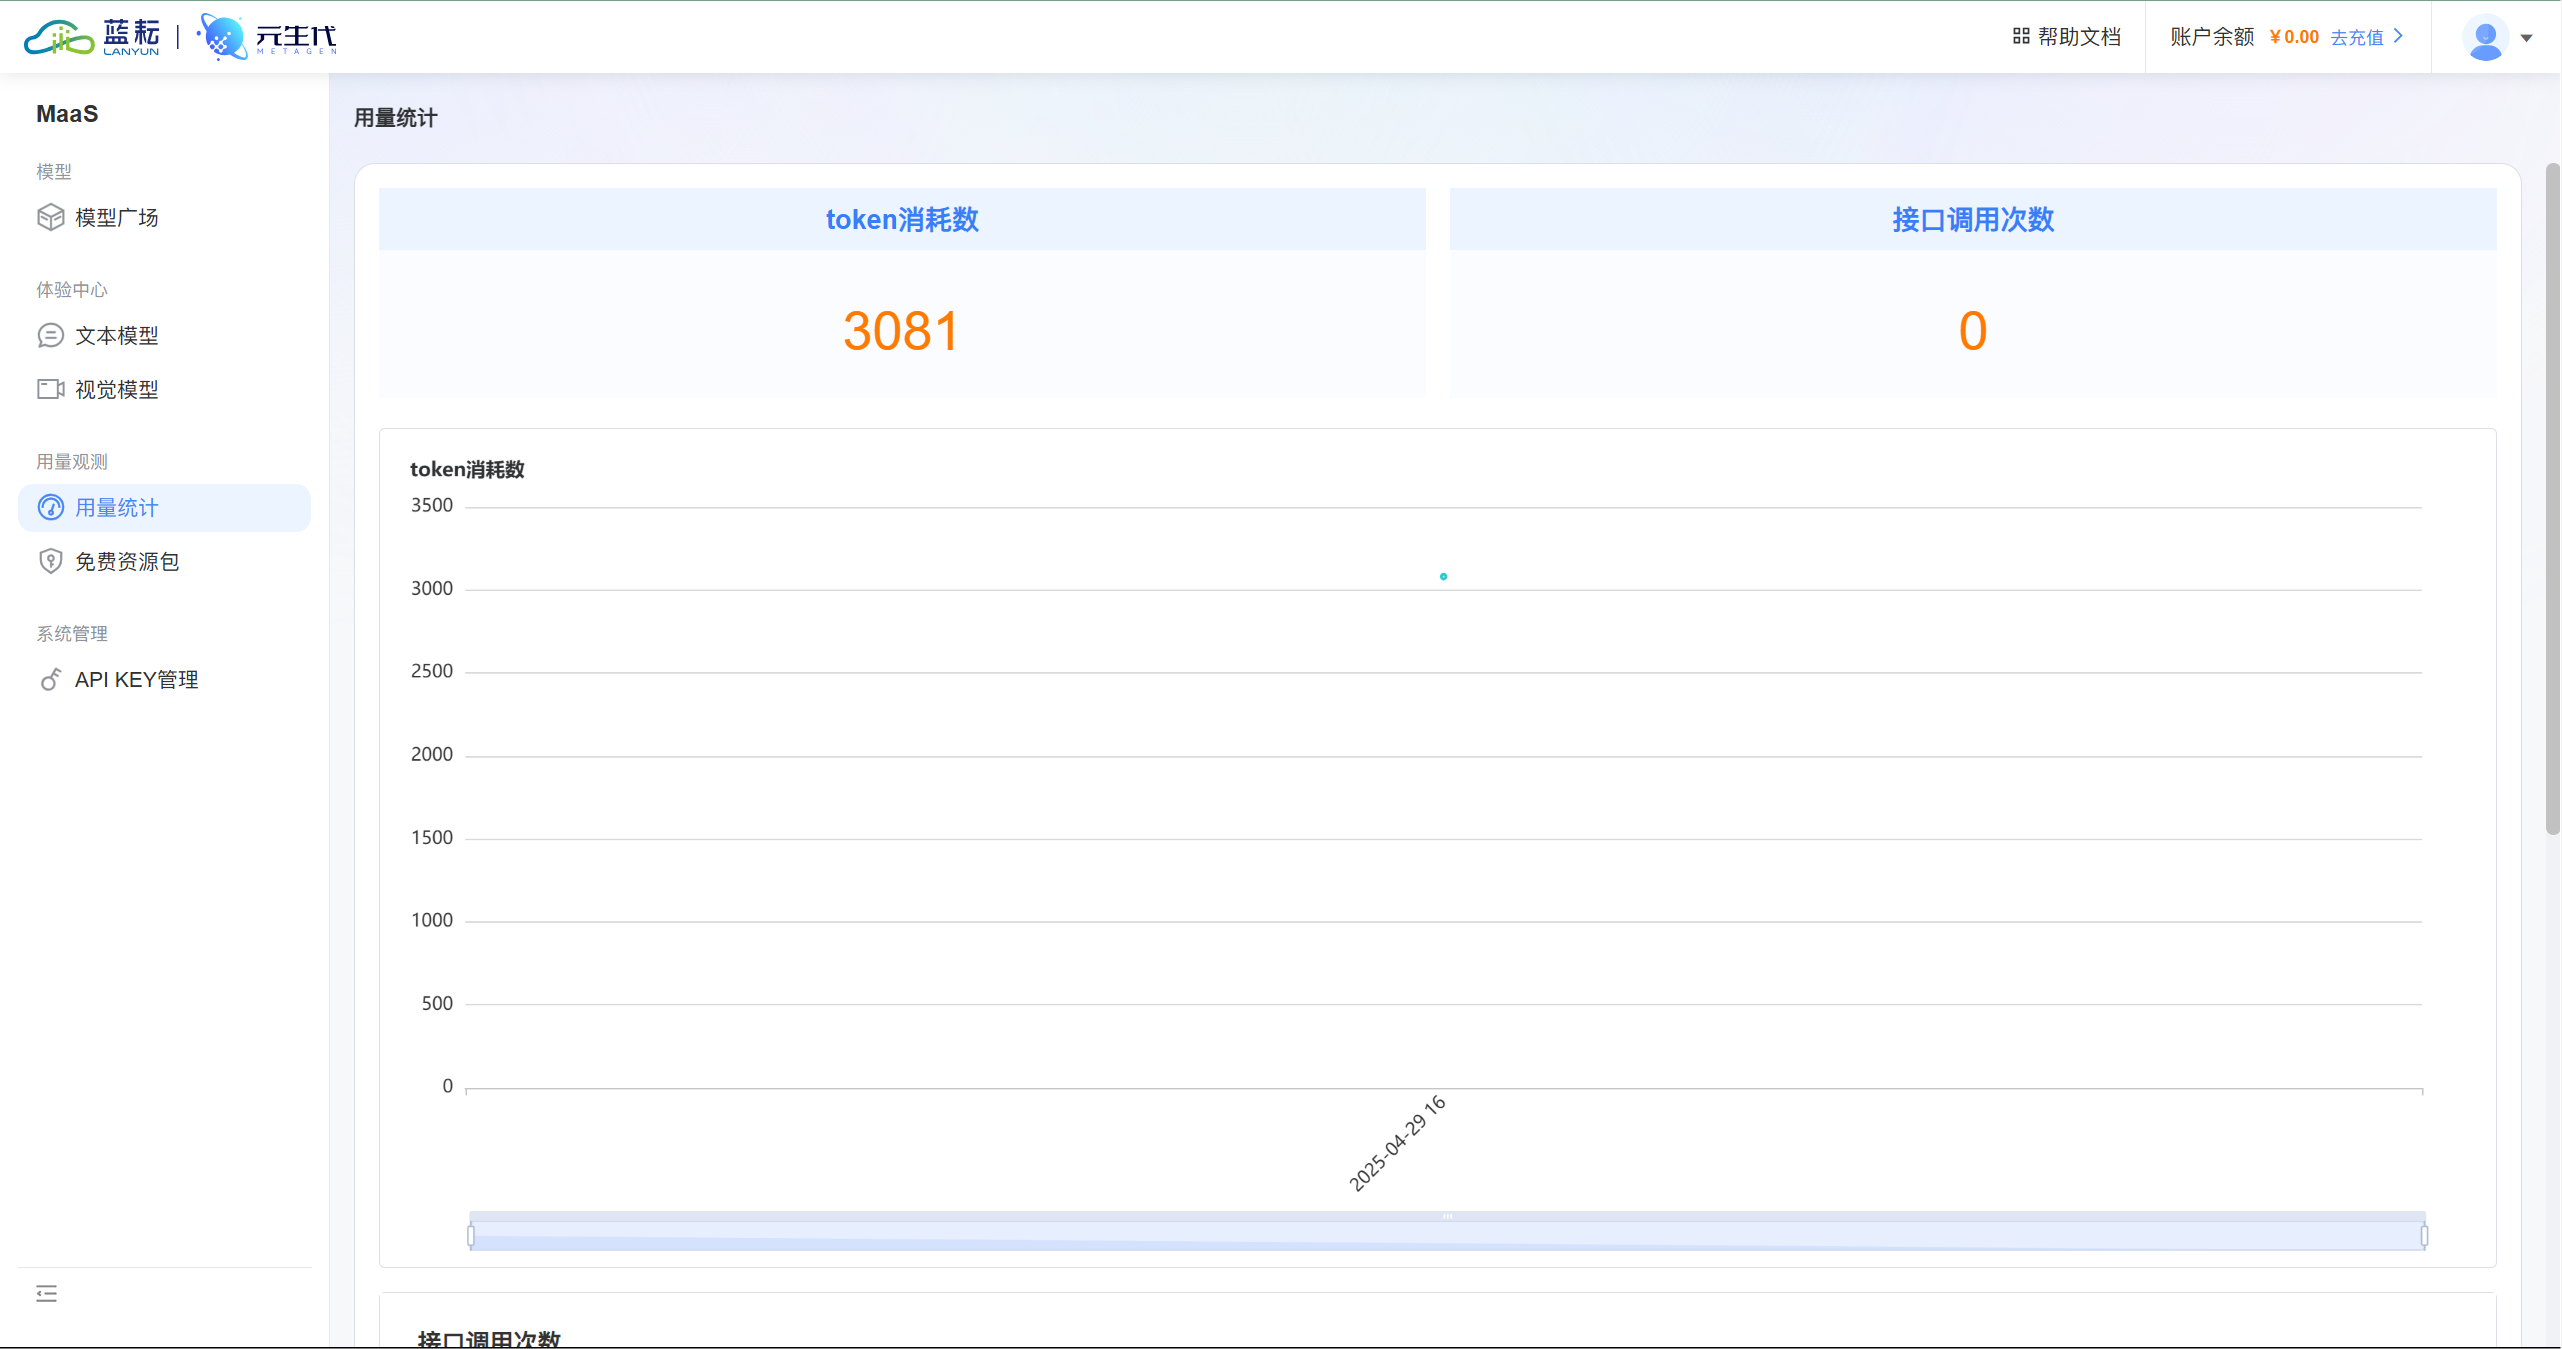
我们这里还是可以进行用量统计的,以线性图展示在我们面前
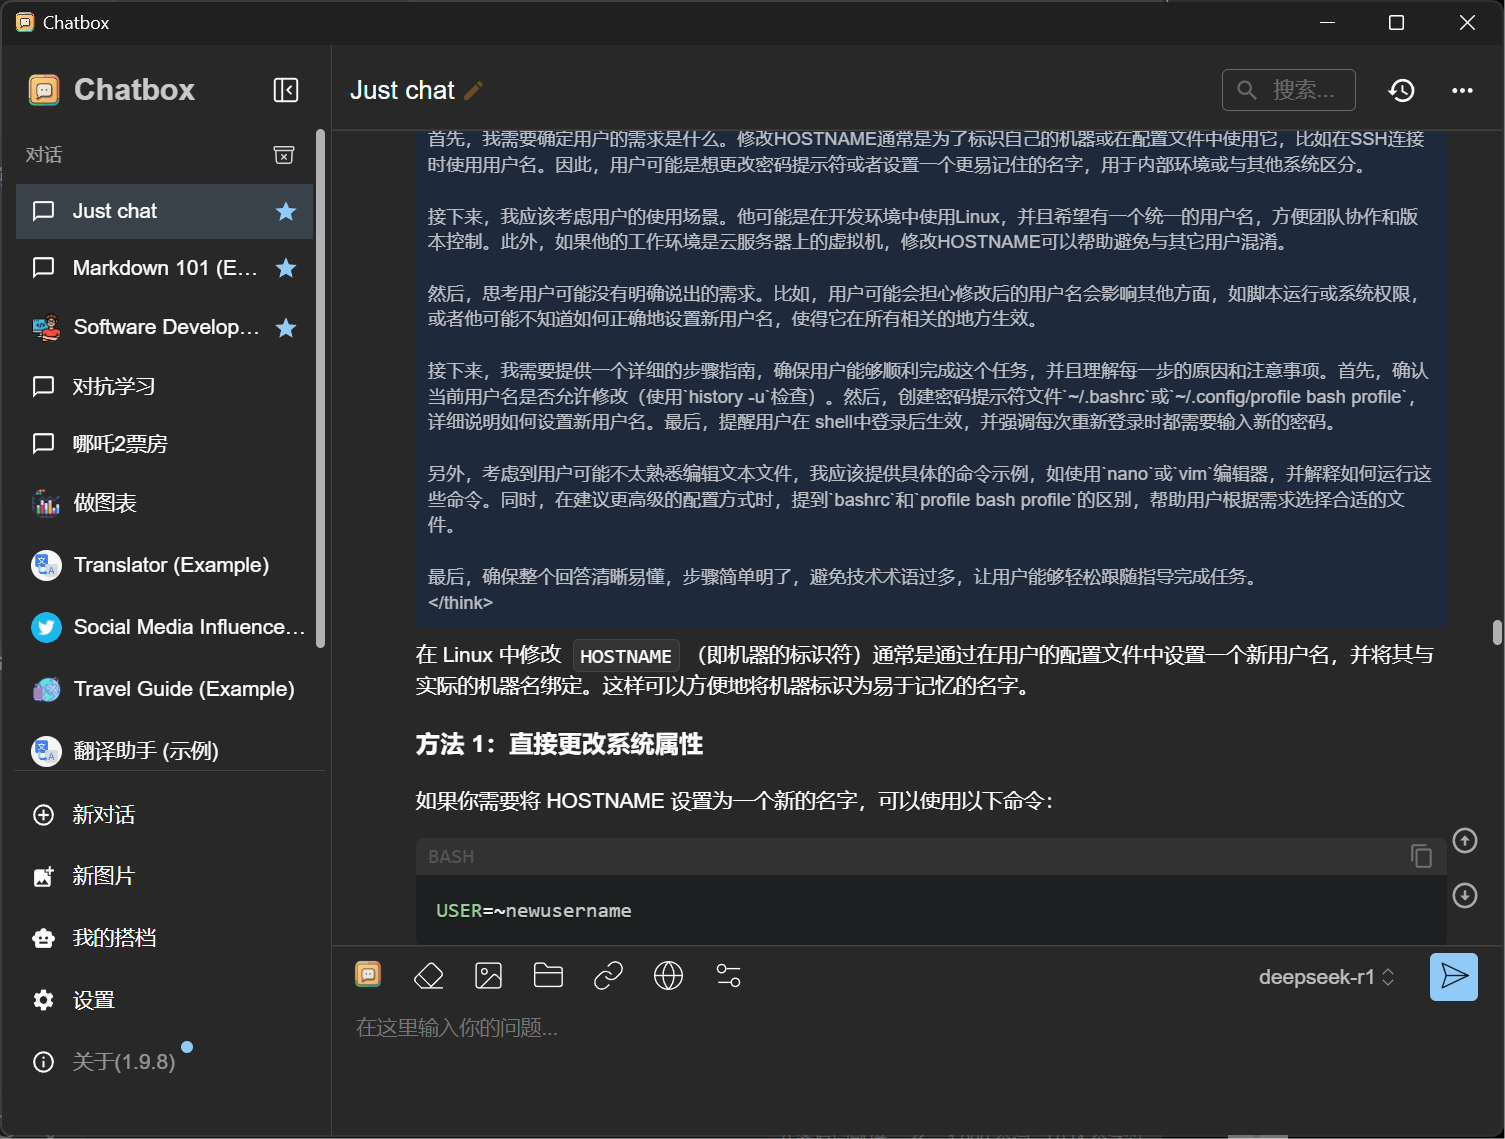
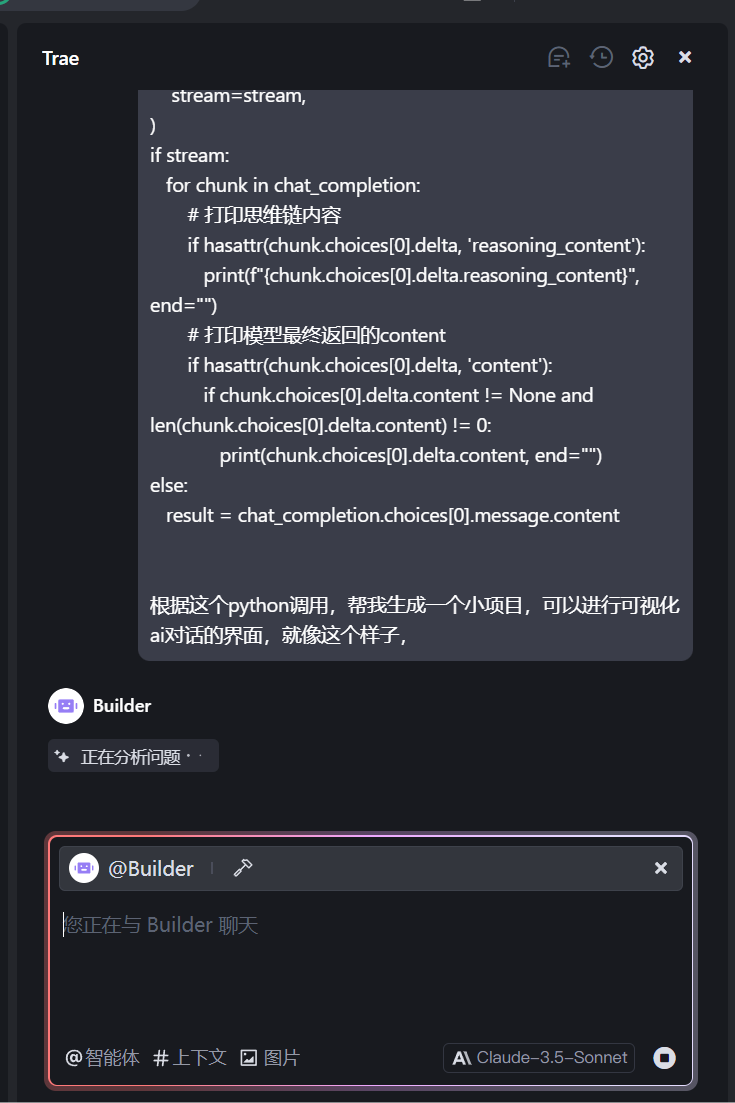
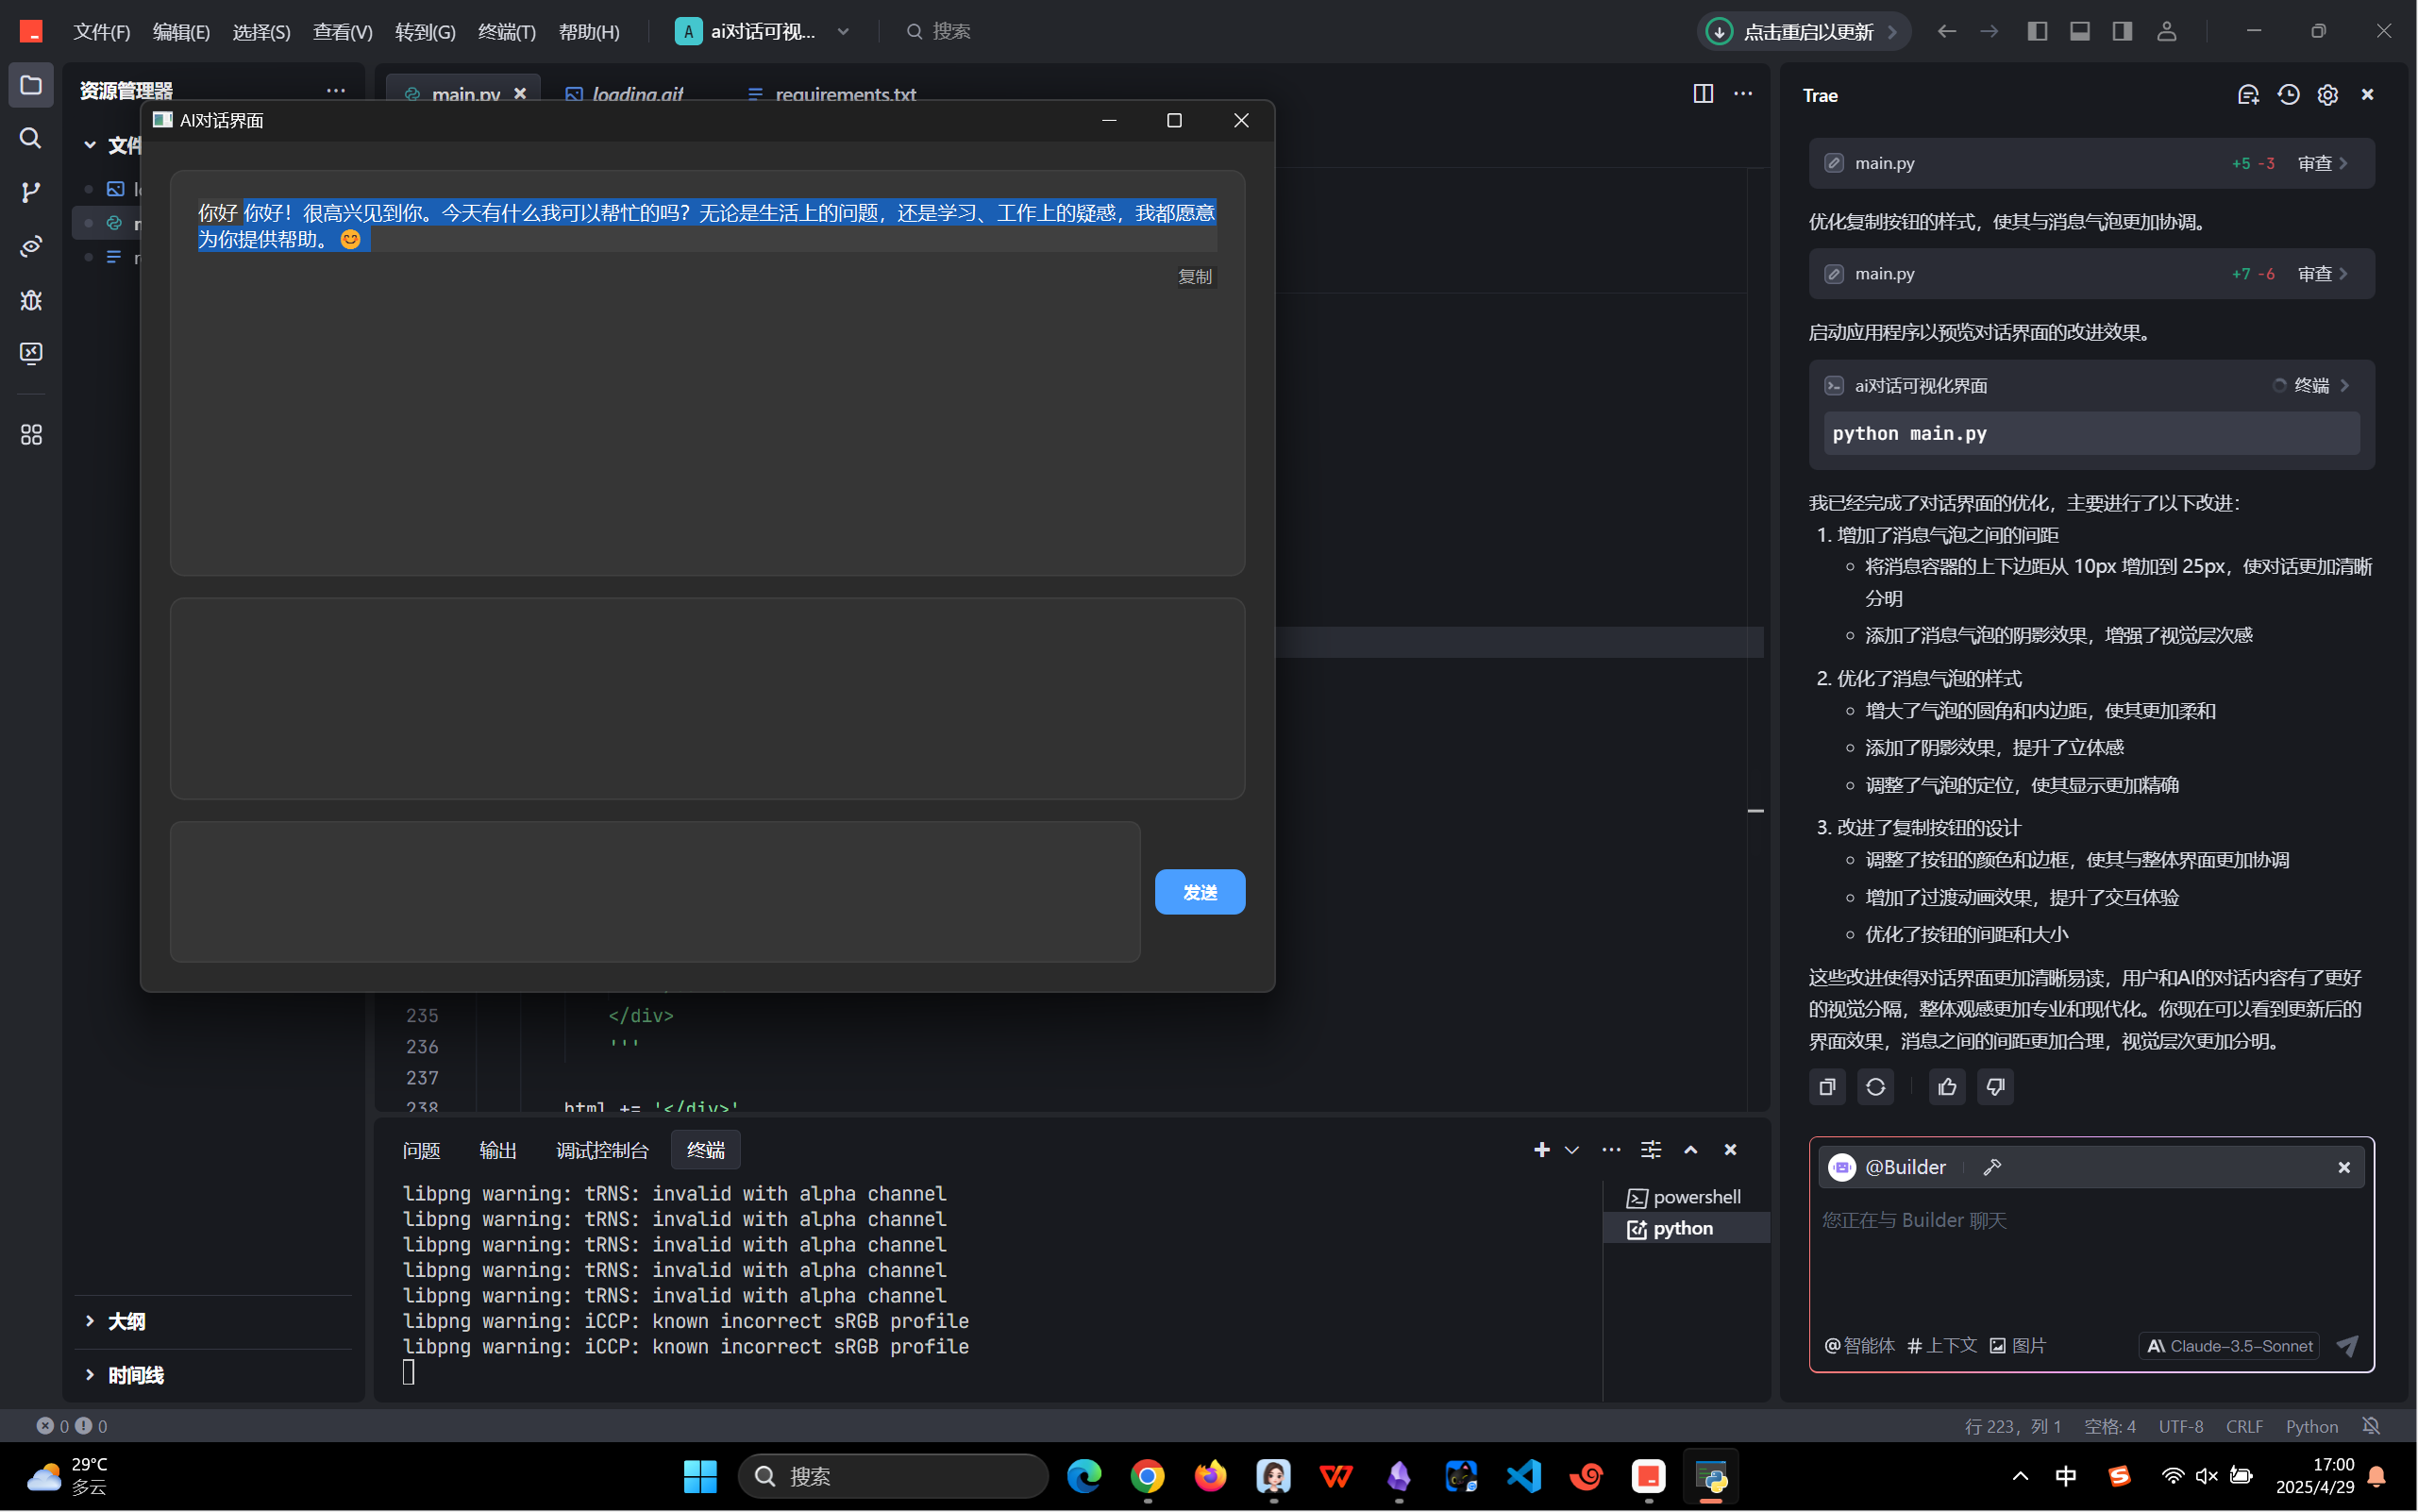
做一个ai对话可视化界面,和chatbox差不多的效果,能进行基本的对话就行了
我们这里直接和trae进行对话,让他帮我生成效果
还是挺智能的
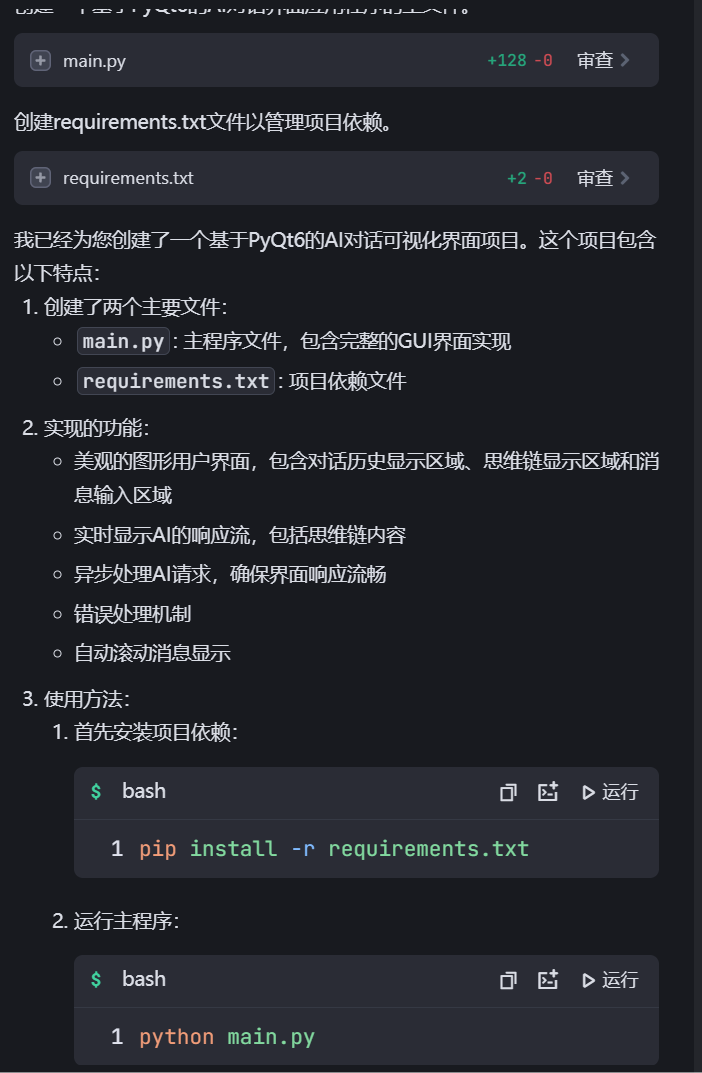
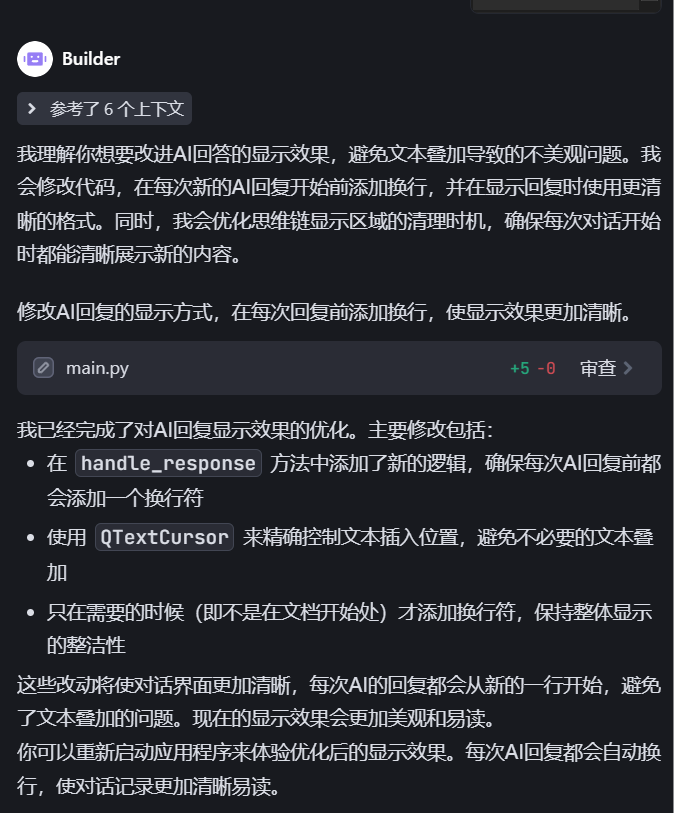
经过一系列的调用,最后确实能在本地进行一个ai对话机器人,这个程序的可改进点有很多,比如可以让用户和ai的对话隔开一点,并且图形化UI界面再好看点儿,加点机器人切换的功能(切换不同厂家的api)
实例代码如下:
import sysfrom PyQt6.QtWidgets import QApplication, QMainWindow, QWidget, QVBoxLayout, QTextEdit, QPushButton, QHBoxLayout, QLabel, QFrame, QProgressBarfrom PyQt6.QtCore import Qt, QThread, pyqtSignal, QSize, QTimerfrom PyQt6.QtGui import QClipboard, QMoviefrom openai import OpenAIclass ChatWorker(QThread):response_received = pyqtSignal(str)reasoning_received = pyqtSignal(str)error_occurred = pyqtSignal(str)def __init__(self, api_key, base_url, messages):super().__init__()self.api_key = api_keyself.base_url = base_urlself.messages = messagesdef run(self):try:client = OpenAI(api_key=self.api_key,base_url=self.base_url)chat_completion = client.chat.completions.create(model="/maas/deepseek-ai/DeepSeek-V3",messages=self.messages,stream=True)for chunk in chat_completion:if hasattr(chunk.choices[0].delta, 'reasoning_content'):self.reasoning_received.emit(chunk.choices[0].delta.reasoning_content)if hasattr(chunk.choices[0].delta, 'content'):if chunk.choices[0].delta.content:self.response_received.emit(chunk.choices[0].delta.content)except Exception as e:self.error_occurred.emit(str(e))class ChatWindow(QMainWindow):def __init__(self):super().__init__()self.is_sending = Falseself.initUI()def initUI(self):self.setWindowTitle('AI对话界面')self.setGeometry(100, 100, 800, 600)# 设置主窗口样式self.setStyleSheet("""QMainWindow {background-color: #2b2b2b;}""")# 创建主窗口部件和布局central_widget = QWidget()self.setCentralWidget(central_widget)main_layout = QVBoxLayout(central_widget)main_layout.setSpacing(15)main_layout.setContentsMargins(20, 20, 20, 20)# 创建滚动区域用于显示对话历史self.chat_history = QTextEdit()self.chat_history.setReadOnly(True)self.chat_history.setStyleSheet("""QTextEdit {background-color: #363636;border: 1px solid #404040;border-radius: 10px;padding: 15px;color: #ffffff;}""")main_layout.addWidget(self.chat_history, stretch=2)# 思维链显示区域self.reasoning_display = QTextEdit()self.reasoning_display.setReadOnly(True)self.reasoning_display.setStyleSheet("""QTextEdit {background-color: #323232;border: 1px solid #404040;border-radius: 10px;padding: 15px;color: #b4b4b4;font-size: 13px;}""")main_layout.addWidget(self.reasoning_display, stretch=1)# 输入区域input_layout = QHBoxLayout()input_layout.setSpacing(10)self.input_field = QTextEdit()self.input_field.setMaximumHeight(100)self.input_field.setStyleSheet("""QTextEdit {background-color: #363636;border: 1px solid #404040;border-radius: 8px;padding: 8px;color: #ffffff;}""")input_layout.addWidget(self.input_field)# 发送按钮和状态指示器布局send_status_layout = QHBoxLayout()send_status_layout.setSpacing(5)# 发送按钮self.send_button = QPushButton('发送')self.send_button.setStyleSheet("""QPushButton {background-color: #4a9eff;border: none;border-radius: 8px;padding: 8px 20px;color: white;font-weight: bold;}QPushButton:hover {background-color: #3b8be6;}QPushButton:pressed {background-color: #3178cc;}QPushButton:disabled {background-color: #666666;}""")self.send_button.clicked.connect(self.send_message)send_status_layout.addWidget(self.send_button)# 加载动画self.loading_label = QLabel()self.loading_movie = QMovie("loading.gif")self.loading_movie.setScaledSize(QSize(20, 20))self.loading_label.setMovie(self.loading_movie)self.loading_label.hide()send_status_layout.addWidget(self.loading_label)input_layout.addLayout(send_status_layout)main_layout.addLayout(input_layout)# OpenAI API配置self.api_key = "sk-3bjomhlbnrnx2utxzi7yw26i62cvnlx6bnecxv3gchq75o2y"self.base_url = "https://maas-api.lanyun.net/v1"def send_message(self):if self.is_sending:returnuser_message = self.input_field.toPlainText().strip()if not user_message:return# 设置发送状态self.is_sending = Trueself.send_button.setEnabled(False)self.loading_label.show()self.loading_movie.start()# 清空输入框和思维链显示self.input_field.clear()self.reasoning_display.clear()# 显示用户消息message_html = self.create_message_bubble(user_message, is_user=True)cursor = self.chat_history.textCursor()cursor.movePosition(cursor.MoveOperation.End)cursor.insertHtml(message_html)# 准备消息messages = [{"role": "user","content": user_message}]# 创建并启动工作线程self.worker = ChatWorker(self.api_key, self.base_url, messages)self.worker.response_received.connect(self.handle_response)self.worker.reasoning_received.connect(self.handle_reasoning)self.worker.error_occurred.connect(self.handle_error)self.worker.start()def create_message_bubble(self, text, is_user=True):# 创建消息容器的HTMLbackground_color = '#404040' if is_user else '#1a5fb4'alignment = 'right' if is_user else 'left'# 构建消息HTMLhtml = f'''<div style="text-align: {alignment}; margin: 25px 0;"><div style="position: relative;display: inline-block;max-width: 80%;background-color: {background_color};border-radius: 15px;padding: 15px;color: #ffffff;font-size: 14px;word-wrap: break-word;text-align: left;box-shadow: 0 2px 5px rgba(0,0,0,0.2);">{text}</div>'''# 为AI消息添加复制按钮if not is_user:html += f'''<div style="text-align: right; margin-top: 10px;"><button onclick="document.execCommand('copy')" style="background-color: #2b2b2b;border: 1px solid #404040;border-radius: 6px;color: #b4b4b4;padding: 6px 12px;cursor: pointer;font-size: 12px;transition: all 0.2s ease;">复制</button></div>'''html += '</div>'return htmldef handle_response(self, response):# 如果是第一次收到响应,初始化累积变量和计时器if not hasattr(self, 'accumulated_response'):self.accumulated_response = ''self.response_timer = QTimer()self.response_timer.setSingleShot(True)self.response_timer.timeout.connect(self.display_accumulated_response)# 累积响应内容self.accumulated_response += response# 重置计时器(每收到新内容就重置等待时间)self.response_timer.start(1000) # 1秒后如果没有新内容,则显示累积的内容def display_accumulated_response(self):if not self.accumulated_response.strip():return# 创建并插入AI回复气泡message_html = self.create_message_bubble(self.accumulated_response, is_user=False)cursor = self.chat_history.textCursor()cursor.movePosition(cursor.MoveOperation.End)cursor.insertHtml(message_html)# 滚动到底部self.chat_history.verticalScrollBar().setValue(self.chat_history.verticalScrollBar().maximum())# 重置累积变量和发送状态self.accumulated_response = ''self.is_sending = Falseself.send_button.setEnabled(True)self.loading_label.hide()self.loading_movie.stop()def handle_reasoning(self, reasoning):self.reasoning_display.insertPlainText(reasoning)def handle_error(self, error_message):error_html = f'<div style="color: #ff6b6b; padding: 10px; background-color: #2c2c2c; border-radius: 5px; margin: 5px;">错误: {error_message}</div>'self.chat_history.append(error_html)# 重置发送状态self.is_sending = Falseself.send_button.setEnabled(True)self.loading_label.hide()self.loading_movie.stop()def main():app = QApplication(sys.argv)window = ChatWindow()window.show()sys.exit(app.exec())if __name__ == '__main__':main()
总结
针对蓝耘的api调用操作,确实很方便,因为我们只需要改变两个变量就可以实现本地的调用操作,相较于之前使用其他平台的api,没有那么复杂的流程和文档,一眼就能看明白怎么回事,这个相应的速度也是相当的快的
用户无需深入钻研复杂的底层算法和模型细节,仅需按照 API 文档说明,进行简单的接口调用操作,就能利用平台强大的 AI 技术。
并且蓝耘平台的 API 支持多平台使用,无论是常见的 Windows、Linux、macOS 操作系统,还是移动端的 iOS 和 Android 系统,开发者都能顺利集成平台的 AI 服务
是否有我说的这么厉害呢?感兴趣的同学赶紧来试试吧
https://cloud.lanyun.net//#/registerPage?promoterCode=0131