- 🍨 本文为🔗365天深度学习训练营 中的学习记录博客
- 🍖 原作者:K同学啊
具体实现
(一)环境
语言环境:Python 3.10
编 译 器: PyCharm
框 架:
(二)具体步骤
from absl.logging import warning
import tensorflow as tf
from tensorflow.python.data import AUTOTUNE  from utils import GPU_ON
import matplotlib.pyplot as plt  # 第一步:准备环境
GPU_ON()  # ##########output#############################################
# Tensorflow Version: 2.10.0# [PhysicalDevice(name='/physical_device:GPU:0', device_type='GPU')]
# [PhysicalDevice(name='/physical_device:GPU:0', device_type='GPU')]
# ##########end output##########################################
# 支持中文
plt.rcParams['font.sans-serif'] = ['SimHei']  # 用来显示中文标签
plt.rcParams['axes.unicode_minus'] = False     # 用来正常显示负号  import os, PIL, pathlib  # 隐藏警告
import warnings
warnings.filterwarnings('ignore')  # 第二步:导入数据
data_dir = "./datasets/365-7-data"
data_dir = pathlib.Path(data_dir)
image_count = len(list(data_dir.glob('*/*')))
print("图片总数为:", image_count)
# ########output##############################################
# 图片总数为: 3400# ########end output##########################################  # 第三步:数据预处理
batch_size = 8
img_height, img_width = 224, 224
train_ds = tf.keras.preprocessing.image_dataset_from_directory(  data_dir,  validation_split=0.2,  subset="training",  seed=123,  image_size=(img_height, img_width),  batch_size=batch_size,
)
# ############output##########################################
# Found 3400 files belonging to 2 classes.
# Using 2720 files for training.
##############end output######################################  val_ds = tf.keras.preprocessing.image_dataset_from_directory(  data_dir,  validation_split=0.2,  subset="validation",  seed=123,  image_size=(img_height, img_width),  batch_size=batch_size,
)
# ############output##########################################
# Found 3400 files belonging to 2 classes.
# Using 680 files for validation.
# ###############end output##################################
# 获取名称标签
class_names = train_ds.class_names
print(class_names)
# #################output######################################
# ['cat', 'dog']
###################end output###################################
# 检查一下数据
for image_batch, labels_batch in train_ds:  print(image_batch.shape)  print(labels_batch.shape)  break
# #############output########################################
# (8, 224, 224, 3)  ---每一批8张图片,长224,宽224,RGB彩色通道(3)
# (8,) --- 标签就是一批8张图片的标签
# #############end output###################################
# 预处理
AUTOTUNE = tf.data.AUTOTUNE  def preprocess_image(image, label):  return (image / 255.0, label)  # 归一化处理
train_ds = train_ds.map(preprocess_image, num_parallel_calls=AUTOTUNE)
val_ds = val_ds.map(preprocess_image, num_parallel_calls=AUTOTUNE)  # cache() ----将数据集缓存到内存当中 加速运行
# shuffle() ----打乱数据
# prefetch() ----预取数据,加速运行
train_ds = train_ds.cache().shuffle(1000).prefetch(buffer_size=AUTOTUNE)
val_ds = val_ds.cache().prefetch(buffer_size=AUTOTUNE)  # 可视化数据
plt.figure(figsize=(15, 10))    # 创建一个顶层容器,大小是15*20英寸
for images, labels in train_ds.take(1):  for i in range(8):  # 向当前图添加坐标轴, 我们想在1行显示8张图片,所以是1行8列  ax = plt.subplot(1, 8, i + 1)   print(images[i])  # imshow()--将数据显示为图像,支持的数据类型(M,N)标量数据/(M,N,3)RGB数据/(M,N,4)RGBA数据。本例中是RGB  plt.imshow(images[i])       plt.title(class_names[labels[i]])   # 显示坐标轴标签  plt.axis('off')     # 隐藏所有的轴信息  plt.show()

# 第四步:构建VGG16网络模型
from tensorflow.keras import layers, models, Input
from tensorflow.keras.models import Model
from tensorflow.keras.layers import Conv2D, MaxPooling2D, Dense, Flatten, Dropout  def VGG16(nb_classes, input_shape):  input_tensor = Input(shape=input_shape)  # 1st block  x = Conv2D(64, (3,3), activation='relu', padding='same',name='block1_conv1')(input_tensor)  x = Conv2D(64, (3,3), activation='relu', padding='same',name='block1_conv2')(x)  x = MaxPooling2D((2,2), strides=(2,2), name = 'block1_pool')(x)  # 2nd block  x = Conv2D(128, (3,3), activation='relu', padding='same',name='block2_conv1')(x)  x = Conv2D(128, (3,3), activation='relu', padding='same',name='block2_conv2')(x)  x = MaxPooling2D((2,2), strides=(2,2), name = 'block2_pool')(x)  # 3rd block  x = Conv2D(256, (3,3), activation='relu', padding='same',name='block3_conv1')(x)  x = Conv2D(256, (3,3), activation='relu', padding='same',name='block3_conv2')(x)  x = Conv2D(256, (3,3), activation='relu', padding='same',name='block3_conv3')(x)  x = MaxPooling2D((2,2), strides=(2,2), name = 'block3_pool')(x)  # 4th block  x = Conv2D(512, (3,3), activation='relu', padding='same',name='block4_conv1')(x)  x = Conv2D(512, (3,3), activation='relu', padding='same',name='block4_conv2')(x)  x = Conv2D(512, (3,3), activation='relu', padding='same',name='block4_conv3')(x)  x = MaxPooling2D((2,2), strides=(2,2), name = 'block4_pool')(x)  # 5th block  x = Conv2D(512, (3,3), activation='relu', padding='same',name='block5_conv1')(x)  x = Conv2D(512, (3,3), activation='relu', padding='same',name='block5_conv2')(x)  x = Conv2D(512, (3,3), activation='relu', padding='same',name='block5_conv3')(x)  x = MaxPooling2D((2,2), strides=(2,2), name = 'block5_pool')(x)  # full connection  x = Flatten()(x)  x = Dense(4096, activation='relu',  name='fc1')(x)  x = Dense(4096, activation='relu', name='fc2')(x)  output_tensor = Dense(nb_classes, activation='softmax', name='predictions')(x)  model = Model(input_tensor, output_tensor)  return model  model=VGG16(1000, (img_width, img_height, 3))
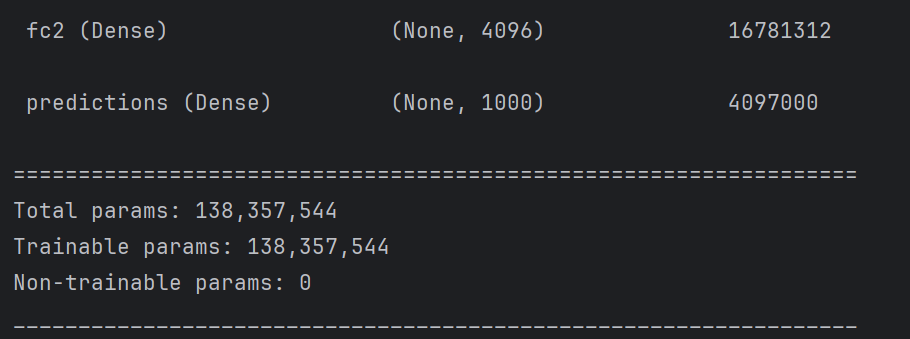
model.summary()

# 第五步:编译
model.compile(loss='sparse_categorical_crossentropy',  # 损失函数  optimizer='adam',                 # 优化函数  metrics=['accuracy'])             # 模型评估的指标,一般是accuracy
# 第六步:训练模型
from tqdm import tqdm
import tensorflow.keras.backend as K  epochs = 10
lr = 1e-4  # 记录训练数据,方便后面分析
history_train_loss = []
history_val_loss = []
history_train_accuracy = []
history_val_accuracy = []  for epoch in range(epochs):  train_total = len(train_ds)  val_total = len(val_ds)  """  total: 预期的迭代数目  ncols: 控制进度条宽度  mininterval: 进度条更新最小间隔,以秒为单位(默认为0.1)  """    with tqdm(total=train_total,  desc=f'Epoch {epoch + 1}/{epochs}',  mininterval=1,  ncols=100) as pbar:  lr = lr * 0.92  K.set_value(model.optimizer.lr, lr)  for image, label in train_ds:  history = model.train_on_batch(image, label)  train_loss = history[0]  train_accuracy = history[1]  pbar.set_postfix({  "loss": "%.4f" % train_loss,  "accuracy": "%.4f" % train_accuracy,  "lr": K.get_value(model.optimizer.lr),  })  pbar.update(1)  history_train_loss.append(train_loss)  history_train_accuracy.append(train_accuracy)  print('开始验证!')  with tqdm(total=val_total,  desc=f'Epoch {epoch + 1}/{epochs}',  mininterval=0.3,  ncols=100) as pbar:  for image, label in val_ds:  history = model.test_on_batch(image, label)  val_loss = history[0]  val_accuracy = history[1]  pbar.set_postfix({  "loss": "%.4f" % val_loss,  "accuracy": "%.4f" % val_accuracy  })  pbar.update(1)  history_val_loss.append(val_loss)  history_val_accuracy.append(val_accuracy)  print('结束验证!')  print('验证loss为:%.4f'%val_loss)  print('验证准确率为:%.4f'%val_accuracy)

# 第七步:评估模型  [# 采用加载的模型(new_model)来看预测结果
plt.figure(figsize=(18, 3))  # 图形的宽为18高为5
plt.suptitle("预测结果展示")  for images, labels in val_ds.take(1):  for i in range(8):  ax = plt.subplot(1, 8, i + 1)  # 显示图片  plt.imshow(images[i].numpy())  # 需要给图片增加一个维度  img_array = tf.expand_dims(images[i], 0)  # 使用模型预测图片中的人物  predictions = model.predict(img_array)  plt.title(class_names[np.argmax(predictions)])  plt.axis("off")
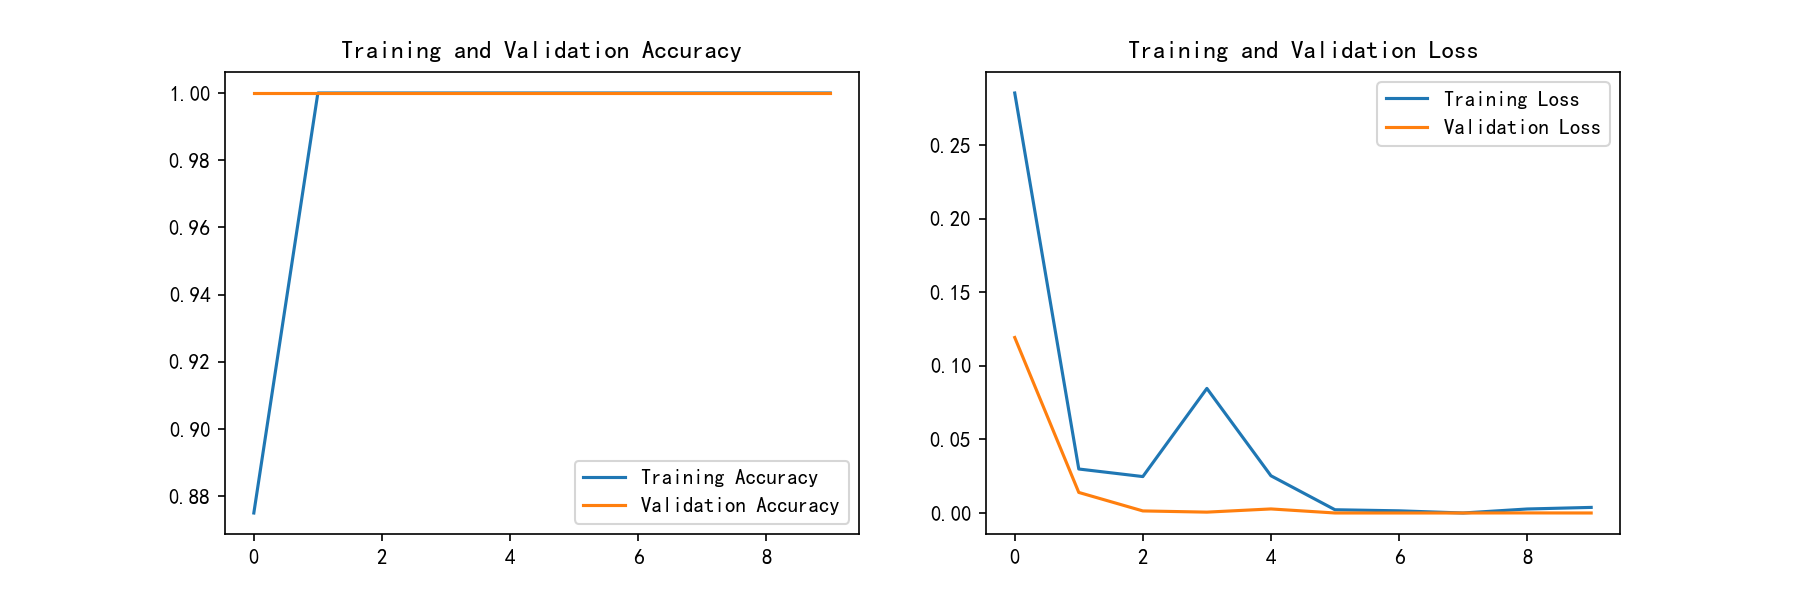
plt.show()](<epochs_range = range(epochs)plt.figure(figsize=(12, 4))
plt.subplot(1, 2, 1)plt.plot(epochs_range, history_train_accuracy, label='Training Accuracy')
plt.plot(epochs_range, history_val_accuracy, label='Validation Accuracy')
plt.legend(loc='lower right')
plt.title('Training and Validation Accuracy')plt.subplot(1, 2, 2)
plt.plot(epochs_range, history_train_loss, label='Training Loss')
plt.plot(epochs_range, history_val_loss, label='Validation Loss')
plt.legend(loc='upper right')
plt.title('Training and Validation Loss')
plt.show()>)

# 第八步:预测
import numpy as np
# 采用加载的模型(new_model)来看预测结果
plt.figure(figsize=(18, 3))  # 图形的宽为18高为5
plt.suptitle("预测结果展示")  for images, labels in val_ds.take(1):  for i in range(8):  ax = plt.subplot(1, 8, i + 1)  # 显示图片  plt.imshow(images[i].numpy())  # 需要给图片增加一个维度  img_array = tf.expand_dims(images[i], 0)  # 使用模型预测图片中的人物  predictions = model.predict(img_array)  plt.title(class_names[np.argmax(predictions)])  plt.axis("off")
plt.show()


