基础环境搭建
官网:https://www.electronjs.org/zh/
这一套笔记根据这套视频而写的
创建项目
方式一:
官网点击GitHub往下拉找到快速入门就能看到下面这几个命令了
git clone https://github.com/electron/electron-quick-start  //克隆项目
cd electron-quick-start  //切换到项目目录
npm install //这里可能会有报错问题,本人查了gpt说是什么连接远程失败,这里本人建议使用cnpm淘宝镜像,没有的可以百度安装一下,yarn也不行(亲测yarn安装还是报错)
npm start //启动项目
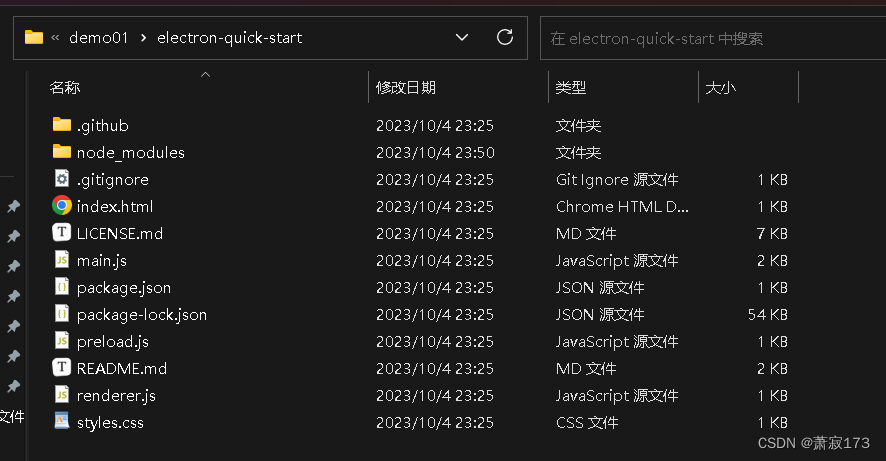
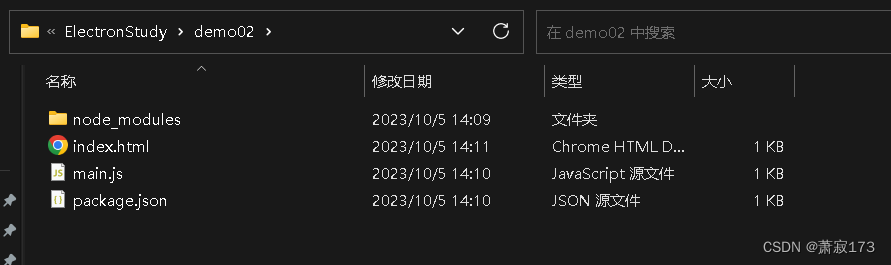
目录结构
方式二:
先安装
cnpm install --save-dev electron //这里也是建议使用cnpm淘宝镜像
直接使用npm或者yarn都可能会报错,官方也有解释,这里本人使用cnpm就没问题
然后在package.json里面创建如下内容
{"name": "my-electron-app","version": "1.0.0","description": "Hello World!","main": "main.js", //这里是主入口"author": "萧寂","license": "MIT","scripts": {"start": "electron ." //运行的命令},"devDependencies": {"electron": "^26.0.0"}
}
如果安装了nodemon,可以在script节点进行如下配置,可以监听js的代码并实时变化
在html代码改变后不会立即监听,需要切换到应用里面按下CTRL+R即可刷新
"scripts": {"start": "nodemon --watch main.js --exec npm run build","build": "electron ."
},
在同级创建main.js,然后在main.js中插入以下内容
const { app, BrowserWindow } = require("electron");
const createWindow = () => {// 创建窗口let win = new BrowserWindow({width: 800,height: 600,});//当前窗口显示的页面win.loadFile("index.html");
};// app启动之后创建窗口
app.on("ready", () => {console.log("窗口加载");createWindow();
});// 生命周期
// 通过on监听事件// 监听关闭的
app.on("close", () => {console.log("当前窗口关闭");
});app.on("window-all-closed", () => {console.log("所有窗口关闭");//退出应用app.quit();
});
CTRL+SHIFT+I可以打开调试面板
同级下创建index.html文件
<!DOCTYPE html>
<html><head><meta charset="UTF-8" /><!-- https://developer.mozilla.org/zh-CN/docs/Web/HTTP/CSP --><metahttp-equiv="Content-Security-Policy"content="default-src 'self'; script-src 'self'"/><title>萧寂</title></head><body><h1>你好!</h1>我们正在使用 Node.js <span id="node-version"></span>, Chromium<span id="chrome-version"></span>, 和 Electron<span id="electron-version"></span>.</body>
</html>
然后直接运行
npm start
目录结构
因为第二种方式目录结构简单,所以在这里演示的所有代码都以第二种创建方式基础上写的
electron生命周期事件
ready:app初始化完成  //重要
dom-ready:一个窗口中的文本加载完成  //重要
did-finsh-load:导航完成时触发   //重要
window-all-closed:所有窗口都被关闭时触发  //重要
before-quit:在关闭窗口之前触发
will-quit:在窗口关闭并且应用退出时触发
quit:当所有窗口被关闭时触发
close:当窗口关闭时触发,此时应删除窗口引用
main.js代码
const { app, BrowserWindow } = require("electron")
const createWindow = () => {// 创建窗口let win = new BrowserWindow({width: 800,height: 600,})//当前窗口显示的页面win.loadFile("index.html")// 这个webContents对象可以控制dom元素加载事件win.webContents.on('did-finish-load', () => {console.log('3333->did-finish-load')})win.webContents.on('dom-ready', () => {console.log('2222->dom-ready')})// 窗口关闭win.on('close', () => {console.log('8888->close')// 从性能考虑,应该释放窗体这个变量,删除窗体引用win = null})
}// 生命周期
// 通过on监听事件
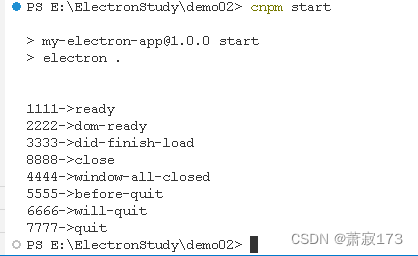
app.on('ready', () => {console.log("1111->ready")createWindow()
})app.on("window-all-closed", () => {// 如果监听了window-all-closed这个事件,需要在事件里面主动退出应用,没有监听事件的话默认会直接退出应用// 但如果监听了此事件,但没有退出操作的话,后续的567生命周期也不会执行console.log("4444->window-all-closed")//退出应用app.quit()
})app.on("before-quit", () => {console.log("5555->before-quit")
})app.on("will-quit", () => {console.log("6666->will-quit")
})app.on("quit", () => {console.log("7777->quit")
})
从打开窗体到关闭窗体打印结果如下
创建窗体时所携带的一些属性
也是main.js代码
const { app, BrowserWindow } = require("electron")
const createWindow = () => {// 创建窗口let win = new BrowserWindow({x: 100, y: 50, //窗体坐标show: false, //不展示窗体width: 800,height: 600, //长宽maxHeight: 600,maxWidth: 1000, //最大宽高minHeight: 200,minWidth: 300, //最小宽高resizable: false, //不允许缩放title: "萧寂", //标题(加上这个属性,在页面中就不要有title标签了)icon: "./及格.png", //设置icon图标// frame: false, //只保留主体部分,不保留其他的选项卡窗口了,隐藏菜单栏// transparent: true, //将窗体完全透明化autoHideMenuBar: true, //只保留标题,不保留其他的选项卡部分})// show需要设置false,意思就是默认不显示窗体,然后执行下面这个事件,ready-to-show:等待完毕准备加载执行,适用于页面显示,监听到了再执行show()win.on('ready-to-show', () => {win.show()})//当前窗口显示的页面win.loadFile("index.html")// 窗口关闭win.on('close', () => {console.log('close')win = null})
}// 窗口加载和关闭
app.on('ready', createWindow)
app.on("window-all-closed", () => {console.log("window-all-closed")app.quit()
})
窗口标题及环境(创建窗口)
这里要说明一下,低版本直接可以使用一个remote,主进程稍微配置一下就能创建窗口了,高版本就不行了,高版本需要安装一个@electron/remote模块,通过对这个模块稍微配置一下也能创建窗口了,本人之前版本是
"electron": "^26.0.0","@electron/remote": "^2.0.11",[具体配置可以可以看看这个小哥的博客](https://blog.csdn.net/qq_39077394/article/details/125667918?ops_request_misc=%7B%22request%5Fid%22%3A%22169651971016800213043799%22%2C%22scm%22%3A%2220140713.130102334.pc%5Fall.%22%7D&request_id=169651971016800213043799&biz_id=0&utm_medium=distribute.pc_search_result.none-task-blog-2allfirst_rank_ecpm_v1~rank_v31_ecpm-1-125667918-null-null.142v94insert_down28v1&utm_term=enableRemoteModule%3A true不能使用remote&spm=1018.2226.3001.4187),我下面的代码和这两个不一样我是在主进程创建窗口,渲染进程向主进程发请求才能创建窗体(下面代码示例就是这个方法),因为方式和另两种不一样,因此记录一下
ctrl+r 可以刷新当前窗口的index.html样式,ctrl+shift+i可以打开调试窗口
这里强调一下main.js为主进程,创建的js里面重新创建的窗口为渲染进程
主进程main.js代码如下
const { app, BrowserWindow, ipcMain } = require("electron") // ipcMain用于渲染进程创建窗体使用
const createWindow = () => {// 创建窗口let win = new BrowserWindow({x: 100,y: 50, //窗体坐标 webPreferences: {nodeIntegration: true,contextIsolation: false,  //加入这两行代码就可以正常使用require了,不会报错了}})//当前窗口显示的页面win.loadFile("index.html")// 窗口关闭win.on('close', () => {console.log('close')win = null})
}
// 窗口加载和关闭
app.on('ready', createWindow)
app.on("window-all-closed", () => {console.log("window-all-closed")app.quit()
})// 下面代码就是创建渲染进程窗体代码
// 在主进程中监听渲染进程的请求
// open-window后面的回调函数,参数一默认是事件对象,参数二为渲染进程传递来的数据
// pageFileName为ipcRenderer.send()的第二个参数,ipcRenderer.send()由渲染进程发起,参数一为事件名,参数二为页面配置(大小,位置等等)
ipcMain.on('open-window', (event, winconfig) => {console.log('winconfig', winconfig)// 创建新窗口并设置相应的配置(配置由渲染进程提供)let newWindow = new BrowserWindow(winconfig)// 这里设置的是winconfig.pageFileName,所以渲染进程的请求的配置中必须pageFileName代表页面newWindow.loadFile(winconfig.pageFileName)// 监听创建的窗体关闭事件newWindow.on('close', () => {console.log('close')newWindow = null})
})
主进程页面index.html代码
<!DOCTYPE html>
<html><head><meta charset="UTF-8" /><!-- https://developer.mozilla.org/zh-CN/docs/Web/HTTP/CSP --><meta http-equiv="Content-Security-Policy" content="default-src 'self'; script-src 'self'" /><title>萧寂</title>
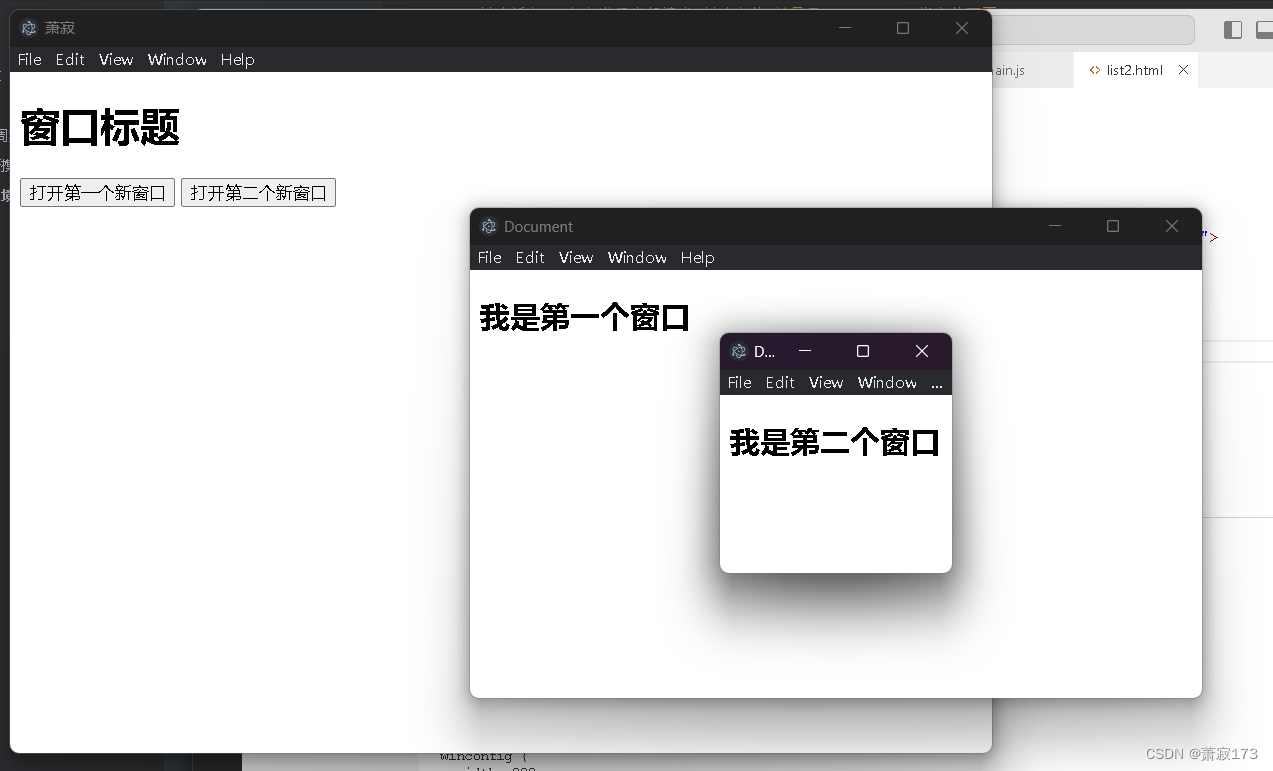
</head><body><h1>窗口标题</h1><button id="btn">打开第一个新窗口</button><button id="btn2">打开第二个新窗口</button><!-- 这里必须要使用外联,不能直接在下面写,不然会报错,大概意思就是不能使用内联脚本 --><script src="./index.js"></script>
</body>
</html>
渲染进程index.js代码
// 这里强调一下main.js为主进程,窗口里面页面点击创建的js里面重新创建的窗口为渲染进程
// require直接使用会报错,因为electron是不被允许直接require的,不给这个权限,需要我们自行放开
// 权限需要在窗口的配置定义webPreferences对象,值为 {nodeIntegration: true,contextIsolation: false},这样就可以正常使用require了// 创建窗口这里使用的是electron自带的ipcRenderer属性,它是向主进程发送创建窗体请求,参数一为事件名,参数二为窗体配置
const { ipcRenderer } = require("electron")
const path = require("path")
window.addEventListener("DOMContentLoaded", () => {// 点击按钮打开新窗口// 获取btnconst btn = document.getElementById("btn")// 按钮点击打开新窗口btn.addEventListener("click", () => {// 创建新窗口(向主进程发起请求,创建窗体,并显示pageFileName指定的页面)ipcRenderer.send('open-window', {width: 600,height: 400,webPreferences: {nodeIntegration: true,contextIsolation: false},pageFileName: path.join(__dirname, "list.html") // 确保传递了正确的页面文件名,list.html需要显示的页面})})// 打开第二个窗口// 获取btnconst btn2 = document.getElementById("btn2")// 按钮点击打开新窗口btn2.addEventListener("click", () => {// 创建新窗口(向主进程发起请求,创建窗体,并显示pageFileName指定的页面)ipcRenderer.send('open-window', {width: 200,height: 200,webPreferences: {nodeIntegration: true,contextIsolation: false},pageFileName: path.join(__dirname, "list2.html") // 确保传递了正确的页面文件名,list2.html需要显示的页面})})
})
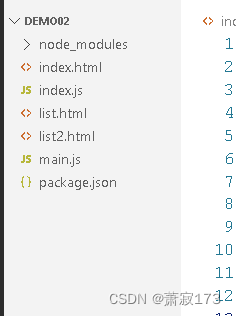
项目结构
效果图
自定义窗口的实现(以及阻止窗口关闭)
项目结构
安装
npm install --save @electron/remote
main.js代码如下
const { app, BrowserWindow } = require("electron")
const createWindow = () => {// 创建窗口let win = new BrowserWindow({x: 100,y: 50, //窗体坐标 frame: false, // 只保留主体部分,然后后面的样式全部都是由html去模拟webPreferences: {nodeIntegration: true,contextIsolation: false,  //加入这两行代码就可以正常使用require了,不会报错了enableRemoteModule: true}})require('@electron/remote/main').initialize()require("@electron/remote/main").enable(win.webContents)//当前窗口显示的页面win.loadFile("index.html")// 窗口关闭win.on('close', () => {console.log('close')win = null})
}// 窗口加载和关闭
app.on('ready', createWindow)
app.on("window-all-closed", () => {console.log("window-all-closed")app.quit()
})
index.html
<!DOCTYPE html>
<html><head><meta charset="UTF-8" /><!-- https://developer.mozilla.org/zh-CN/docs/Web/HTTP/CSP --><meta http-equiv="Content-Security-Policy" content="default-src 'self'; script-src 'self'" /><title>萧寂</title><link rel="stylesheet" href="./index.css">
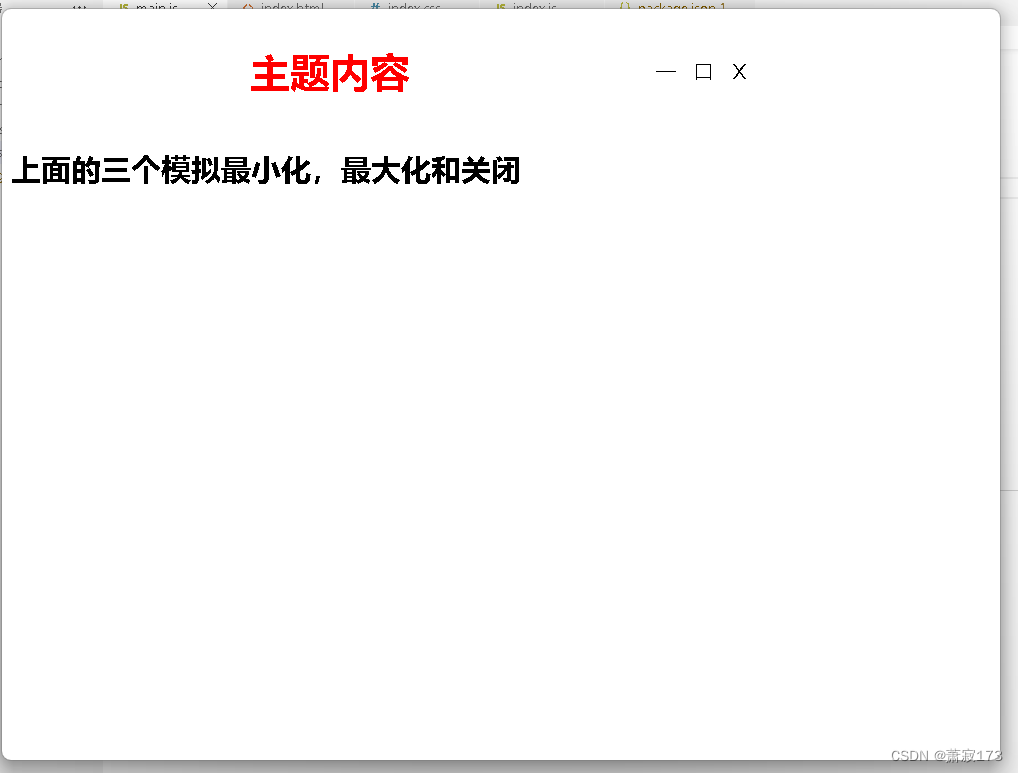
</head><body><main><h1 class="box">主题内容</h1><div><span>一</span><span>口</span><span>X</span></div></main><h2>上面的三个模拟最小化,最大化和关闭</h2><div class="isShow"><h3>是否关闭当前应用</h3><p>系统可能不会保存您的所有更改</p><p><span class="s1">是</span><span class="s1">否</span></p></div><script src="./index.js"></script>
</body></html>
index.css
main {display: flex;justify-content: space-evenly;align-items: center;
}
.box {color: red;
}
span {padding: 10px 5px;cursor: pointer;
}
/* 将提示语隐藏 */
.isShow {display: none;
}
.s1 {cursor: pointer;
}
index.js
const remote = require("@electron/remote")window.addEventListener('DOMContentLoaded', () => {
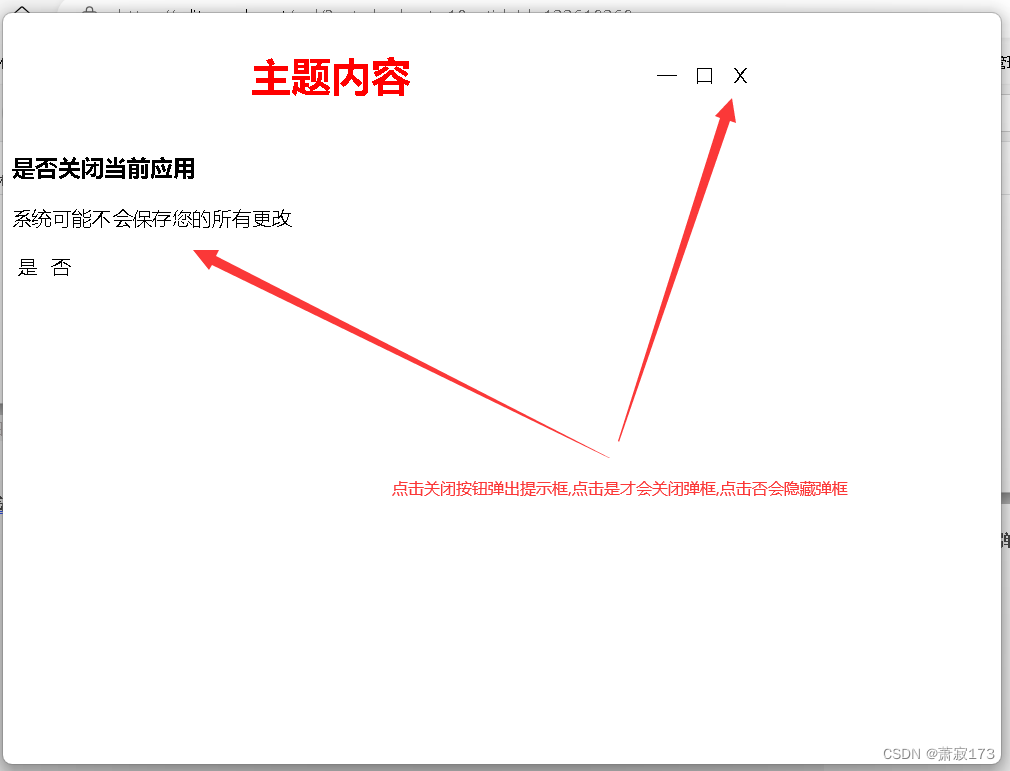
//利用remote获取当前窗口对象let mainwin = remote.getCurrentWindow()// 这里代码是当窗口关闭,去进行一下阻止,并弹出提示框,用户确定关闭再进行关闭// 监听close事件,close事件触发会执行这个事件onbeforeunloadwindow.onbeforeunload = function () {// 获取到弹框dom元素,并设置样式document.querySelector('.isShow').style.display = 'block'// 将主题内容隐藏document.querySelector('h2').style.display = 'none'// 获取弹窗的按钮(确认和取消)let btn = document.querySelectorAll('.s1')// 点击确认关闭按钮btn[0].addEventListener('click', () => {// 这里不再使用close事件,不然会一直触发window.onbeforeunload事件,进入死循环了mainwin.destroy() //窗口销毁})// 点击取消按钮btn[1].addEventListener('click', () => {// 将窗口隐藏就好了// 获取到弹框dom元素,并设置样式document.querySelector('.isShow').style.display = 'none'// 将主题内容显示document.querySelector('h2').style.display = 'block'})return false}const spans = document.querySelectorAll('span')// 最小化spans[0].addEventListener("click", () => {mainwin.minimize() //窗口最小化})// 放大spans[1].addEventListener("click", () => {// 最大化操作console.log('mainwin.isMaximized()', mainwin.isMaximized()) //false,返回布尔值,代表当前界面是否是最大化了if (!mainwin.isMaximized()) {mainwin.maximize() //如果没有最大化的话,给个最大化} else {mainwin.restore() //如果是最大化了,给它恢复到初始状态}})// 关闭窗口spans[2].addEventListener("click", () => {mainwin.close() //关闭窗口})
})效果图
当点击关闭按钮,会弹出提示框,点击是就关闭,点击否会将提示框进行隐藏
父子及模态窗口
模态窗口定义:定义完以后不能对主窗口或者别的窗口进行操作,除非模态窗口
其余代码和上面一样,只修改了index.js代码,代码如下
const remote = require('@electron/remote')window.addEventListener('DOMContentLoaded', () => {let btn = document.querySelector('#btn')btn.addEventListener('click', () => {let subWin = new remote.BrowserWindow({width: 200,height: 200,parent: remote.getCurrentWindow(), //这个属性指向父级,实现了父子关联modal: true,  //定义模态窗口(默认为false,定义完以后不能对主窗口或者别的窗口进行操作,除非关闭模态窗口)})subWin.loadFile('sub.html')subWin.on('close', () => {subWin = null})})
})
自定义菜单
main.js代码如下
const { app, BrowserWindow, Menu } = require("electron") //Menu是菜单模块console.log(process.platform)const createWindow = () => {// 创建窗口let win = new BrowserWindow({x: 100,y: 50,title: '自定义菜单',webPreferences: {nodeIntegration: true,contextIsolation: false,enableRemoteModule: true,}})// 1.这里定义菜单(定义自己需要的菜单项)let menuTemp = [{label: '文件',submenu: [ //定义二级菜单{label: '打开文件',click () {// 这里就可以使用每个选项的点击事件console.log('当前需要的就是打开某一具体的文件')}},{type: 'separator'  // 添加分割线,就这一个属性将上下分隔开},{label: '关闭文件夹'},{label: '关于',role: 'about' //弹出关于项}]},{label: '编辑'}]// 2.利用上面菜单项生成一个菜单let menu = Menu.buildFromTemplate(menuTemp)// 3.将上述的自定义菜单添加到应用里面Menu.setApplicationMenu(menu)require('@electron/remote/main').initialize()require("@electron/remote/main").enable(win.webContents)win.loadFile("index.html")win.on('close', () => {console.log('close')win = null})
}// 窗口加载和关闭
app.on('ready', createWindow)
app.on("window-all-closed", () => {console.log("window-all-closed")app.quit()
})
这里打印有点中文乱码问题,解决方法就是在终端输入chcp 65001回车,重新执行即可解决中文乱码问题
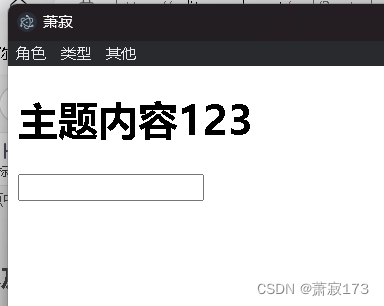
菜单角色及类型
main.js代码
const { app, BrowserWindow, Menu } = require("electron")
const createWindow = () => {// 创建窗口let win = new BrowserWindow({x: 100,y: 50, //窗体坐标 webPreferences: {nodeIntegration: true,contextIsolation: false,  //加入这两行代码就可以正常使用require了,不会报错了enableRemoteModule: true}})require('@electron/remote/main').initialize()require("@electron/remote/main").enable(win.webContents)//  1.自定义菜单项let menutap = [{label: '角色',submenu: [{ label: '复制', role: 'copy' },{ label: '剪切', role: 'cut' },{ label: '粘贴', role: 'paste' },{ label: '最小化', role: 'minimize' },]},{label: '类型',submenu: [{ label: '多选一', type: 'checkbox' },{ label: '多选二', type: 'checkbox' },{ label: '多选三', type: 'checkbox' },{ type: 'separator' },{ label: '单选1', type: 'radio' },{ label: '单选2', type: 'radio' },{ label: '单选3', type: 'radio' },{ type: 'separator' },{ label: 'windows', type: 'submenu', role: 'windowMenu' } //这里两个属性必须同时给出]},{label: '其他',submenu: [{label: '打开',icon: '',accelerator: 'ctrl + o', //定义快捷键click () {console.log('打开操作执行了')}}]}]// 2.依据上述的数据创建一个menulet menu = Menu.buildFromTemplate(menutap)// 3.将上述菜单添加至app身上Menu.setApplicationMenu(menu)//当前窗口显示的页面win.loadFile("index.html")// 窗口关闭win.on('close', () => {console.log('close')win = null})
}// 窗口加载和关闭
app.on('ready', createWindow)
app.on("window-all-closed", () => {console.log("window-all-closed")app.quit()
})
动态创建菜单
index.html代码如下
<!DOCTYPE html>
<html><head><meta charset="UTF-8" /><!-- https://developer.mozilla.org/zh-CN/docs/Web/HTTP/CSP --><meta http-equiv="Content-Security-Policy" content="default-src 'self'; script-src 'self'" /><title>萧寂</title>
</head><body><h1>动态创建菜单</h1><button>创建自定义菜单</button><hr><input type="text" placeholder="输入自定义菜单项内容" name="" id=""><button>添加菜单项</button><script src="./index.js"></script>
</body></html>
index.js代码如下
const remote = require('@electron/remote')
// 找到菜单和菜单项
const Menu = remote.Menu
const MenuItem = remote.MenuItem
window.addEventListener('DOMContentLoaded', () => {// 获取按钮let btn = document.querySelectorAll('button')// 获取输入框let input = document.querySelector('input')// 自定义全局变量存放菜单项let menuItem = new Menu()// 点击生成自定义菜单btn[0].addEventListener('click', () => {// 创建菜单let menuFile = new MenuItem({ label: '文件', type: 'normal' })let menuEdit = new MenuItem({ label: '编辑', type: 'normal' })let customMenu = new MenuItem({ label: '自定义菜单项', submenu: menuItem })// 将创建好的菜单添加到menulet menu = new Menu()menu.append(menuFile)menu.append(menuEdit)menu.append(customMenu)// 将ment放置于app中显示Menu.setApplicationMenu(menu)})// 点击动态添加菜单项btn[1].addEventListener('click', () => {// 获取当前input输入框当中输入的内容let con = input.value.trim()if (con) {menuItem.append(new MenuItem({ label: con, type: 'normal' }))input.value = ''}})
})
效果图
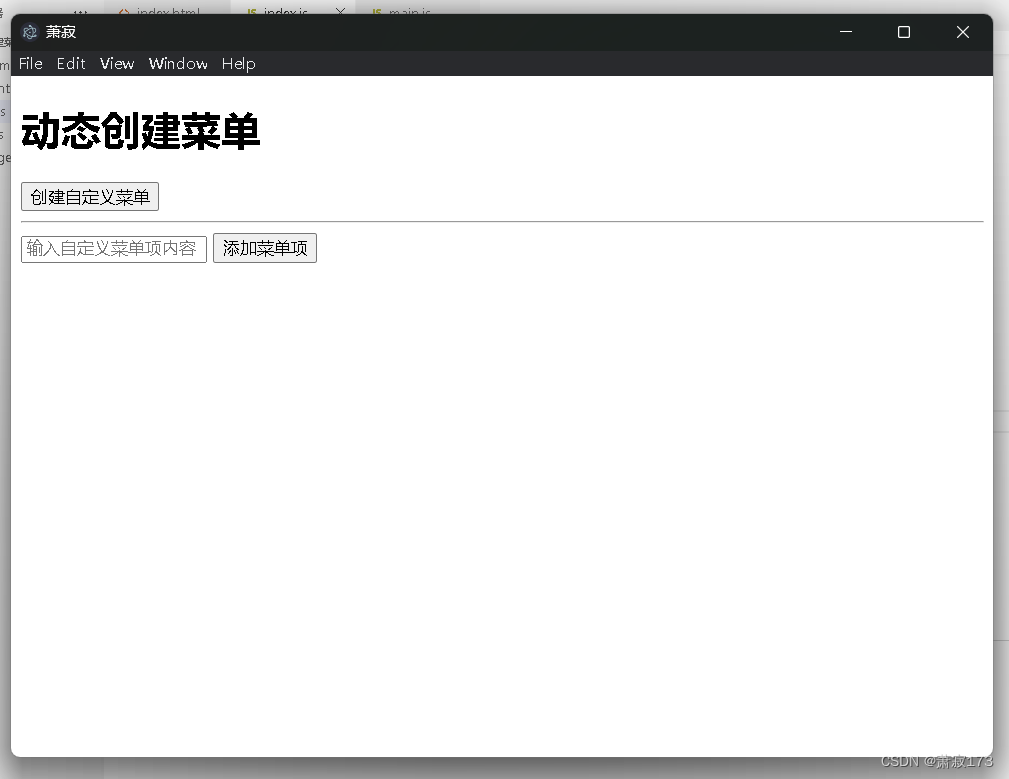
点击自定义创建菜单会替换原来的菜单项,在输入框输入菜单名,点击添加菜单项会在菜单栏的自定义菜单里面追加自己添加的菜单项
自定义右键菜单
所有代码都是在index.js里面写的,index.html无代码只引用了index.js
index.js代码如下
const remote = require('@electron/remote')
const Menu = remote.Menu// 01 创建一个自定义菜单的内容
let contextTemp = [{ label: 'RunCode' },{ label: '转到定义' },{ type: 'separator' },{label: '其他功能',click () {console.log("其他功能选项被点击了")  //这个打印不会在主进程显示,而是在桌面版使用ctrl+shifl+i去控制台看}}
]// 02 依据上述内容来创建menu
let menu = Menu.buildFromTemplate(contextTemp)window.addEventListener('DOMContentLoaded', () => {// 03 在鼠标右击行为发生后显示出来window.addEventListener('contextmenu', (e) => {e.preventDefault() //阻止有些元素点击的默认行为menu.popup({ window: remote.getCurrentWindow() })  //将当前窗口对象作为popup参数,代表在当前窗口弹出}, false)
})
主进程和渲染进程进行通信
同步和异步进行通信
index.html
<!DOCTYPE html>
<html><head><meta charset="UTF-8" /><!-- https://developer.mozilla.org/zh-CN/docs/Web/HTTP/CSP --><meta http-equiv="Content-Security-Policy" content="default-src 'self'; script-src 'self'" /><title>萧寂</title>
</head><body><h1>渲染进程与主进程进行通信</h1><hr><button>渲染主异步操作</button><hr><button>渲染主同步操作</button><script src="./index.js"></script>
</body></html>
index.js
const { ipcRenderer } = require('electron')window.onload = () => {// 获取元素let abtn = document.querySelectorAll('button')// 01 采用异步的API在渲染进程中给主进程发送消息abtn[0].addEventListener('click', () => {ipcRenderer.send('msg1', 'dataMag')})// 当前接收主进程的消息ipcRenderer.on('msgRe', (ev, data) => {console.log('data', data) //主进程回复的异步消息})// 02 采用同步的方式完成数据的通信abtn[1].addEventListener('click', () => {let val = ipcRenderer.sendSync('msg2', 'SyncMsg')console.log('val', val)  // 主进程回复的同步消息})
}
主进程main.js
const { app, BrowserWindow, ipcMain } = require("electron")
const createWindow = () => {// 创建窗口let win = new BrowserWindow({x: 100,y: 50, //窗体坐标 webPreferences: {nodeIntegration: true,contextIsolation: false,  //加入这两行代码就可以正常使用require了,不会报错了enableRemoteModule: true}})require('@electron/remote/main').initialize()require("@electron/remote/main").enable(win.webContents)//当前窗口显示的页面win.loadFile("index.html")// 窗口关闭win.on('close', () => {console.log('close')win = null})
}
// 窗口加载和关闭
app.on('ready', createWindow)
app.on("window-all-closed", () => {console.log("window-all-closed")app.quit()
})// 监听渲染进程发送的消息
ipcMain.on('msg1', (e, data) => {console.log('data', data)// 主进程给渲染进程发消息e.sender.send('msgRe', "主进程回复的异步消息")
})// 监听渲染进程发送的消息
ipcMain.on('msg2', (e, data) => {console.log('data', data)// // 主进程给渲染进程发消息e.returnValue = '主进程回复的同步消息'
})
通过主进程主动发送消息控制渲染进程作出行为
以下代码没有使用index.html,index.html只是引用了一下index.js
index.js
const { ipcRenderer } = require('electron')window.onload = () => {// 当前接收主进程的消息ipcRenderer.on('mtp', (ev, data) => {console.log('data', data) //主进程回复的异步消息})
}
main.js主进程代码
const { app, BrowserWindow, ipcMain, Menu } = require("electron")
const createWindow = () => {// 创建窗口let win = new BrowserWindow({x: 100,y: 50, //窗体坐标 webPreferences: {nodeIntegration: true,contextIsolation: false,  //加入这两行代码就可以正常使用require了,不会报错了enableRemoteModule: true}})// 主要就是下面这一块// 定义菜单let temp = [{label: 'send',click () {// 点击发送消息,getFocusedWindow获取渲染进程窗口BrowserWindow.getFocusedWindow().webContents.send('mtp', '来自主进程发送来的消息')}}]let menu = Menu.buildFromTemplate(temp)Menu.setApplicationMenu(menu)// 添加了菜单发现ctrl+shift+i不能打开控制台了,因为将原生东西替换掉就不能使用里面的快捷键了// 可以使用下面的win.webContents可以控制窗口的所有内容win.webContents.openDevTools()  //可以直接运行项目看到控制台require('@electron/remote/main').initialize()require("@electron/remote/main").enable(win.webContents)//当前窗口显示的页面win.loadFile("index.html")// 窗口关闭win.on('close', () => {console.log('close')win = null})
}
// 窗口加载和关闭
app.on('ready', createWindow)
app.on("window-all-closed", () => {console.log("window-all-closed")app.quit()
})

这段代码就是点击菜单的send可以向渲染进程发送消息
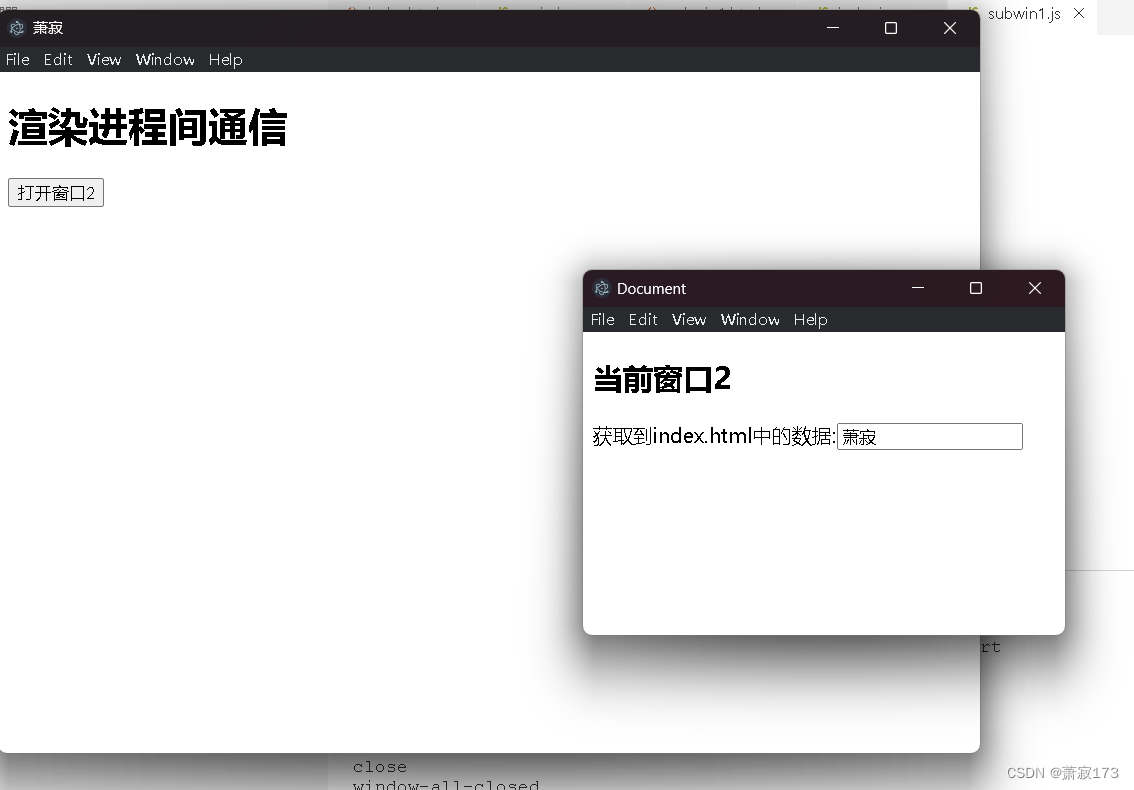
渲染进程间的通信
基于本地存储的渲染进程通信
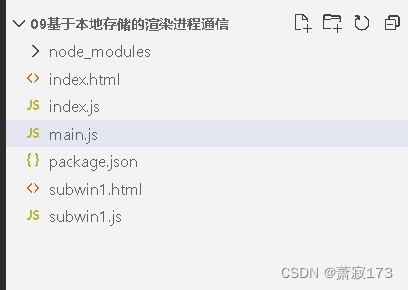
项目结构
index.html代码如下
<!DOCTYPE html>
<html><head><meta charset="UTF-8" /><!-- https://developer.mozilla.org/zh-CN/docs/Web/HTTP/CSP --><meta http-equiv="Content-Security-Policy" content="default-src 'self'; script-src 'self'" /><title>萧寂</title>
</head><body><h1>渲染进程间通信</h1><button>打开窗口2</button><script src="./index.js"></script>
</body></html>
index.js代码如下:
const { ipcRenderer } = require('electron')window.onload = () => {// 获取元素let btn = document.querySelector('button')// 向主进程发送消息btn.addEventListener('click', () => {ipcRenderer.send('openWin2')// 打开窗口二之后保存数据localStorage.setItem('name', '萧寂')})
}
main.js代码如下
const { app, BrowserWindow, ipcMain } = require("electron")// 定义全局变量,存放主窗口id
let mainwinid = nullconst createWindow = () => {// 创建窗口let win = new BrowserWindow({x: 100,y: 50, //窗体坐标 webPreferences: {nodeIntegration: true,contextIsolation: false,  //加入这两行代码就可以正常使用require了,不会报错了enableRemoteModule: true}})require('@electron/remote/main').initialize()require("@electron/remote/main").enable(win.webContents)//当前窗口显示的页面win.loadFile("index.html")// 获得主窗口idmainwinid = win.id// 窗口关闭win.on('close', () => {console.log('close')win = null})
}
// 窗口加载和关闭
app.on('ready', createWindow)
app.on("window-all-closed", () => {console.log("window-all-closed")app.quit()
})// 接收其他进程发送的数据,然后完成后续的逻辑
ipcMain.on('openWin2', () => {// 接收到渲染进程中按钮点击信息之后完成窗口2 的打开let subwin1 = new BrowserWindow({width: 400,height: 300,parent: BrowserWindow.fromId(mainwinid),  //代表将index.html主窗口作为这个subwin1的父窗口,这样父窗口关闭,subwin1也能跟着关闭webPreferences: {nodeIntegration: true,contextIsolation: false,  //加入这两行代码就可以正常使用require了,不会报错了enableRemoteModule: true}})subwin1.loadFile('subwin1.html')subwin1.on('close', () => {subwin1 = null})
})
subwin1.html代码如下
<!DOCTYPE html>
<html lang="en"><head><meta charset="UTF-8"><meta name="viewport" content="width=device-width, initial-scale=1.0"><title>Document</title>
</head><body><h2>当前窗口2</h2>获取到index.html中的数据:<input type="text" /><script src="./subwin1.js"></script>
</body></html>
subwin1.js代码如下:
window.onload = () => {let input = document.querySelector('input')let val = localStorage.getItem('name')input.value = val
}
效果图