作者主页:paper jie 的博客
本文作者:大家好,我是paper jie,感谢你阅读本文,欢迎一建三连哦。
本文录入于《JAVA数据结构》专栏,本专栏是针对于大学生,编程小白精心打造的。笔者用重金(时间和精力)打造,将javaSE基础知识一网打尽,希望可以帮到读者们哦。
其他专栏:《算法详解》《C语言》《javaSE》等
内容分享:本期将会分享数据结构中的链表知识
目录
链表
链表的概念与结构
单向链表的模拟实现
具体实现代码
MyLinkedList
indexillgality
LinkedList
LinkedList的模拟实现
MyLinkedList
Indexexception
java中的LinkedList
LinkedList的使用
LinkedList的多种遍历
ArrayList与LinkedList的区别
链表
链表的概念与结构
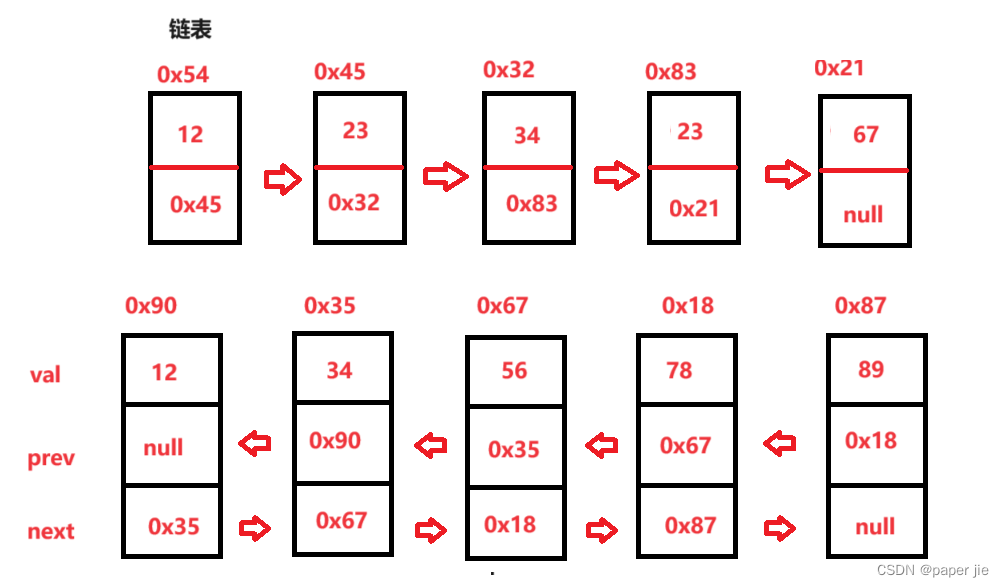
链表是一种物理存储结构上非连续的存储结构,数据元素的逻辑顺序是通过链表中的引用链接次序实现的。大家可以把它理解为现实中的绿皮火车


这里要注意:
链式在逻辑上是连续的,但是在物理上不一定是连续的
现实中的结点一般都是从堆上申请出来的
从堆上申请的空间,是按照一定的策略来分配的,所以两次申请的空间可能连续,也可能不连续
链表中的结构是多样的,根据情况来使用,一般使用一下结构:
单向或双向
带头和不带头

循环和非循环

这些结构中,我们需要重点掌握两种:
无头单向非循环链表:结构简单,一般不会单独来存数据,实际上更多的是作为其他数据结构的子结构,如哈希桶,图的邻接表等。
无头双向链表:在我们java的集合框架中LinkedList低层实现的就是无头双向循环链表。
单向链表的模拟实现
下面是单向链表需要实现的一些基本功能:
// 1、无头单向非循环链表实现
public class SingleLinkedList {
//头插法
public void addFirst(int data){
}
//尾插法
public void addLast(int data){
}
//任意位置插入,第一个数据节点为0号下标
public void addIndex(int index,int data){
}
//查找是否包含关键字key是否在单链表当中
public boolean contains(int key){
return false;
}
//删除第一次出现关键字为key的节点
public void remove(int key){
}
//删除所有值为key的节点
public void removeAllKey(int key){
}
//得到单链表的长度
public int size(){
return -1;
}
public void clear() {
}
public void display() {}
}
具体实现代码
MyLinkedList
package myLinkedList;import sun.awt.image.ImageWatched;import java.util.List;/*** Created with IntelliJ IDEA.* Description:* User: sun杰* Date: 2023-09-14* Time: 10:38*/
public class MyLinkedList implements IList{static class LinkNode {public int value;public LinkNode next;public LinkNode(int data) {this.value = data;}}LinkNode head;public void createNode() {LinkNode linkNode1 = new LinkNode(12);LinkNode linkNode2 = new LinkNode(23);LinkNode linkNode3 = new LinkNode(34);LinkNode linkNode4 = new LinkNode(56);LinkNode linkNode5 = new LinkNode(78);linkNode1.next = linkNode2;linkNode2.next = linkNode3;linkNode3.next = linkNode4;linkNode4.next = linkNode5;this.head = linkNode1;}@Overridepublic void addFirst(int data) {//实例化一个节点LinkNode firstNode = new LinkNode(data);if(this.head == null) {this.head = firstNode;return;}//将原第一个对象的地址给新节点的next,也就是将head给新nextfirstNode.next = this.head;//将新的对象的地址给head头this.head = firstNode;}@Overridepublic void addLast(int data) {//实例化一个节点LinkNode lastNode = new LinkNode(data);//找到最后一个节点LinkNode cur = this.head;while(cur.next!= null) {cur = cur.next;}cur.next = lastNode;//将最后一个节点的next记录插入节点的地址}@Overridepublic void addIndex(int index, int data) throws indexillgality {if(index < 0 || index > size()) {throw new indexillgality("index不合法");}LinkNode linkNode = new LinkNode(data);if(this.head == null) {addFirst(data);return;}if(size() == index ) {addLast(data);return;}LinkNode cur = this.head;int count = 0;while(count != index - 1) {cur = cur.next;count++;}linkNode.next = cur.next;cur.next = linkNode;}@Overridepublic boolean contains(int key) {LinkNode cur = this.head;while(cur != null) {if(cur.value == key) {return true;}cur = cur.next;}return false;}@Overridepublic void remove(int key) {if(this.head.value == key) {this.head = this.head.next;return ;}//找前驱LinkNode cur = findprev(key);//判断返回值if(cur != null) {//删除LinkNode del = cur.next;cur.next = del.next;//cur.next = cur.next.next;}}//找删除的前驱private LinkNode findprev(int key) {LinkNode cur = head;while(cur.next != null) {if(cur.next.value == key) {return cur;}cur = cur.next;}return null;}@Overridepublic void removeAllKey(int key) {if(size() == 0) {return ;}if(head.value == key) {head = head.next;}LinkNode cur = head.next;LinkNode prev = head;while(cur != null) {if(cur.value == key) {prev.next = cur.next;}prev = cur;cur = cur.next;}}@Overridepublic int size() {LinkNode cur = head;int count = 0;while(cur != null) {count++;cur = cur.next;}return count;}@Overridepublic void display() {LinkNode x = head;while(x != null) {System.out.print(x.value + " ");x = x.next;}System.out.println();}@Overridepublic void clear() {LinkNode cur = head;while(cur != null) {LinkNode curNext = cur.next;cur.next = null;cur = curNext;}head = null;}
}
indexillgality
这时一个自定义异常
package myLinkedList;/*** Created with IntelliJ IDEA.* Description:* User: sun杰* Date: 2023-09-14* Time: 12:55*/
public class indexillgality extends RuntimeException {public indexillgality(String message) {super(message);}
}
LinkedList
LinkedList的模拟实现
这相当于无头双向链表的实现,下面是它需要的基本功能:
// 2、无头双向链表实现
public class MyLinkedList {
//头插法
public void addFirst(int data){ }
//尾插法
public void addLast(int data){}
//任意位置插入,第一个数据节点为0号下标
public void addIndex(int index,int data){}
//查找是否包含关键字key是否在单链表当中
public boolean contains(int key){}
//删除第一次出现关键字为key的节点
public void remove(int key){}
//删除所有值为key的节点
public void removeAllKey(int key){}
//得到单链表的长度
public int size(){}
public void display(){}
public void clear(){}
}
MyLinkedList
package myLinkedList;import java.util.List;/*** Created with IntelliJ IDEA.* Description:* User: sun杰* Date: 2023-09-20* Time: 18:49*/
public class MyLinkedList implements IList {//单个节点public static class ListNode {private int val;private ListNode prev;private ListNode next;public ListNode(int val) {this.val = val;}}ListNode head;ListNode last;@Overridepublic void addFirst(int data) {ListNode cur = new ListNode(data);if(head == null) {cur.next = head;head = cur;last = cur;}else {cur.next = head;head.prev = cur;head = cur;}}@Overridepublic void addLast(int data) {ListNode cur = new ListNode(data);if(head == null) {head = cur;last = cur;} else {last.next = cur;cur.prev = last;last = cur;}}@Overridepublic void addIndex(int index, int data) throws Indexexception {ListNode cur = new ListNode(data);if(index < 0 || index > size()) {throw new Indexexception("下标越界");}//数组为空时if(head == null) {head = cur;last = cur;return ;}//数组只有一个节点的时候if(head.next == null || index == 0) {head.prev = cur;cur.next = head;head = cur;return;}if(index == size()) {last.next = cur;cur.prev = last;return ;}//找到对应下标的节点ListNode x = head;while(index != 0) {x = x.next;index--;}//头插法cur.next = x;cur.prev = x.prev;x.prev.next = cur;x.prev = cur;}@Overridepublic boolean contains(int key) {ListNode cur = head;while(cur != null) {if(cur.val == key) {return true;}cur = cur.next;}return false;}@Overridepublic void remove(int key) {if(head == null) {return;}ListNode cur = head;while(cur != null) {if(cur.val == key) {if(cur.next == null && cur.prev == null) {head = null;last = null;return;}else if(cur.next == null){cur.prev.next = null;last = cur.prev;return;}else if(cur.prev == null) {head = cur.next;cur.next.prev = null;return ;}else {ListNode frone = cur.prev;ListNode curnext = cur.next;frone.next = curnext;curnext.prev = frone;return ;}}cur = cur.next;}}@Overridepublic void removeAllKey(int key) {if(head == null) {return;}ListNode cur = head;while(cur != null) {if(cur.val == key) {if(cur.next == null && cur.prev == null) {head = null;last = null;} else if(cur.next == null){cur.prev.next = null;last = cur.prev;}else if(cur.prev == null) {head = cur.next;cur.next.prev = null;}else {ListNode frone = cur.prev;ListNode curnext = cur.next;frone.next = curnext;curnext.prev = frone;}}cur = cur.next;}}@Overridepublic int size() {int count = 0;ListNode cur = head;while(cur != null) {count++;cur = cur.next;}return count;}@Overridepublic void display() {ListNode cur = head;while(cur != null) {System.out.print(cur.val + " ");cur = cur.next;}System.out.println();}@Overridepublic void clear() {if(head == null) {return;}ListNode cur = head.next;while(cur != null) {head = null;head = cur;cur = cur.next;}head = null;}
}
Indexexception
这也是一个自定义异常
package myLinkedList;/*** Created with IntelliJ IDEA.* Description:* User: sun杰* Date: 2023-09-21* Time: 9:47*/
public class Indexexception extends RuntimeException{public Indexexception(String message) {super(message);}
}
java中的LinkedList
LinkedList的底层是双向链表结构,由于链表没有将元素存储在连续的空间中,元素存储在单独的节点中,然后通过引用将节点连接起来。因为这样,在任意位置插入和删除元素时,是不需要搬移元素,效率比较高。

在集合框架中,LinkedList也实现了List接口:

注意:
LinkedList实现了List接口
LinkedList的底层使用的是双向链表
Linked没有实现RandomAccess接口,因此LinkedList不支持随机访问
LinkedList的随机位置插入和删除元素时效率较高,复杂度为O(1)
LinkedList比较适合任意位置插入的场景
LinkedList的使用
LinkedList的构造:
一般来说有两种方法:
无参构造:
List<Integer> list = new LinkedList<>();使用其他集合容器中的元素构造List:
public LinkedList(Collection<? extends E> c)栗子:
public static void main(String[] args) {
// 构造一个空的LinkedListList<Integer> list1 = new LinkedList<>();List<String> list2 = new java.util.ArrayList<>();list2.add("JavaSE");list2.add("JavaWeb");list2.add("JavaEE");
// 使用ArrayList构造LinkedListList<String> list3 = new LinkedList<>(list2);}
LinkedList的基本方法:
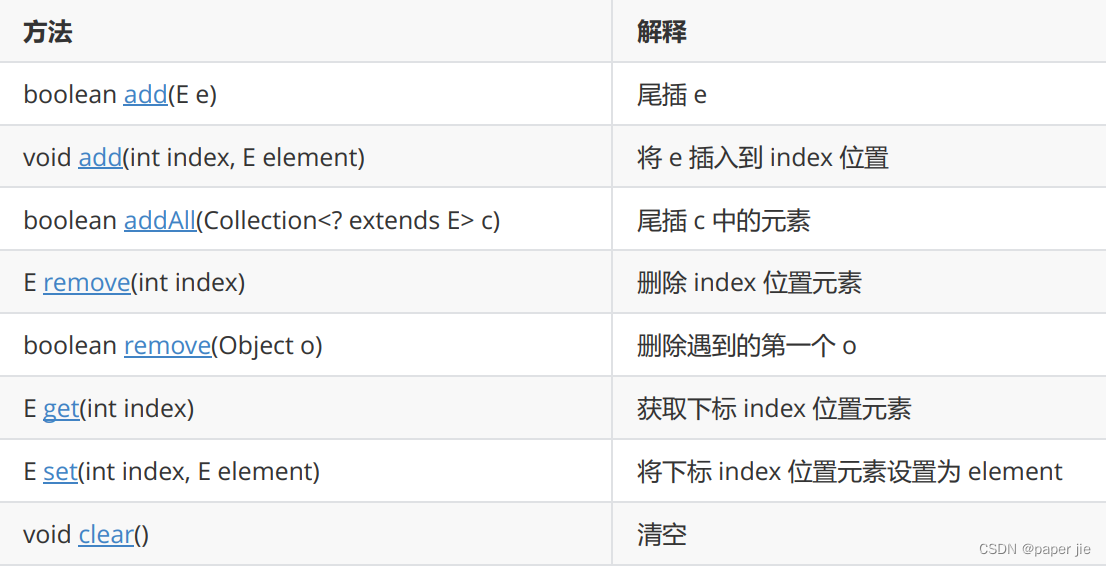
public static void main(String[] args) {
LinkedList<Integer> list = new LinkedList<>();
list.add(1); // add(elem): 表示尾插
list.add(2);
list.add(3);
list.add(4);
list.add(5);
list.add(6);
list.add(7);
System.out.println(list.size());
System.out.println(list);
// 在起始位置插入0
list.add(0, 0); // add(index, elem): 在index位置插入元素elem
System.out.println(list);
list.remove(); // remove(): 删除第一个元素,内部调用的是removeFirst()
list.removeFirst(); // removeFirst(): 删除第一个元素
list.removeLast(); // removeLast(): 删除最后元素
list.remove(1); // remove(index): 删除index位置的元素
System.out.println(list);
// contains(elem): 检测elem元素是否存在,如果存在返回true,否则返回false
if(!list.contains(1)){
list.add(0, 1);
}
list.add(1);
System.out.println(list);
System.out.println(list.indexOf(1)); // indexOf(elem): 从前往后找到第一个elem的位置
System.out.println(list.lastIndexOf(1)); // lastIndexOf(elem): 从后往前找第一个1的位置
int elem = list.get(0); // get(index): 获取指定位置元素
list.set(0, 100); // set(index, elem): 将index位置的元素设置为elem
System.out.println(list);
// subList(from, to): 用list中[from, to)之间的元素构造一个新的LinkedList返回
List<Integer> copy = list.subList(0, 3);
System.out.println(list);
System.out.println(copy);
list.clear(); // 将list中元素清空
System.out.println(list.size());
}
LinkedList的多种遍历
foreach:
public static void main(String[] args) {List<Integer> list = new LinkedList<>();list.add(1);list.add(3);list.add(5);list.add(2);list.remove(1);for (int x:list) {System.out.print(x + " ");}}使用迭代器遍历:
ListIterator<Integer> it = list.listIterator();while(it.hasNext()) {System.out.println(it.next() + " ");}}ArrayList与LinkedList的区别


![[NOIP2012 提高组] 开车旅行](https://img-blog.csdnimg.cn/img_convert/2408bbe8f583f9f4498a48180a20c617.png)