文章目录
- 1.概述
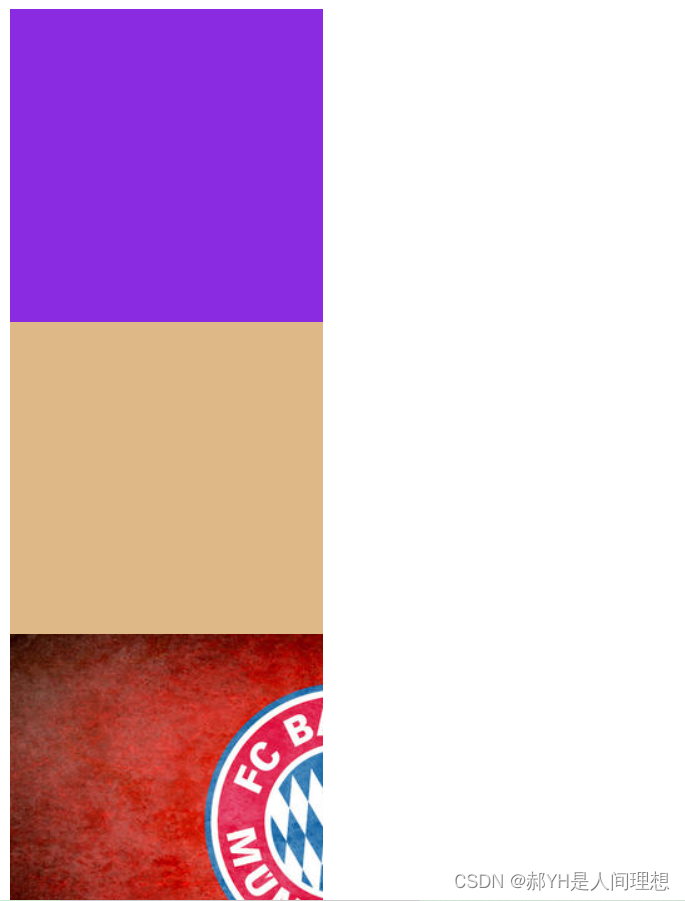
- 2.运行效果图
- 3.代码实现
- 3.1 扩展RecyclerView
- 3.2 扩展Adapter
- 3.3 RecyclerView装饰绘制
- 3.3.1 以图片实现分割线
- 3.3.2 画网格线
- 3.3.3空白的分割线
- 3.3.4 不同方向上的分割线
- 3.4 使用方法
1.概述
在一个开源项目上看到了一个Android Kotlin版的RecyclerView封装,个人觉得非常方便,所以就将这个封装摘了出来,记录下,方便以后使用,这个开源的项目叫DanDanPlayForAndroid点击链接可以查看具体的开源项目代码。
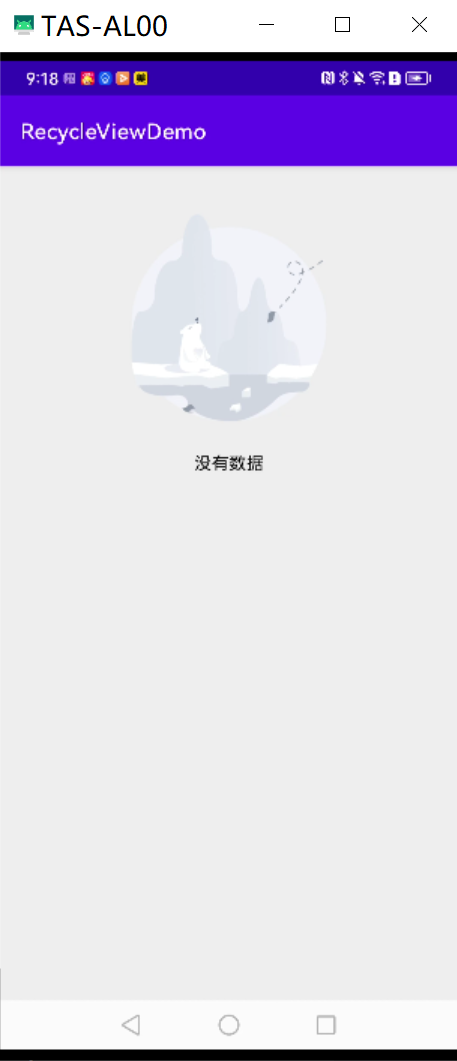
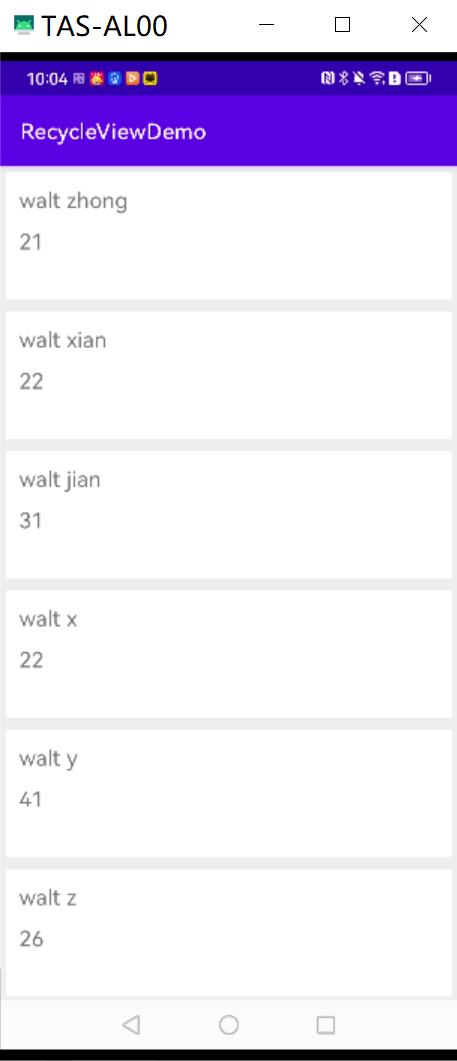
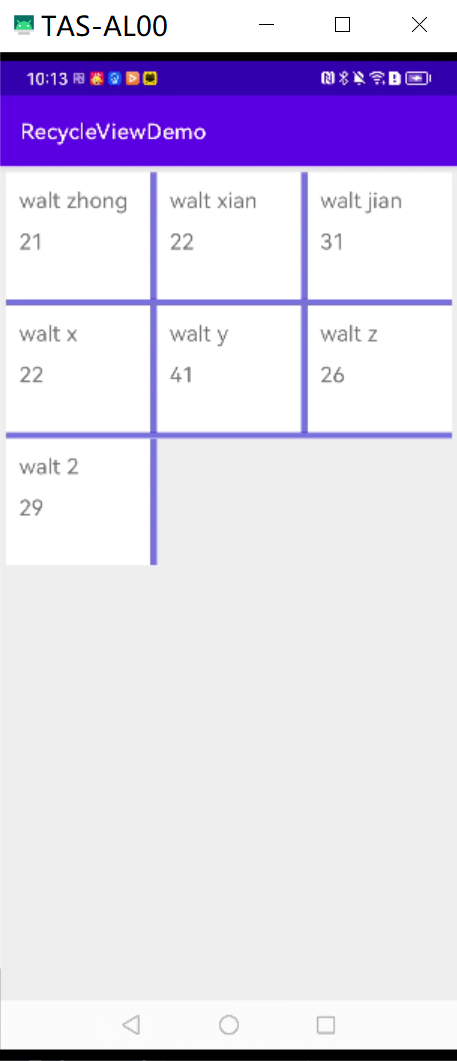
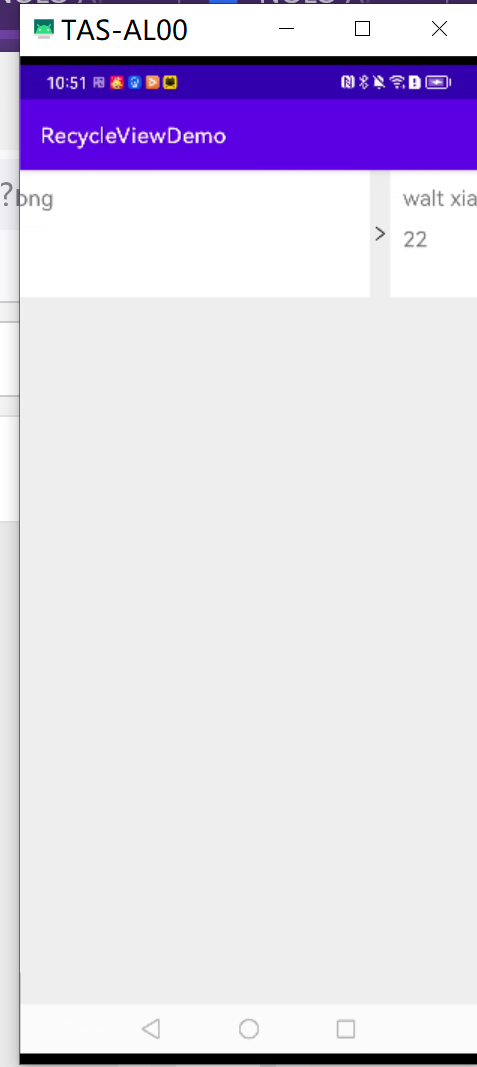
2.运行效果图
3.代码实现
3.1 扩展RecyclerView
我们可以通过Kotlin的扩展函数扩展RecycleView的布局方式,设置数据等功能,方便我们调用。代码如下:
fun RecyclerView.vertical(reverse: Boolean = false
): LinearLayoutManager {return LinearLayoutManager(context,LinearLayoutManager.VERTICAL,reverse)
}fun RecyclerView.horizontal(reverse: Boolean = false
): LinearLayoutManager {return LinearLayoutManager(context,LinearLayoutManager.HORIZONTAL,reverse)
}fun RecyclerView.grid(spanCount: Int
): GridLayoutManager {return GridLayoutManager(context, spanCount)
}fun RecyclerView.gridEmpty(spanCount: Int): GridLayoutManager {return GridLayoutManager(context, spanCount).also {it.spanSizeLookup = object : GridLayoutManager.SpanSizeLookup() {override fun getSpanSize(position: Int): Int {if (position == RecyclerView.NO_POSITION) {return 1}val viewType = adapter?.getItemViewType(position)if (viewType != -1) {return 1}return spanCount}}}
}fun RecyclerView.setData(itemData: List<Any>) {(adapter as RVBaseAdapter).setData(itemData)
}fun RecyclerView.requestIndexChildFocus(index: Int): Boolean {scrollToPosition(index)val targetTag = "tag_focusable_item"val indexView = layoutManager?.findViewByPosition(index)if (indexView != null) {indexView.findViewWithTag<View>(targetTag)?.requestFocus()return true}post {layoutManager?.findViewByPosition(index)?.findViewWithTag<View>(targetTag)?.requestFocus()}return true
}
3.2 扩展Adapter
在扩展Adapter之前,我们需要先定义一个我们自己的Adapter,然后再基于我们自己的Adapter去做扩展,代码如下:
class RVBaseAdapter : RecyclerView.Adapter<RecyclerView.ViewHolder>() {companion object{// the data of empty layoutval EMPTY_ITEM = Any()// view type of empty layoutconst val VIEW_TYPE_EMPTY = -1// number of max itemprivate const val NUMBER_OF_MAX_VIEW_TYPE = Int.MAX_VALUE -1}val itemData: MutableList<Any> = mutableListOf()private val typeHolders = SparseArrayCompat<BaseViewHolderCreator<out ViewDataBinding>>()override fun onCreateViewHolder(parent: ViewGroup,viewType: Int): RecyclerView.ViewHolder {return BaseViewHolder(DataBindingUtil.inflate(LayoutInflater.from(parent.context),getHolderCreator(viewType).getResourceId(),parent,false))}private fun getHolderCreator(viewType: Int): BaseViewHolderCreator<out ViewDataBinding> {return typeHolders.get(viewType)?: throw java.lang.RuntimeException()}override fun getItemCount(): Int {return itemData.size}override fun onBindViewHolder(holder: RecyclerView.ViewHolder,position: Int) {getHolderCreator(holder.itemViewType).apply {initItemBinding(holder.itemView)onBindViewHolder(itemData[position],position,this)}}fun setData(dataList: List<Any>) {itemData.clear()itemData.addAll(dataList)// show the empty layout when data is emptyif(itemData.isEmpty() && typeHolders.containsKey(VIEW_TYPE_EMPTY)){itemData.add(EMPTY_ITEM)}notifyDataSetChanged()}fun register(creator: BaseViewHolderCreator<out ViewDataBinding>, customViewType: Int? = null) {apply {var viewType = customViewType ?: typeHolders.size()while (typeHolders.get(viewType) != null) {viewType++require(viewType < NUMBER_OF_MAX_VIEW_TYPE) {"the number of view type has reached the maximum limit"}}require(viewType < NUMBER_OF_MAX_VIEW_TYPE) {"the number of view type has reached the maximum limit"}typeHolders.put(viewType, creator)}}override fun getItemViewType(position: Int): Int {if(itemData[position] == EMPTY_ITEM&& typeHolders.containsKey(VIEW_TYPE_EMPTY)){return VIEW_TYPE_EMPTY}// only one viewHolderif(typeHolders.size() == 1){return typeHolders.keyAt(0)}// more than one viewHolderfor (i in 0 until typeHolders.size()){if(typeHolders.keyAt(i) == VIEW_TYPE_EMPTY){continue}val holder = typeHolders.valueAt(i)if(holder.isForViewType(itemData[position],position)){return typeHolders.keyAt(i)}}throw java.lang.IllegalStateException("no holder added that matches at position: $position in data source")}
}
与上面代码相关联的抽象类:
class BaseViewHolder(binding: ViewDataBinding) :RecyclerView.ViewHolder(binding.root) {
}
abstract class BaseViewHolderCreator<V : ViewDataBinding> {abstract fun isForViewType(data: Any?, position: Int): Booleanabstract fun getResourceId(): Intabstract fun onBindViewHolder(data: Any?,position: Int,creator: BaseViewHolderCreator<out ViewDataBinding>)lateinit var itemDataBinding: Vfun initItemBinding(itemView: View) {this.itemDataBinding = DataBindingUtil.getBinding(itemView)!!}
}
抽象类的实现:
class BaseViewHolderDSL<T : Any, V : ViewDataBinding>(private val resourceId: Int,private val clazz: KClass<T>
) : BaseViewHolderCreator<V>() {private var checkViewType: ((data: Any, position: Int) -> Boolean)? = nullprivate var viewHolder: ((data: T, position: Int, creator:BaseViewHolderCreator<out ViewDataBinding>) -> Unit)? = nullprivate var emptyViewHolder: (() -> Unit)? = nulloverride fun isForViewType(data: Any?, position: Int): Boolean {if(data == null){return false}if(checkViewType != null){return checkViewType!!.invoke(data,position)}return clazz.isInstance(data)}/*** judge the type of current item data according to position*/fun checkType(viewType:(data:Any,position:Int) ->Boolean){this.checkViewType = viewType}fun initView(holder:(data:T,position:Int,holder:BaseViewHolderCreator<out ViewDataBinding>)->Unit){this.viewHolder = holder}override fun getResourceId(): Int {return resourceId}override fun onBindViewHolder(data: Any?,position: Int,creator: BaseViewHolderCreator<out ViewDataBinding>) {// empty layoutif(data == RVBaseAdapter.EMPTY_ITEM){emptyViewHolder?.invoke()return}data ?: returnviewHolder?.invoke(data as T,position,creator)}
}
RVBaseAdapter类的扩展
fun buildAdapter(init: RVBaseAdapter.() -> Unit): RVBaseAdapter {return RVBaseAdapter().apply {init()}
}inline fun <reified T : Any, V : ViewDataBinding> RVBaseAdapter.addItem(resourceID: Int,init: BaseViewHolderDSL<T, V>.() -> Unit
) {register(BaseViewHolderDSL<T, V>(resourceID, T::class).apply { init() })
}inline fun RVBaseAdapter.addEmptyView(resourceID: Int,init: (BaseViewHolderDSL<Any, LayoutEmptyBinding>.() -> Unit) = {}
) {register(BaseViewHolderDSL<Any, LayoutEmptyBinding>(resourceID, Any::class).apply {init()},customViewType = RVBaseAdapter.VIEW_TYPE_EMPTY)setData(listOf(RVBaseAdapter.EMPTY_ITEM))
}
3.3 RecyclerView装饰绘制
RecyclerView可以继承自ItemDecoration类绘制自己想要的分割线和装饰,这里做了几个例子,代码如下:
3.3.1 以图片实现分割线
/*** 分割线(以图片实现)*/
class MyItemDecoration(divider: Drawable, dividerSize: Int) :
RecyclerView.ItemDecoration() {private val mDivider = dividerprivate val mDividerSize = dividerSizeoverride fun onDraw(canvas: Canvas, parent: RecyclerView, state: RecyclerView.State) {canvas.save()//居中显示val top = (parent.height - mDividerSize) / 2val bottom = top + mDividerSizeval mBounds = Rect()//只在中间绘制for (i in 0 until parent.childCount - 1) {val child = parent.getChildAt(i)parent.layoutManager!!.getDecoratedBoundsWithMargins(child, mBounds)val right = mBounds.right + child.translationX.roundToInt()val left = right - mDividerSizemDivider.setBounds(left, top, right, bottom)mDivider.draw(canvas)}canvas.restore()}override fun getItemOffsets(outRect: Rect,view: View,parent: RecyclerView,state: RecyclerView.State) {outRect.set(0, 0, mDividerSize, 0)}
}
3.3.2 画网格线
class ItemGridDecorationDrawable : ItemDecoration {private var leftRight: Intprivate var topBottom: Intprivate var mDivider: Drawable?constructor(spacePx: Int) {leftRight = spacePxtopBottom = spacePxmDivider = ColorDrawable(Color.WHITE)}constructor(leftRight: Int, topBottom: Int) {this.leftRight = leftRightthis.topBottom = topBottommDivider = ColorDrawable(Color.WHITE)}constructor(leftRight: Int, topBottom: Int, mColor: Int) {this.leftRight = leftRightthis.topBottom = topBottommDivider = ColorDrawable(mColor)}override fun onDraw(c: Canvas,parent: RecyclerView,state: RecyclerView.State) {val layoutManager = parent.layoutManager as GridLayoutManager? ?: returnval lookup = layoutManager.spanSizeLookupif (mDivider == null || layoutManager.childCount == 0) {return}//判断总的数量是否可以整除val spanCount = layoutManager.spanCountvar left: Intvar right: Intvar top: Intvar bottom: Intval childCount = parent.childCountif (layoutManager.orientation == GridLayoutManager.VERTICAL) {for (i in 0 until childCount) {val child = parent.getChildAt(i)//将带有颜色的分割线处于中间位置val centerLeft =((layoutManager.getLeftDecorationWidth(child) + layoutManager.getRightDecorationWidth(child)).toFloat()* spanCount / (spanCount + 1) + 1 - leftRight) / 2val centerTop =(layoutManager.getBottomDecorationHeight(child)+ 1 - topBottom) / 2f//得到它在总数里面的位置val position = parent.getChildAdapterPosition(child)//获取它所占有的比重val spanSize = lookup.getSpanSize(position)//获取每排的位置val spanIndex = lookup.getSpanIndex(position, layoutManager.spanCount)//判断是否为第一排val isFirst =layoutManager.spanSizeLookup.getSpanGroupIndex(position,spanCount) == 0//画上边的,第一排不需要上边的,只需要在最左边的那项的时候画一次就好if (!isFirst && spanIndex == 0) {left = layoutManager.getLeftDecorationWidth(child)right = parent.width - layoutManager.getLeftDecorationWidth(child)top = (child.top - centerTop).toInt() - topBottombottom = top + topBottommDivider!!.setBounds(left, top, right, bottom)mDivider!!.draw(c)}//最右边的一排不需要右边的val isRight = spanIndex + spanSize == spanCountif (!isRight) { //计算右边的left = (child.right + centerLeft).toInt()right = left + leftRighttop = child.topif (!isFirst) {top -= centerTop.toInt()}bottom = (child.bottom + centerTop).toInt()mDivider!!.setBounds(left, top, right, bottom)mDivider!!.draw(c)}}} else {for (i in 0 until childCount) {val child = parent.getChildAt(i)//将带有颜色的分割线处于中间位置val centerLeft =(layoutManager.getRightDecorationWidth(child) + 1 - leftRight) / 2fval centerTop =((layoutManager.getTopDecorationHeight(child) + layoutManager.getBottomDecorationHeight(child)).toFloat()
* spanCount / (spanCount + 1) - topBottom) / 2//得到它在总数里面的位置val position = parent.getChildAdapterPosition(child)//获取它所占有的比重val spanSize = lookup.getSpanSize(position)//获取每排的位置val spanIndex = lookup.getSpanIndex(position, layoutManager.spanCount)//判断是否为第一列val isFirst =layoutManager.spanSizeLookup.getSpanGroupIndex(position, spanCount) == 0//画左边的,第一排不需要左边的,只需要在最上边的那项的时候画一次就好if (!isFirst && spanIndex == 0) {left = (child.left - centerLeft).toInt() - leftRightright = left + leftRighttop = layoutManager.getRightDecorationWidth(child)bottom = parent.height - layoutManager.getTopDecorationHeight(child)mDivider!!.setBounds(left, top, right, bottom)mDivider!!.draw(c)}//最下的一排不需要下边的val isRight = spanIndex + spanSize == spanCountif (!isRight) { //计算右边的left = child.leftif (!isFirst) {left -= centerLeft.toInt()}right = (child.right + centerTop).toInt()top = (child.bottom + centerLeft).toInt()bottom = top + leftRightmDivider!!.setBounds(left, top, right, bottom)mDivider!!.draw(c)}}}}override fun getItemOffsets(outRect: Rect,view: View,parent: RecyclerView,state: RecyclerView.State) {val layoutManager = parent.layoutManager as GridLayoutManager? ?: returnval lp =view.layoutParams as GridLayoutManager.LayoutParamsval childPosition = parent.getChildAdapterPosition(view)val spanCount = layoutManager.spanCountif (layoutManager.orientation == GridLayoutManager.VERTICAL) { //判断是否在第一排if (layoutManager.spanSizeLookup.getSpanGroupIndex(childPosition,spanCount) == 0) { //第一排的需要上面outRect.top = topBottom}outRect.bottom = topBottom//这里忽略和合并项的问题,只考虑占满和单一的问题if (lp.spanSize == spanCount) { //占满outRect.left = leftRightoutRect.right = leftRight} else {outRect.left =((spanCount - lp.spanIndex).toFloat() / spanCount * leftRight).toInt()outRect.right =(leftRight.toFloat() * (spanCount + 1) / spanCount - outRect.left).toInt()}} else {if (layoutManager.spanSizeLookup.getSpanGroupIndex(childPosition,spanCount) == 0) { //第一排的需要leftoutRect.left = leftRight}outRect.right = leftRight//这里忽略和合并项的问题,只考虑占满和单一的问题if (lp.spanSize == spanCount) { //占满outRect.top = topBottomoutRect.bottom = topBottom} else {outRect.top =((spanCount - lp.spanIndex).toFloat() / spanCount * topBottom).toInt()outRect.bottom =(topBottom.toFloat() * (spanCount + 1) / spanCount - outRect.top).toInt()}}}
}
3.3.3空白的分割线
/*** 空白的分割线**/
class ItemDecorationSpace : ItemDecoration {private var top: Intprivate var left: Intprivate var right: Intprivate var bottom: Intprivate var spanCount: Intconstructor(space: Int) : this(space, space, space, space)constructor(spaceLR: Int, spaceTB: Int) : this(spaceTB, spaceLR, spaceLR,spaceTB)constructor(top: Int, left: Int, right: Int, bottom: Int) {this.top = topthis.left = leftthis.right = rightthis.bottom = bottomspanCount = 0}constructor(top: Int, left: Int, right: Int, bottom: Int, spanCount: Int) {this.top = topthis.left = leftthis.right = rightthis.bottom = bottomthis.spanCount = spanCount}override fun getItemOffsets(outRect: Rect, view: View,parent: RecyclerView, state: RecyclerView.State) {outRect.top = topoutRect.left = leftoutRect.bottom = bottomif (spanCount != 0) {val position = parent.getChildLayoutPosition(view)if ((position + 1) % spanCount == 0) {outRect.right = 0} else {outRect.right = right}} else {outRect.right = right}}
}
3.3.4 不同方向上的分割线
/*** 不同方向上的分割线*/class ItemDecorationOrientation : ItemDecoration {private val dividerPx: Intprivate val headerPx: Intprivate val footerPx: Intprivate val orientation: Intconstructor(dividerPx: Int, @RecyclerView.Orientation orientation: Int) : this(dividerPx,dividerPx,orientation)constructor(dividerPx: Int,headerFooterPx: Int,@RecyclerView.Orientation orientation: Int) : this(dividerPx, headerFooterPx, headerFooterPx, orientation)constructor(dividerPx: Int,headerPx: Int,footerPx: Int,@RecyclerView.Orientation orientation: Int) {this.dividerPx = dividerPxthis.headerPx = headerPxthis.footerPx = footerPxthis.orientation = orientation}override fun getItemOffsets(outRect: Rect,view: View,parent: RecyclerView,state: RecyclerView.State) {if (orientation == RecyclerView.VERTICAL) {getItemOffsetsVertical(outRect, view, parent)} else {getItemOffsetsHorizontal(outRect, view, parent)}}private fun getItemOffsetsVertical(outRect: Rect, view: View,parent: RecyclerView) {val itemCount = parent.adapter?.itemCount ?: returnval position = parent.getChildAdapterPosition(view)if (position == 0) {outRect.top = headerPx} else {outRect.top = position * dividerPx / itemCount}if (position == itemCount - 1) {outRect.bottom = footerPx} else {outRect.bottom = dividerPx - (position + 1) * dividerPx / itemCount}}private fun getItemOffsetsHorizontal(outRect: Rect, view: View, parent:RecyclerView) {val itemCount = parent.adapter?.itemCount ?: returnval position = parent.getChildAdapterPosition(view)if (position == 0) {outRect.left = headerPx} else {outRect.left = position * dividerPx / itemCount}if (position == itemCount - 1) {outRect.right = footerPx} else {outRect.right = dividerPx - (position + 1) * dividerPx / itemCount}}
}
3.4 使用方法
使用的时候去掉代码中对应的注释,体验各种风格
class RecyclerViewActivity : AppCompatActivity() {private lateinit var dataBinding: ActivityRecyclerViewBindingoverride fun onCreate(savedInstanceState: Bundle?) {super.onCreate(savedInstanceState)initDataBinding()initRV()val dataList = listOf<UserData>(UserData("walt zhong", 21),UserData("walt xian", 22),UserData("walt jian", 31),UserData("walt x", 22),UserData("walt y", 41),UserData("walt z", 26),UserData("walt 2", 29),)//   val dataList = emptyList<UserData>()dataBinding.rvList.setData(dataList)}private fun initRV() {dataBinding.rvList.apply {// layoutManager = gridEmpty(3) //网格布局// layoutManager = vertical(false) // 垂直布局layoutManager = horizontal(false) // 水平布局adapter = buildAdapter {addEmptyView(R.layout.layout_empty)addItem<UserData, RvItemBinding>(R.layout.rv_item) {initView { data, position, _ ->itemDataBinding.apply {tvName.text = data.nametvAge.text = data.age.toString()itemLayout.setOnClickListener {Log.d("zhongxj", "click item: $position")}}}}}//            val pxValue = dp2px(5)
//
//            addItemDecoration(
//                ItemGridDecorationDrawable(
//                    pxValue,
//                    pxValue,
//                    R.color.purple_200
//                )
//            )//            addItemDecoration(
//                ItemDecorationSpace(
//                    pxValue
//                )
//            )//            addItemDecoration(
//                ItemDecorationOrientation(
//                   dividerPx = pxValue,
//                    headerFooterPx = 0,
//                    orientation = RecyclerView.HORIZONTAL
//                )
//            )val dividerSize = dp2px(16)val divider =  ContextCompat.getDrawable(context, R.drawable.ic_arrow)if(divider != null){addItemDecoration(MyItemDecoration(divider,dividerSize))}}}private fun initDataBinding() {dataBinding = DataBindingUtil.setContentView(this,R.layout.activity_recycler_view)dataBinding.lifecycleOwner = this@RecyclerViewActivity}/*** 单位转换,将DP转为PX*/fun dp2px(dpValue: Int): Int {val scale = Resources.getSystem().displayMetrics.densityreturn (dpValue * scale + 0.5f).toInt()}
}data class UserData(var name:String,var age:Int)
布局文件:
RcyclerViewActivity布局
<?xml version="1.0" encoding="utf-8"?>
<layout xmlns:android="http://schemas.android.com/apk/res/android"xmlns:app="http://schemas.android.com/apk/res-auto"xmlns:tools="http://schemas.android.com/tools"><data></data><LinearLayoutandroid:background="#eeeeee"android:layout_width="match_parent"android:layout_height="match_parent"android:orientation="vertical"tools:context=".RecyclerViewActivity"><androidx.recyclerview.widget.RecyclerViewandroid:id="@+id/rv_list"android:layout_width="match_parent"android:layout_height="wrap_content" /></LinearLayout>
</layout>
RecyclerView item布局
<?xml version="1.0" encoding="utf-8"?>
<layout xmlns:android="http://schemas.android.com/apk/res/android"><data></data><LinearLayoutandroid:background="@color/white"android:padding="10dp"android:orientation="vertical"android:layout_width="match_parent"android:layout_height="100dp"android:id="@+id/item_layout"><TextViewandroid:layout_width="match_parent"android:layout_height="wrap_content"android:textSize="20sp"android:text="walt"android:id="@+id/tv_name"/><TextViewandroid:layout_marginTop="10dp"android:layout_width="match_parent"android:layout_height="wrap_content"android:textSize="20sp"android:text="24"android:id="@+id/tv_age"/></LinearLayout>
</layout>
没有数据时的空布局
<?xml version="1.0" encoding="utf-8"?>
<layout xmlns:android="http://schemas.android.com/apk/res/android"xmlns:app="http://schemas.android.com/apk/res-auto"><androidx.constraintlayout.widget.ConstraintLayoutandroid:layout_width="match_parent"android:layout_height="match_parent"><ImageViewandroid:id="@+id/empty_iv"android:layout_width="200dp"android:layout_height="200dp"android:src="@mipmap/ic_empty_data"app:layout_constraintBottom_toBottomOf="parent"app:layout_constraintEnd_toEndOf="parent"app:layout_constraintStart_toStartOf="parent"app:layout_constraintTop_toTopOf="parent"app:layout_constraintVertical_bias="0.382" /><TextViewandroid:id="@+id/empty_tv"android:layout_width="wrap_content"android:layout_height="wrap_content"android:layout_marginTop="5dp"android:text="没有数据"android:textColor="@color/black"android:textSize="16sp"app:layout_constraintEnd_toEndOf="parent"app:layout_constraintStart_toStartOf="parent"app:layout_constraintTop_toBottomOf="@+id/empty_iv" /></androidx.constraintlayout.widget.ConstraintLayout>
</layout>
里面对应的图片读者自己找喜欢的替换上就可以啦,本文主要是记录,代码也不难,读者可以自行跟着敲一遍,加深映像,熟悉这种封装方法,后面可以使用在项目的其他部分的封装。