第一步 下载源码、更新、cmake编译:
为了依赖的成功安装,采用gitee进行下载与更新。记得需要安装git软件。
安装命令:
在自己指定的目录下,鼠标右键,选择 git Bash Here
打开命令行
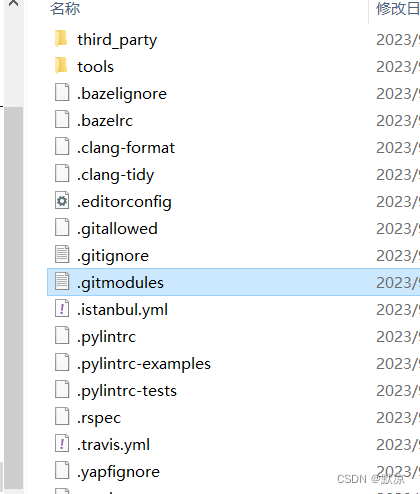
git clone -b v1.34.0 https://gitee.com/mirrors/grpc-framework.git grpc在grpc的目录下修改配置文件:.gitmodules
复制下面内容替换.gitmodules内容:
[submodule "third_party/zlib"]path = third_party/zlib#url = https://github.com/madler/zliburl = https://gitee.com/mirrors/zlib.git# When using CMake to build, the zlib submodule ends up with a# generated file that makes Git consider the submodule dirty. This# state can be ignored for day-to-day development on gRPC.ignore = dirty
[submodule "third_party/protobuf"]path = third_party/protobuf#url = https://github.com/google/protobuf.giturl = https://gitee.com/local-grpc/protobuf.git
[submodule "third_party/googletest"]path = third_party/googletest#url = https://github.com/google/googletest.giturl = https://gitee.com/local-grpc/googletest.git
[submodule "third_party/benchmark"]path = third_party/benchmark#url = https://github.com/google/benchmarkurl = https://gitee.com/mirrors/google-benchmark.git
[submodule "third_party/boringssl-with-bazel"]path = third_party/boringssl-with-bazel#url = https://github.com/google/boringssl.giturl = https://gitee.com/mirrors/boringssl.git
[submodule "third_party/re2"]path = third_party/re2#url = https://github.com/google/re2.giturl = https://gitee.com/local-grpc/re2.git
[submodule "third_party/cares/cares"]path = third_party/cares/cares#url = https://github.com/c-ares/c-ares.giturl = https://gitee.com/mirrors/c-ares.gitbranch = cares-1_12_0
[submodule "third_party/bloaty"]path = third_party/bloaty#url = https://github.com/google/bloaty.giturl = https://gitee.com/local-grpc/bloaty.git
[submodule "third_party/abseil-cpp"]path = third_party/abseil-cpp#url = https://github.com/abseil/abseil-cpp.giturl = https://gitee.com/mirrors/abseil-cpp.gitbranch = lts_2020_02_25
[submodule "third_party/envoy-api"]path = third_party/envoy-api#url = https://github.com/envoyproxy/data-plane-api.giturl = https://gitee.com/local-grpc/data-plane-api.git
[submodule "third_party/googleapis"]path = third_party/googleapis#url = https://github.com/googleapis/googleapis.giturl = https://gitee.com/mirrors/googleapis.git
[submodule "third_party/protoc-gen-validate"]path = third_party/protoc-gen-validate#url = https://github.com/envoyproxy/protoc-gen-validate.giturl = https://gitee.com/local-grpc/protoc-gen-validate.git
[submodule "third_party/udpa"]path = third_party/udpa#url = https://github.com/cncf/udpa.giturl = https://gitee.com/local-grpc/udpa.git
[submodule "third_party/libuv"]path = third_party/libuv#url = https://github.com/libuv/libuv.giturl = https://gitee.com/mirrors/libuv.git
在grpc目录下,在git 上使用更新命令
cd grpc
git submodule update --init
使用cmake对grpc进行编译。
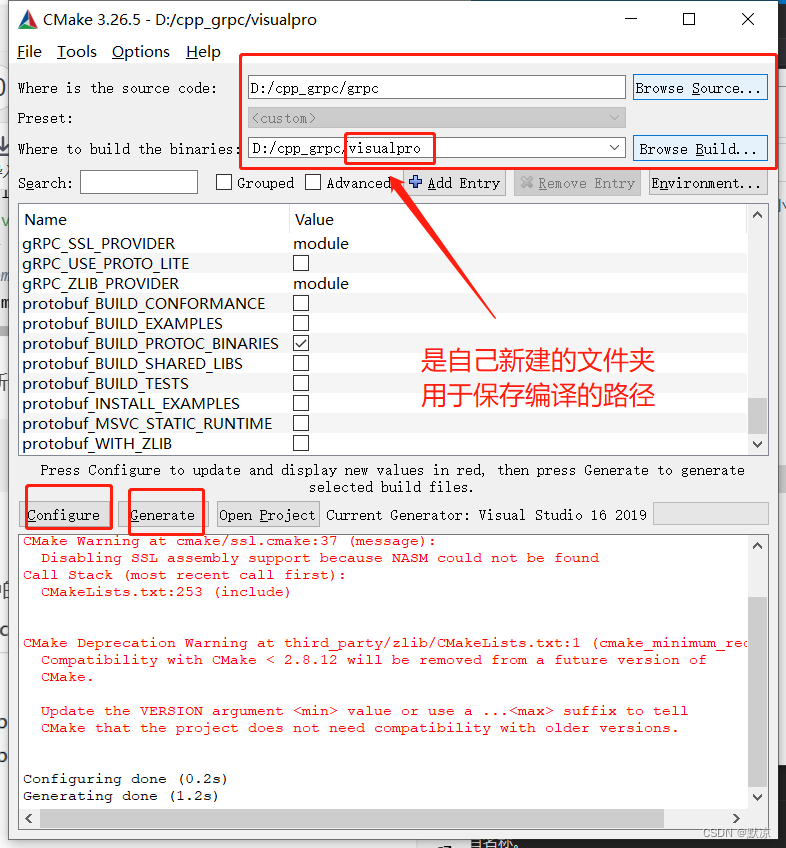
编译结束后,使用vs打开目录中的grpc.sln文件

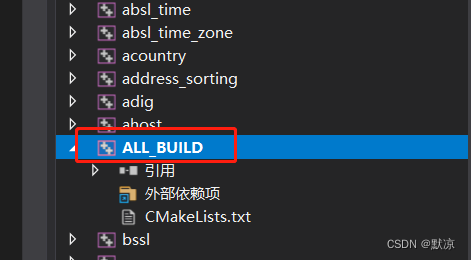
右键ALL——BUILD,点击重新生成。
第二步 编写 .proto 文件
新建一个C++控制台项目,新建 demo.proto 文件
文件内容:
syntax = "proto3";package hello;service Greeter {rpc SayHello (HelloRequest) returns (HelloReply) {}
}message HelloRequest {string message = 1;
}message HelloReply {string message = 1;
}
在资源文件中右键添加现有项,将demo.proto 文件添加进来。
demo.proto里面不能有中文或者utf-8的格式
第三步 生成头文件与源文件
在自己新建的控制台项目中,按住Shift + 右键 调处控制台
接下来我们利用grpc编译后生成的proc.exe生成proto的头文件和源文件
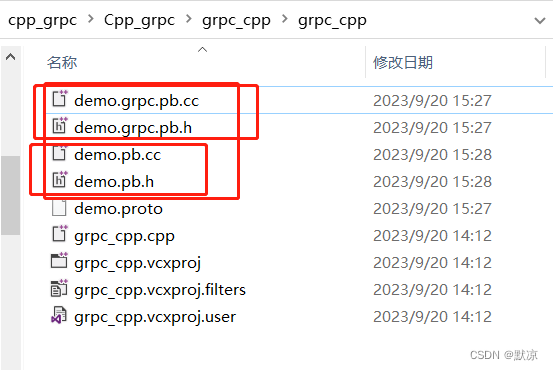
D:\cpp_grpc\visualpro\third_party\protobuf\Debug\protoc.exe -I="." --grpc_out="." --plugin=protoc-gen-grpc="D:\cpp_grpc\visualpro\Debug\grpc_cpp_plugin.exe" "demo.proto"D:\cpp_grpc\visualpro\third_party\protobuf\Debug\protoc.exe --cpp_out=. "demo.proto"
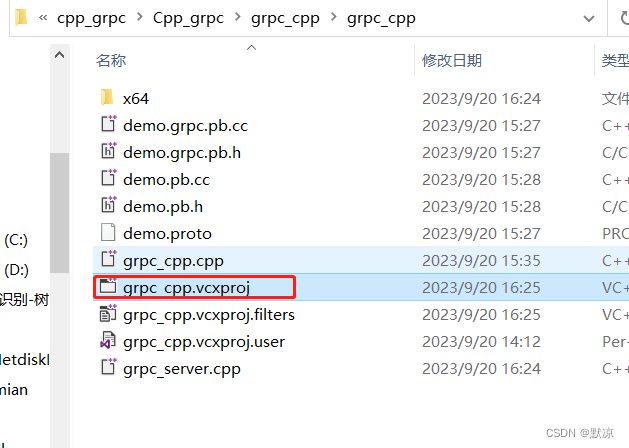
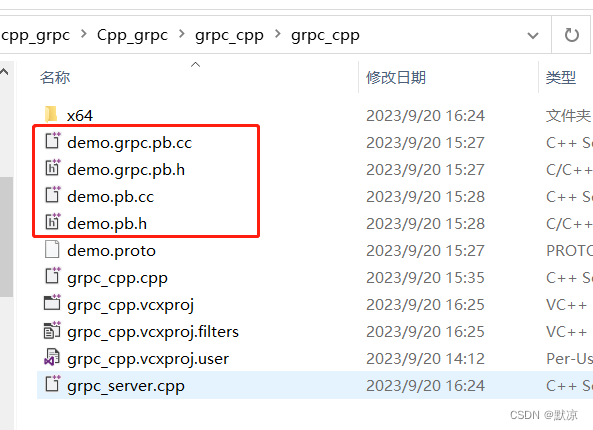
生成出来的文件:
第四步 配置VS
将这4个都右键添加现有项的方法添加到C++的控制台项目中去。
开始配置VS
右键项目,点击属性,选择c/c++,选择常规,选择附加包含目录
D:\cpp_grpc\grpc\third_party\re2
D:\cpp_grpc\grpc\third_party\address_sorting\include
D:\cpp_grpc\grpc\third_party\abseil-cpp
D:\cpp_grpc\grpc\third_party\protobuf\src
D:\cpp_grpc\grpc\include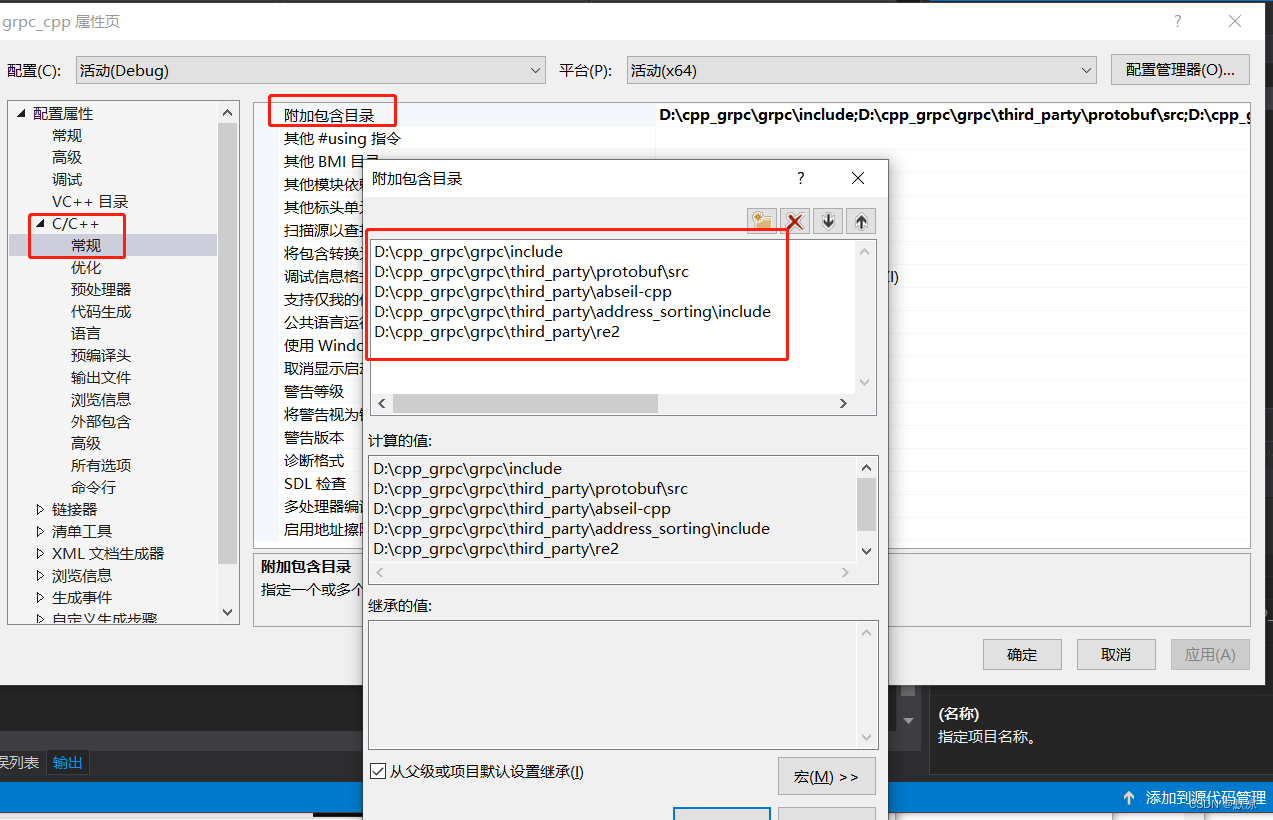
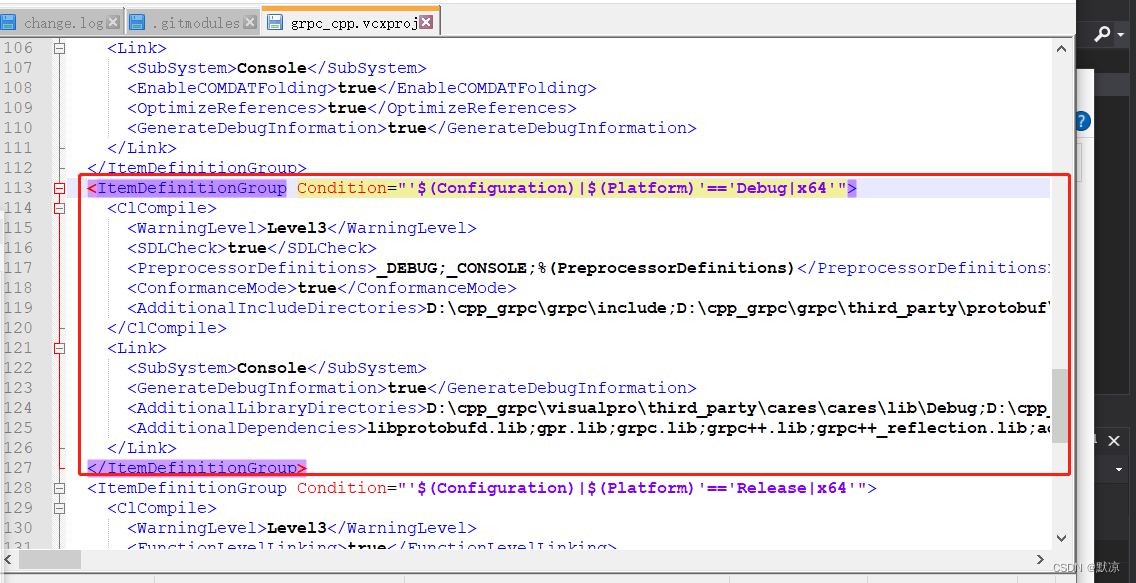
接下来配置库路径, 在链接器常规选项下,点击附加库目录,添加我们需要的库目录。
右键项目,点击属性,选择链接器,选择附加库目录
D:\cpp_grpc\visualpro\third_party\re2\Debug
D:\cpp_grpc\visualpro\third_party\abseil-cpp\absl\types\Debug
D:\cpp_grpc\visualpro\third_party\abseil-cpp\absl\synchronization\Debug
D:\cpp_grpc\visualpro\third_party\abseil-cpp\absl\status\Debug
D:\cpp_grpc\visualpro\third_party\abseil-cpp\absl\random\Debug
D:\cpp_grpc\visualpro\third_party\abseil-cpp\absl\flags\Debug
D:\cpp_grpc\visualpro\third_party\abseil-cpp\absl\debugging\Debug
D:\cpp_grpc\visualpro\third_party\abseil-cpp\absl\container\Debug
D:\cpp_grpc\visualpro\third_party\abseil-cpp\absl\hash\Debug
D:\cpp_grpc\visualpro\third_party\boringssl-with-bazel\Debug
D:\cpp_grpc\visualpro\third_party\abseil-cpp\absl\numeric\Debug
D:\cpp_grpc\visualpro\third_party\abseil-cpp\absl\time\Debug
D:\cpp_grpc\visualpro\third_party\abseil-cpp\absl\base\Debug
D:\cpp_grpc\visualpro\third_party\abseil-cpp\absl\strings\Debug
D:\cpp_grpc\visualpro\third_party\protobuf\Debug
D:\cpp_grpc\visualpro\third_party\zlib\Debug
D:\cpp_grpc\visualpro\Debug
D:\cpp_grpc\visualpro\third_party\cares\cares\lib\Debug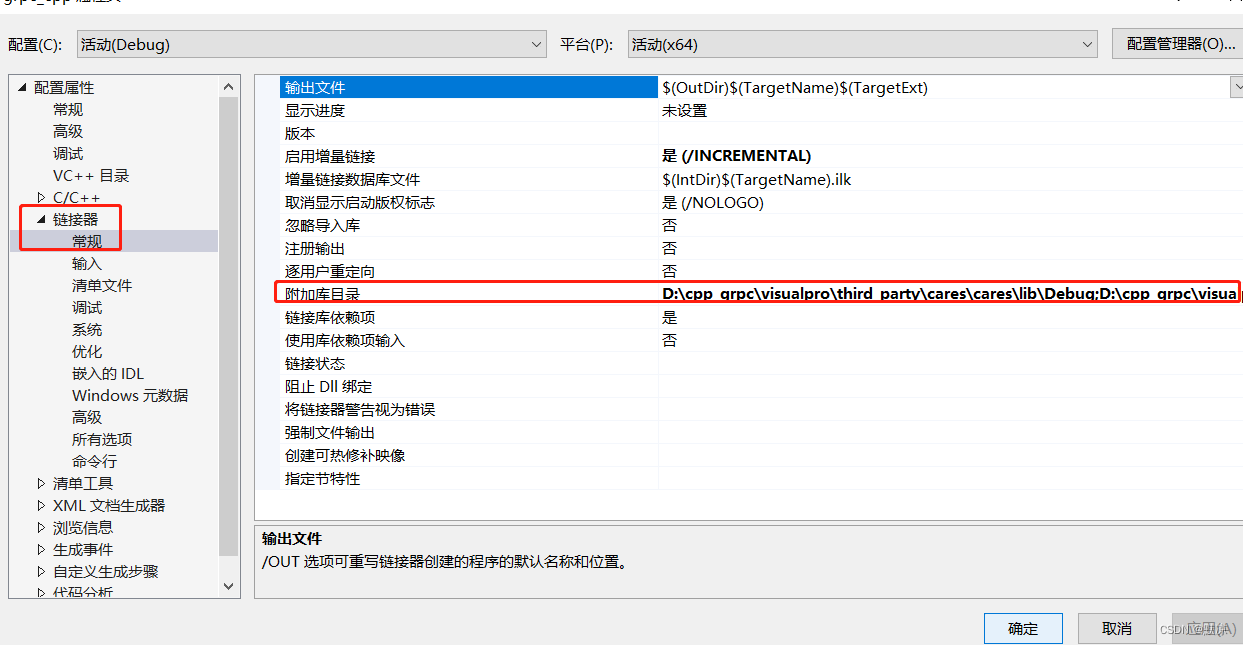
另外,我们虽然配置了库目录,但还要将要使用的库链接到项目
点击链接器,选择输入选项,点击附加依赖项,添加依赖的库名字
libprotobufd.lib
gpr.lib
grpc.lib
grpc++.lib
grpc++_reflection.lib
address_sorting.lib
ws2_32.lib
cares.lib
zlibstaticd.lib
upb.lib
ssl.lib
crypto.lib
absl_bad_any_cast_impl.lib
absl_bad_optional_access.lib
absl_bad_variant_access.lib
absl_base.lib
absl_city.lib
absl_civil_time.lib
absl_cord.lib
absl_debugging_internal.lib
absl_demangle_internal.lib
absl_examine_stack.lib
absl_exponential_biased.lib
absl_failure_signal_handler.lib
absl_flags.lib
absl_flags_config.lib
absl_flags_internal.lib
absl_flags_marshalling.lib
absl_flags_parse.lib
absl_flags_program_name.lib
absl_flags_usage.lib
absl_flags_usage_internal.lib
absl_graphcycles_internal.lib
absl_hash.lib
absl_hashtablez_sampler.lib
absl_int128.lib
absl_leak_check.lib
absl_leak_check_disable.lib
absl_log_severity.lib
absl_malloc_internal.lib
absl_periodic_sampler.lib
absl_random_distributions.lib
absl_random_internal_distribution_test_util.lib
absl_random_internal_pool_urbg.lib
absl_random_internal_randen.lib
absl_random_internal_randen_hwaes.lib
absl_random_internal_randen_hwaes_impl.lib
absl_random_internal_randen_slow.lib
absl_random_internal_seed_material.lib
absl_random_seed_gen_exception.lib
absl_random_seed_sequences.lib
absl_raw_hash_set.lib
absl_raw_logging_internal.lib
absl_scoped_set_env.lib
absl_spinlock_wait.lib
absl_stacktrace.lib
absl_status.lib
absl_strings.lib
absl_strings_internal.lib
absl_str_format_internal.lib
absl_symbolize.lib
absl_synchronization.lib
absl_throw_delegate.lib
absl_time.lib
absl_time_zone.lib
absl_statusor.lib
re2.lib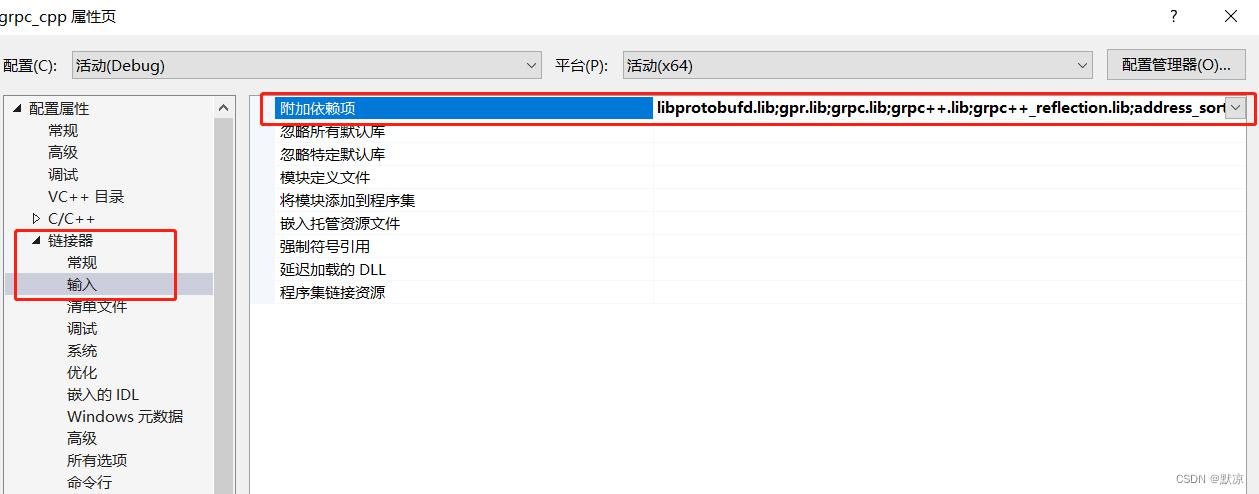
第五步 编写服务端代码:
编写服务端代码:
#include <iostream>
#include <memory>
#include <string>
#include <grpcpp/grpcpp.h>
#include "demo.grpc.pb.h"
using grpc::Server;
using grpc::ServerBuilder;
using grpc::ServerContext;
using grpc::Status;
using hello::HelloRequest;
using hello::HelloReply;
using hello::Greeter;
// Logic and data behind the server's behavior.
class GreeterServiceImpl final : public Greeter::Service {Status SayHello(ServerContext* context, const HelloRequest* request,HelloReply* reply) override {std::string prefix("llfc grpc server has received :  ");reply->set_message(prefix + request->message());return Status::OK;}
};
void RunServer() {std::string server_address("127.0.0.1:50051");GreeterServiceImpl service;ServerBuilder builder;// Listen on the given address without any authentication mechanism.// 监听给定的地址builder.AddListeningPort(server_address, grpc::InsecureServerCredentials());// Register "service" as the instance through which we'll communicate with// clients. In this case it corresponds to an *synchronous* service.builder.RegisterService(&service);// Finally assemble the server.std::unique_ptr<Server> server(builder.BuildAndStart());std::cout << "Server listening on " << server_address << std::endl;// Wait for the server to shutdown. Note that some other thread must be// responsible for shutting down the server for this call to ever return.server->Wait();
}
int main(int argc, char** argv) {RunServer();return 0;
}
写完使用x64平台运行一下。
第六步 编写客户端代码:
右键添加新建项目,grpcclient客户端
为了不重新配置一边,找到当前路径
直接复制过去,就完成了配置。
还要复制以下这4个文件到客户端,再使用右键添加现有项,将这4个添加进去。
客户端代码:
#include <string>
#include <iostream>
#include <memory>
#include <grpcpp/grpcpp.h>
#include "demo.grpc.pb.h"
using grpc::ClientContext;
using grpc::Channel;
using grpc::Status;
using hello::HelloReply;
using hello::HelloRequest;
using hello::Greeter;
// static method : Greeter::NewStub
class FCClient {
public:FCClient(std::shared_ptr<Channel> channel):stub_(Greeter::NewStub(channel)) {}std::string SayHello(std::string name) {ClientContext context;HelloReply reply;HelloRequest request;request.set_message(name);Status status = stub_->SayHello(&context, request, &reply);if (status.ok()) {return reply.message();}else {return "failure " + status.error_message();}}
private:std::unique_ptr<Greeter::Stub> stub_;
};
int main(int argc, char* argv[]) {auto channel = grpc::CreateChannel("127.0.0.1:50051", grpc::InsecureChannelCredentials());FCClient client(channel);// block until get result from RPC serverstd::string result = client.SayHello("hello , llfc.club !");printf("get result [%s]\n", result.c_str());return 0;
}
运行效果: