序言
先来简单回顾一下ConfigurationClassPostProcessor大致的一个处理流程,再来详细的讲解@PropertySources注解的处理逻辑。
详细的步骤可参考ConfigurationClassPostProcessor这篇帖子。
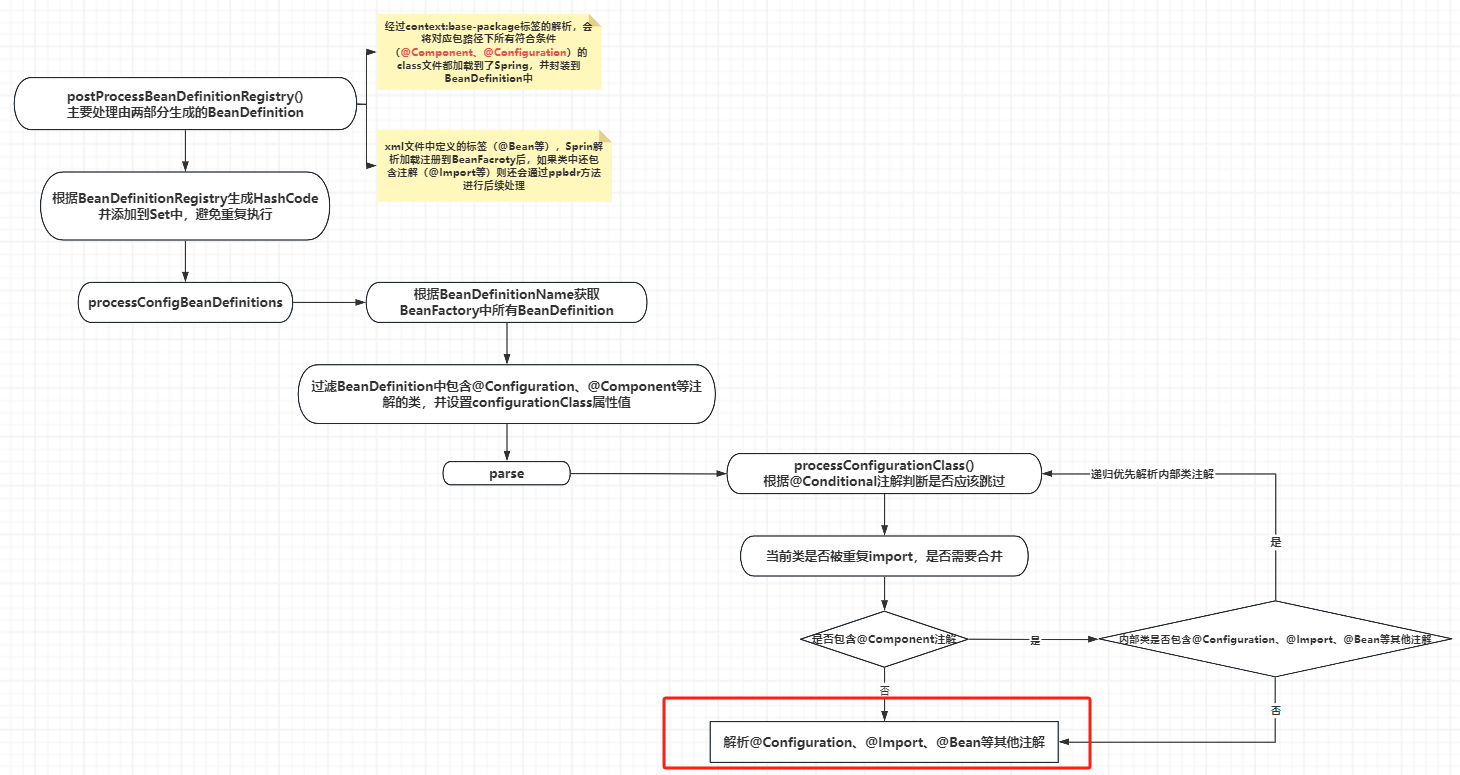
流程图
从获取所有BeanDefinition -> 过滤、赋值、遍历 -> 解析 -> 优先递归处理内部类这一系列操作后。
来到了最后一步,处理@Bean、@Configuration、@Component、@ComponentScan、@PropertySource等注解。
按照代码的执行顺序,首先介绍@PropertySource注解的执行原理。
@PropertySource
测试类
创建类MyService并添加@Configuration和@PropertySource。
其中@Configuration继承了@Component , 而@PropertySource引入了myconfig.properties文件。
@Configuration
@PropertySource({"classpath:myconfig.properties"})
public class MyService{
}
Other同样加载了myconfig.properties文件
@Component
@PropertySource({"classpath:myconfig.properties"})
public class Other {}
myconfig.properties
文件中简单的设置一个name属性即可。
myconfig.name=lisi
流程图
源码片段
来看看加载后解析@PropertySource时做了什么。
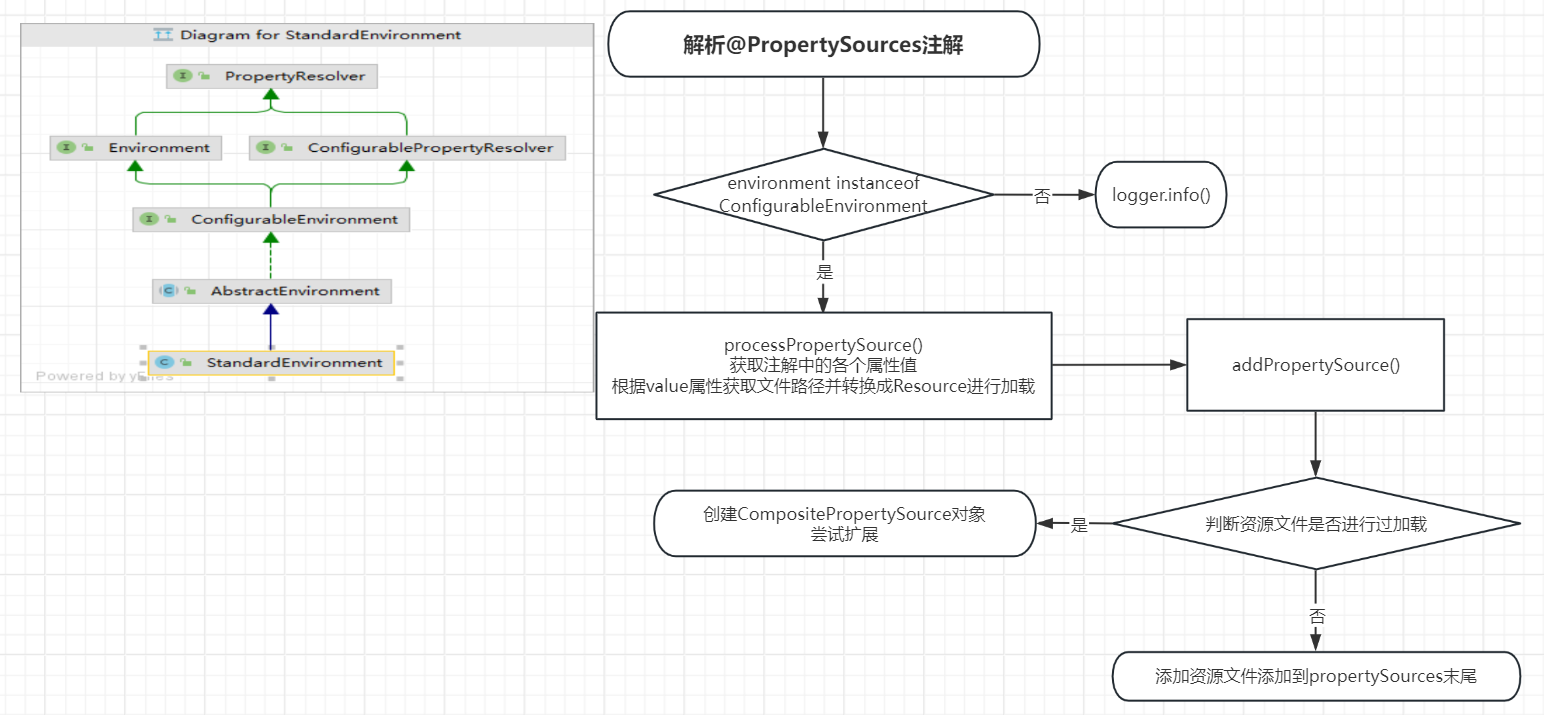
protected final SourceClass doProcessConfigurationClass(ConfigurationClass configClass, SourceClass sourceClass, Predicate<String> filter)throws IOException {//如果是@Component注解,则优先递归处理内部类if (configClass.getMetadata().isAnnotated(Component.class.getName())) {// Recursively process any member (nested) classes firstprocessMemberClasses(configClass, sourceClass, filter);}// Process any @PropertySource annotationsfor (AnnotationAttributes propertySource : AnnotationConfigUtils.attributesForRepeatable(sourceClass.getMetadata(), PropertySources.class,org.springframework.context.annotation.PropertySource.class)) {if (this.environment instanceof ConfigurableEnvironment) {processPropertySource(propertySource);}else {logger.info("Ignoring @PropertySource annotation on [" + sourceClass.getMetadata().getClassName() +"]. Reason: Environment must implement ConfigurableEnvironment");}}//省略部分源码 。。。}
获取注解中属性
获取注解中我们定义的name、encoding、value等属性值,根据我们定义的java类中只有value有具体的属性值。
获取value属性后转换成Resource对象,并再次封装成ResourcePropertySource对象用来存储properties文件属性。
private void processPropertySource(AnnotationAttributes propertySource) throws IOException {//获取name属性值String name = propertySource.getString("name");if (!StringUtils.hasLength(name)) {name = null;}//获取encoding属性值String encoding = propertySource.getString("encoding");if (!StringUtils.hasLength(encoding)) {encoding = null;}//获取value属性值String[] locations = propertySource.getStringArray("value");Assert.isTrue(locations.length > 0, "At least one @PropertySource(value) location is required");boolean ignoreResourceNotFound = propertySource.getBoolean("ignoreResourceNotFound");Class<? extends PropertySourceFactory> factoryClass = propertySource.getClass("factory");PropertySourceFactory factory = (factoryClass == PropertySourceFactory.class ?DEFAULT_PROPERTY_SOURCE_FACTORY : BeanUtils.instantiateClass(factoryClass));//遍历locationfor (String location : locations) {try {String resolvedLocation = this.environment.resolveRequiredPlaceholders(location);Resource resource = this.resourceLoader.getResource(resolvedLocation);addPropertySource(factory.createPropertySource(name, new EncodedResource(resource, encoding)));}//省略catch捕获异常部分源码。。}}
public PropertySource<?> createPropertySource(@Nullable String name, EncodedResource resource) throws IOException {return (name != null ? new ResourcePropertySource(name, resource) : new ResourcePropertySource(resource));}
其中遍历location部分源码是否有些熟悉?
同样是String -> Resource的转换。refresh()主流程方法中将xml文件也是将String[] -> String -> Resource[] -> Resource。
首次加载
将文件封装成ResourcePropertySource对象后,如果该文件未被加载过则添加到propertySources属性尾端,否则封装成CompositePropertySource对象。
值得注意的是,目前只是对文件进行加载,没有对文件中字段属性做特别处理。
addPropertySource
我们第一次加载处理MyService类中@PropertySource注解时,propertySourceNames属性的size = 0, 所以会直接添加到propertySources的尾端。
private void addPropertySource(PropertySource<?> propertySource) {String name = propertySource.getName();MutablePropertySources propertySources = ((ConfigurableEnvironment) this.environment).getPropertySources();//如果资源文件名已经存在,则进行扩展if (this.propertySourceNames.contains(name)) {// We've already added a version, we need to extend it//获取已经存在的资源文件PropertySource<?> existing = propertySources.get(name);if (existing != null) {//获取扩展的资源文件PropertySource<?> newSource = (propertySource instanceof ResourcePropertySource ?((ResourcePropertySource) propertySource).withResourceName() : propertySource);//如果资源文件是CompositePropertySource,则添加到CompositePropertySource中if (existing instanceof CompositePropertySource) {((CompositePropertySource) existing).addFirstPropertySource(newSource);}else {//如果资源文件不是CompositePropertySource,则创建CompositePropertySourceif (existing instanceof ResourcePropertySource) {existing = ((ResourcePropertySource) existing).withResourceName();}CompositePropertySource composite = new CompositePropertySource(name);composite.addPropertySource(newSource);composite.addPropertySource(existing);propertySources.replace(name, composite);}return;}}// 如果没有已处理的属性源,将新属性源添加到末尾;如果有,则在最后一个处理的属性源之前添加if (this.propertySourceNames.isEmpty()) {propertySources.addLast(propertySource);}else {String firstProcessed = this.propertySourceNames.get(this.propertySourceNames.size() - 1);propertySources.addBefore(firstProcessed, propertySource);}this.propertySourceNames.add(name);}
因为我们只设置了@PropertySource中的value属性,所以resourceName为null。
public ResourcePropertySource withResourceName() {if (this.resourceName == null) {return this;}return new ResourcePropertySource(this.resourceName, null, this.source);}
而最后添加的propertySources属性,我们debug看一下它里面都有什么。
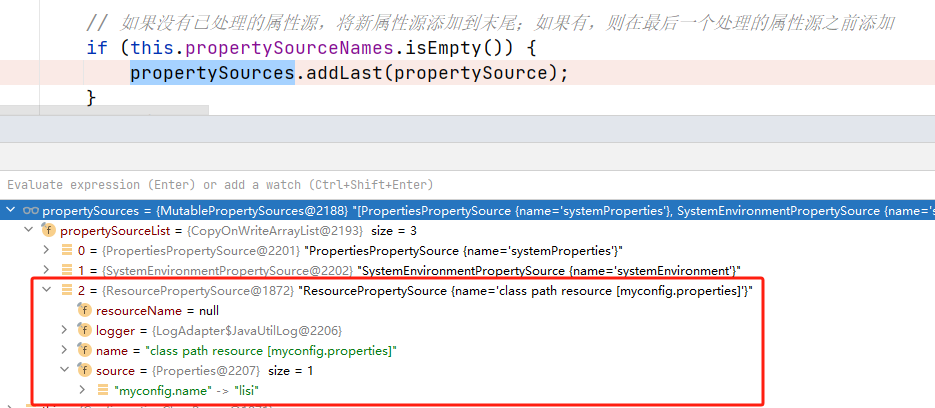
可以看到,我们的myconfig.properties文件已经加到了里面,并且source中有我们设置的myconfig.name字段。
而前两个systemProperties和systemEnvironment属性在之前帖子中也有讲到。是我们StandardEnvironment对象创建时获取到的系统变量。
在父类AbstractEnvironment构造方法中 进行调用。
public AbstractEnvironment() {customizePropertySources(this.propertySources);}public class StandardEnvironment extends AbstractEnvironment {/** System environment property source name: {@value}. */public static final String SYSTEM_ENVIRONMENT_PROPERTY_SOURCE_NAME = "systemEnvironment";/** JVM system properties property source name: {@value}. */public static final String SYSTEM_PROPERTIES_PROPERTY_SOURCE_NAME = "systemProperties";@Overrideprotected void customizePropertySources(MutablePropertySources propertySources) {propertySources.addLast(new PropertiesPropertySource(SYSTEM_PROPERTIES_PROPERTY_SOURCE_NAME, getSystemProperties()));propertySources.addLast(new SystemEnvironmentPropertySource(SYSTEM_ENVIRONMENT_PROPERTY_SOURCE_NAME, getSystemEnvironment()));}}
再次加载
MyService类对应的@PropertySource已经处理完成,再来看看Other类中的@PropertySource注解加载时都做了什么?
源码片段
依然是addPropertySource()方法没有变,此时要加载的资源文件都是myconfig.properties。所以propertySourceNames属性不为null。
代码逻辑会走if判断并将之前加载过的资源文件(existing)和新封装的资源文件propertySource(myconfig.properties)封装到CompositePropertySource,并根据name计算索引替换propertySources原位置的propertySource。
private void addPropertySource(PropertySource<?> propertySource) {String name = propertySource.getName();MutablePropertySources propertySources = ((ConfigurableEnvironment) this.environment).getPropertySources();//如果资源文件名已经存在,则进行扩展if (this.propertySourceNames.contains(name)) {// We've already added a version, we need to extend it//获取已经存在的资源文件PropertySource<?> existing = propertySources.get(name);if (existing != null) {//获取扩展的资源文件PropertySource<?> newSource = (propertySource instanceof ResourcePropertySource ?((ResourcePropertySource) propertySource).withResourceName() : propertySource);//如果资源文件是CompositePropertySource,则添加到CompositePropertySource中if (existing instanceof CompositePropertySource) {((CompositePropertySource) existing).addFirstPropertySource(newSource);}else {//如果资源文件不是CompositePropertySource,则创建CompositePropertySourceif (existing instanceof ResourcePropertySource) {existing = ((ResourcePropertySource) existing).withResourceName();}CompositePropertySource composite = new CompositePropertySource(name);composite.addPropertySource(newSource);composite.addPropertySource(existing);propertySources.replace(name, composite);}return;}}// 如果没有已处理的属性源,将新属性源添加到末尾;如果有,则在最后一个处理的属性源之前添加if (this.propertySourceNames.isEmpty()) {propertySources.addLast(propertySource);}else {String firstProcessed = this.propertySourceNames.get(this.propertySourceNames.size() - 1);propertySources.addBefore(firstProcessed, propertySource);}this.propertySourceNames.add(name);}
以上就是@PropertySource注解解析的全过程。需要注意的是!!!
此时仅仅是文件的加载,并未对文件中属性、字段做任何逻辑处理。


![[AutoSar]BSW_Diagnostic_004 ReadDataByIdentifier(0x22)的配置和实现](https://img-blog.csdnimg.cn/direct/c84c73a2eab942bba8aeefddae9f851d.png)