AIGC专栏7——EasyPhoto 人像训练与生成原理详解
- 学习前言
- 源码下载地址
- 为什么是Lora
- EasyPhoto的训练流程
- 1、数据的预处理
- a、人像排序
- i、人脸特征向量提取过程
- ii、人脸偏移角度计算
- iii、人像排序
- b、人像分割与修复
- i、人像分割
- ii、图像修复与超分处理
- 2、Lora模型训练
- a、训练的基线
- b、Lora模型融合
- EasyPhoto预测流程
- 1、初步重建
- a、人脸融合
- b、人脸裁剪与仿射变换
- c、Stable Diffusion重建 + 颜色转移
- 2、边缘完善
- a、人脸融合
- b、Stable Diffusion重建
- 3、后处理
学习前言
如何训练一个高品质的人像Lora与应用高品质Lora的链路对于写真生成而言非常重要。

源码下载地址
WebUI插件版本:https://github.com/aigc-apps/sd-webui-EasyPhoto
Diffusers版本:https://github.com/aigc-apps/EasyPhoto
麻烦各位朋友点个Star,这对我来讲还是很重要的!
为什么是Lora
由《LoRA: Low-Rank Adaptation of Large Language Models》 提出的一种基于低秩矩阵的对大参数模型进行少量参数微调训练的方法,广泛引用在各种大模型的下游使用中。
目前对超过数十亿以上参数的具有强能力的大模型针对下游任务进行微调中会呈现出巨大开销。 LoRA 建议冻结预训练模型的权重并在每个自注意力部分通过全连接的方式注入可训练层。因为不需要为所有的权重计算梯度,仅需要为一些全连接层计算梯度,大大减少了需要训练参数的数量并且降低了 GPU 的内存要求。
Stable Diffusion的整个模型的微调既缓慢又困难,使用 LoRA,在自定义数据集上微调模型要容易得多。市面上有很多优秀的Lora模型,如墨心:

Lora普遍地用于训练某个角色、某个特征、某个风格。在AI真人写真领域中,我们需要保证最后生成的图像和我们想要生成的人是相像的,这就需要我们使用Lora 技术,对输入的少量图片,进行一个快速的训练,从而使得我们可以得到一个小的指定人像的模型。
EasyPhoto的训练流程

1、数据的预处理
EasyPhoto的数据预处理流程可以分为:
- 人像得分排序与Top-k个人像选取;
- 显著性分割与图像修复。
a、人像排序
人像排序流程需要结合人脸特征向量、图像质量评分与人脸偏移角度。但因为图像质量评分会引入一部分计算压力,所以WebUI插件中暂时没有使用,原理解析中我们依然使用到。
其中人脸特征向量 用于 选出最像本人的图片,因为每个人在不同时期的相片是不一样的,我们选出 当前所有图片中,最像自己的那些照片进行训练。
图像质量评分 用于 判断图片的质量,选出质量最低的一些进行超分,提升图片质量。
人脸偏移角度 用于 选出最正的人像,这个最正的人像会在预测中作为参考人像进行使用,进行人脸融合。
下面解析每个技术细节:
i、人脸特征向量提取过程
人脸特征向量计算是一个比较复杂的过程,需要先进行检测,然后对人脸进行对齐,使其成为一张标准的人脸;最后使用一个人脸识别模型,提取出这个人脸的特征向量。 因此,在经过人脸特征向量的提取后,我们可以通过一个 定长的一维矩阵 表示人脸。
算法流程如下所示:
利用Retinaface我们可以获得一张图片中人脸的位置,但是我们截取下来的人脸是这样的:

我们可以很明显的看出来人脸是歪着的,我们如果人脸可以正过来,那么将对人脸的特征提取非常有好处。

对齐后的人脸使用CurricularFace提取特征向量。这个特征向量就是这个人脸的特征集合,通过对特征向量之间的比对,就可以判断人脸之间的相似程度。
人脸特征向量提取的过程是相对比较复杂的,全都写在代码里面,代码量就会比较大,我们用modelscope进行了封装,方便调用。
# jpg list
jpgs            = os.listdir(inputs_dir)
# ---------------------------FaceID score calculate-------------------------- #
face_id_scores  = []
face_angles     = []
copy_jpgs       = []
selected_paths  = []
for index, jpg in enumerate(tqdm(jpgs)):try:if not jpg.lower().endswith(('.bmp', '.dib', '.png', '.jpg', '.jpeg', '.pbm', '.pgm', '.ppm', '.tif', '.tiff')):continue_image_path = os.path.join(inputs_dir, jpg)image       = Image.open(_image_path)h, w, c     = np.shape(image)retinaface_boxes, retinaface_keypoints, _ = call_face_crop(retinaface_detection, image, 3, prefix="tmp")retinaface_box      = retinaface_boxes[0]retinaface_keypoint = retinaface_keypoints[0]# get key pointretinaface_keypoint = np.reshape(retinaface_keypoint, [5, 2])# get anglex = retinaface_keypoint[0,0] - retinaface_keypoint[1,0]y = retinaface_keypoint[0,1] - retinaface_keypoint[1,1]angle = 0 if x==0 else abs(math.atan(y/x)*180/math.pi)angle = (90 - angle)/ 90 # face size judgeface_width  = (retinaface_box[2] - retinaface_box[0]) / (3 - 1)face_height = (retinaface_box[3] - retinaface_box[1]) / (3 - 1)if min(face_width, face_height) < 128:print("Face size in {} is small than 128. Ignore it.".format(jpg))continue# face cropsub_image = image.crop(retinaface_box)# get embeddingembedding = face_recognition(dict(user=image))[OutputKeys.IMG_EMBEDDING]face_id_scores.append(embedding)face_angles.append(angle)copy_jpgs.append(jpg)selected_paths.append(_image_path)except:pass
ii、人脸偏移角度计算
人脸偏移角度的计算方法有很多,我们使用比较简单的方法计算人脸偏移角度,即计算双眼的旋转角度。双眼的旋转角度代表的是 眼睛连线相对于水平线的倾斜角。具体示意图如下所示:

如果这个倾斜角为0,则代表双眼完全正视,一般来讲,如果人像存在侧拍、歪头等情况,倾斜角是不会为0的,因此我们可以通过倾斜角度的判断,选出最正的人像,这个最正的人像会在预测中作为参考人像进行使用。
iii、人像排序
我们首先通过 人脸偏移角度 计算 人脸的偏移情况,做一个简单的归一化:
- 人脸偏移角度为0的时候,得分为1;
- 人脸偏移角度为90的时候,得分为0。
x = retinaface_keypoint[0,0] - retinaface_keypoint[1,0]
y = retinaface_keypoint[0,1] - retinaface_keypoint[1,1]
angle = 0 if x==0 else abs(math.atan(y/x)*180/math.pi)
angle = (90 - angle)/ 90
然后根据 人脸特征向量,计算 用户 自身与自身的相似程度,首先计算人像的平均特征,然后计算每一张图片与平均特征的相似程度,相似程度也是一个0-1之间的得分:
def compare_jpg_with_face_id(embedding_list):embedding_array = np.vstack(embedding_list)# 然后对真人图片取mean,获取真人图片的平均特征pivot_feature = np.mean(embedding_array, axis=0)pivot_feature = np.reshape(pivot_feature, [512, 1])# 计算一个文件夹中,和中位值最接近的图片排序scores = [np.dot(emb, pivot_feature)[0][0] for emb in embedding_list]return scores
我们将 相似程度得分 与 人脸偏移情况得分 进行相乘,选出得分最高的,作为参考人像。
ref_total_scores = np.array(face_angles) * np.array(face_id_scores)
然后 使用 相似程度得分 与 图像质量评分 进行相乘,选出得分最高的top-k个人像进行训练。但因为图像质量评分会引入一部分计算压力,所以WebUI插件中暂时没有使用。此时仅使用 相似程度得分 最高的top-k个人像进行训练。
# Filter reference faces based on scores, considering quality scores, similarity scores, and angle scores
face_id_scores      = compare_jpg_with_face_id(face_id_scores)
ref_total_scores    = np.array(face_angles) * np.array(face_id_scores)
ref_indexes         = np.argsort(ref_total_scores)[::-1]
for index in ref_indexes:print("selected paths:", selected_paths[index], "total scores: ", ref_total_scores[index], "face angles", face_angles[index])
copyfile(selected_paths[ref_indexes[0]], ref_image_path)# Select faces based on scores, considering similarity scores
total_scores    = np.array(face_id_scores)
indexes         = np.argsort(total_scores)[::-1][:15]selected_jpgs   = []
selected_scores = []
for index in indexes:selected_jpgs.append(copy_jpgs[index])selected_scores.append(ref_total_scores[index])print("jpg:", copy_jpgs[index], "face_id_scores", ref_total_scores[index])
b、人像分割与修复
i、人像分割
因为我们要训练Lora,训练Lora首先要看期望的目标是什么,因为我们期望保留人像特征而不是其它的特征,有些东西是可以被去除掉的。简单来讲,我们无需关注图片中的背景、衣服甚至是头发。
在代码中,我们首先对输入图片进行 显著性分割,将背景进行了去除,然后通过 人脸检测框 选择出人脸周围的区域。此时无用的信息便非常少了。
这里其实有一些改进方案,如果我们要获得最重要的人像信息,可以直接使用皮肤分割的方式,但具体效果还待测试。
ii、图像修复与超分处理
由于我们不能保证用户的输入图片一定是非常清晰的好图片,很多图片都 存在 模糊、噪声、不清晰的问题,以下图的蒙娜丽莎为例,它不仅模糊,还有噪点,还不清晰,还有裂痕。

这个时候我们需要一些超分算法与修复算法将这个图像变得更好看再进行学习。因为Lora的学习能力非常强,它不仅能学到人像特征,还能学到模糊、噪声、不清晰等不好的特征。
在这里我们使用modelscope已经集成的图像修复算法进行图像修复,并且超分。这是上图超分后的结果,明显好得多。

为了提升写真的皮肤质感,我们还使用了 ABPN人像美肤 进行美肤。
images              = []
enhancement_num      = 0
max_enhancement_num  = len(selected_jpgs) // 2
for index, jpg in tqdm(enumerate(selected_jpgs[::-1])):if not jpg.lower().endswith(('.bmp', '.dib', '.png', '.jpg', '.jpeg', '.pbm', '.pgm', '.ppm', '.tif', '.tiff')):continue_image_path             = os.path.join(inputs_dir, jpg)image                   = Image.open(_image_path)retinaface_boxes, _, _  = call_face_crop(retinaface_detection, image, 3, prefix="tmp")retinaface_box          = retinaface_boxes[0]# crop imagesub_image               = image.crop(retinaface_box)try:sub_image           = Image.fromarray(cv2.cvtColor(skin_retouching(sub_image)[OutputKeys.OUTPUT_IMG], cv2.COLOR_BGR2RGB))except:logging.info("Skin Retouching model detect error, but pass.")try:# Determine which images to enhance based on quality score and image sizeif (np.shape(sub_image)[0] < 512 or np.shape(sub_image)[1] < 512) and enhancement_num < max_enhancement_num:sub_image = Image.fromarray(cv2.cvtColor(portrait_enhancement(sub_image)[OutputKeys.OUTPUT_IMG], cv2.COLOR_BGR2RGB))enhancement_num += 1except:logging.info("Portrait Enhancement model detect error, but pass.")# Correct the mask area of the facesub_boxes, _, sub_masks = call_face_crop(retinaface_detection, sub_image, 1, prefix="tmp")sub_box     = sub_boxes[0]sub_mask    = sub_masks[0]h, w, c     = np.shape(sub_mask)face_width  = sub_box[2] - sub_box[0]face_height = sub_box[3] - sub_box[1]sub_box[0]  = np.clip(np.array(sub_box[0], np.int32) - face_width * 0.3, 1, w - 1)sub_box[2]  = np.clip(np.array(sub_box[2], np.int32) + face_width * 0.3, 1, w - 1)sub_box[1]  = np.clip(np.array(sub_box[1], np.int32) + face_height * 0.15, 1, h - 1)sub_box[3]  = np.clip(np.array(sub_box[3], np.int32) + face_height * 0.15, 1, h - 1)sub_mask    = np.zeros_like(np.array(sub_mask, np.uint8))sub_mask[sub_box[1]:sub_box[3], sub_box[0]:sub_box[2]] = 1# Significance detection, merging facial masksresult      = salient_detect(sub_image)[OutputKeys.MASKS]mask        = np.float32(np.expand_dims(result > 128, -1)) * sub_mask# Obtain the image after the maskmask_sub_image = np.array(sub_image) * np.array(mask) + np.ones_like(sub_image) * 255 * (1 - np.array(mask))mask_sub_image = Image.fromarray(np.uint8(mask_sub_image))if np.sum(np.array(mask)) != 0:images.append(mask_sub_image)
2、Lora模型训练
a、训练的基线
EasyPhoto的Lora模型 基于 kohya_ss 的Lora添加方式,分别在Text Encoder与Unet的自注意力部分添加 Lora 进行训练。
默认参数如下:
| 参数名 | 含义 |
|---|---|
| resolution | 训练时喂入网络的图片大小,默认值为512 |
| validation & save steps | 验证图片与保存中间权重的steps数,默认值为100,代表每100步验证一次图片并保存权重 |
| max train steps | 最大训练步数,默认值为800 |
| max steps per photos | 每张图片的最大训练次数,默认为200 |
| train batch size | 训练的批次大小,默认值为1 |
| gradient accumulationsteps | 是否进行梯度累计,默认值为4,结合train batch size来看,每个Step相当于喂入四张图片 |
| dataloader num workers | 数据加载的works数量,windows下不生效,因为设置了会报错,Linux正常设置 |
| learning rate | 训练Lora的学习率,默认为1e-4 |
| rank Lora | 权重的特征长度,默认为128 |
| network alpha | Lora训练的正则化参数,一般为rank的二分之一,默认为64 |
| 训练代码为: |
if platform.system() == 'Windows':pwd = os.getcwd()dataloader_num_workers = 0 # for solve multi process bugcommand = [f'{python_executable_path}', '-m', 'accelerate.commands.launch', '--mixed_precision=fp16', "--main_process_port=3456", f'{train_kohya_path}',f'--pretrained_model_name_or_path={os.path.relpath(sd15_save_path, pwd)}',f'--pretrained_model_ckpt={os.path.relpath(webui_load_path, pwd)}', f'--train_data_dir={os.path.relpath(user_path, pwd)}','--caption_column=text', f'--resolution={resolution}','--random_flip',f'--train_batch_size={train_batch_size}',f'--gradient_accumulation_steps={gradient_accumulation_steps}',f'--dataloader_num_workers={dataloader_num_workers}', f'--max_train_steps={max_train_steps}',f'--checkpointing_steps={val_and_checkpointing_steps}', f'--learning_rate={learning_rate}','--lr_scheduler=constant','--lr_warmup_steps=0', '--train_text_encoder', '--seed=42', f'--rank={rank}',f'--network_alpha={network_alpha}', f'--validation_prompt={validation_prompt}', f'--validation_steps={val_and_checkpointing_steps}', f'--output_dir={os.path.relpath(weights_save_path, pwd)}', f'--logging_dir={os.path.relpath(weights_save_path, pwd)}', '--enable_xformers_memory_efficient_attention', '--mixed_precision=fp16', f'--template_dir={os.path.relpath(training_templates_path, pwd)}', '--template_mask', '--merge_best_lora_based_face_id', f'--merge_best_lora_name={user_id}',f'--cache_log_file={cache_log_file_path}']if validation:command += ["--validation"]try:subprocess.run(command, check=True)except subprocess.CalledProcessError as e:print(f"Error executing the command: {e}")
else:command = [f'{python_executable_path}', '-m', 'accelerate.commands.launch', '--mixed_precision=fp16', "--main_process_port=3456", f'{train_kohya_path}',f'--pretrained_model_name_or_path={sd15_save_path}',f'--pretrained_model_ckpt={webui_load_path}', f'--train_data_dir={user_path}','--caption_column=text', f'--resolution={resolution}','--random_flip',f'--train_batch_size={train_batch_size}',f'--gradient_accumulation_steps={gradient_accumulation_steps}',f'--dataloader_num_workers={dataloader_num_workers}', f'--max_train_steps={max_train_steps}',f'--checkpointing_steps={val_and_checkpointing_steps}', f'--learning_rate={learning_rate}','--lr_scheduler=constant','--lr_warmup_steps=0', '--train_text_encoder', '--seed=42', f'--rank={rank}',f'--network_alpha={network_alpha}', f'--validation_prompt={validation_prompt}', f'--validation_steps={val_and_checkpointing_steps}', f'--output_dir={weights_save_path}', f'--logging_dir={weights_save_path}', '--enable_xformers_memory_efficient_attention', '--mixed_precision=fp16', f'--template_dir={training_templates_path}', '--template_mask', '--merge_best_lora_based_face_id', f'--merge_best_lora_name={user_id}',f'--cache_log_file={cache_log_file_path}']if validation:command += ["--validation"]try:subprocess.run(command, check=True)except subprocess.CalledProcessError as e:print(f"Error executing the command: {e}")
最终Lora模型的训练步数等于:
Final training step = Min(photo_num * max_steps_per_photos, max_train_steps)
以默认参数为例,如果图片数量小于4,则训练步数为200x图片数量;如果大于等于4,则训练步数为800。
b、Lora模型融合
直接用一个固定参数训练出的Lora并不稳定,我们不能保证最后几个Step出来的模型就是最符合人像特征的。因此,我们在这里加入了Lora模型融合的机制。
我们会在每100个Step处添加一次验证并且保存Lora权重,使用一些模板图像进行img2img,保证出来的人像一定是正脸照。以默认参数为例,我们一共进行800步的训练,那么我们可以得到8组验证结果与8个Lora模型,我们会使用验证结果与训练图片进行人脸特征向量提取,进而进行人脸相似度的计算。然后在其中选择最佳的几个Lora模型进行融合。由于每组验证结果包含多张图片(默认为4张),我们会根据每组验证结果 被选中的比例 作为这个Lora模型所占的比重。
如下为Lora融合的代码:
def merge_different_loras(loras_load_path, lora_save_path, ratios=None):if ratios is None:ratios = [1 / float(len(loras_load_path)) for _ in loras_load_path]state_dict = {}for lora_load, ratio in zip(loras_load_path, ratios):if os.path.splitext(lora_load)[1] == ".safetensors":from safetensors.torch import load_fileweights_sd = load_file(lora_load)else:weights_sd = torch.load(lora_load, map_location="cpu")for key in weights_sd.keys():if key not in state_dict.keys():state_dict[key] = weights_sd[key] * ratioelse:state_dict[key] += weights_sd[key] * ratioif os.path.splitext(lora_save_path)[1] == ".safetensors":from safetensors.torch import save_filemetadata = {}model_hash, legacy_hash = precalculate_safetensors_hashes(state_dict, metadata)metadata["sshs_model_hash"] = model_hashmetadata["sshs_legacy_hash"] = legacy_hashsave_file(state_dict, lora_save_path, metadata)else:torch.save(state_dict, lora_save_path)return def merge_from_name_and_index(name, index_list, output_dir='output_dir/'):loras_load_path = [os.path.join(output_dir, f'checkpoint-{i}.safetensors') for i in index_list]lora_save_path = os.path.join(output_dir,f'{name}.safetensors')for l in loras_load_path:assert os.path.exists(l)==Truemerge_different_loras(loras_load_path, lora_save_path)return lora_save_path
EasyPhoto预测流程

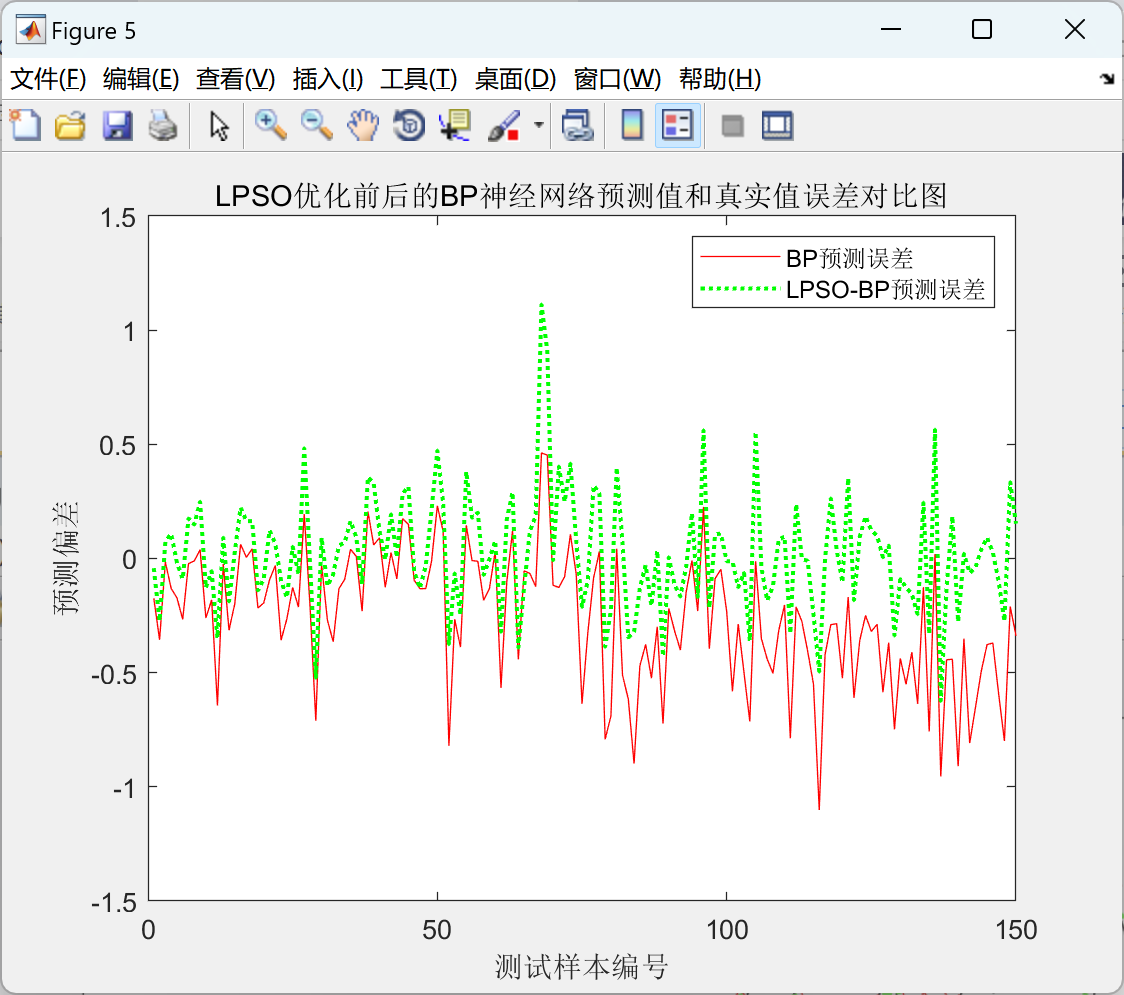
EasyPhoto通过三个阶段来实现更精致的AI写真,可以认为是初步重建+边缘完善+后处理。
1、初步重建
初步重建可以分为三个部分:
- 人脸融合;
- 人脸裁剪与仿射变换;
- Stable Diffusion重建 + 颜色转移;
a、人脸融合

人脸融合算法是modelscope开源的一个算法,给定一张模板图和一张目标用户图,人脸融合模型能够自动地将用户图中的人脸融合到模板人脸图像中,生成一张与目标人脸相似,且具有模版图外貌特征的新图像。
该算法使用多尺度属性编码器提取模板图属性特征,使用预训练人脸识别模型提取用户图的ID特征,再通过引入可行变特征融合结构, 将ID特征嵌入属性特征空间的同时,以光流场的形式实现面部的自适应变化,最终融合结果真实,高保真,且支持一定程度内对目标用户脸型的自适应感知。

我们在训练的时候选择出了一个最正的人像,这个最正的人像会在预测中作为参考人像进行使用,也就是在这个时候使用,用于作为目标脸型进行人脸融合。
在EasyPhoto中,人像重建是通过img2img实现的,初步重建 中的 人脸融合算法 用于提供一个较好的 基础图片,这样出来的结果会更像用户。同时这个基础图片还会提供canny特征,用于防止重建图片的崩坏。
# Fusion of user reference images and input images as canny input
if roop_images[index] is not None and apply_face_fusion_before:# input_image = image_face_fusion(dict(template=input_image, user=roop_images[index]))[OutputKeys.OUTPUT_IMG]# swap_face(target_img=input_image, source_img=roop_image, model="inswapper_128.onnx", upscale_options=UpscaleOptions())# input_image = Image.fromarray(np.uint8(cv2.cvtColor(input_image, cv2.COLOR_BGR2RGB)))fusion_image = image_face_fusion(dict(template=input_image, user=roop_images[index]))[OutputKeys.OUTPUT_IMG] # swap_face(target_img=output_image, source_img=roop_image, model="inswapper_128.onnx", upscale_options=UpscaleOptions())fusion_image = Image.fromarray(cv2.cvtColor(fusion_image, cv2.COLOR_BGR2RGB))input_image = Image.fromarray(np.uint8((np.array(input_image, np.float32) * (1 - before_face_fusion_ratio) + np.array(fusion_image, np.float32) * before_face_fusion_ratio)))
b、人脸裁剪与仿射变换

Easyphoto的训练过程有三个特点:
- 在训练过程中我们有很多的验证过程;
- 在训练的最后我们会将所有的验证图片与训练图片进行人脸相似度比对;
- 我们使用一些模板图像进行img2img,保证出来的人像一定是正脸照,
因此,理论上,在完成训练后Easyphoto可以获得一个与用户最为相似的正脸照片。
在这个基础上我们可以裁剪这个人像照片并且进行仿射变换,利用五个人脸关键点,将其贴到模板图像上,获得一个Replaced Image,这个图像会在下一步Stable Diffusion重建进行使用,提供openpose信息。
def crop_and_paste(source_image, source_image_mask, target_image, source_five_point, target_five_point, source_box):"""Applies a face replacement by cropping and pasting one face onto another image.Args:source_image (PIL.Image): The source image containing the face to be pasted.source_image_mask (PIL.Image): The mask representing the face in the source image.target_image (PIL.Image): The target image where the face will be pasted.source_five_point (numpy.ndarray): Five key points of the face in the source image.target_five_point (numpy.ndarray): Five key points of the corresponding face in the target image.source_box (list): Coordinates of the bounding box around the face in the source image.Returns:PIL.Image: The resulting image with the pasted face.Notes:The function takes a source image, its corresponding mask, a target image, key points, and the bounding boxaround the face in the source image. It then aligns and pastes the face from the source image onto thecorresponding location in the target image, taking into account the key points and bounding box."""source_five_point = np.reshape(source_five_point, [5, 2]) - np.array(source_box[:2])target_five_point = np.reshape(target_five_point, [5, 2])crop_source_image                       = source_image.crop(np.int32(source_box))crop_source_image_mask                  = source_image_mask.crop(np.int32(source_box))source_five_point, target_five_point    = np.array(source_five_point), np.array(target_five_point)tform = transform.SimilarityTransform()# 程序直接估算出转换矩阵Mtform.estimate(source_five_point, target_five_point)M = tform.params[0:2, :]warped      = cv2.warpAffine(np.array(crop_source_image), M, np.shape(target_image)[:2][::-1], borderValue=0.0)warped_mask = cv2.warpAffine(np.array(crop_source_image_mask), M, np.shape(target_image)[:2][::-1], borderValue=0.0)mask        = np.float32(warped_mask == 0)output      = mask * np.float32(target_image) + (1 - mask) * np.float32(warped)return outputdef call_face_crop(retinaface_detection, image, crop_ratio, prefix="tmp"):# retinaface detect retinaface_result                                           = retinaface_detection(image) # get mask and keypointsretinaface_box, retinaface_keypoints, retinaface_mask_pil   = safe_get_box_mask_keypoints(image, retinaface_result, crop_ratio, None, "crop")return retinaface_box, retinaface_keypoints, retinaface_mask_pil# Detect the box where the face of the template image is located and obtain its corresponding small mask
logging.info("Start face detect.")
input_image_retinaface_boxes, input_image_retinaface_keypoints, input_masks = call_face_crop(retinaface_detection, input_image, 1.1, "template")
input_image_retinaface_box      = input_image_retinaface_boxes[0]
input_image_retinaface_keypoint = input_image_retinaface_keypoints[0]
input_mask                      = input_masks[0]# backup input template and mask
origin_input_mask               = copy.deepcopy(input_mask)
original_input_template         = copy.deepcopy(input_image)# Paste user images onto template images
replaced_input_image = crop_and_paste(face_id_images[index], face_id_retinaface_masks[index], input_image, face_id_retinaface_keypoints[index], input_image_retinaface_keypoint, face_id_retinaface_boxes[index])
replaced_input_image = Image.fromarray(np.uint8(replaced_input_image))
c、Stable Diffusion重建 + 颜色转移

在完成 a中的人脸融合后,下一步是使用我们训练出来的Lora进行重建;但光使用Lora进行重建是不够的,很容易不和谐,我们需要施加一些Controlnet控制。
在此处我们使用了三个Controlnet控制 + 一个Lora + 一个Mask:
- 使用a中人脸融合图像的Canny控制(防止人像崩坏);
- 使用a中人脸融合图像的颜色的控制(使生成的颜色且符合模板);
- 使用b中Replaced Image的Openpose+Face pose控制(使得眼睛与轮廓更像本人);
- 使用训练获得的Lora。
- 使用Mask对人像区域进行重建;
重建完成后图像可能存在一些颜色的偏移,我们最后会使用一个color_transfer方法,保证重建后的图片与原图的颜色协调。
def color_transfer(sc, dc):"""Transfer color distribution from of sc, referred to dc.Args:sc (numpy.ndarray): input image to be transfered.dc (numpy.ndarray): reference image Returns:numpy.ndarray: Transferred color distribution on the sc."""def get_mean_and_std(img):x_mean, x_std = cv2.meanStdDev(img)x_mean = np.hstack(np.around(x_mean, 2))x_std = np.hstack(np.around(x_std, 2))return x_mean, x_stdsc = cv2.cvtColor(sc, cv2.COLOR_BGR2LAB)s_mean, s_std = get_mean_and_std(sc)dc = cv2.cvtColor(dc, cv2.COLOR_BGR2LAB)t_mean, t_std = get_mean_and_std(dc)img_n = ((sc-s_mean)*(t_std/s_std))+t_meannp.putmask(img_n, img_n > 255, 255)np.putmask(img_n, img_n < 0, 0)dst = cv2.cvtColor(cv2.convertScaleAbs(img_n), cv2.COLOR_LAB2BGR)return dst# First diffusion, facial reconstruction
logging.info("Start First diffusion.")
controlnet_pairs = [["canny", input_image, 0.50], ["openpose", replaced_input_image, 0.50], ["color", input_image, 0.85]]
first_diffusion_output_image = inpaint(input_image, input_mask, controlnet_pairs, diffusion_steps=first_diffusion_steps, denoising_strength=first_denoising_strength, input_prompt=input_prompts[index], hr_scale=1.0, seed=str(seed), sd_model_checkpoint=sd_model_checkpoint)if color_shift_middle:# apply color shiftlogging.info("Start color shift middle.")first_diffusion_output_image_face_area  = np.array(copy.deepcopy(first_diffusion_output_image))[input_image_retinaface_box[1]:input_image_retinaface_box[3], input_image_retinaface_box[0]:input_image_retinaface_box[2], :] first_diffusion_output_image_face_area  = color_transfer(first_diffusion_output_image_face_area, template_image_original_face_area)first_diffusion_output_image    = np.array(first_diffusion_output_image)face_skin_mask                  = np.int32(np.float32(face_skin(Image.fromarray(np.uint8(first_diffusion_output_image[input_image_retinaface_box[1]:input_image_retinaface_box[3], input_image_retinaface_box[0]:input_image_retinaface_box[2],:])), retinaface_detection, needs_index=[1, 2, 3, 4, 5, 10, 12, 13])) > 128)first_diffusion_output_image[input_image_retinaface_box[1]:input_image_retinaface_box[3], input_image_retinaface_box[0]:input_image_retinaface_box[2],:] = \first_diffusion_output_image_face_area * face_skin_mask + first_diffusion_output_image[input_image_retinaface_box[1]:input_image_retinaface_box[3], input_image_retinaface_box[0]:input_image_retinaface_box[2],:] * (1 - face_skin_mask)first_diffusion_output_image = Image.fromarray(first_diffusion_output_image)
2、边缘完善
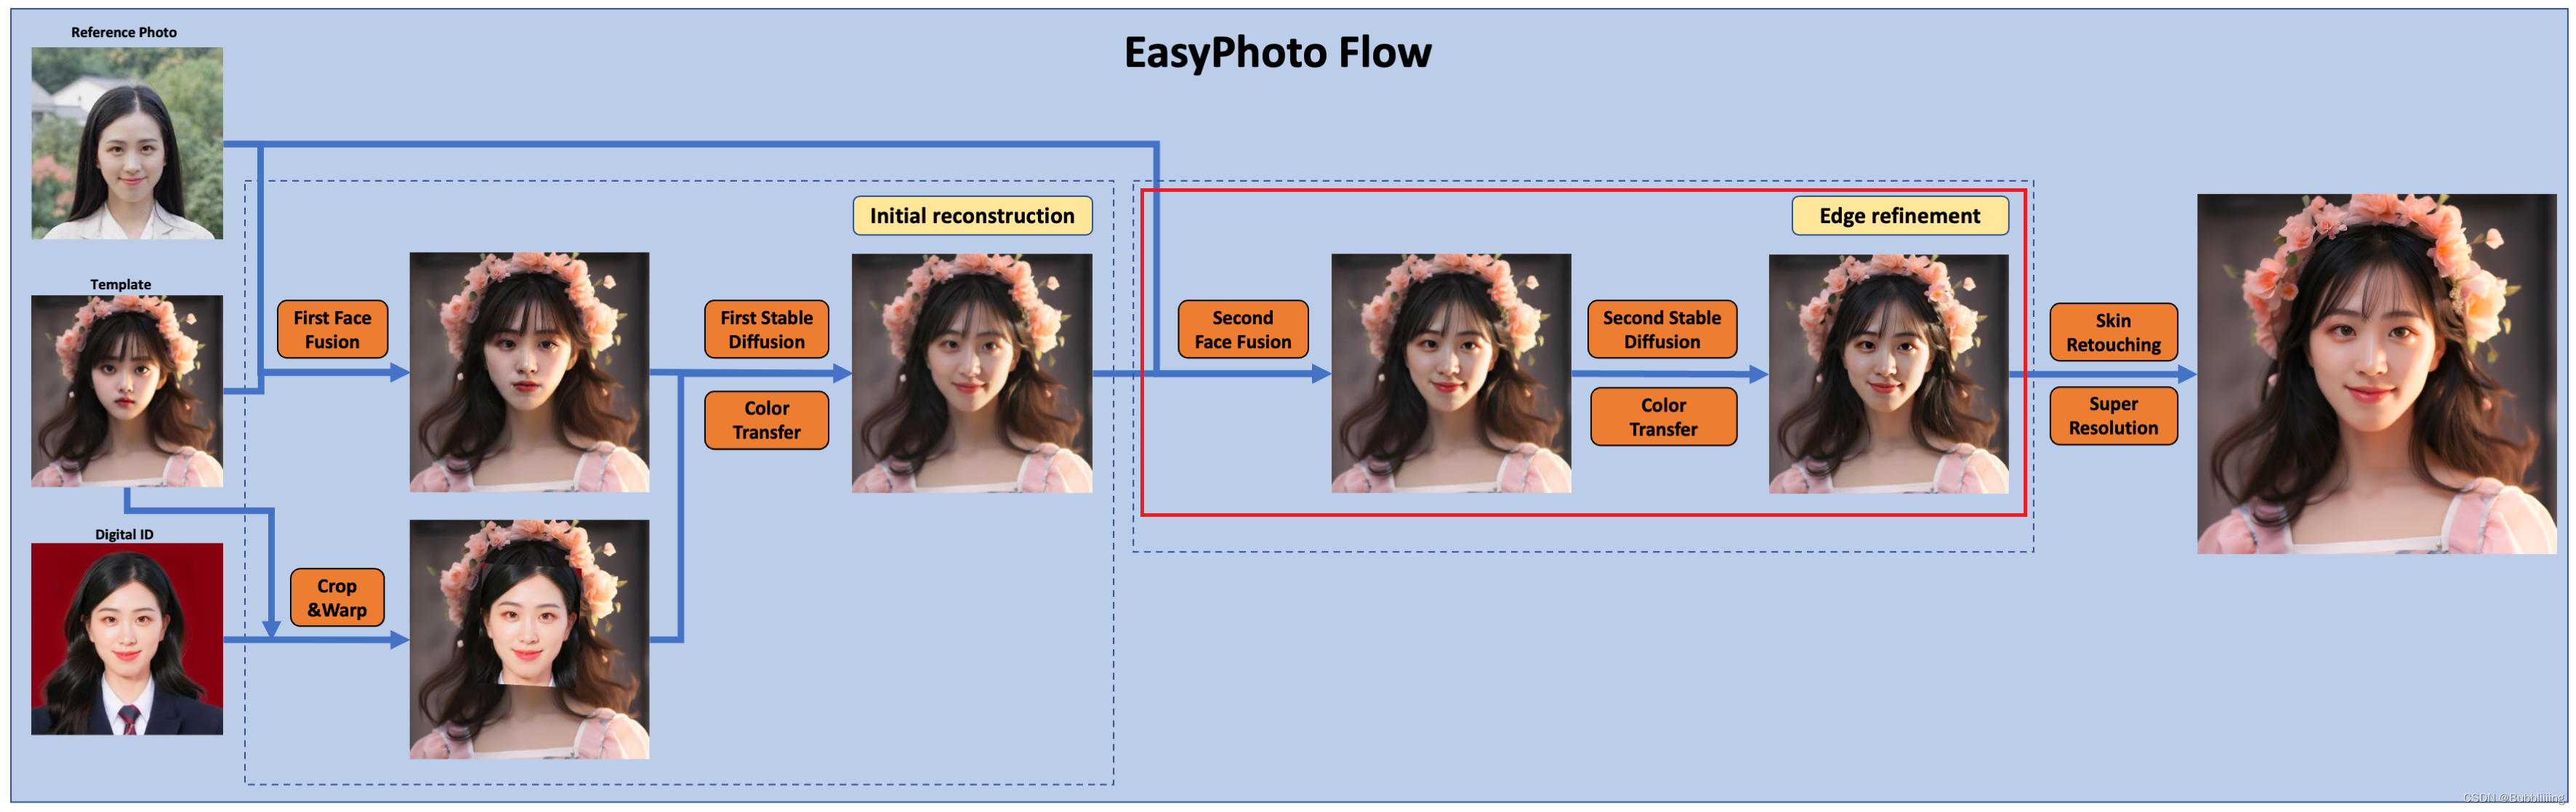
边缘完善 可以分为两步:
- 人脸融合;
- Stable Diffusion重建;
a、人脸融合

与1、初步重建类似,我们依然做一次人脸融合以提升人脸的相似程度。然后在此基础上进行通过img2img实现人像重建,给第二次重建打好基础,这样出来的结果会更像用户。
# Second diffusion
if roop_images[index] is not None and apply_face_fusion_after:# Fusion of facial photos with user photoslogging.info("Start second face fusion.")fusion_image = image_face_fusion(dict(template=first_diffusion_output_image, user=roop_images[index]))[OutputKeys.OUTPUT_IMG] # swap_face(target_img=output_image, source_img=roop_image, model="inswapper_128.onnx", upscale_options=UpscaleOptions())fusion_image = Image.fromarray(cv2.cvtColor(fusion_image, cv2.COLOR_BGR2RGB))input_image = Image.fromarray(np.uint8((np.array(first_diffusion_output_image, np.float32) * (1 - after_face_fusion_ratio) + np.array(fusion_image, np.float32) * after_face_fusion_ratio)))else:fusion_image = Noneinput_image = first_diffusion_output_image
b、Stable Diffusion重建

通过1、初步重建 后,其实我们已经可以获得一个比较不错的人像了,但可能存在边缘上的问题,因此,我们还设立了第二次重建用于进行边缘完善。但光使用Lora进行重建还是不够的,很容易不和谐,我们需要施加一些Controlnet控制。
在此处我们使用了两个Controlnet控制 + 一个Lora + 一个Mask:
- 使用a中人脸融合图像的tile控制(防止颜色过于失真);
- 使用a中canny的控制(防止人像崩坏);
- 使用训练获得的Lora。
- 通过Mask对人像周围区域进行重建(而不是人像区域);
logging.info("Start Second diffusion.")
controlnet_pairs = [["canny", fusion_image, 1.00], ["tile", fusion_image, 1.00]]
second_diffusion_output_image = inpaint(input_image, input_mask, controlnet_pairs, input_prompts[index], diffusion_steps=second_diffusion_steps, denoising_strength=second_denoising_strength, hr_scale=default_hr_scale, seed=str(seed), sd_model_checkpoint=sd_model_checkpoint)# use original template face area to shift generated face color at last
if color_shift_last:logging.info("Start color shift last.")# scale boxrescale_retinaface_box = [int(i * default_hr_scale) for i in input_image_retinaface_box]# apply color shiftsecond_diffusion_output_image_face_area = np.array(copy.deepcopy(second_diffusion_output_image))[rescale_retinaface_box[1]:rescale_retinaface_box[3], rescale_retinaface_box[0]:rescale_retinaface_box[2], :] second_diffusion_output_image_face_area = color_transfer(second_diffusion_output_image_face_area, template_image_original_face_area)second_diffusion_output_image = np.array(second_diffusion_output_image)face_skin_mask = np.int32(np.float32(face_skin(Image.fromarray(np.uint8(second_diffusion_output_image[rescale_retinaface_box[1]:rescale_retinaface_box[3], rescale_retinaface_box[0]:rescale_retinaface_box[2],:])), retinaface_detection, needs_index=[1, 2, 3, 4, 5, 10, 12, 13])) > 128)second_diffusion_output_image[rescale_retinaface_box[1]:rescale_retinaface_box[3], rescale_retinaface_box[0]:rescale_retinaface_box[2],:] = \second_diffusion_output_image_face_area * face_skin_mask + second_diffusion_output_image[rescale_retinaface_box[1]:rescale_retinaface_box[3], rescale_retinaface_box[0]:rescale_retinaface_box[2],:] * (1 - face_skin_mask)second_diffusion_output_image = Image.fromarray(second_diffusion_output_image)
3、后处理

后处理一共有两个内容:
- 人像美肤;
- Super Resolution进行超分辨率;
这两个处理可以让照片更美且更清晰。
try:logging.info("Start Skin Retouching.")# Skin Retouching is performed here. output_image = Image.fromarray(cv2.cvtColor(skin_retouching(output_image)[OutputKeys.OUTPUT_IMG], cv2.COLOR_BGR2RGB))
except Exception as e:torch.cuda.empty_cache()logging.error(f"Skin Retouching error: {e}")try:logging.info("Start Portrait enhancement.")h, w, c = np.shape(np.array(output_image))# Super-resolution is performed here. if super_resolution:output_image = Image.fromarray(cv2.cvtColor(portrait_enhancement(output_image)[OutputKeys.OUTPUT_IMG], cv2.COLOR_BGR2RGB))
except Exception as e:torch.cuda.empty_cache()logging.error(f"Portrait enhancement error: {e}")