目录
- 1. 项目介绍
- 2. 项目准备
- 2.1 数据库准备
- 2.2 创建项目
- 2.3 配置文件
- 2.4 准备前端页面
- 2.5 测试
- 3. 项目公共模块
- 3.1 实体类
- 3.2 公共层
- 4. 业务代码
- 4.1 持久层代码
- 4.2 实现博客列表
- 4.3 实现博客详情
1. 项目介绍
使用SSM框架(Spring、Spring MVC、MyBatis框架)实现⼀个简单的博客系统共5个页面:
- 用户登录
- 博客发表页
- 博客编辑页
- 博客列表页
- 博客详情页
功能描述:
用户登录成功后,可以查看所有⼈的博客。点击 <<查看全文>> 可以查看该博客的正⽂内容。如果该博客作者为当前登录用户,可以完成博客的修改和删除操作,以及发表新博客。
页面预览:
用户登录页面:
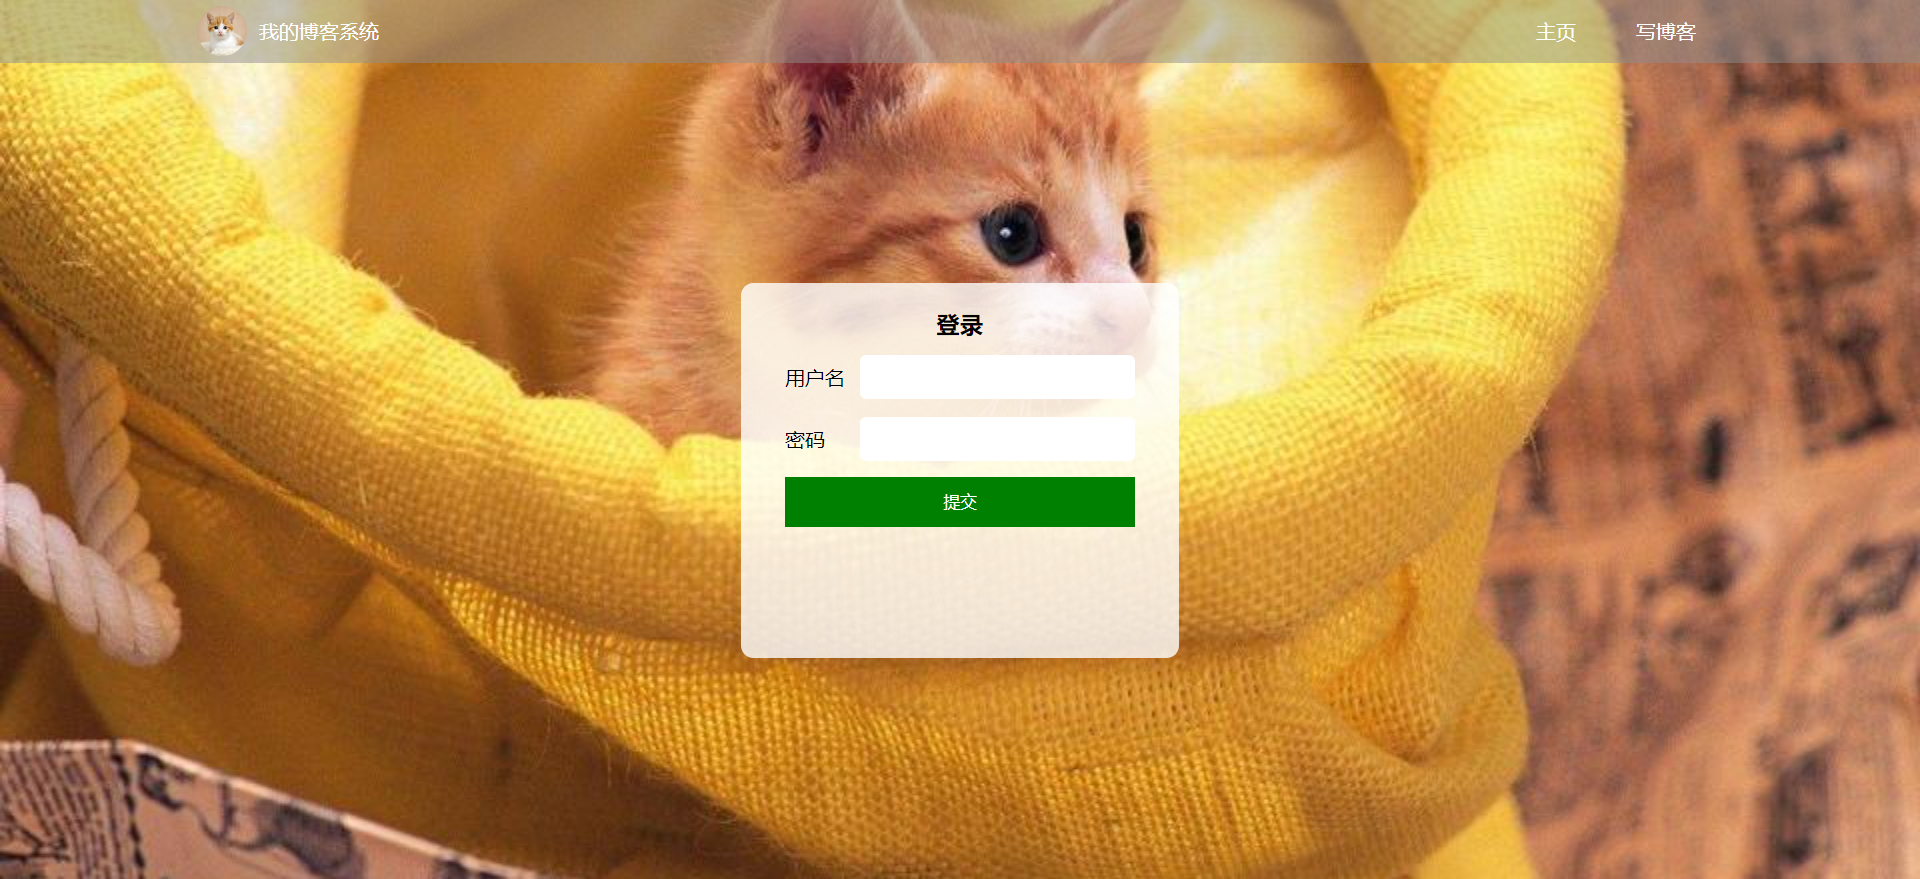
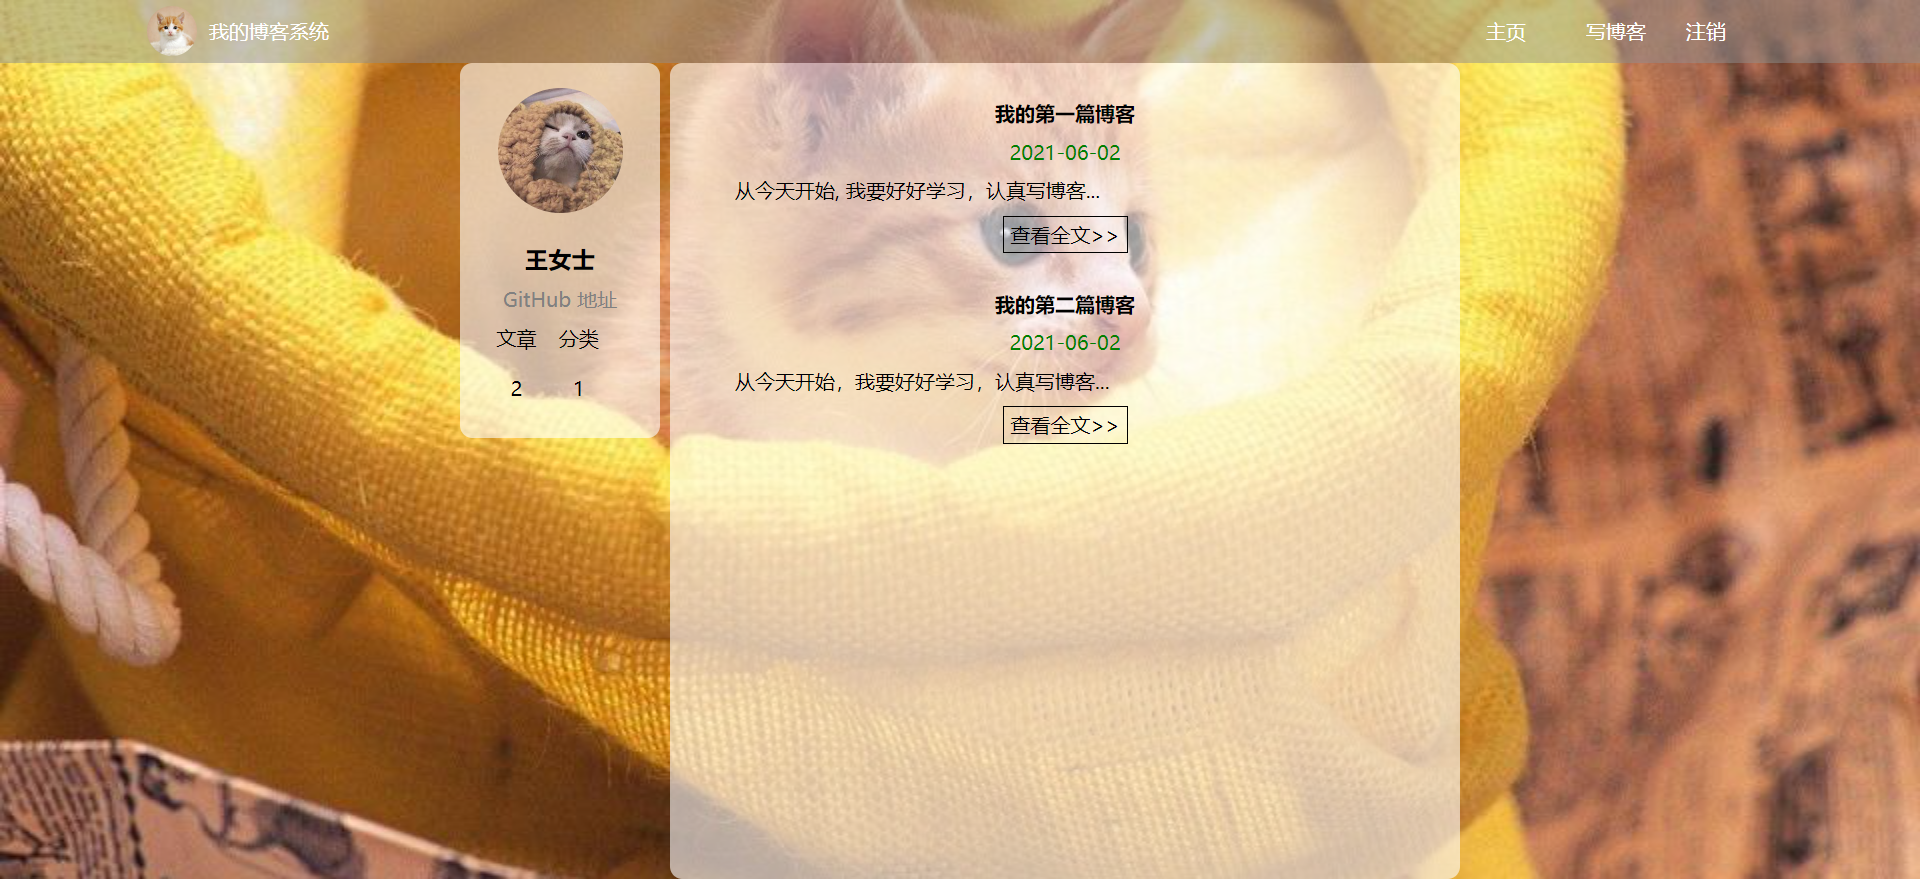
博客列表页:
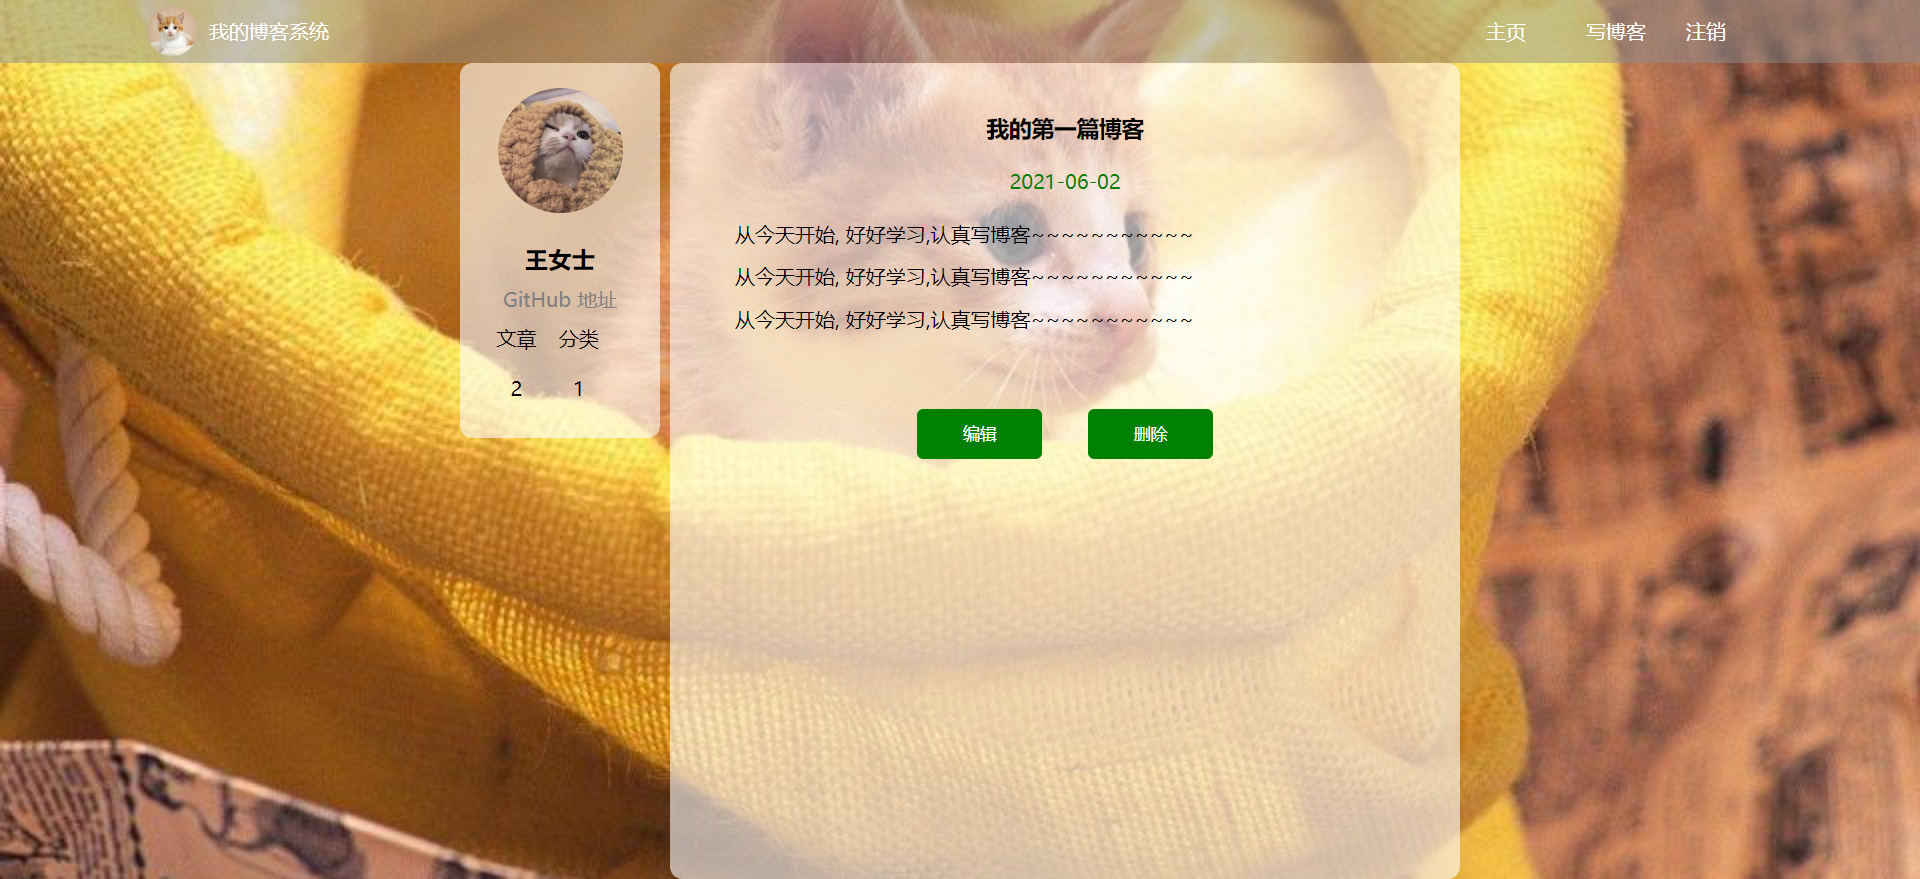
博客详情页:
博客编辑页:

2. 项目准备
2.1 数据库准备
-- 建表SQL
create database if not exists java_blog_spring charset utf8mb4;-- 用户表
DROP TABLE IF EXISTS java_blog_spring.user;
CREATE TABLE java_blog_spring.user(
`id` INT NOT NULL AUTO_INCREMENT,
`user_name` VARCHAR ( 128 ) NOT NULL,
`password` VARCHAR ( 128 ) NOT NULL,
`github_url` VARCHAR ( 128 ) NULL,
`delete_flag` TINYINT ( 4 ) NULL DEFAULT 0,
`create_time` DATETIME DEFAULT now(),
`update_time` DATETIME DEFAULT now(),
PRIMARY KEY ( id ),
UNIQUE INDEX user_name_UNIQUE ( user_name ASC )) ENGINE = INNODB DEFAULT
CHARACTER
SET = utf8mb4 COMMENT = '用户表';-- 博客表
drop table if exists java_blog_spring.blog;
CREATE TABLE java_blog_spring.blog (
`id` INT NOT NULL AUTO_INCREMENT,
`title` VARCHAR(200) NULL,
`content` TEXT NULL,
`user_id` INT(11) NULL,
`delete_flag` TINYINT(4) NULL DEFAULT 0,
`create_time` DATETIME DEFAULT now(),
`update_time` DATETIME DEFAULT now(),
PRIMARY KEY (id))
ENGINE = InnoDB DEFAULT CHARSET = utf8mb4 COMMENT = '博客表';-- 新增用户信息
insert into java_blog_spring.user (user_name,password,github_url)
values("zhangsan","123456","https://gitee.com/little-fishs-code-house/java-ee2");
insert into java_blog_spring.user (user_name,password,github_url)
values("lisi","123456","https://gitee.com/little-fishs-code-house/java-ee2");
insert into java_blog_spring.blog (title,content,user_id)
values("第⼀篇博客","1我是博客正我是博客正文,这是我的第一篇博客",1);
insert into java_blog_spring.blog (title,content,user_id)
values("第⼆篇博客","2我是博客正文我是博客正文,这是我的第二篇博客",2);


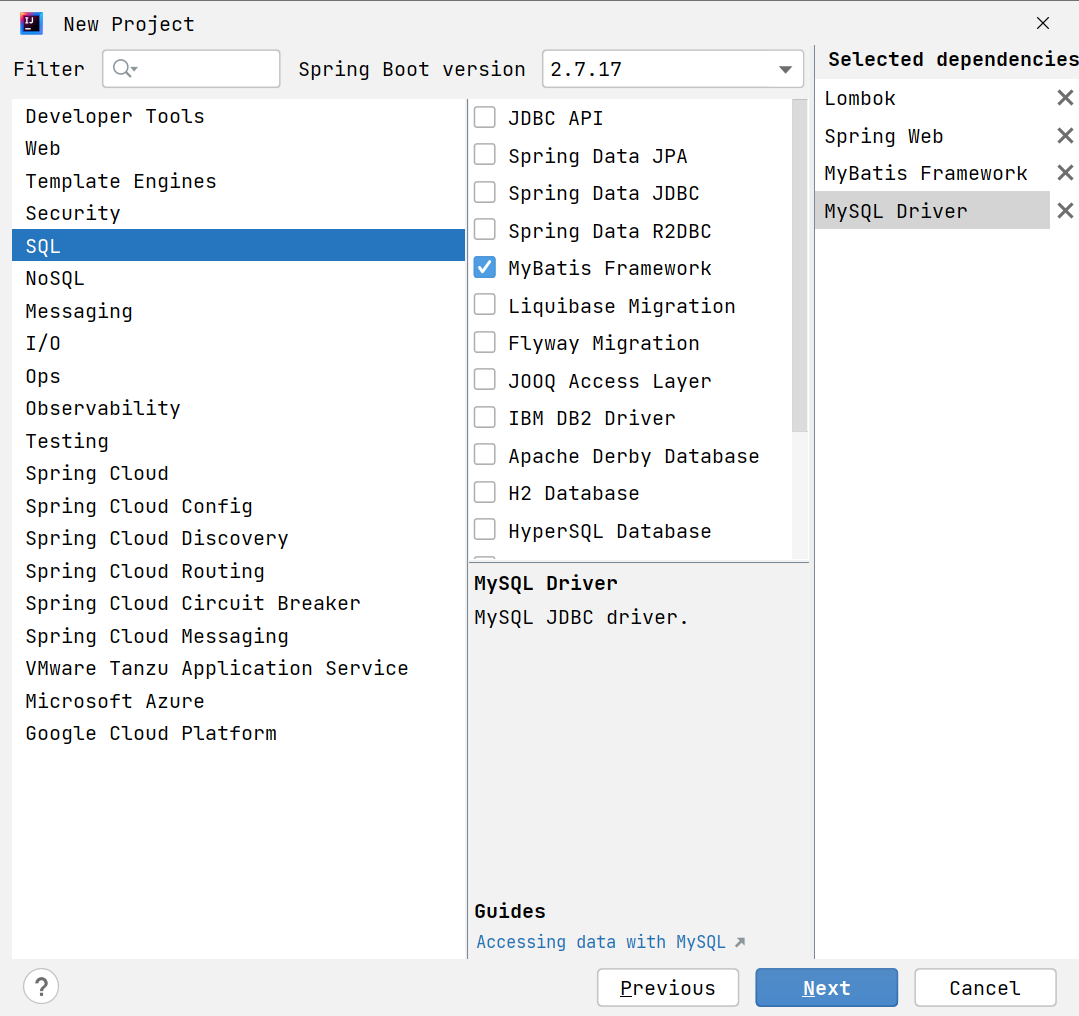
2.2 创建项目
创建SpringBoot项目, 添加Spring MVC 和MyBatis对应依赖。
2.3 配置文件
在application.yml文件中配置数据库相关的信息:
spring:datasource:url: jdbc:mysql://127.0.0.1:3306/java_blog_spring?characterEncoding=utf8&useSSL=falseusername: rootpassword: '0124'driver-class-name: com.mysql.cj.jdbc.Driver
mybatis:configuration: # 配置打印 MyBatis日志log-impl: org.apache.ibatis.logging.stdout.StdOutImpl #配置打印sql语句map-underscore-to-camel-case: true #配置驼峰自动转换mapper-locations: classpath:mapper/**Mapper.xml
#设置日志文件的文件名
logging:file:name: spring-blog.log
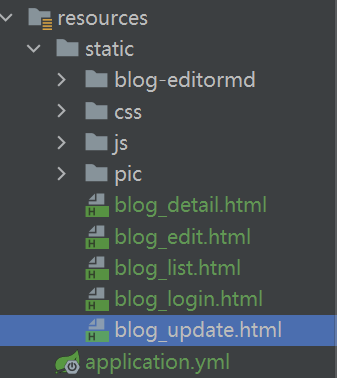
2.4 准备前端页面
把博客系统静态页⾯拷贝到static目录下:
2.5 测试
访问前端页面:http://127.0.0.1:8080/blog_login.html

前端页面可以正常显示,说明项目初始化成功。
3. 项目公共模块
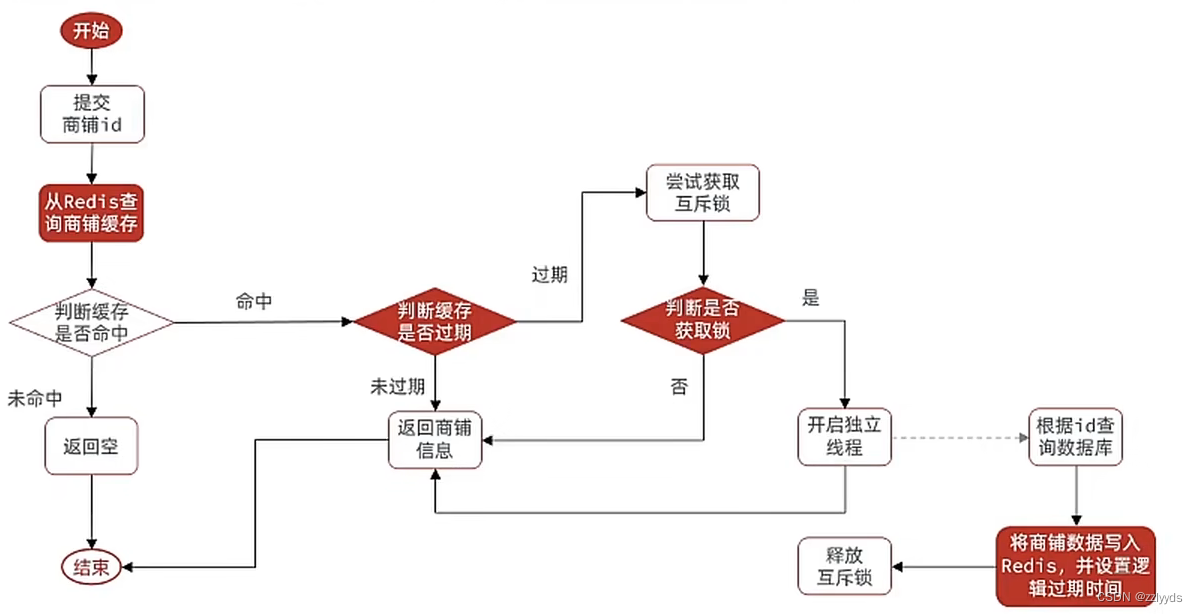
项⽬分为控制层(Controller), 服务层(Service), 持久层(Mapper)。各层之间的调⽤关系如下:
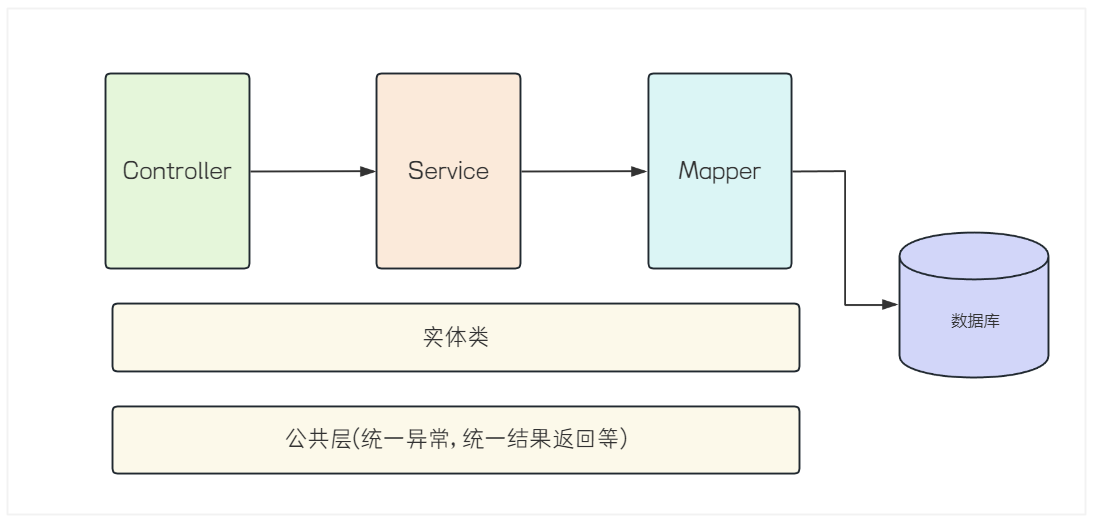
我们先根据需求完成实体类和公共层代码的编写。
3.1 实体类
@Data
public class UserInfo {private Integer id;private String userName;private String password;private String githubUrl;private Integer deleteFlag;private Date createTime;private Date updateTime;
}
@Data
public class BlogInfo {private Integer id;private String title;private String content;private Integer userId;private Integer deleteFlag;private Date createTime;private Date updateTime;
}
3.2 公共层
统一功能处理:
- 拦截器
- 统一结果返回
- 统一异常处理
拦截器内容在后面用户登录时介绍,这部分我们先写统一结果返回和统一异常处理。
- 统一结果返回为实体类:
- code:业务状态码
- 200:业务处理成功
- -1:业务处理失败
- -2:用户未登录
- errMsg:业务处理失败时,返回的错误信息
- data:业务返回的数据
- code:业务状态码
定义业务状态码:
public class Constant {public final static Integer SUCCESS_CODE = 200;// 成功public final static Integer FAIL_CODE = -1;// 失败public final static Integer UNLOGIN_CODE = -2;// 未登录
}
/*** 定义接口的统一返回结果*/
@Data
public class Result {private int code;// 业务码  定义:200-成功  -1-失败  -2-未登录private String errMsg;// 接口发生错误的信息private Object data;// 接口的返回真实结果/*** 接口返回成功时*/public static Result success(Object data) {Result result = new Result();result.setCode(Constant.SUCCESS_CODE);result.setErrMsg("");result.setData(data);return result;}/*** 接口返回失败时*/public static Result fail(String errMsg) {Result result = new Result();result.setCode(Constant.FAIL_CODE);result.setErrMsg(errMsg);result.setData(null);return result;}public static Result fail(String errMsg, Object data) {Result result = new Result();result.setCode(Constant.FAIL_CODE);result.setErrMsg(errMsg);result.setData(data);return result;}/*** 用户未登录时*/public static Result unLogin(String errMsg) {Result result = new Result();result.setCode(Constant.UNLOGIN_CODE);result.setErrMsg("用户未登录");result.setData(null);return result;}
}
- 统一返回结果:
@ControllerAdvice
public class ResponseAdvice implements ResponseBodyAdvice {@Autowiredprivate ObjectMapper objectMapper;@Overridepublic boolean supports(MethodParameter returnType, Class converterType) {// 对于哪些方法执行统一结果返回,可以自己定义,不写默认所有方法return true;}@SneakyThrows@Overridepublic Object beforeBodyWrite(Object body, MethodParameter returnType, MediaType selectedContentType, Class selectedConverterType, ServerHttpRequest request, ServerHttpResponse response) {// 统一结果返回的具体逻辑if (body instanceof Result) {return body;}// 如果接口返回为String类型,进行单独处理if (body instanceof String) {// 转为JSON类型
//            ObjectMapper objectMapper = new ObjectMapper();// 也可以直接注入进来return objectMapper.writeValueAsString(Result.success(body));}return Result.success(body);}
}
- 统一异常处理:
@ResponseBody
@ControllerAdvice
public class ErrorHandler {@ExceptionHandlerpublic Result handler(Exception e) {return Result.fail(e.getMessage());}// 两种写法
//    @ExceptionHandler(NullPointerException.class)
//    public Result handler(Exception e) {
//        return Result.fail(e.getMessage());
//    }
//
//    @ExceptionHandler
//    public Result handler(NullPointerException e) {
//        return Result.fail(e.getMessage());
//    }
}
4. 业务代码
4.1 持久层代码
根据需求, 先⼤致计算有哪些DB相关操作, 完成持久层初步代码, 后续再根据业务需求进⾏完善。
每个页面需要实现的接口:
- 用户登录页
- 用户登录:根据用户名和密码,判断是否正确。
具体实现:根据用户名,查找用户信息,对比密码是否正确。
DB操作:根据用户名,查询用户信息。
- 博客列表页
- 查询用户信息:根据用户ID,查询用户信息。
DB操作:根据用户ID,查询用户信息。
- 获取所有博客列表:查询所有博客。
DB操作:查询所有博客。
- 博客详情页
- 查询作者信息:
- 根据博客,拿到作者ID
- 根据作者ID,获取作者信息
- 查询作者信息:
DB操作:根据用户ID,查询用户信息。
- 查询博客详情:根据博客ID,查询博客信息
DB操作:根据博客ID,查询博客信息。
- 删除博客:根据博客ID,删除博客(修改delete_flag=1)
DB操作:根据博客ID,修改博客信息。
- 博客编辑页
- 修改博客:根据博客ID,修改博客信息。
DB操作:根据博客ID,修改博客信息。
- 发表博客:添加新的博客信息。
DB操作:插入新的博客数据。
总结:
用户表:
- 根据用户名,查询用户信息
- 根据用户ID,查询用户信息
博客表:
- 查询博客列表
- 根据博客ID,查询博客信息
- 根据博客ID,修改博客信息
- 插入博客
根据以上分析, 来实现持久层的代码:
@Mapper
public interface UserMapper {// 根据用户名,查找用户信息// *可以替换成具体字段@Select("select * from user where user_name = #{userName} and delete_flag = 0")UserInfo selectByName(String userName);// 根据用户ID,查询用户信息@Select("select * from user where id = #{userId} and delete_flag = 0")UserInfo selectById(Integer userId);
}
@Mapper
public interface BlogMapper {// 查询博客列表@Select("select * from blog where delete_flag = 0 order by create_time desc")List<BlogInfo> selectAllBlog();// 根据博客Id,查询博客信息@Select("select * from blog where id = #{blogId} and delete_flag = 0")BlogInfo selectById(Integer blogId);// 根据博客ID,修改博客信息(包含修改和删除,根据参数决定修改什么)Integer updateBlog(BlogInfo blogInfo);// 插入博客@Insert("insert into blog (title, content, user_id) values(#{title}, #{content}, #{userId})")Integer insertBlog(BlogInfo blogInfo);
}
<?xml version="1.0" encoding="UTF-8"?>
<!DOCTYPE mapper PUBLIC "-//mybatis.org//DTD Mapper 3.0//EN" "http://mybatis.org/dtd/mybatis-3-mapper.dtd">
<mapper namespace="com.xiaoyu.blog.mapper.BlogMapper"><update id="updateBlog">update blog<set><if test="title != null">title = #{title},</if><if test="content != null">content = #{content},</if><if test="deleteFlag != null">delete_flag = #{deleteFlag}</if></set>where id = #{id}</update>
</mapper>
书写测试用例, 简单进行单元测试:
@SpringBootTest
class UserMapperTest {@Autowiredprivate UserMapper userMapper;@Testvoid selectByName() {System.out.println(userMapper.selectByName("zhangsan"));}@Testvoid selectById() {System.out.println(userMapper.selectById(2));}
}
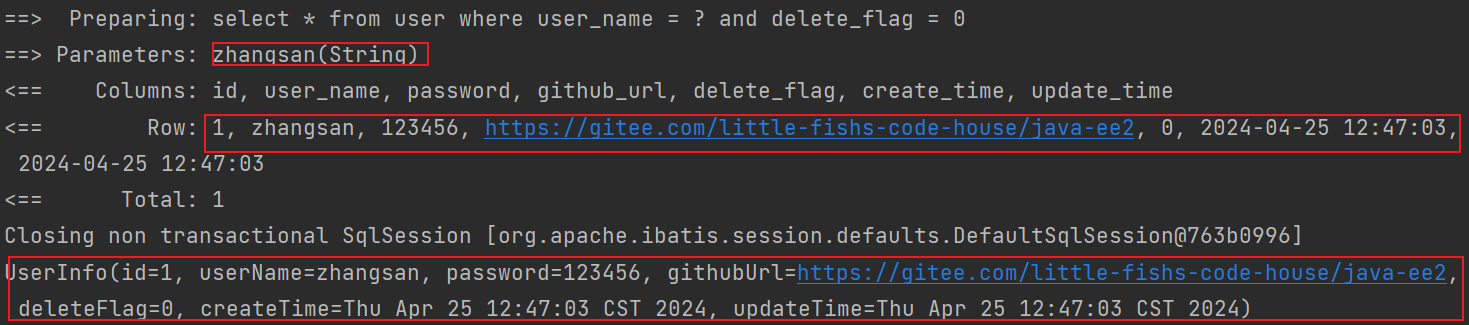
运行程序,观察日志:
- selectByName接口返回结果:
- selectById接口返回结果:
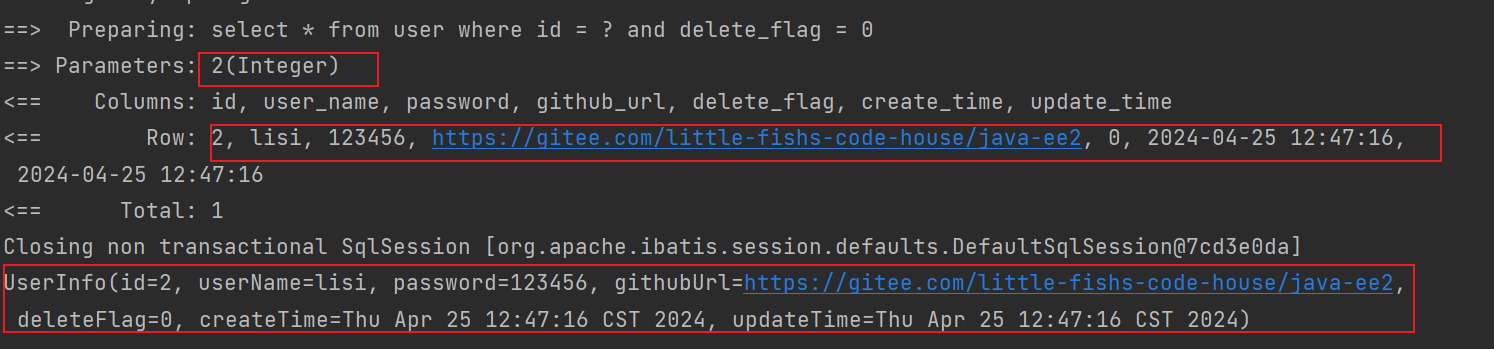
接口返回均正确。
@SpringBootTest
class BlogMapperTest {@Autowiredprivate BlogMapper blogMapper;@Testvoid selectAllBlog() {System.out.println(blogMapper.selectAllBlog());}@Testvoid selectById() {System.out.println(blogMapper.selectById(1));}@Testvoid updateBlog() {BlogInfo blogInfo = new BlogInfo();blogInfo.setTitle("update更新标题");blogInfo.setContent("update更新内容");blogInfo.setId(1);System.out.println(blogMapper.updateBlog(blogInfo));}@Testvoid deleteBlog() {BlogInfo blogInfo = new BlogInfo();blogInfo.setId(2);//第二条数据blogInfo.setDeleteFlag(1);System.out.println(blogMapper.updateBlog(blogInfo));}@Testvoid insertBlog() {BlogInfo blogInfo = new BlogInfo();blogInfo.setTitle("insert第三篇博客");blogInfo.setContent("insert博客内容");blogInfo.setUserId(2);System.out.println(blogMapper.insertBlog(blogInfo));}
}
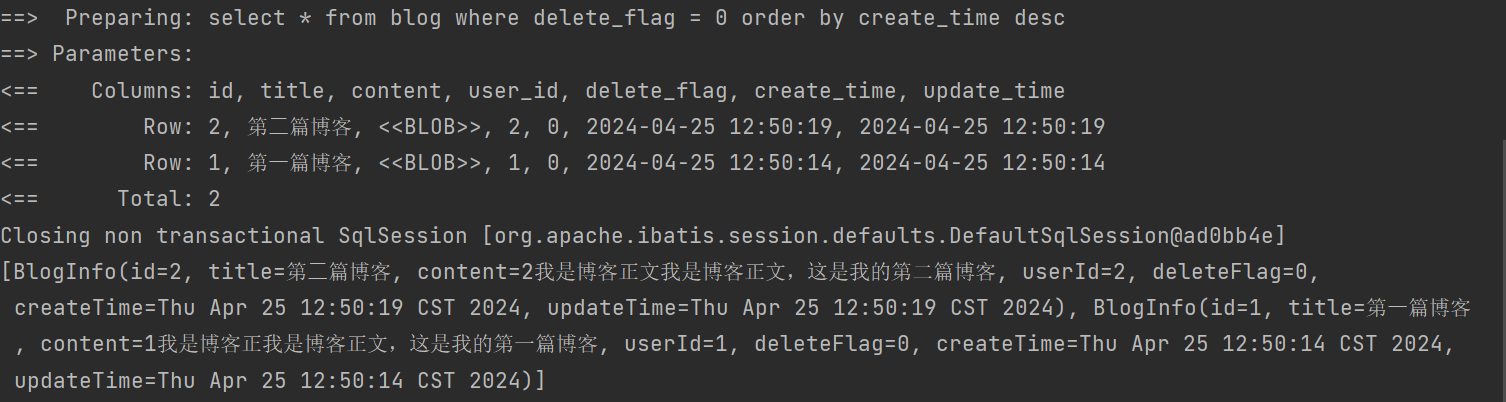
- 测试接口selectAllBlog,观察日志:
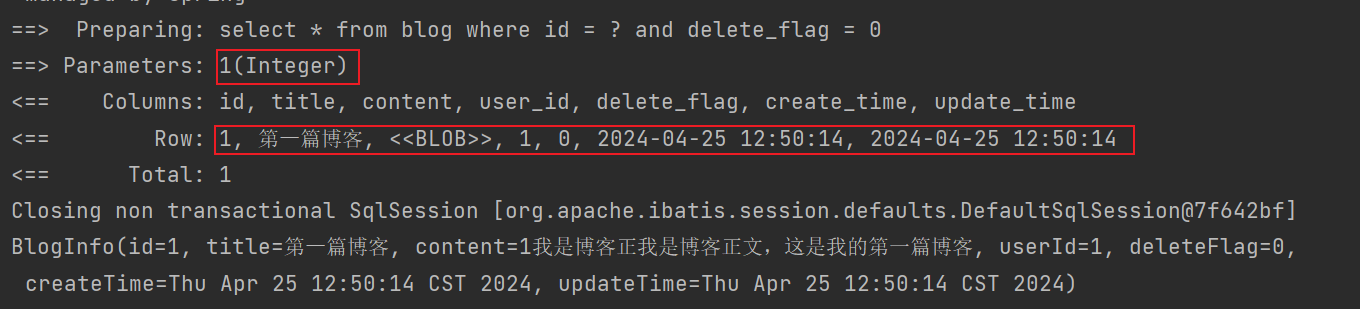
- 测试接口selectById,观察日志:
- 测试接口updateBlog,观察日志:

更新前数据库信息为:

更新后数据库信息为:

- 测试接口deleteBlog,观察日志:

更新后数据库信息为:

- 测试接口insertBlog,观察日志:

更新后数据库信息为:

接口均测试成功。
4.2 实现博客列表
约定前后端交互接口:
[请求]
/blog/getList
[响应]
{"code": 200,"errMsg": "","data": [{"id": 4,"title": "insert第三篇博客","content": "insert博客内容","userId": 2,"deleteFlag": 0,"createTime": "2024-04-26T10:49:52.000+00:00","updateTime": "2024-04-26T10:49:52.000+00:00"},...]
}
客户端给服务器发送⼀个 /blog/getList 这样的 HTTP 请求, 服务器给客户端返回了⼀个 JSON 格式的数据。
实现服务器代码:
@RestController
@RequestMapping("/blog")
public class BlogController {@Autowiredprivate BlogService blogService;@RequestMapping("/getList")public List<BlogInfo> queryBlogList() {return blogService.queryBlogList();}
}
@Service
public class BlogService {@Autowiredprivate BlogMapper blogMapper;public List<BlogInfo> queryBlogList() {return blogMapper.selectAllBlog();}
}
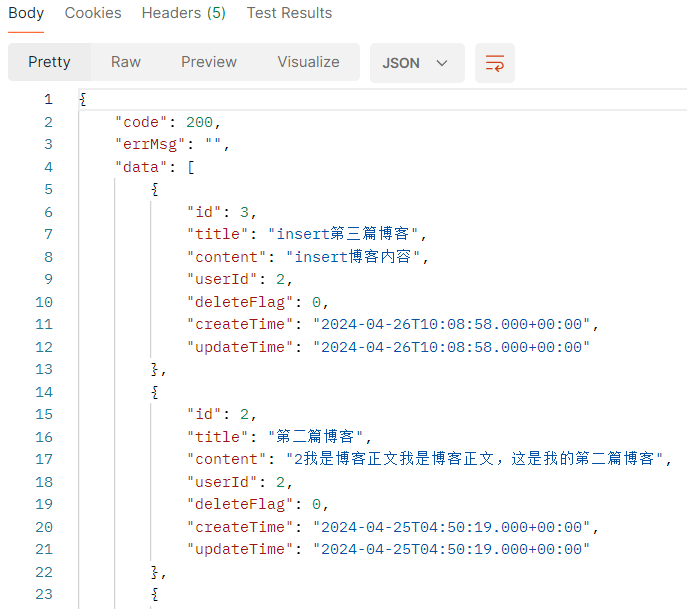
启动程序,验证服务器能否返回正确数据:访问http://127.0.0.1:8080/blog/getList,响应结果为:
实现客户端代码:
我们希望访问blog_list.html这个页面,在页面加载的时候就去调用后端接口,返回数据,并进行填充,所以修改blog_list.html,删除之前写死的博客内容(即 <divclass=“blog”> ),并新增 js 代码处理ajax 请求。
- 使用 ajax 给服务器发送 HTTP 请求。
- 服务器返回的响应是⼀个 JSON 格式的数据, 根据这个响应数据使用 DOM API 构造页⾯内容。
- 响应中的 createTime 字段为 ms 级时间戳, 需要转成格式化日期。
- 跳转到博客详情页的 url 形如 blog_detail.html?blogId=1 这样就可以让博客详情页知道当前是要访问哪篇博客。
<script>$.ajax({type: "get",url: "/blog/getList",success: function(result) {// 如果result.code == 200 && result.data == null,页面可以提示:当前还没有任何博客,快去写博客吧!并进行页面跳转if (result.code == 200 && result.data != null) {var finalHtml = "";// 页面展示// 循环拼接result.data里面的数据for (var blog of result.data) {finalHtml += '<div class="blog">';finalHtml += '<div class="title">'+ blog.title +'</div>';finalHtml += '<div class="date">'+ blog.createTime +'</div>';finalHtml += '<div class="desc">'+ blog.content +'</div>';finalHtml += '<a class="detail" href="blog_detail.html?blogId='+ blog.id +'">查看全文>></a>';finalHtml += '</div>';}$(".right").html(finalHtml);}}});</script>
运行程序,通过url:http://127.0.0.1:8080/blog_list.html访问服务器:
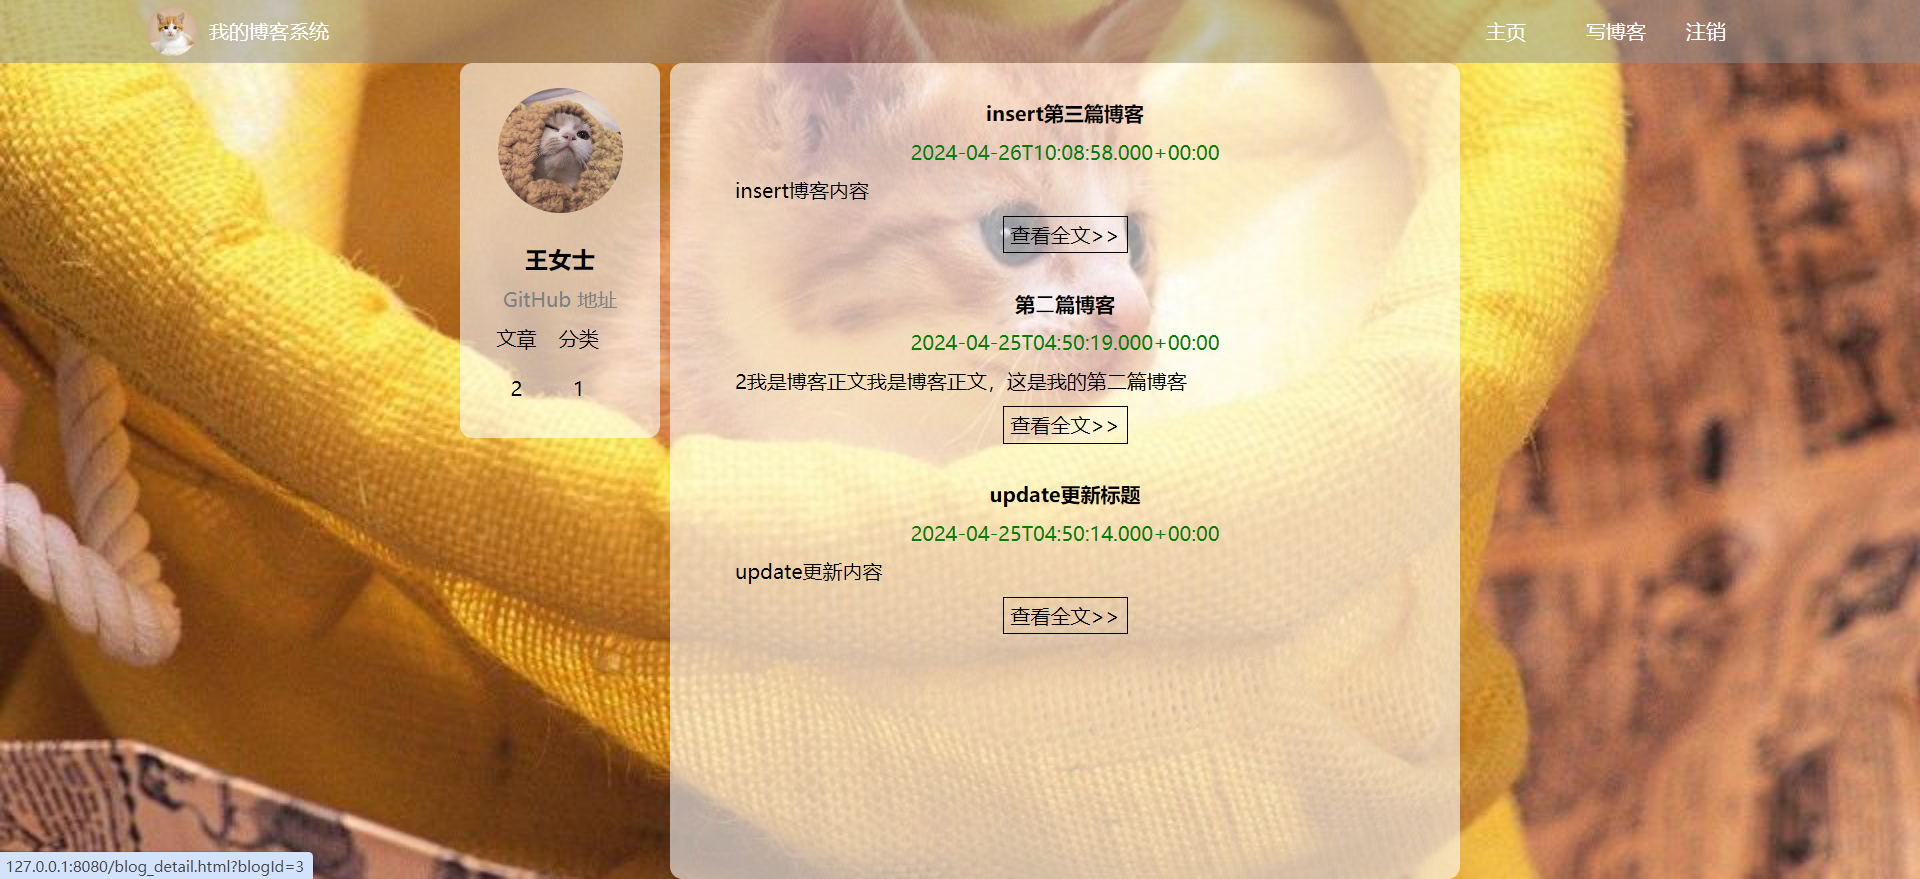
我们发现页面的日期显示为ms 级时间戳, 需要转成格式化日期,从后端对日期进行处理:
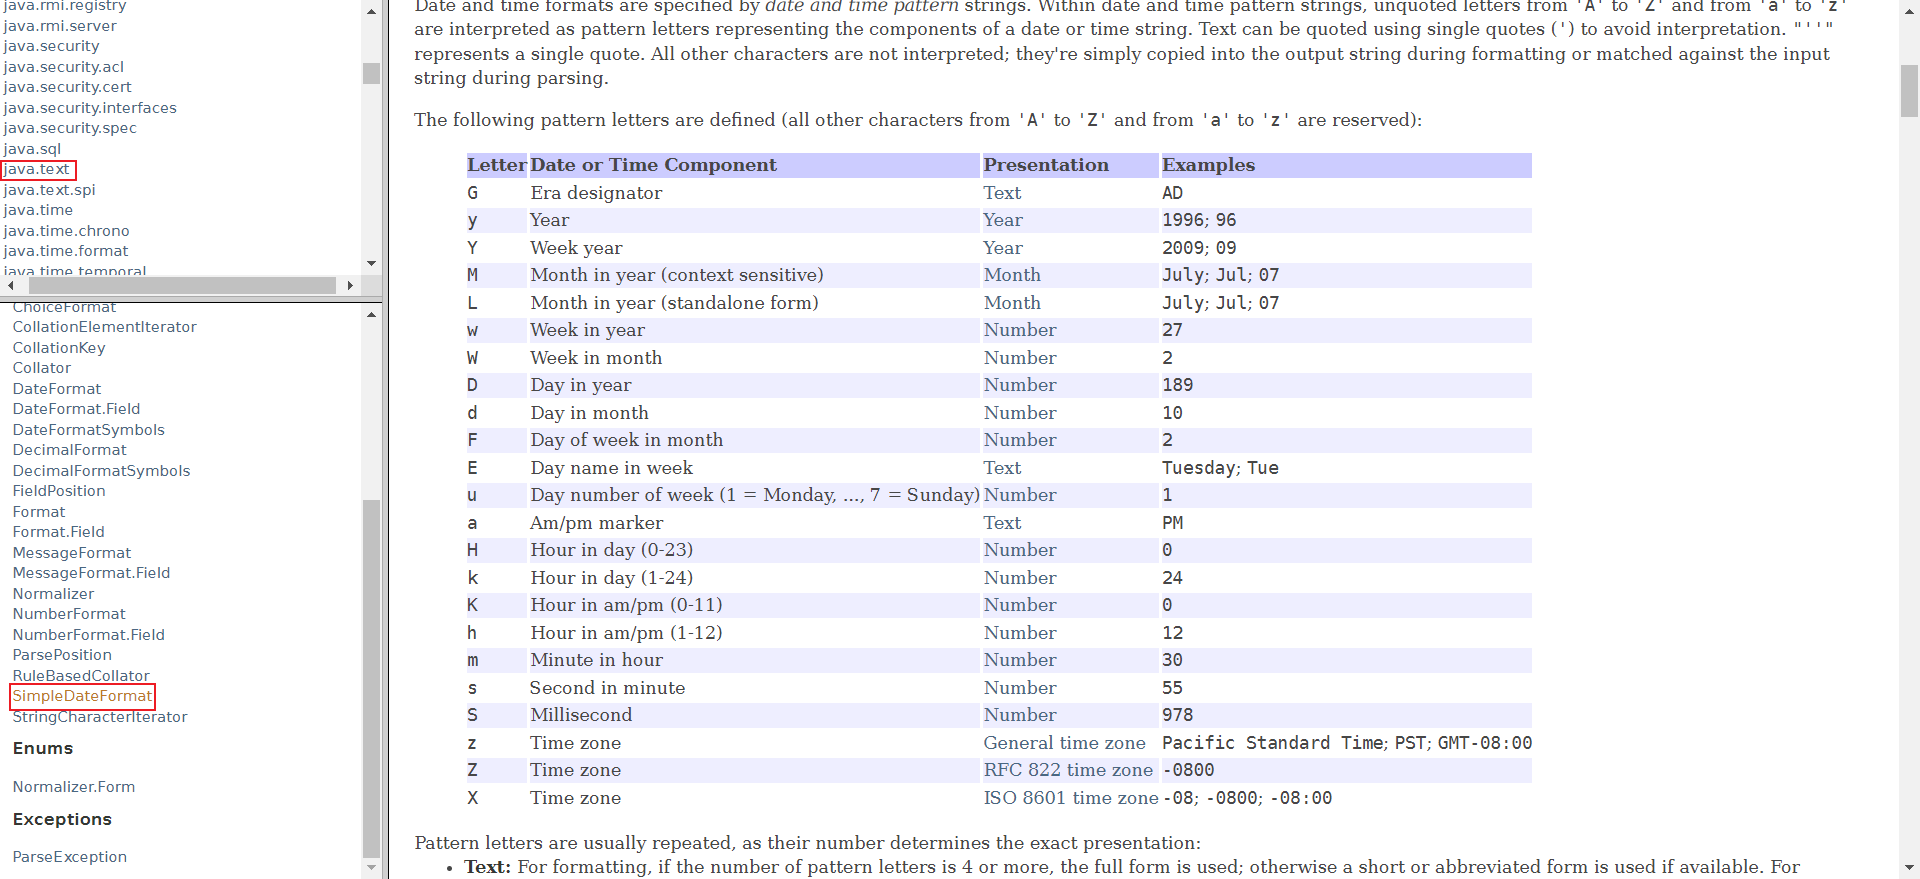
SimpleDateFormat 格式参考官⽅⽂档:
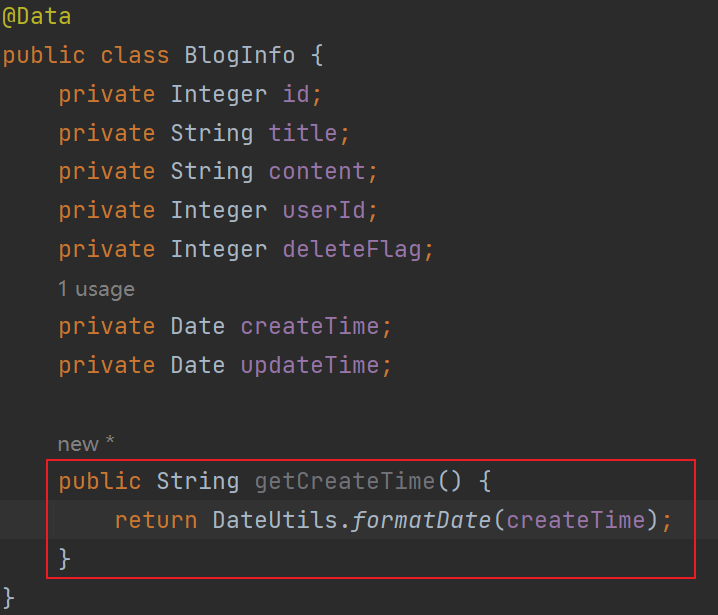
/*** 日期工具类*/
public class DateUtils {public static String formatDate(Date date) {SimpleDateFormat simpleDateFormat = new SimpleDateFormat("yyyy-MM-dd HH:mm");return simpleDateFormat.format(date);}
}
修改BlogInfo实体类:
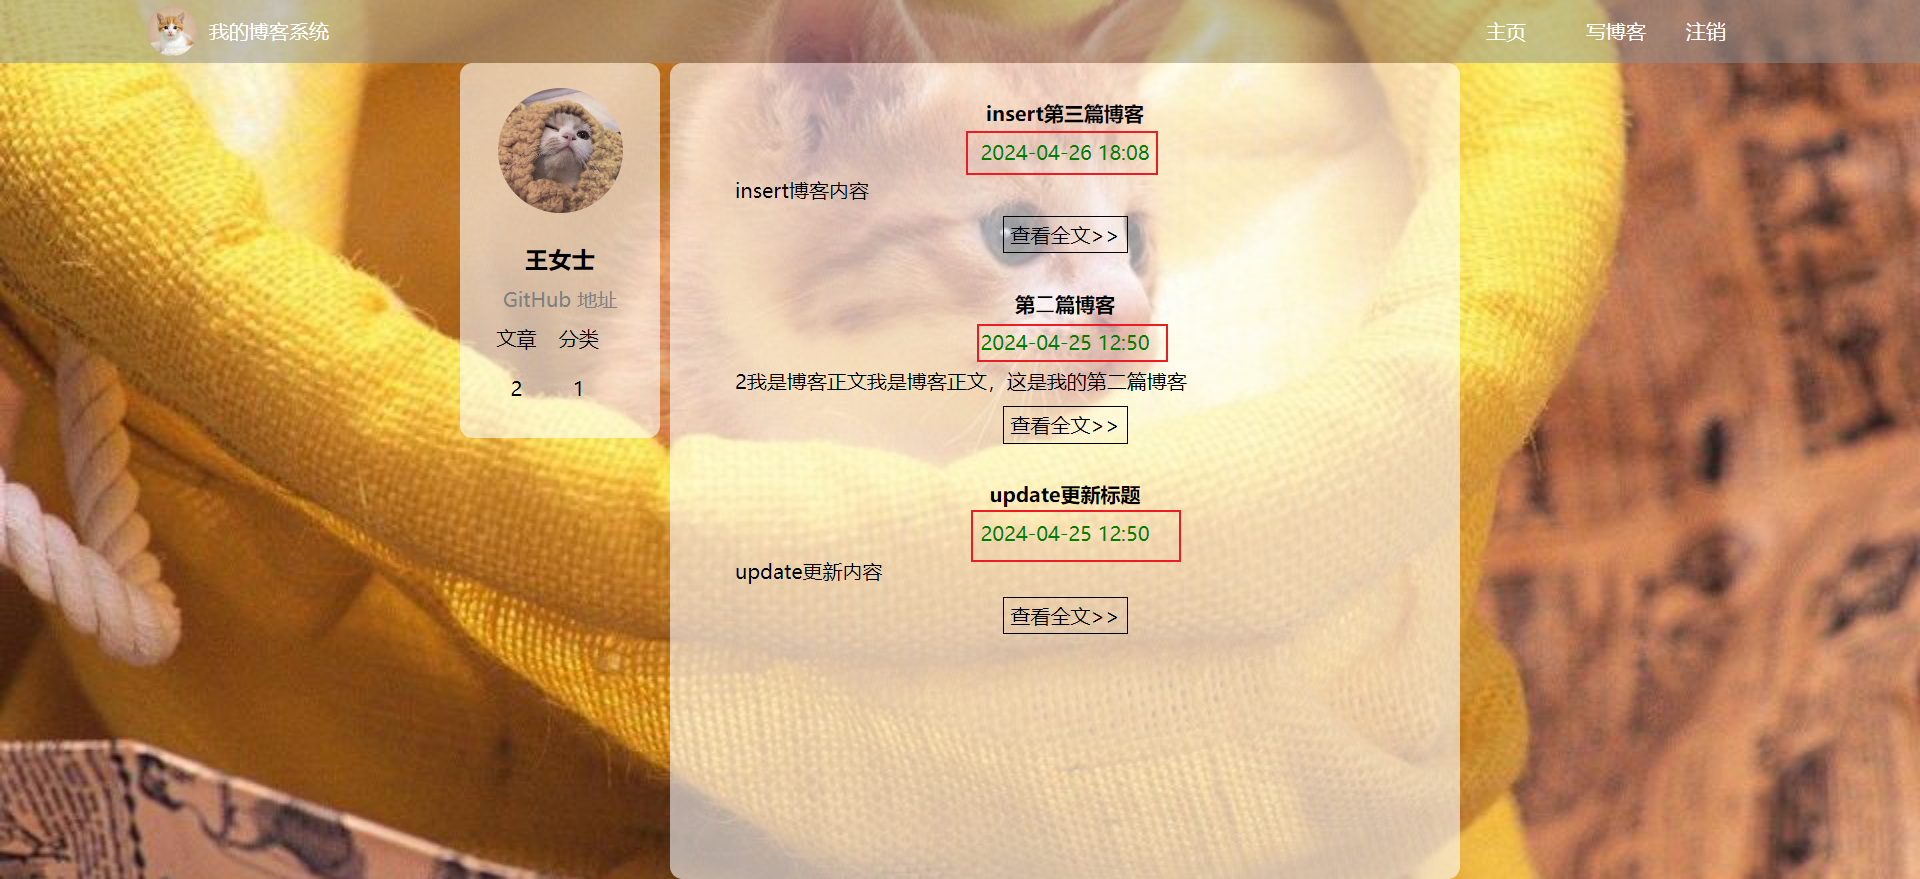
重新启动程序,通过 URL http://127.0.0.1:8080/blog_list.html 访问服务器, 验证效果:
4.3 实现博客详情
⽬前点击博客列表⻚的 “查看全⽂” , 能进⼊博客详情⻚, 但是这个博客详情⻚是写死的内容。我们期望能够根据当前的博客 id 从服务器动态获取博客内容。
约定前后端交互接口:
[请求]
/blog/getBlogDetail?blogId=1
[响应]
{"code": 200,"msg": "","data": {"id": 1,"title": "第⼀篇博客","content": "111我是博客正⽂我是博客正⽂我是博客正⽂","userId": 1,"deleteFlag": 0,"createTime": "2023-10-21 16:56:57","updateTime": "2023-10-21T08:56:57.000+00:00"}
}
实现服务器代码:
BlogController 中添加queryBlogDetail ⽅法:
@RequestMapping("/getBlogDetail")
public BlogInfo queryBlogDetail(Integer blogId) {return blogService.queryBlogDetail(blogId);
}
在BlogService 中添加queryBlogDetail⽅法:
public BlogInfo queryBlogDetail(Integer blogId) {return blogMapper.selectById(blogId);
}
运行程序,访问http://127.0.0.1:8080/blog/getBlogDetail?blogId=3,测试后端接口的返回结果:

实现客户端代码:
修改 blog_detail.html
- 根据当前页面 URL 中的 blogId 参数(使用 location.search 即可得到形如 ?blogId=3 的数据), 给服务器发送 GET /blog 请求。
- 根据获取到的响应数据, 显示在页面上
- 修改html⻚⾯, 去掉原来写死的博客标题, ⽇期和正⽂部分:
<div class="content"><div class="title"></div><div class="date"></div><div class="detail"></div><div class="operating"><button onclick="window.location.href='blog_update.html'">编辑</button><button onclick="deleteBlog()">删除</button></div>
</div>
- 完善 js 代码, 从服务器获取博客详情数据:
// 获取博客详情
$.ajax({type: "get",url: "/blog/getBlogDetail"+location.search,success: function(result) {if (result.code == 200 && result.data != null) {var blog = result.data;$(".right .content .title").text(blog.title);$(".right .content .date").text(blog.createTime);$(".right .content .detail").text(blog.content);}}
});
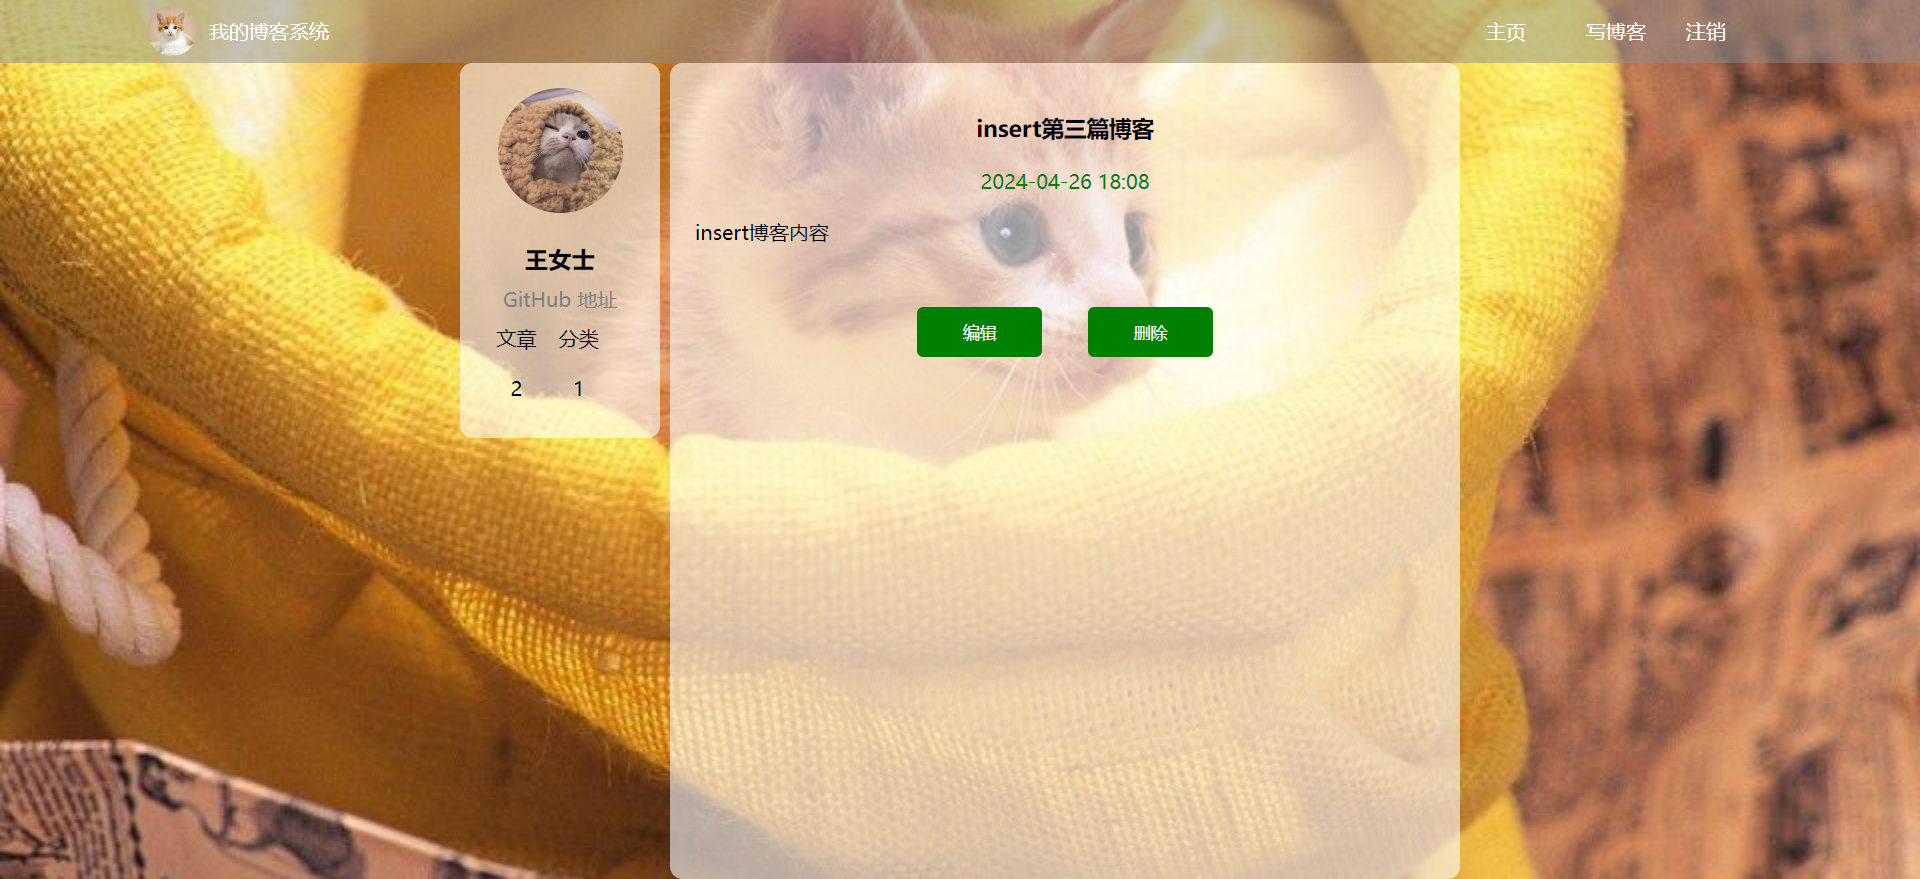
运行程序,访问http://127.0.0.1:8080/blog_detail.html?blogId=3,观察页面返回的数据:
未完,后见下篇文章!