vue入门:路由 router
文章目录
- 介绍
- 安装
- 配置
- 路由模式
- 嵌套路由
- 路由传参
- 编程式导航
- 路由懒加载
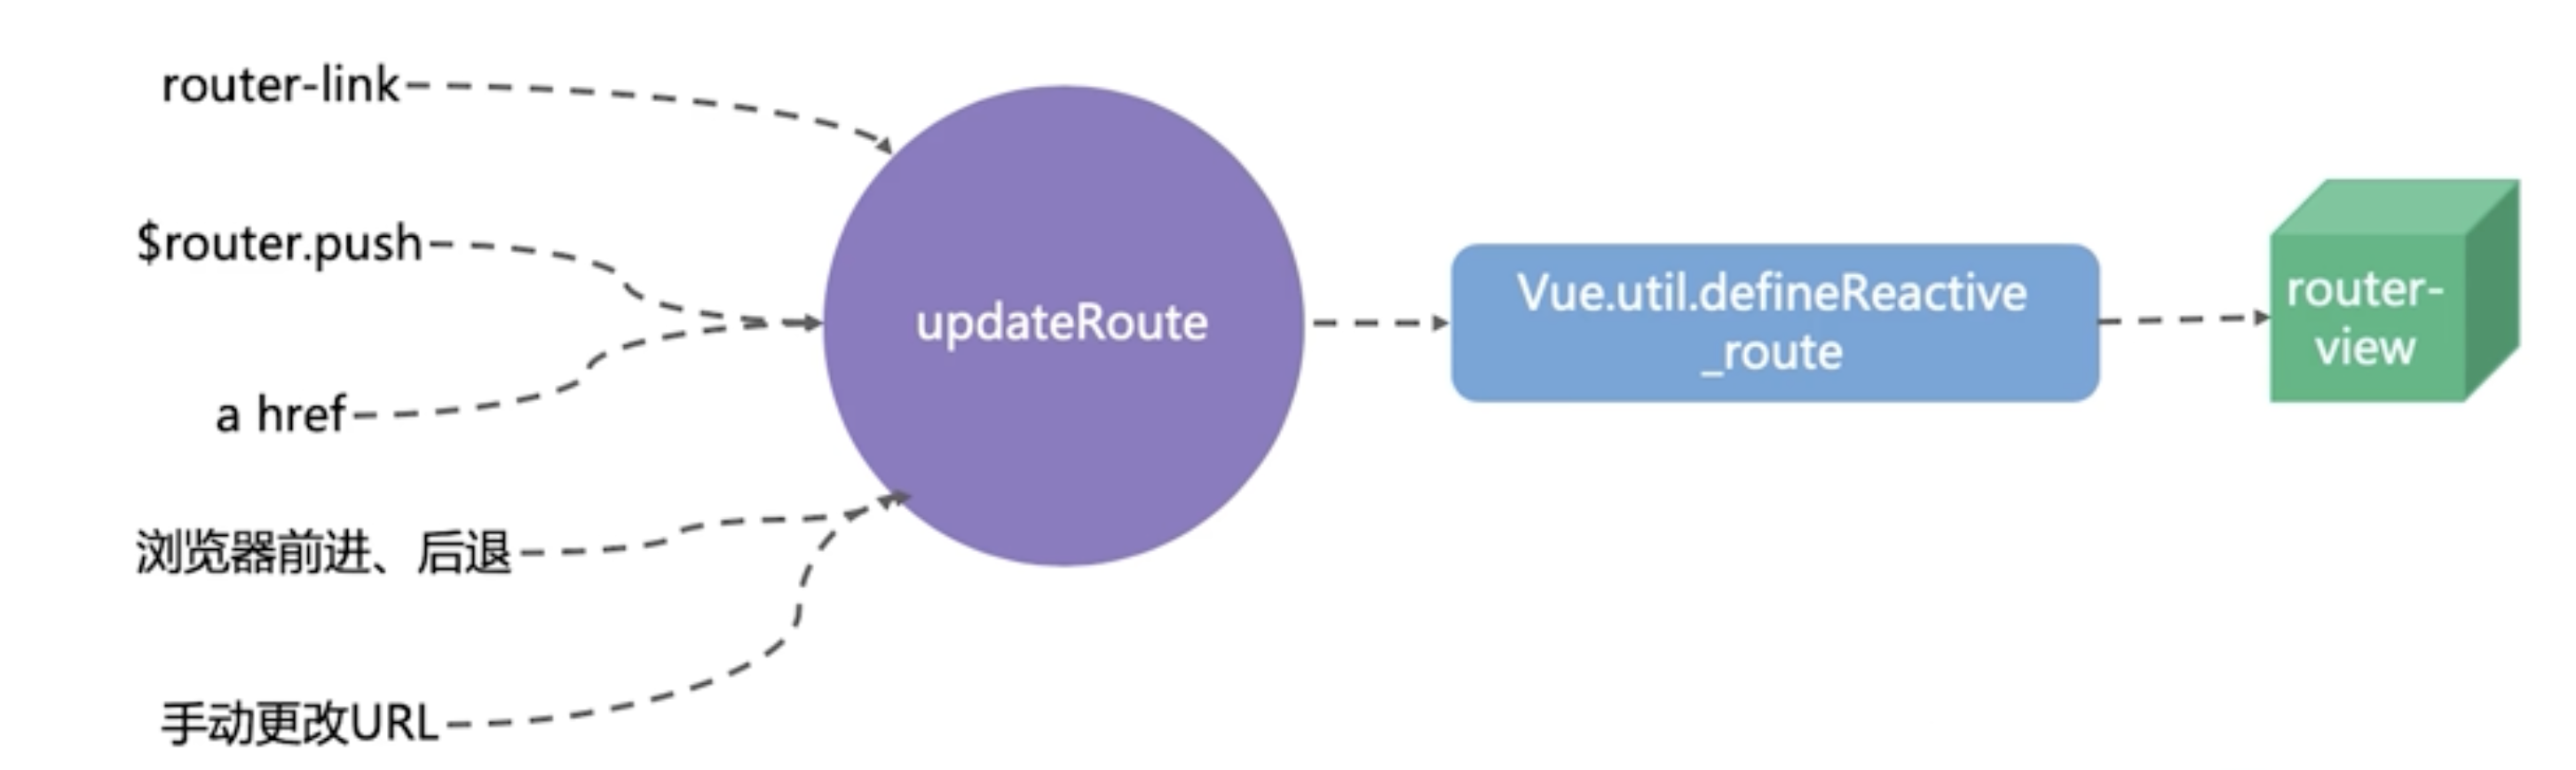
- 底层原理
介绍
vue2 vue router API
vue3 vue router API
Vue Router 是 Vue.js 的官方路由管理器,它允许你通过不同的 URL 显示不同的组件,从而实现单页面应用(SPA)。
Vue Router 是构建单页面应用的核心工具,通过路由管理不同的页面组件,实现页面的切换而无需重新加载整个页面,从而提高用户体验和性能。
路由(Route) :路由是 Vue Router 中的基本单元,它定义了路径与组件之间的映射关系。
例如,当用户访问 /home 路径时,路由会将对应的 Home 组件渲染到页面上。路由可以包含路径参数、查询参数等,用于传递动态数据。
路由表(Routes) :路由表是一个数组,包含了所有路由的定义。
每个路由对象通常包含 path(路径)和 component(组件)两个属性。例如:
const routes = [{ path: '/', component: Home },{ path: '/about', component: About },{ path: '/user/:id', component: User }
];
在这个例子中,
Home 组件对应根路径 /,About 组件对应/about 路径,而/user/:id是一个带有动态参数的路由,id 是路径参数,可以通过 this.$route.params.id 在组件中获取。
导航守卫(Navigation Guards) :导航守卫是 Vue Router 提供的一种机制,用于在路由跳转过程中执行一些逻辑判断或操作。
它可以在路由跳转之前(前置守卫)、跳转之后(后置守卫)或在路由跳转过程中(全局守卫)进行拦截和处理。
例如,可以使用前置守卫 beforeEach 来实现登录验证,如果用户未登录,则跳转到登录页面
const router = new VueRouter({ ... });
router.beforeEach((to, from, next) => {if (to.path === '/login') {next(); // 如果目标路径是登录页面,直接放行} else {const isAuthenticated = checkAuth(); // 假设有一个函数用于检查用户是否登录if (isAuthenticated) {next(); // 如果用户已登录,放行} else {next('/login'); // 如果用户未登录,跳转到登录页面}}
});
安装
npm install vue-router
配置
在 Vue 项目中,通常会在一个单独的文件(如 router/index.js)中配置路由。以下是基本配置的步骤:
- 引入 Vue 和 Vue Router,并使用 Vue.use() 将 Vue Router 安装为 Vue 的插件:
import Vue from 'vue';
import VueRouter from 'vue-router';
Vue.use(VueRouter);
- 定义路由组件:
import Home from '../components/Home.vue';
import About from '../components/About.vue';# 创建路由表:
const routes = [{ path: '/', component: Home },{ path: '/about', component: About }
];# 创建并配置路由实例,然后挂载到 Vue 实例上:
const router = new VueRouter({mode: 'history', // 设置路由模式,默认是 hash 模式routes // (缩写)相当于 routes: routes
});
export default router;
在 Vue 实例中使用路由:
import Vue from 'vue';
import App from '../App.vue';
import router from './router';
new Vue({router,render: h => h(App)
}).$mount('#app');
路由模式
hash 模式 :
这是 Vue Router 的默认模式。在这种模式下,URL 中会包含一个 #,例如 http://example.com/#/home。它的原理是利用浏览器的 hashchange 事件来监听 URL 的变化,并且不会向服务器发送请求。优点是兼容性好,不需要服务器配置支持;缺点是 URL 中的 # 可能会影响美观。
history 模式 :
这种模式下,URL 是正常的路径形式,例如 http://example.com/home。它利用了 HTML5 的 History API(pushState 和 replaceState)来实现 URL 的变化,而不会重新加载页面。优点是 URL 更美观,符合传统的网页路径形式;缺点是需要服务器配置支持,因为服务器需要正确处理所有路由对应的路径,否则可能会返回 404 错误。
嵌套路由
Vue Router 支持嵌套路由,允许在一个组件内部定义子路由。例如,有一个 User 组件,它包含多个子页面,如 Profile 和 Posts,可以通过嵌套路由来实现:
const routes = [{// 当 /user/:id/profile 匹配成功,// UserProfile 会被渲染在 User 的 <router-view> 中path: '/user/:id',component: User,children: [{ path: 'profile', component: Profile },{ path: 'posts', component: Posts }]}
];
在 User 组件中,可以通过 <router-view> 来渲染子路由对应的组件:
<template><div><h1>User</h1><router-view></router-view></div>
</template>
这样,当访问
/user/1/profile时,Profile组件会被渲染到User组件的<router-view>中。
路由视图 <router-view>
<template><div id="app"><router-view/></div>
</template>
导航链接 <router-link>
<router-link to="/">Home</router-link>
<router-link to="/about">About</router-link><!-- 使用命名路由 -->
<router-link :to="{ name: 'About' }">About</router-link><!--  路由导航到  /user/123 路径 -->
<router-link :to="{ name: 'user', params: { userId: 123 }}">User</router-link>
路由传参
路径参数 :通过在路由路径中定义参数来传递数据,例如 /user/:id。在组件中可以通过 this.$route.params 获取路径参数。例如:
// 路由定义
{ path: '/user/:id', component: User }// 在 User 组件中获取参数
export default {mounted() {const userId = this.$route.params.id;console.log(userId);}
};
查询参数 :通过 URL 的查询字符串来传递参数,例如 /user?id=1。在组件中可以通过 this.$route.query 获取查询参数。例如:
// 在组件中获取查询参数
export default {mounted() {const userId = this.$route.query.id;console.log(userId);}
};
编程式导航
Vue Router 提供了编程式导航的方法,允许在代码中直接操作路由跳转,而不仅仅是通过 <router-link>。例如:
// 跳转到指定路径
this.$router.push('/about');
// 带参数的跳转
this.$router.push({ path: '/user', query: { id: 1 } });
// 带路径参数的跳转
this.$router.push({ name: 'user', params: { id: 1 } });
// 替换当前路由,不会添加到历史记录
this.$router.replace('/home');
// 后退到上一个路由
this.$router.go(-1);
路由懒加载
为了提高应用的性能,可以通过路由懒加载来实现按需加载组件。这样可以减少初始加载时间,只在需要时才加载对应的组件代码。例如:
const routes = [{path: '/',component: () => import('../components/Home.vue')},{path: '/about',component: () => import('../components/About.vue')}
];
底层原理