图片上传
一、七牛云oss介绍
1.1 图片存储介绍
在实际开发中,我们会有很多处理不同功能的服务器。例如:
应用服务器:负责部署我们的应用
数据库服务器:运行我们的数据库
文件服务器:负责存储用户上传文件的服务器
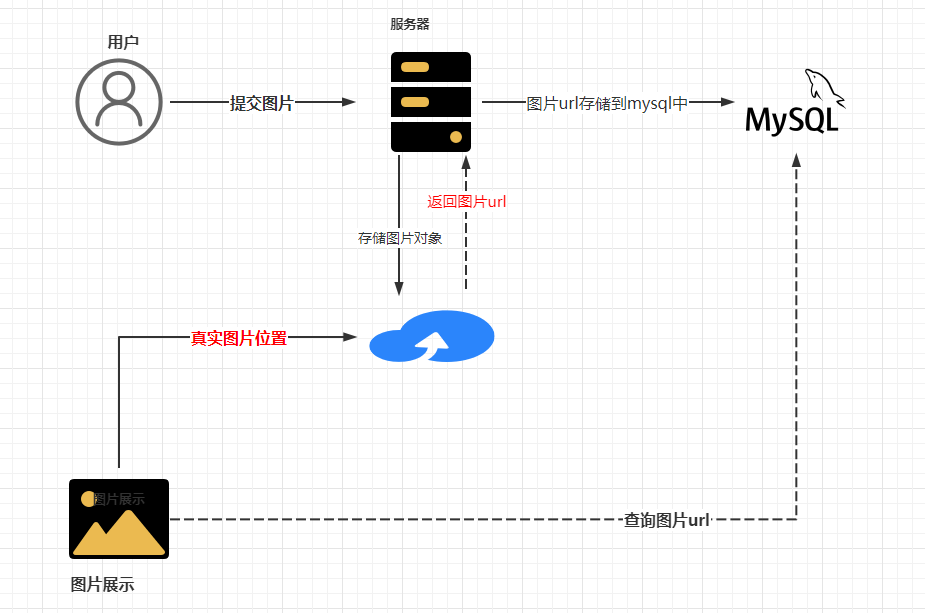
分服务器处理的目的是让服务器各司其职,从而提高我们项目的运行效率。
常见的图片存储方案:
方案一:使用nginx搭建图片服务器(最不常用)
方案二:使用开源的分布式文件存储系统,例如Fastdfs、HDFS等
方案三:使用云存储,例如阿里云、七牛云等
1.2 使用
1.2.1 注册账号
1.2.2 创建存储空间

1.2.3 开发文档
快速入门文档: https://developer.qiniu.com/kodo/1233/console-quickstart
java 开发SDK文档: https://developer.qiniu.com/kodo/1239/java
1.2.4 鉴权
鉴权:Java SDK的所有的功能,都需要合法的授权。授权凭证的签算需要七牛账号下的一对有效的Access Key和Secret Key
1.2.5 工具类封装
1)添加依赖
<!--七牛云的图片上传依赖-->
<dependency><groupId>com.qiniu</groupId><artifactId>qiniu-java-sdk</artifactId><version>7.16.0</version>
</dependency>
2)编写工具类
package com.woniuxy.portal.utils;import com.google.gson.Gson;
import com.qiniu.common.QiniuException;
import com.qiniu.http.Response;
import com.qiniu.storage.BucketManager;
import com.qiniu.storage.Configuration;
import com.qiniu.storage.Region;
import com.qiniu.storage.UploadManager;
import com.qiniu.storage.model.DefaultPutRet;
import com.qiniu.util.Auth;public class QiNiuUploadUtils {/*** 图片上传* @param uploadBytes* @param filename*/public static String uploadFile(byte[] uploadBytes, String filename){//构造一个带指定 Region 对象的配置类Configuration cfg = new Configuration(Region.region2());cfg.resumableUploadAPIVersion = Configuration.ResumableUploadAPIVersion.V2;// 指定分片上传版本//...其他参数参考类注释UploadManager uploadManager = new UploadManager(cfg);//...生成上传凭证,然后准备上传String accessKey = "2Zoe5PP-D0Jxf3pcIHjVzgOaVxxxx";String secretKey = "w4nWQuFo_0VpybJ6pnesFmOZ9xxxx";String bucket = "xxxx";//外链接域名String url = "http://smgw1dpx5.hn-bkt.xxxx";//默认不指定key的情况下,以文件内容的hash值作为文件名 文件的名称String key = filename;// 签名(密码)Auth auth = Auth.create(accessKey, secretKey);String upToken = auth.uploadToken(bucket);try {Response response = uploadManager.put(uploadBytes, key, upToken);//解析上传成功的结果DefaultPutRet putRet = new Gson().fromJson(response.bodyString(), DefaultPutRet.class);// http://smgw1dpx5.hn-bxxxx/zs.jpgreturn url +"/" +filename;} catch (QiniuException ex) {Response r = ex.response;System.err.println(r.toString());try {System.err.println(r.bodyString());} catch (QiniuException ex2) {//ignore}}return "";}/*** 删除文件* @param fileName*/public static void deleteFile(String fileName){//构造一个带指定 Region 对象的配置类Configuration cfg = new Configuration(Region.region2());//...其他参数参考类注释String accessKey = "2Zoe5PP-D0Jxf3pcIHjVzgOaVKAxxxx";String secretKey = "w4nWQuFo_0VpybJ6pnesFmOZ9xxxx";String bucket = "xxxx";//外链接域名Auth auth = Auth.create(accessKey, secretKey);BucketManager bucketManager = new BucketManager(auth, cfg);try {bucketManager.delete(bucket, fileName);} catch (QiniuException ex) {//如果遇到异常,说明删除失败System.err.println(ex.code());System.err.println(ex.response.toString());}}
}
二、头像上传
2.1 后端上传图片开发
2.2.1 编写上传图片的控制器
package com.woniuxy.portal.controller;import com.woniuxy.portal.utils.QiNiuUploadUtils;
import io.swagger.annotations.Api;
import io.swagger.annotations.ApiOperation;
import org.springframework.http.ResponseEntity;
import org.springframework.web.bind.annotation.*;
import org.springframework.web.multipart.MultipartFile;import java.io.IOException;
import java.util.UUID;@RestController
@RequestMapping("/upload")
@Api(tags = "文件上传")
public class UploadController{// @RequestPart 接受 前端 传递过来的图片 @ApiOperation("文件上传")@PostMapping("/images")public ResponseEntity<String> upload(@RequestPart MultipartFile file) throws IOException {// 1. 获取文件名称String originalFilename = file.getOriginalFilename();// 2. 重新设置文件的名称String uuid = UUID.randomUUID().toString();// 文件的名称 = uuid + 源文件的后缀String substring = originalFilename.substring(originalFilename.lastIndexOf("."));String fileName = uuid + substring;fileName = fileName.replaceAll("-", "");// 3. 调用图片上传的工具类String pathUrl = QiNiuUploadUtils.uploadFile(file.getBytes(), fileName);// 4. 响应数据return ResponseEntity.ok(pathUrl);}@ApiOperation("删除图片")@GetMapping("/delete")public ResponseEntity delete(String fileName){QiNiuUploadUtils.deleteFile(fileName);return ResponseEntity.ok().build();}
}
2.2.2 swagger测试
注意:springmvc处理上传的文件,要想通过swagger测试,需要添加注解@RequestPart,声明是一个文件上传表单
2.2.3 图片上传优化
存在的问题
String accessKey = "xxx";
String secretKey = "xxx";
String bucket = "xxx";
七牛云的账号全部是写在代码里面的,将来要修改的话不是非常方便,而且有可能会漏掉,所以,将配置项全部移到配置文件中
1)将账号配置到配置文件中
# 七牛云账号相关配置
qiNiu:accessKey: xxxsecretKey: xxxbucket: xxx
2)定义常量类
在common工程中定义一个常量类
package com.woniu.entity;import org.springframework.beans.factory.annotation.Value;
import org.springframework.stereotype.Component;import javax.annotation.PostConstruct;/*** 常量类,定义各种常量*/
@Component
public class Constant {@Value("${qiNiu.accessKey}")private String accessKey;@Value("${qiNiu.secretKey}")private String secretKey;@Value("${qiNiu.bucket}")private String bucket;public static String ACCESSKEY;public static String SECRETKEY;public static String BUCKET;// 对象创建之后执行该方法@PostConstructpublic void init(){ACCESSKEY = this.accessKey;SECRETKEY = this.secretKey;BUCKET = this.bucket;}
}
3)修改工具类
String accessKey = Constant.ACCESSKEY;
String secretKey = Constant.SECRETKEY;
String bucket = Constant.BUCKET;
2.2 前端上传图片开发
2.2.1 从官网拷贝组件
<script setup>import { ref } from 'vue'import { ElMessage } from 'element-plus'const imgUrl = ref('')const handleAvatarSuccess = (response) => {console.log(response);// 文件上传成功后的处理,通常是返回头像的 URLimgUrl.value =response;}const submitAvatar = () => {//提交数据const user = {username:"zs",age:"30",url:imgUrl.value}if (imgUrl.value) {ElMessage.success('头像修改成功'+ user.url + ",用户信息进行修改")} else {ElMessage.error('请先上传头像')}}
</script><template><el-row class="avatar-uploader-container"><el-col :span="12" class="avatar-uploader-col"><el-uploadaction="http://localhost:8080/upload/images"class="avatar-uploader":show-file-list="false":on-success="handleAvatarSuccess"><img v-if="imgUrl" :src="imgUrl" class="avatar" /><img v-else src="@/assets/logo.png" class="default-avatar" /></el-upload><el-buttontype="success"size="large"@click="submitAvatar"class="upload-button">上传头像</el-button></el-col></el-row>
</template>
<style scoped>.avatar-uploader-container {display: flex;justify-content: center;align-items: center;margin-top: 30px;}.avatar-uploader-col {display: flex;flex-direction: column;justify-content: center;align-items: center;}.avatar-uploader {border: 2px solid #e4e7ed;border-radius: 50%;width: 120px;height: 120px;background-color: #f3f4f6;display: flex;justify-content: center;align-items: center;cursor: pointer;transition: border-color 0.3s ease;}.avatar-uploader:hover {border-color: #409eff;}.avatar {width: 100%;height: 100%;object-fit: cover;border-radius: 50%;}.default-avatar {width: 60%;height: 60%;object-fit: contain;}.upload-button {margin-top: 15px;background-color: #409eff;border-color: #409eff;color: white;border-radius: 20px;padding: 10px 30px;font-size: 16px;transition: background-color 0.3s ease, border-color 0.3s ease;}.upload-button:hover {background-color: #66b1ff;border-color: #66b1ff;}.upload-button:focus {outline: none;}.upload-button i {margin-right: 8px;}
</style>
2.2.3 修改上传成功的回调
//上传成功回调的处理方法
const handleAvatarSuccess = (response) => {console.log(response);// 文件上传成功后的处理,通常是返回头像的 URLimgUrl.value =response;
}
2.2.3效果图:

