RabbitMQ交换机类型
- 1、RabbitMQ工作模型
- 2、RabbitMQ交换机类型
- 2.1、Fanout Exchange(扇形)
- 2.1.1、介绍
- 2.1.2、示例
- 2.1.2.1、生产者
- 2.1.2.2、消费者
- 2.1.2.3、测试
- 2.2、Direct Exchange(直连)
- 2.2.1、介绍
- 2.2.2、示例
- 2.2.2.1、生产者
- 2.2.2.2、测试
- 2.3、Topic Exchange(主题交换机)
- 2.3.1 介绍
- 2.3.2 示例
- 2.3.2.1 配置文件appication.yml
- 2.3.2.2 配置类RabbitConfig
- 2.3.2.3 发送消息MessageService
- 2.3.2.4 启动类Application
- 2.3.2.5 pom.xml配置文件
- 2.3.2.6 测试
- 2.4、Headers Exchange(头部交换机)
- 2.4.1、介绍
- 2.4.2、示例
- 2.4.2.1 配置文件appication.yml
- 2.4.2.2 配置类RabbitConfig
- 2.4.2.3 发送消息MessageService
- 2.4.2.4 启动类Application
- 2.4.2.5 pom.xml配置文件
- 2.4.2.6 测试
1、RabbitMQ工作模型
- broker 相当于mysql服务器;
- virtual host相当于数据库(可以有多个数据库);
- queue相当于表;
- 消息相当于记录。
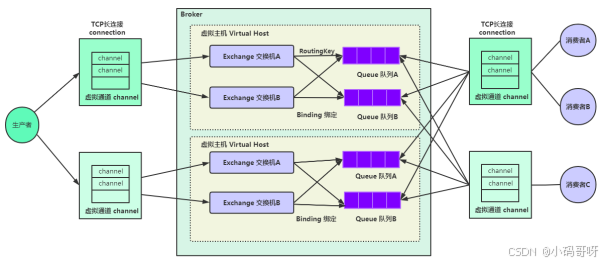
消息队列有三个核心要素: 消息生产者、消息队列、消息消费者;
生产者(Producer):发送消息的应用;(java程序,也可能是别的语言写的程序)
消费者(Consumer):接收消息的应用;(java程序,也可能是别的语言写的程序)
代理(Broker):就是消息服务器,RabbitMQ Server就是Message Broker;
连接(Connection):连接RabbitMQ服务器的TCP长连接;
信道(Channel):连接中的一个虚拟通道,消息队列发送或者接收消息时,都是通过信道进行的;
虚拟主机(Virtual host):一个虚拟分组,在代码中就是一个字符串,当多个不同的用户使用同一个RabbitMQ服务时,可以划分出多个Virtual host,每个用户在自己的Virtual host创建exchange/queue等;(分类比较清晰、相互隔离)
交换机(Exchange):交换机负责从生产者接收消息,并根据交换机类型分发到对应的消息队列中,起到一个路由的作用;
路由键(Routing Key):交换机根据路由键来决定消息分发到哪个队列,路由键是消息的目的地址;
绑定(Binding):绑定是队列和交换机的一个关联连接(关联关系);
队列(Queue):存储消息的缓存;
消息(Message):由生产者通过RabbitMQ发送给消费者的信息;(消息可以任何数据,字符串、user对象,json串等等)
2、RabbitMQ交换机类型
Exchange(X) 可翻译成交换机/交换器/路由器
- Fanout Exchange(扇形)
- Direct Exchange(直连)
- Topic Exchange(主题)
- Headers Exchange(头部)
2.1、Fanout Exchange(扇形)
2.1.1、介绍
Fanout 扇形的,散开的; 扇形交换机
投递到所有绑定的队列,不需要路由键,不需要进行路由键的匹配,相当于广播、群发;

2.1.2、示例
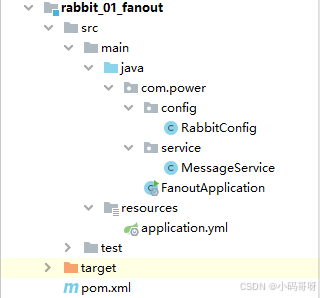
2.1.2.1、生产者
1、配置类
package com.power.config;import org.springframework.amqp.core.Binding;
import org.springframework.amqp.core.BindingBuilder;
import org.springframework.amqp.core.FanoutExchange;
import org.springframework.amqp.core.Queue;
import org.springframework.context.annotation.Bean;
import org.springframework.context.annotation.Configuration;@Configuration
public class RabbitConfig {//rabbitmq三部曲//1、定义交换机@Beanpublic FanoutExchange fanoutExchange() {return new FanoutExchange("exchange.fanout");}//2、定义队列@Beanpublic Queue queueA() {return new Queue("queue.fanout.a");}@Beanpublic Queue queueB() {return new Queue("queue.fanout.b");}//3、绑定交换机何队列@Beanpublic Binding bingingA(FanoutExchange fanoutExchange, Queue queueA) {//将队列A绑定到扇形交换机return BindingBuilder.bind(queueA).to(fanoutExchange);}@Beanpublic Binding bingingB(FanoutExchange fanoutExchange, Queue queueB) {//将队列B绑定到扇形交换机return BindingBuilder.bind(queueB).to(fanoutExchange);}
}
2、生产者
package com.power.service;import lombok.extern.slf4j.Slf4j;
import org.springframework.amqp.core.Message;
import org.springframework.amqp.rabbit.core.RabbitTemplate;
import org.springframework.stereotype.Component;import javax.annotation.Resource;
import java.util.Date;@Component
@Slf4j
public class MessageService {@Resourceprivate RabbitTemplate rabbitTemplate;public void sendMsg() {//定义要发送的消息String msg = "hello world";Message message = new Message(msg.getBytes());rabbitTemplate.convertAndSend("exchange.fanout", "", message);log.info("消息发送完毕,发送时间为:" + new Date());}
}
2、启动类
package com.power;import com.power.service.MessageService;
import org.springframework.boot.ApplicationArguments;
import org.springframework.boot.ApplicationRunner;
import org.springframework.boot.SpringApplication;
import org.springframework.boot.autoconfigure.SpringBootApplication;import javax.annotation.Resource;@SpringBootApplication
public class FanoutApplication implements ApplicationRunner {@Resourceprivate MessageService messageService;public static void main(String[] args) {SpringApplication.run(FanoutApplication.class,args);}/*** 程序一启动就运行该方法** @param args* @throws Exception*/@Overridepublic void run(ApplicationArguments args) throws Exception {messageService.sendMsg();}
}
4、配置文件application.yml
server:port: 8080spring:application:name: fanout-learnrabbitmq:host: 你的RabbitMQ服务器主机IP #rabbitmq的主机port: 5672username: 登录账号password: 登录密码virtual-host: power #虚拟主机
5、项目配置文件pom.xml
<?xml version="1.0" encoding="UTF-8"?>
<project xmlns="http://maven.apache.org/POM/4.0.0"xmlns:xsi="http://www.w3.org/2001/XMLSchema-instance"xsi:schemaLocation="http://maven.apache.org/POM/4.0.0 http://maven.apache.org/xsd/maven-4.0.0.xsd"><modelVersion>4.0.0</modelVersion><groupId>com.power</groupId><artifactId>rabbit_01_fanout</artifactId><version>1.0-SNAPSHOT</version><properties><project.build.sourceEncoding>UTF-8</project.build.sourceEncoding><maven.compiler.source>8</maven.compiler.source><maven.compiler.target>8</maven.compiler.target></properties><parent><groupId>org.springframework.boot</groupId><artifactId>spring-boot-starter-parent</artifactId><version>2.6.13</version><relativePath/></parent><dependencies><dependency><groupId>org.springframework.boot</groupId><artifactId>spring-boot-starter-web</artifactId></dependency><dependency><groupId>org.springframework.boot</groupId><artifactId>spring-boot-starter-test</artifactId><scope>test</scope></dependency><dependency><groupId>org.projectlombok</groupId><artifactId>lombok</artifactId><version>1.18.24</version></dependency><dependency><groupId>org.springframework.boot</groupId><artifactId>spring-boot-starter-amqp</artifactId></dependency></dependencies><build><plugins><plugin><groupId>org.springframework.boot</groupId><artifactId>spring-boot-maven-plugin</artifactId></plugin></plugins></build></project>
2.1.2.2、消费者
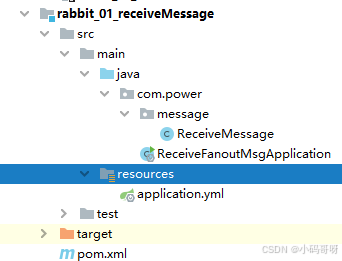
1、消费者
package com.power.message;import lombok.extern.slf4j.Slf4j;
import org.springframework.amqp.core.Message;
import org.springframework.amqp.rabbit.annotation.RabbitListener;
import org.springframework.stereotype.Component;@Component
@Slf4j
public class ReceiveMessage {//接收两个队列的消息@RabbitListener(queues = {"queue.fanout.a","queue.fanout.b"})public void receiveMsg(Message message){byte[] body = message.getBody();String msg = new String(body);log.info("接收到的消息为:"+msg);}
}
2、配置文件application.yml
server:port: 9090spring:application:name: receive-msgrabbitmq:host: 你的RabbitMQ服务器主机IP #rabbitmq的主机port: 5672username: 登录账号password: 登录密码virtual-host: power #虚拟主机
3、配置文件pom.xml
<?xml version="1.0" encoding="UTF-8"?>
<project xmlns="http://maven.apache.org/POM/4.0.0"xmlns:xsi="http://www.w3.org/2001/XMLSchema-instance"xsi:schemaLocation="http://maven.apache.org/POM/4.0.0 http://maven.apache.org/xsd/maven-4.0.0.xsd"><modelVersion>4.0.0</modelVersion><groupId>com.power</groupId><artifactId>rabbit_01_receiveMessage</artifactId><version>1.0-SNAPSHOT</version><parent><groupId>org.springframework.boot</groupId><artifactId>spring-boot-starter-parent</artifactId><version>2.6.13</version><relativePath/></parent><dependencies><dependency><groupId>org.springframework.boot</groupId><artifactId>spring-boot-starter-web</artifactId></dependency><dependency><groupId>org.springframework.boot</groupId><artifactId>spring-boot-starter-test</artifactId><scope>test</scope></dependency><dependency><groupId>org.projectlombok</groupId><artifactId>lombok</artifactId><version>1.18.24</version></dependency><dependency><groupId>org.springframework.boot</groupId><artifactId>spring-boot-starter-amqp</artifactId></dependency></dependencies><build><plugins><plugin><groupId>org.springframework.boot</groupId><artifactId>spring-boot-maven-plugin</artifactId></plugin></plugins></build></project>
4、启动类
package com.power;import org.springframework.boot.SpringApplication;
import org.springframework.boot.autoconfigure.SpringBootApplication;@SpringBootApplication
public class ReceiveFanoutMsgApplication {public static void main(String[] args) {SpringApplication.run(ReceiveFanoutMsgApplication.class,args);}
}
2.1.2.3、测试
先启动生产者:

再启动消费者:
 消费者启动会会一直监听
2.2、Direct Exchange(直连)
2.2.1、介绍
根据路由键精确匹配(一模一样)进行路由消息队列;

2.2.2、示例
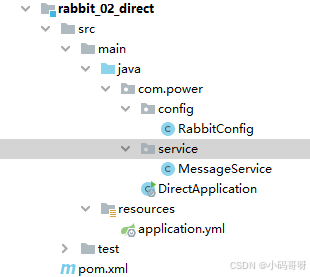
2.2.2.1、生产者
1、配置类
package com.power.config;import org.springframework.amqp.core.*;
import org.springframework.beans.factory.annotation.Value;
import org.springframework.context.annotation.Bean;
import org.springframework.context.annotation.Configuration;@Configuration
//@ConfigurationProperties(prefix = "my")
public class RabbitConfig {//交换机的名字@Value("${my.exchangeName}")private String exchangeName;//队列A的名字@Value("${my.queueAName}")private String queueAName;//队列B的名字@Value("${my.queueBName}")private String queueBName;//1、定义交换机@Beanpublic DirectExchange directExchange() {//使用建造者模式创建return ExchangeBuilder.directExchange(exchangeName).build();}//2、定义队列@Beanpublic Queue queueA() {return QueueBuilder.durable(queueAName).build();}@Beanpublic Queue queueB() {return QueueBuilder.durable(queueBName).build();}//3、交换机和队列A进行绑定@Beanpublic Binding bindingA(DirectExchange directExchange, Queue queueA) {return BindingBuilder.bind(queueA).to(directExchange).with("error");}//交换机和队列B进行绑定@Beanpublic Binding bindingB1(DirectExchange directExchange, Queue queueB) {return BindingBuilder.bind(queueB).to(directExchange).with("error");}@Beanpublic Binding bindingB2(DirectExchange directExchange, Queue queueB) {return BindingBuilder.bind(queueB).to(directExchange).with("info");}@Beanpublic Binding bindingB3(DirectExchange directExchange, Queue queueB) {return BindingBuilder.bind(queueB).to(directExchange).with("warning");}}
2、发送消息
package com.power.service;import lombok.extern.slf4j.Slf4j;
import org.springframework.amqp.core.Message;
import org.springframework.amqp.core.MessageBuilder;
import org.springframework.amqp.rabbit.core.RabbitTemplate;
import org.springframework.context.annotation.Bean;
import org.springframework.stereotype.Service;import javax.annotation.Resource;
import java.util.Date;@Service
@Slf4j
public class MessageService {@Resourceprivate RabbitTemplate rabbitTemplate;@Beanpublic void sendMsg() {//使用建造者模式创建消息Message message = MessageBuilder.withBody("hello world".getBytes()).build();//参数1:交换机   参数2:路由key    参数3:消息rabbitTemplate.convertAndSend("exchange.direct", "info", message);log.info("消息发送完毕,发送时间:"+new Date());}
}
3、配置文件application.yml
server:port: 8080spring:application:name: receive-msgrabbitmq:host: <你的RqaabitMQ服务器IP> #rabbitmq的主机port: 5672username: 登录名password: 登录密码virtual-host: power #虚拟主机my:exchangeName: exchange.directqueueAName: queue.direct.aqueueBName: queue.direct.b
4、启动类
package com.power;import com.power.service.MessageService;
import org.springframework.amqp.core.MessageBuilder;
import org.springframework.boot.ApplicationArguments;
import org.springframework.boot.ApplicationRunner;
import org.springframework.boot.SpringApplication;
import org.springframework.boot.autoconfigure.SpringBootApplication;import javax.annotation.Resource;@SpringBootApplication
public class DirectApplication implements ApplicationRunner {@Resourceprivate MessageService messageService;public static void main(String[] args) {SpringApplication.run(DirectApplication.class, args);}@Overridepublic void run(ApplicationArguments args) throws Exception {messageService.sendMsg();}
}
5、配置文件pom.xml
<?xml version="1.0" encoding="UTF-8"?>
<project xmlns="http://maven.apache.org/POM/4.0.0"xmlns:xsi="http://www.w3.org/2001/XMLSchema-instance"xsi:schemaLocation="http://maven.apache.org/POM/4.0.0 http://maven.apache.org/xsd/maven-4.0.0.xsd"><modelVersion>4.0.0</modelVersion><groupId>com.power</groupId><artifactId>rabbit_02_direct</artifactId><version>1.0-SNAPSHOT</version><parent><groupId>org.springframework.boot</groupId><artifactId>spring-boot-starter-parent</artifactId><version>2.6.13</version><relativePath/></parent><dependencies><dependency><groupId>org.springframework.boot</groupId><artifactId>spring-boot-starter-web</artifactId></dependency><dependency><groupId>org.springframework.boot</groupId><artifactId>spring-boot-starter-test</artifactId><scope>test</scope></dependency><dependency><groupId>org.projectlombok</groupId><artifactId>lombok</artifactId><version>1.18.24</version></dependency><dependency><groupId>org.springframework.boot</groupId><artifactId>spring-boot-starter-amqp</artifactId></dependency></dependencies><build><plugins><plugin><groupId>org.springframework.boot</groupId><artifactId>spring-boot-maven-plugin</artifactId></plugin></plugins></build></project>
2.2.2.2、测试
运行启动类。
登录服务器查看Exchange:

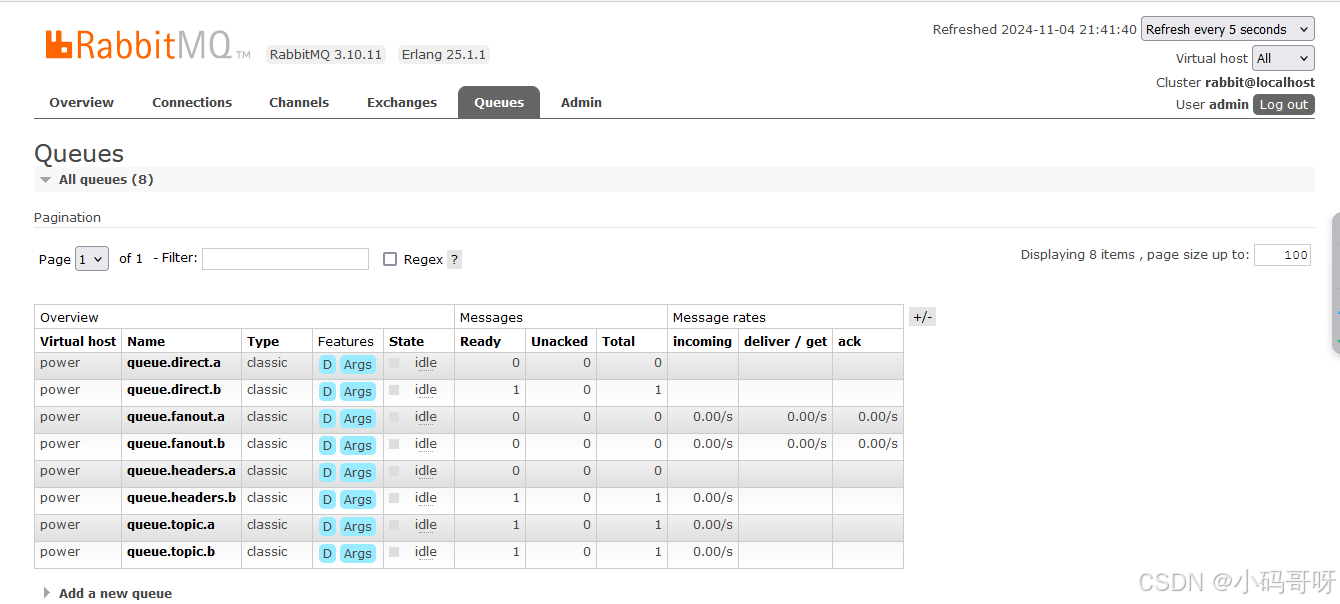
登录服务器查Queues:

2.3、Topic Exchange(主题交换机)
2.3.1 介绍
通配符匹配,相当于模糊匹配;
# 匹配多个单词,用来表示任意数量(零个或多个)单词
* 匹配一个单词(必须有一个,而且只有一个),用.隔开的为一个单词:
beijing.# == beijing.queue.abc, beijing.queue.xyz.xxx
beijing.* == beijing.queue, beijing.xyz

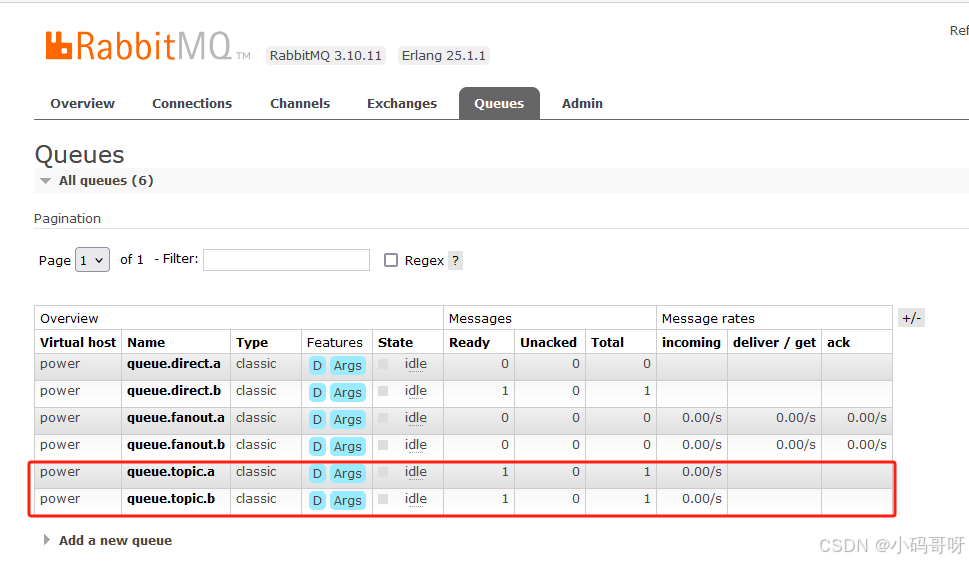
案例:发送时指定的路由键:lazy.orange.rabbit,可以进入上图的那个队列
答:可以进入Q1和Q2队列,其中Q2队列只能进入一条消息
2.3.2 示例
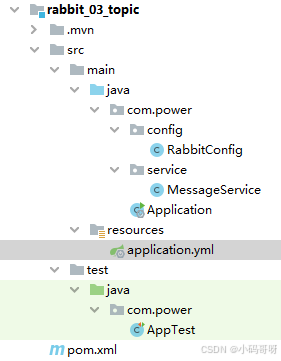
2.3.2.1 配置文件appication.yml
server:port: 8080
spring:application:name: topic-exchangerabbitmq:host: 你的主机IPport: 5672username: 你的管理员账号password: 你的管理员密码virtual-host: powermy:exchangeName: exchange.topicqueueAName: queue.topic.aqueueBName: queue.topic.b
2.3.2.2 配置类RabbitConfig
package com.power.config;import org.springframework.amqp.core.*;
import org.springframework.beans.factory.annotation.Value;
import org.springframework.context.annotation.Bean;
import org.springframework.context.annotation.Configuration;@Configuration
public class RabbitConfig {//交换机的名字@Value("${my.exchangeName}")private String exchangeName;//队列A的名字@Value("${my.queueAName}")private String queueAName;//队列B的名字@Value("${my.queueBName}")private String queueBName;//创建交换机@Beanpublic TopicExchange topicExchange(){return ExchangeBuilder.topicExchange(exchangeName).build();}//创建队列@Beanpublic Queue queueA(){return QueueBuilder.durable(queueAName).build();}@Beanpublic Queue queueB(){return QueueBuilder.durable(queueBName).build();}//创建绑定@Beanpublic Binding bindingA(TopicExchange topicExchange,Queue queueA){return BindingBuilder.bind(queueA).to(topicExchange).with("*.orange.*");}@Beanpublic Binding bindingB1(TopicExchange topicExchange,Queue queueB){return BindingBuilder.bind(queueB).to(topicExchange).with("*.*.rabbit");}@Beanpublic Binding bindingB2(TopicExchange topicExchange,Queue queueB){return BindingBuilder.bind(queueB).to(topicExchange).with("lazy.#");}
}
2.3.2.3 发送消息MessageService
package com.power.service;import org.springframework.amqp.core.AmqpTemplate;
import org.springframework.amqp.core.Message;
import org.springframework.amqp.core.MessageBuilder;
import org.springframework.stereotype.Service;import javax.annotation.Resource;@Service
public class MessageService {@Resourceprivate AmqpTemplate amqpTemplate;public void sendMsg(){Message message = MessageBuilder.withBody("hello world".getBytes()).build();//参数1:交换机,参数2:发送路由key,参数3:消息amqpTemplate.convertAndSend("exchange.topic","hello.world",message);}
}
2.3.2.4 启动类Application
package com.power;import com.power.service.MessageService;
import org.springframework.boot.ApplicationArguments;
import org.springframework.boot.ApplicationRunner;
import org.springframework.boot.SpringApplication;
import org.springframework.boot.autoconfigure.SpringBootApplication;import javax.annotation.Resource;@SpringBootApplication
public class Application implements ApplicationRunner {@Resourceprivate MessageService messageService;public static void main(String[] args) {SpringApplication.run(Application.class);}@Overridepublic void run(ApplicationArguments args) throws Exception {messageService.sendMsg();}
}
2.3.2.5 pom.xml配置文件
<?xml version="1.0" encoding="UTF-8"?>
<project xmlns="http://maven.apache.org/POM/4.0.0" xmlns:xsi="http://www.w3.org/2001/XMLSchema-instance"xsi:schemaLocation="http://maven.apache.org/POM/4.0.0 http://maven.apache.org/xsd/maven-4.0.0.xsd"><modelVersion>4.0.0</modelVersion><groupId>com.power</groupId><artifactId>rabbit_03_topic</artifactId><version>1.0-SNAPSHOT</version><name>rabbit_03_topic</name><parent><groupId>org.springframework.boot</groupId><artifactId>spring-boot-starter-parent</artifactId><version>2.6.13</version><relativePath/></parent><properties><maven.compiler.source>8</maven.compiler.source><maven.compiler.target>8</maven.compiler.target><project.build.sourceEncoding>UTF-8</project.build.sourceEncoding></properties><dependencies><dependency><groupId>org.springframework.boot</groupId><artifactId>spring-boot-starter-web</artifactId></dependency><dependency><groupId>org.springframework.boot</groupId><artifactId>spring-boot-starter-test</artifactId><scope>test</scope></dependency><dependency><groupId>org.projectlombok</groupId><artifactId>lombok</artifactId><version>1.18.24</version></dependency><dependency><groupId>org.springframework.boot</groupId><artifactId>spring-boot-starter-amqp</artifactId></dependency></dependencies><build><plugins><plugin><groupId>org.springframework.boot</groupId><artifactId>spring-boot-maven-plugin</artifactId></plugin></plugins></build></project>
2.3.2.6 测试
2.4、Headers Exchange(头部交换机)
2.4.1、介绍
基于消息内容中的headers属性进行匹配;

2.4.2、示例
2.4.2.1 配置文件appication.yml
server:port: 8080
spring:application:name: topic-exchangerabbitmq:host: 你的服务器IPport: 5672username: 你的账号password: 你的密码virtual-host: powermy:exchangeName: exchange.headersqueueAName: queue.headers.aqueueBName: queue.headers.b
2.4.2.2 配置类RabbitConfig
package com.power.config;import org.springframework.amqp.core.*;
import org.springframework.beans.factory.annotation.Value;
import org.springframework.context.annotation.Bean;
import org.springframework.context.annotation.Configuration;import java.util.HashMap;
import java.util.Map;@Configuration
public class RabbitConfig {//交换机的名字@Value("${my.exchangeName}")private String exchangeName;//队列A的名字@Value("${my.queueAName}")private String queueAName;//队列B的名字@Value("${my.queueBName}")private String queueBName;//创建交换机@Beanpublic HeadersExchange headersExchange(){return ExchangeBuilder.headersExchange(exchangeName).build();}//创建队列@Beanpublic Queue queueA(){return QueueBuilder.durable(queueAName).build();}@Beanpublic Queue queueB(){return QueueBuilder.durable(queueBName).build();}//创建绑定@Beanpublic Binding bindingA(HeadersExchange headersExchange,Queue queueA){Map<String, Object> headerValues = new HashMap<>();headerValues.put("type","m");headerValues.put("status",1);return BindingBuilder.bind(queueA).to(headersExchange).whereAll(headerValues).match();}@Beanpublic Binding bindingB(HeadersExchange headersExchange,Queue queueB){Map<String, Object> headerValues = new HashMap<>();headerValues.put("type","s");headerValues.put("status",0);return BindingBuilder.bind(queueB).to(headersExchange).whereAll(headerValues).match();}
}
2.4.2.3 发送消息MessageService
package com.power.service;import lombok.extern.slf4j.Slf4j;
import org.springframework.amqp.core.Message;
import org.springframework.amqp.core.MessageBuilder;
import org.springframework.amqp.core.MessageProperties;
import org.springframework.amqp.rabbit.core.RabbitTemplate;
import org.springframework.beans.factory.annotation.Value;
import org.springframework.stereotype.Service;import javax.annotation.Resource;
import java.util.HashMap;
import java.util.Map;@Service
@Slf4j
public class MessageService {@Resourceprivate RabbitTemplate rabbitTemplate;@Value("${my.exchangeName}")private String exchangeName;public void sendMsg(){MessageProperties messageProperties = new MessageProperties();Map<String,Object> headers = new HashMap<>();headers.put("type","s");headers.put("status",0);//设置消息头messageProperties.setHeaders(headers);Message message = MessageBuilder.withBody("hello world".getBytes()).andProperties(messageProperties).build();rabbitTemplate.convertAndSend(exchangeName,"",message);log.info("消息发送完毕");}}
2.4.2.4 启动类Application
package com.power;import com.power.service.MessageService;
import org.springframework.boot.ApplicationArguments;
import org.springframework.boot.ApplicationRunner;
import org.springframework.boot.SpringApplication;
import org.springframework.boot.autoconfigure.SpringBootApplication;import javax.annotation.Resource;@SpringBootApplication
public class HeadersExchangeApplication implements ApplicationRunner {@Resourceprivate MessageService messageService;public static void main(String[] args) {SpringApplication.run(HeadersExchangeApplication.class,args);}@Overridepublic void run(ApplicationArguments args) throws Exception {messageService.sendMsg();}
}
2.4.2.5 pom.xml配置文件
<?xml version="1.0" encoding="UTF-8"?>
<project xmlns="http://maven.apache.org/POM/4.0.0" xmlns:xsi="http://www.w3.org/2001/XMLSchema-instance"xsi:schemaLocation="http://maven.apache.org/POM/4.0.0 http://maven.apache.org/xsd/maven-4.0.0.xsd"><modelVersion>4.0.0</modelVersion><groupId>com.power</groupId><artifactId>rabbit_04_headers</artifactId><version>1.0-SNAPSHOT</version><name>rabbit_04_headers</name><!-- FIXME change it to the project's website --><url>http://www.example.com</url><properties><maven.compiler.source>8</maven.compiler.source><maven.compiler.target>8</maven.compiler.target><project.build.sourceEncoding>UTF-8</project.build.sourceEncoding></properties><parent><groupId>org.springframework.boot</groupId><artifactId>spring-boot-starter-parent</artifactId><version>2.6.13</version><relativePath/></parent><dependencies><dependency><groupId>org.springframework.boot</groupId><artifactId>spring-boot-starter-web</artifactId></dependency><dependency><groupId>org.springframework.boot</groupId><artifactId>spring-boot-starter-test</artifactId><scope>test</scope></dependency><dependency><groupId>org.projectlombok</groupId><artifactId>lombok</artifactId><version>1.18.24</version></dependency><dependency><groupId>org.springframework.boot</groupId><artifactId>spring-boot-starter-amqp</artifactId></dependency></dependencies><build><plugins><plugin><groupId>org.springframework.boot</groupId><artifactId>spring-boot-maven-plugin</artifactId></plugin></plugins></build></project>
2.4.2.6 测试
