【博客系统】博客系统第一弹:博客系统项目配置、MyBatis-Plus 实现 Mapper 接口、处理项目公共模块:统一返回结果、统一异常处理


案例综合练习 - 博客系统
本节目标
- 从 0 到 1 完成博客系统后端项目的开发。
前言
通过前面课程的学习,我们掌握了 Spring 框架和 MyBatis 的基本使用,并完成了图书管理系统的常规功能开发。接下来我们系统地从 0 到 1 完成一个项目的开发。
项目介绍
使用 SSM 框架实现一个简单的博客系统,共 5 个页面:
- 用户登录
- 博客发表页
- 博客编辑页
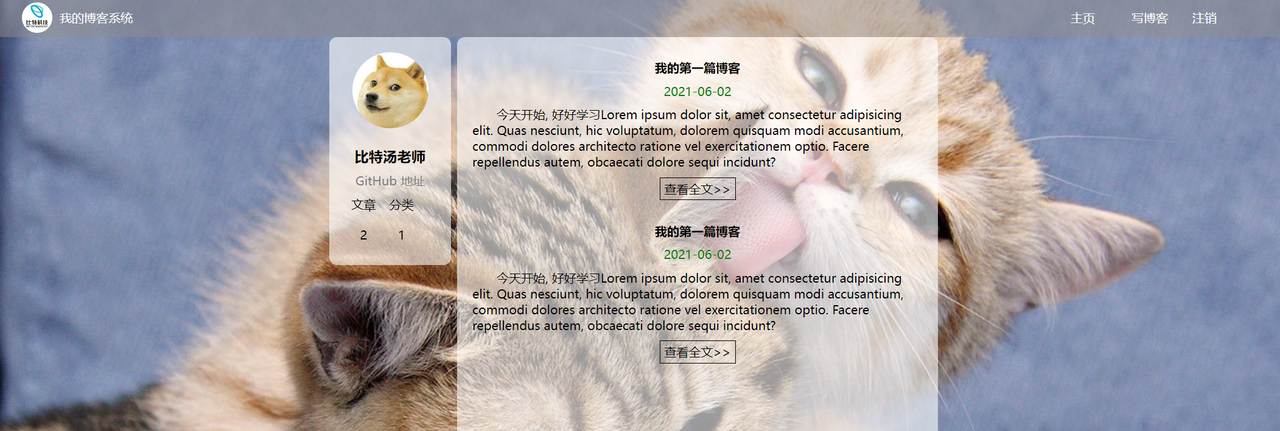
- 博客列表页
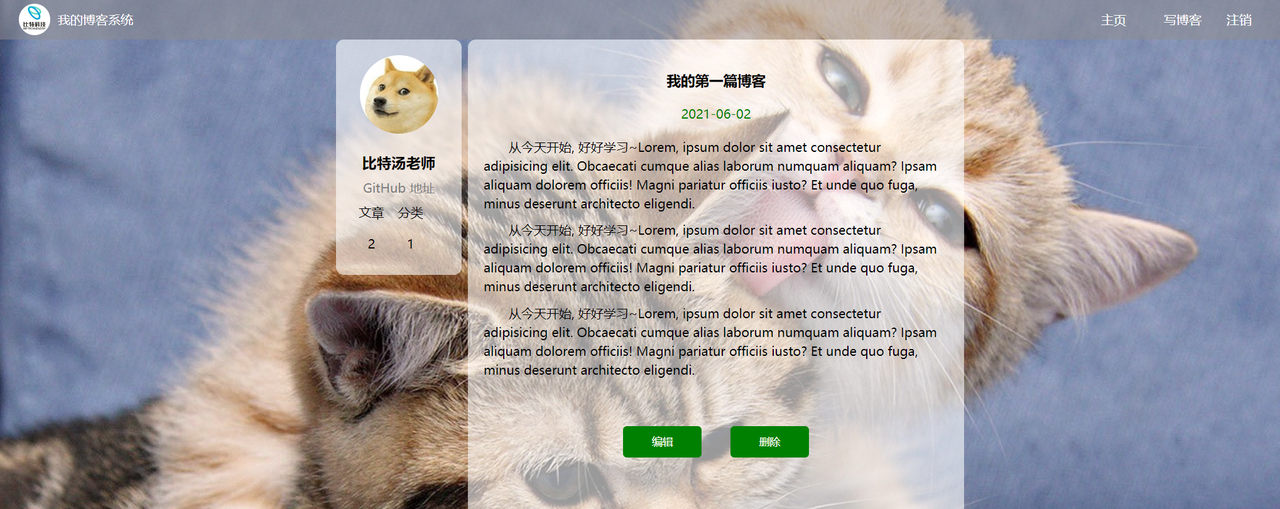
- 博客详情页
功能描述:用户登录成功后,可以查看所有人的博客。点击“查看全文”可以查看该博客的正文内容。如果该博客作者为当前登录用户,可以完成博客的修改和删除操作,以及发表新博客。(前端页面随课堂资料一起提供)
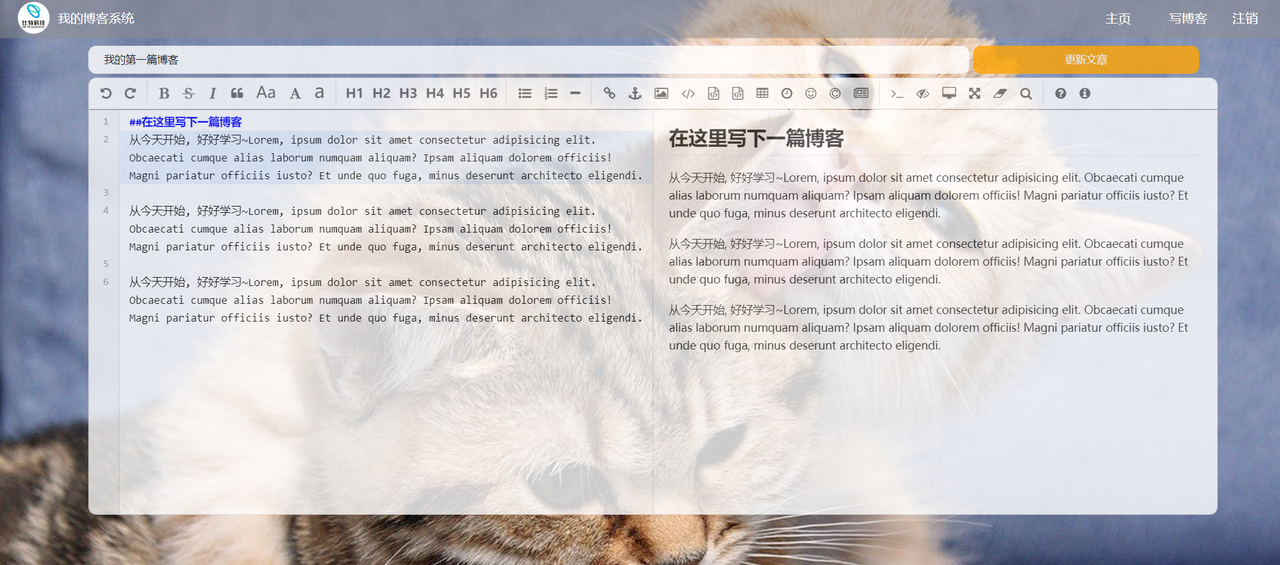
页面预览
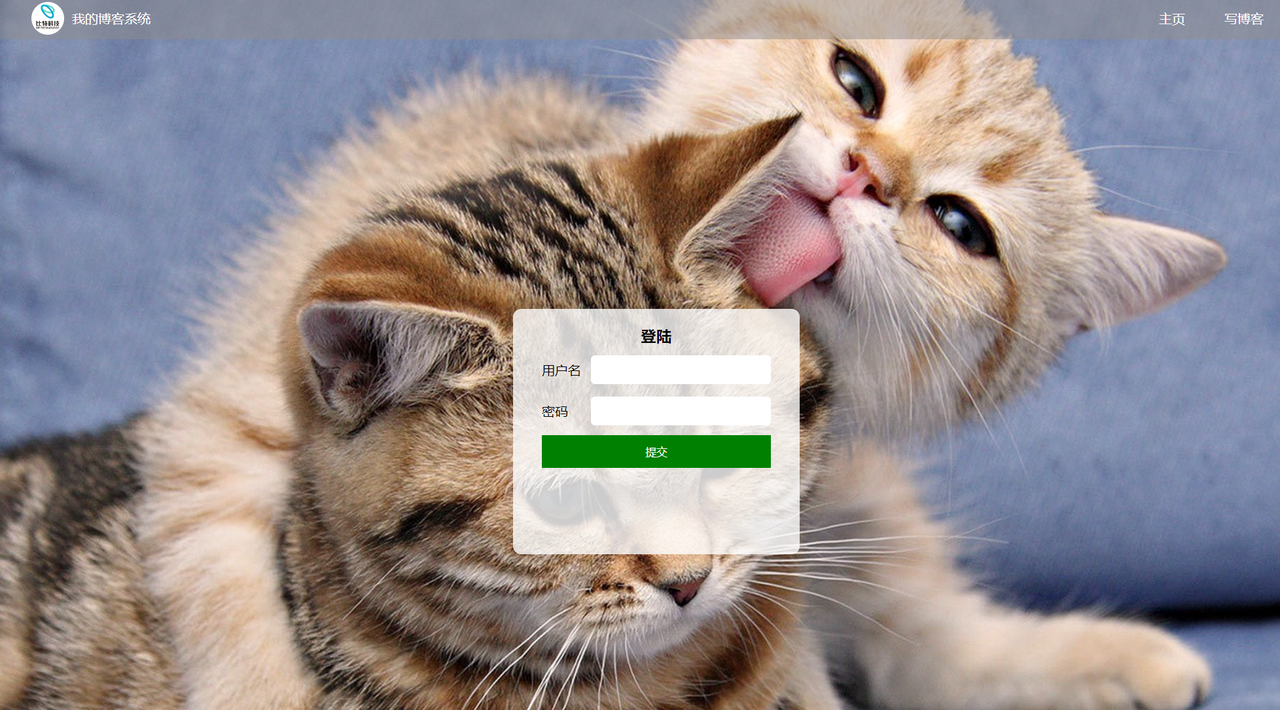
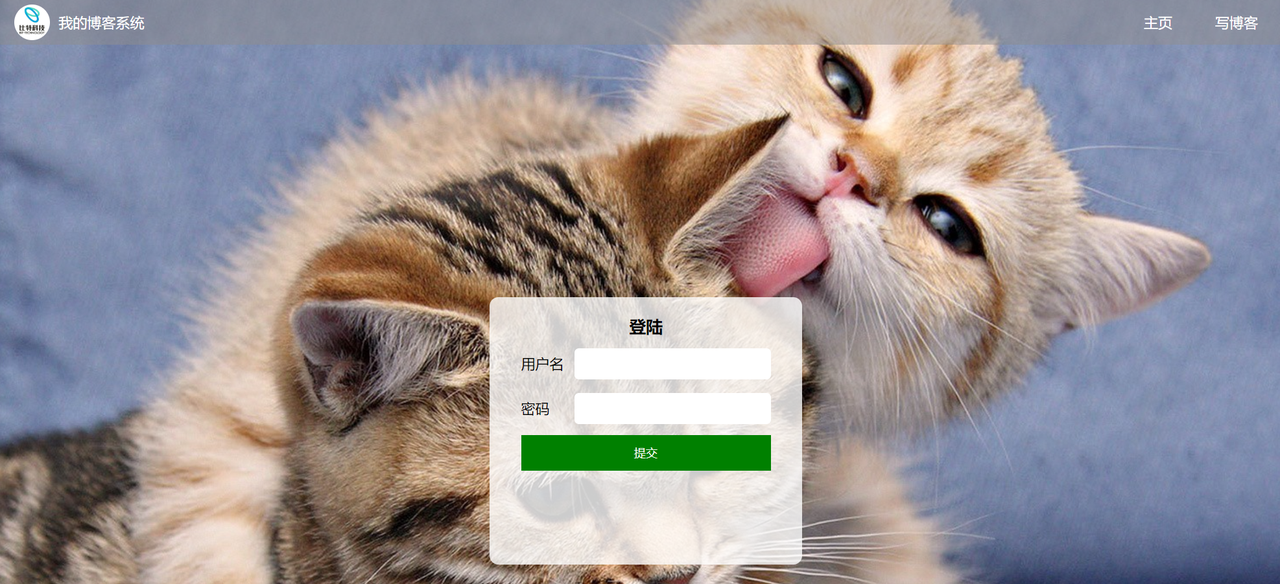
- 用户登录
- 博客列表页
- 博客详情页
- 博客发表/修改页
数据准备
建表 SQL:
-- 建表 SQL
create database if not exists java_blog_spring charset utf8mb4;use java_blog_spring;-- 用户表
DROP TABLE IF EXISTS java_blog_spring.user_info;
CREATE TABLE java_blog_spring.user_info(
`id` INT NOT NULL AUTO_INCREMENT,
`user_name` VARCHAR (128) NOT NULL,
`password` VARCHAR (128) NOT NULL,
`github_url` VARCHAR (128) NULL,
`delete_flag` TINYINT (4) NULL DEFAULT 0,
`create_time` DATETIME DEFAULT now(),
`update_time` DATETIME DEFAULT now() ON UPDATE now(),
PRIMARY KEY (id),
UNIQUE INDEX user_name_UNIQUE (user_name ASC)) ENGINE = INNODB DEFAULT CHARACTER SET = utf8mb4 COMMENT = '用户表';-- 博客表
drop table if exists java_blog_spring.blog_info;
CREATE TABLE java_blog_spring.blog_info (
`id` INT NOT NULL AUTO_INCREMENT,
`title` VARCHAR(200) NULL,
`content` TEXT NULL,
`user_id` INT(11) NULL,
`delete_flag` TINYINT(4) NULL DEFAULT 0,
`create_time` DATETIME DEFAULT now(),
`update_time` DATETIME DEFAULT now() ON UPDATE now(),
PRIMARY KEY (id))
ENGINE = InnoDB DEFAULT CHARSET = utf8mb4 COMMENT = '博客表';-- 新增用户信息
insert into java_blog_spring.user_info (user_name, password, github_url) values("zhangsan", "123456", "https://gitee.com/bubblefish666/class-java45");
insert into java_blog_spring.user_info (user_name, password, github_url) values("lisi", "123456", "https://gitee.com/bubblefish666/class-java45");insert into java_blog_spring.blog_info (title, content, user_id) values("第一篇博客", "111我是博客正文我是博客正文我是博客正文", 1);
insert into java_blog_spring.blog_info (title, content, user_id) values("第二篇博客", "222我是博客正文我是博客正文我是博客正文", 2);
创建项目
创建 SpringBoot 项目,添加 Spring MVC 和 MyBatis 对应依赖。
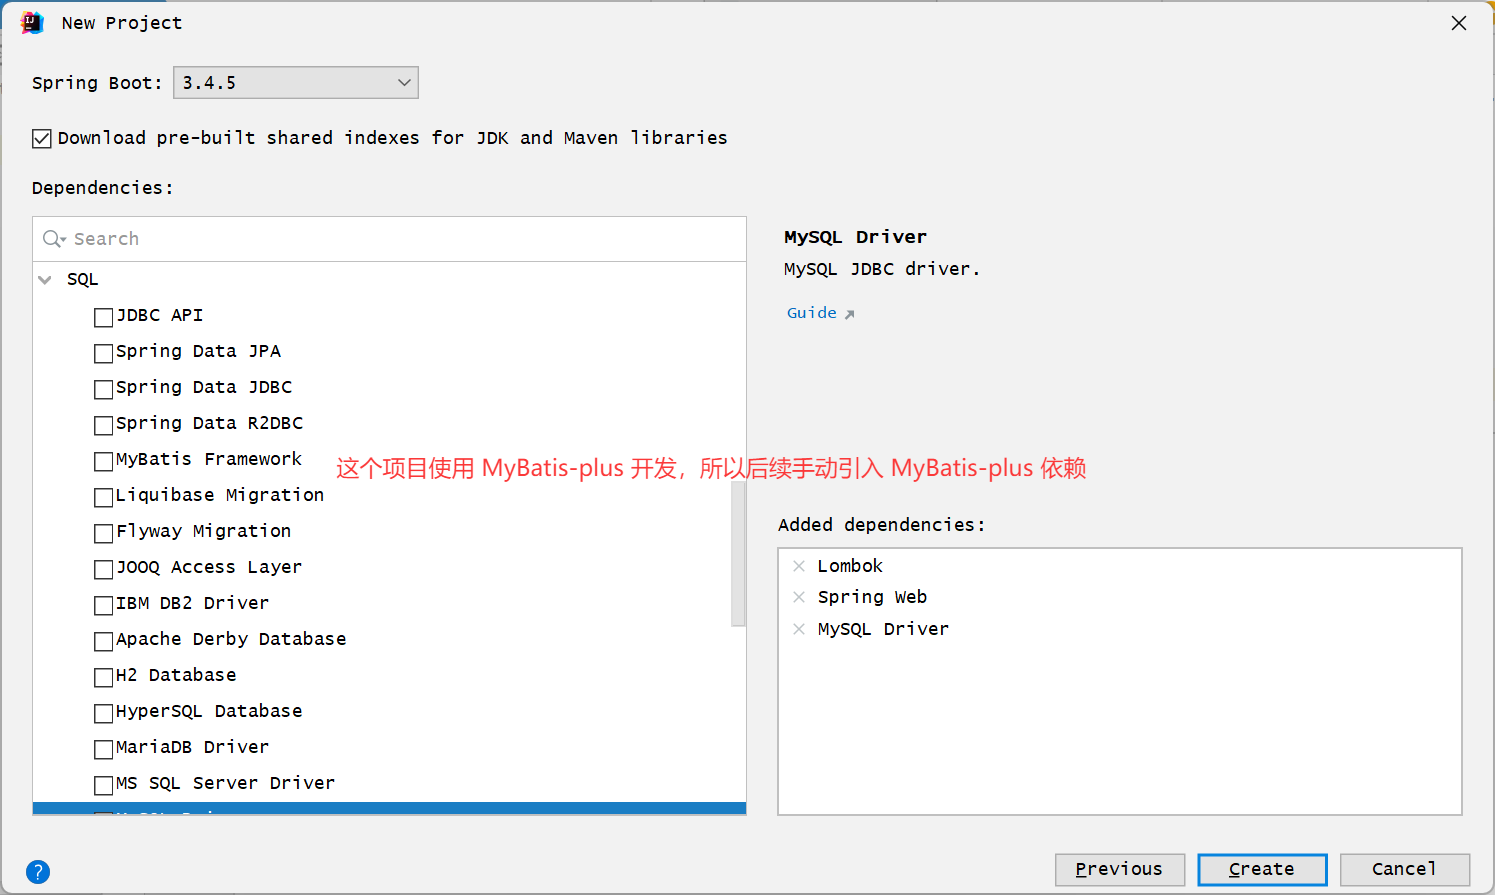
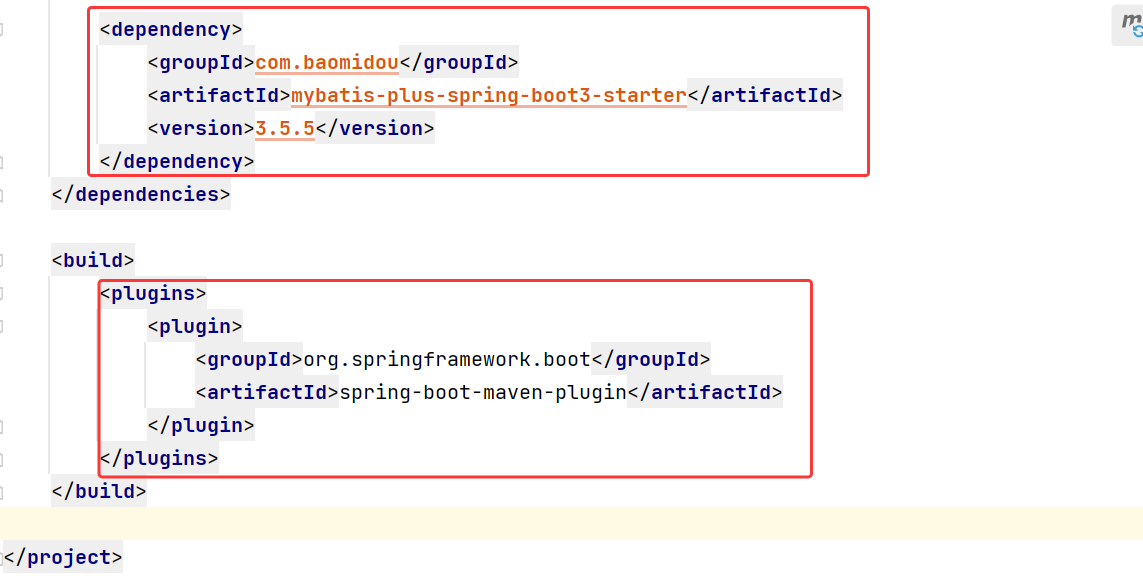
添加MyBatis-Plus 依赖
<dependency><groupId>com.baomidou</groupId><artifactId>mybatis-plus-spring-boot3-starter</artifactId><version>3.5.5</version>
</dependency>
删除引入 lombok 依赖添加的多余插件:
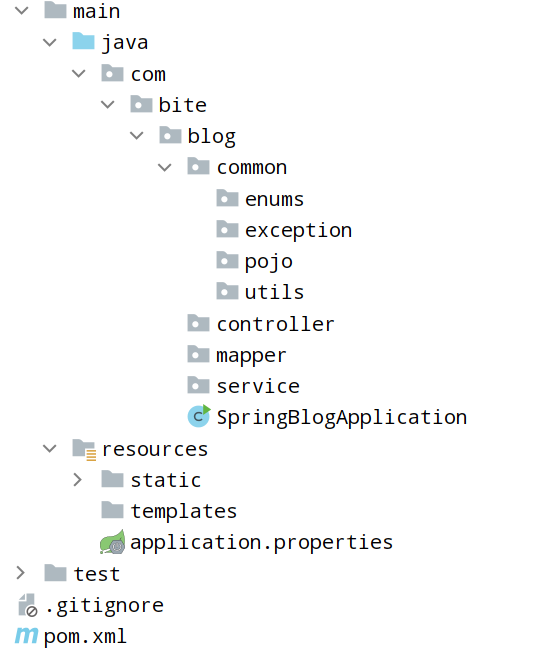
创建对应目录
准备前端页面
把课程中提供的博客系统静态页面拷贝到 static 目录下。

配置配置文件
spring:datasource:url: jdbc:mysql://127.0.0.1:3306/java_blog_spring?characterEncoding=utf8&useSSL=falseusername: rootpassword: rootdriver-class-name: com.mysql.cj.jdbc.Drivermybatis-plus:configuration:map-underscore-to-camel-case: truelog-impl: org.apache.ibatis.logging.stdout.StdOutImpllogging:file:name: spring-blog.log
测试
访问前端页面:http://127.0.0.1:8080/blog_login.html。前端页面可以正确显示,说明项目初始化成功。
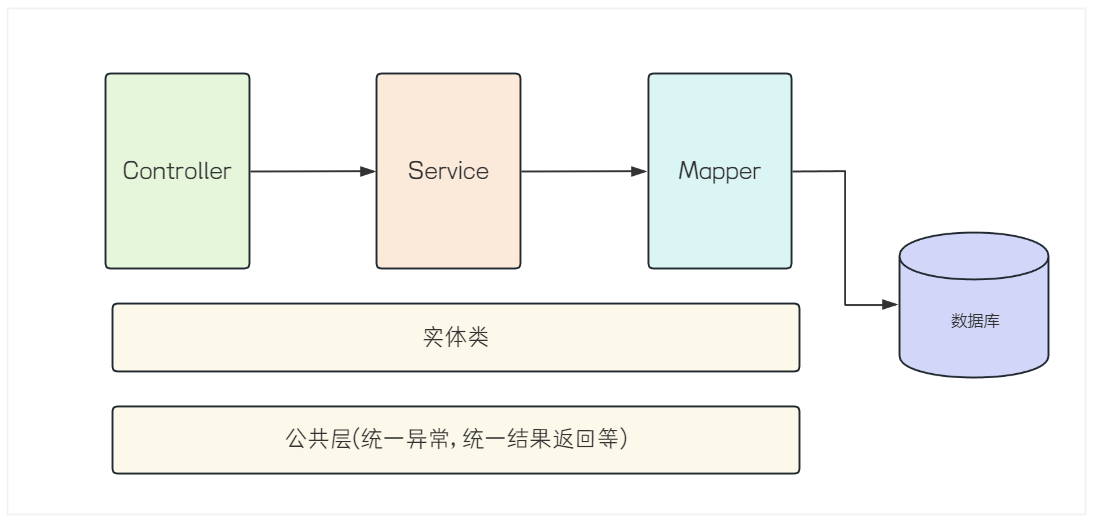
项目公共模块
项目分为控制层(Controller)、服务层(Service)、持久层(Mapper)。各层之间的调用关系如下:
我们先根据需求完成公共层代码的编写。
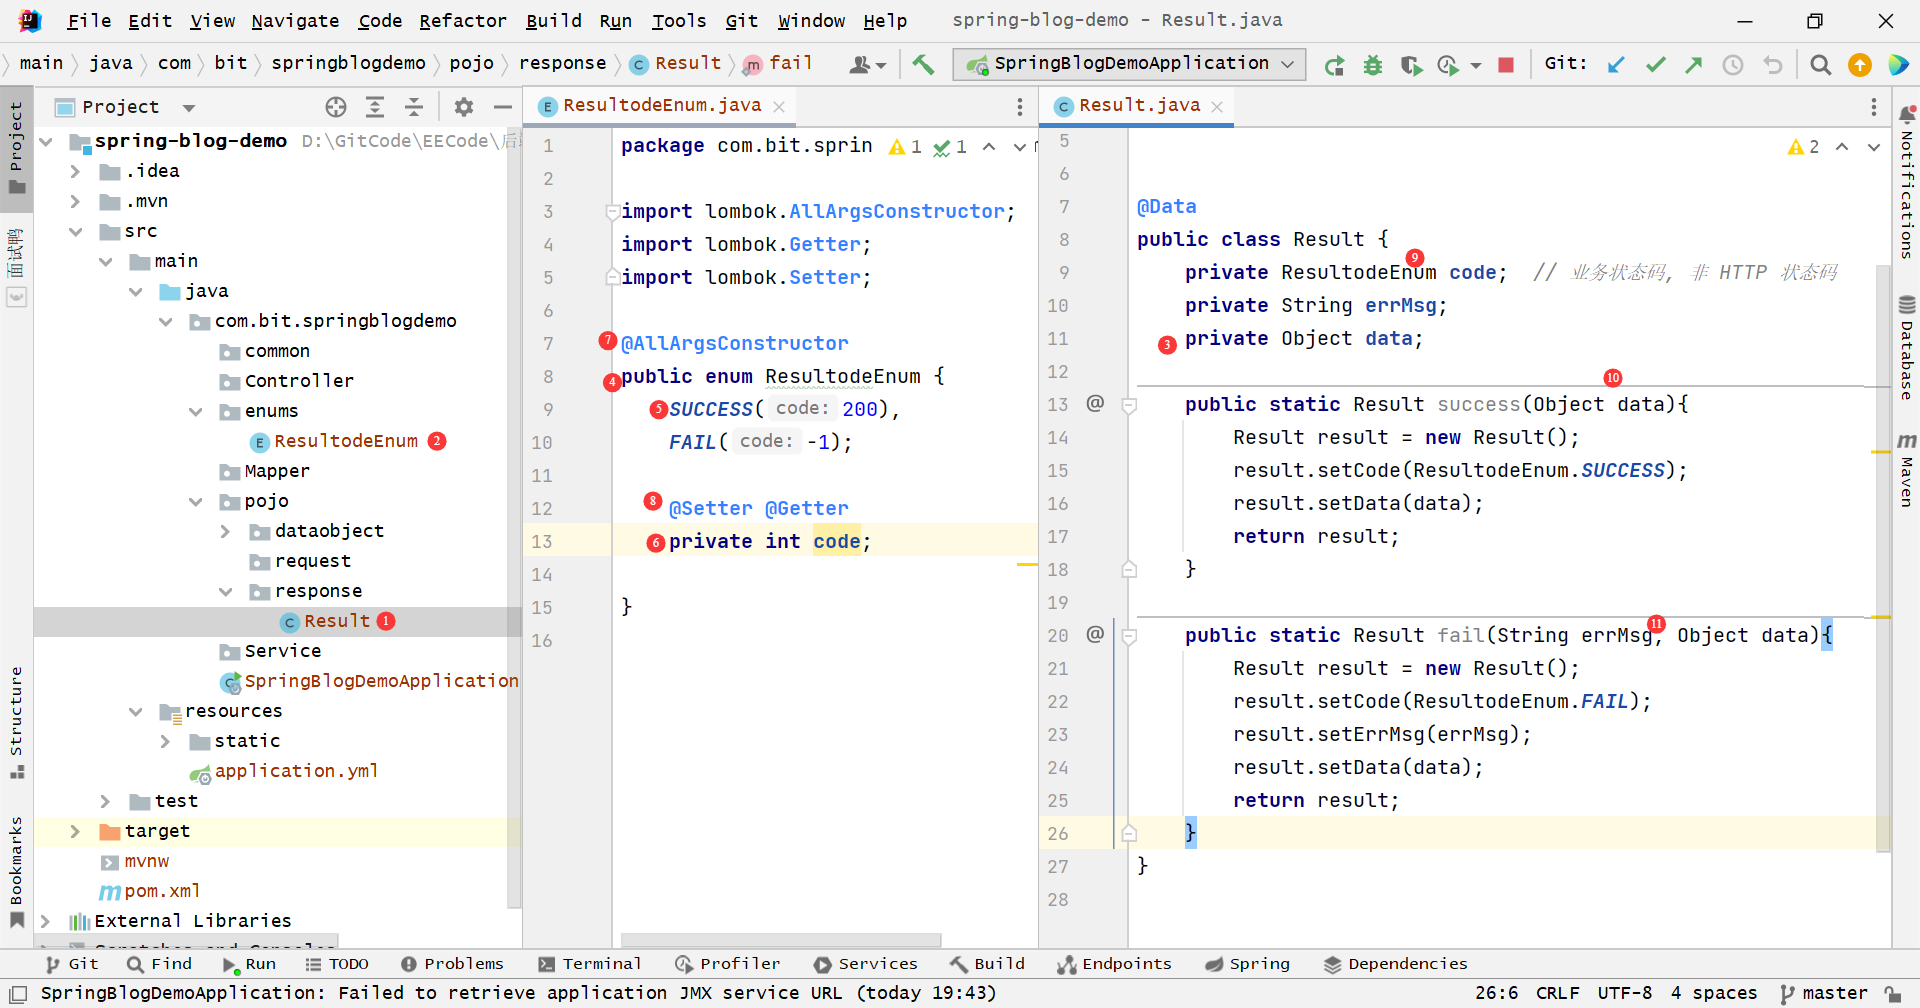
统一返回结果实体类
- code:业务状态码
- 200:业务处理成功
- -1:业务处理失败
- 后续有其他异常信息,可以再补充。
- errMsg:业务处理失败时,返回的错误信息。
- data:业务返回数据。
定义业务状态枚举:
基于会话管理 Session 、统一响应封装、枚举状态码、工厂方法模式实现状态码方法:全栈开发获取图书列表接口的强制登录功能(含会话管理、统一响应封装思维导图、核心部分代码)
后面需要把 Object data 修改为泛型:
@Data
public class Result<T> {private int code;private String errMsg;private T data;public static <T> Result success(T data) {Result result = new Result();result.setCode(ResultCodeEnum.SUCCESS.getCode());result.setData(data);return result;}public static <T> Result fail(String errMsg) {Result result = new Result();result.setCode(ResultCodeEnum.FAIL.getCode());result.setErrMsg(errMsg);return result;}
}
统一返回结果
统一返回结果封装:封装 String 类型造成参数类型不匹配异常、通过 Debug 锁定调用链出现异常的具体位置、解决异常的方法_springboot 报错返回类封装
定义项目异常
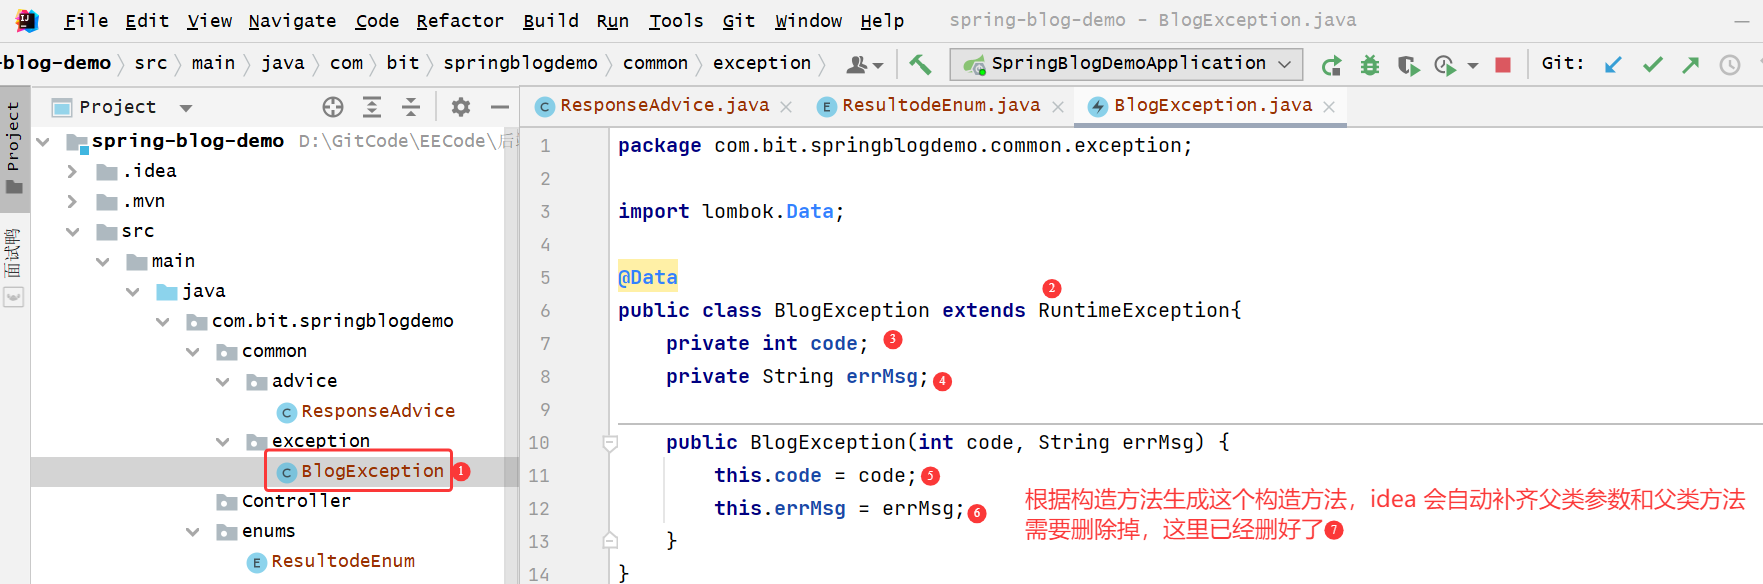
import com.bite.blog.common.pojo.response.Result;public class BlogException extends RuntimeException {private Result errorResult = new Result<>();public BlogException(String message) {this.errorResult.setCode(-1);this.errorResult.setErrMsg(message);}
}
统一异常处理
@ControllerAdvice(含底层源码分析) 、@ExceptionHandler、@ResponseBody 配合实现统一异常处理功能
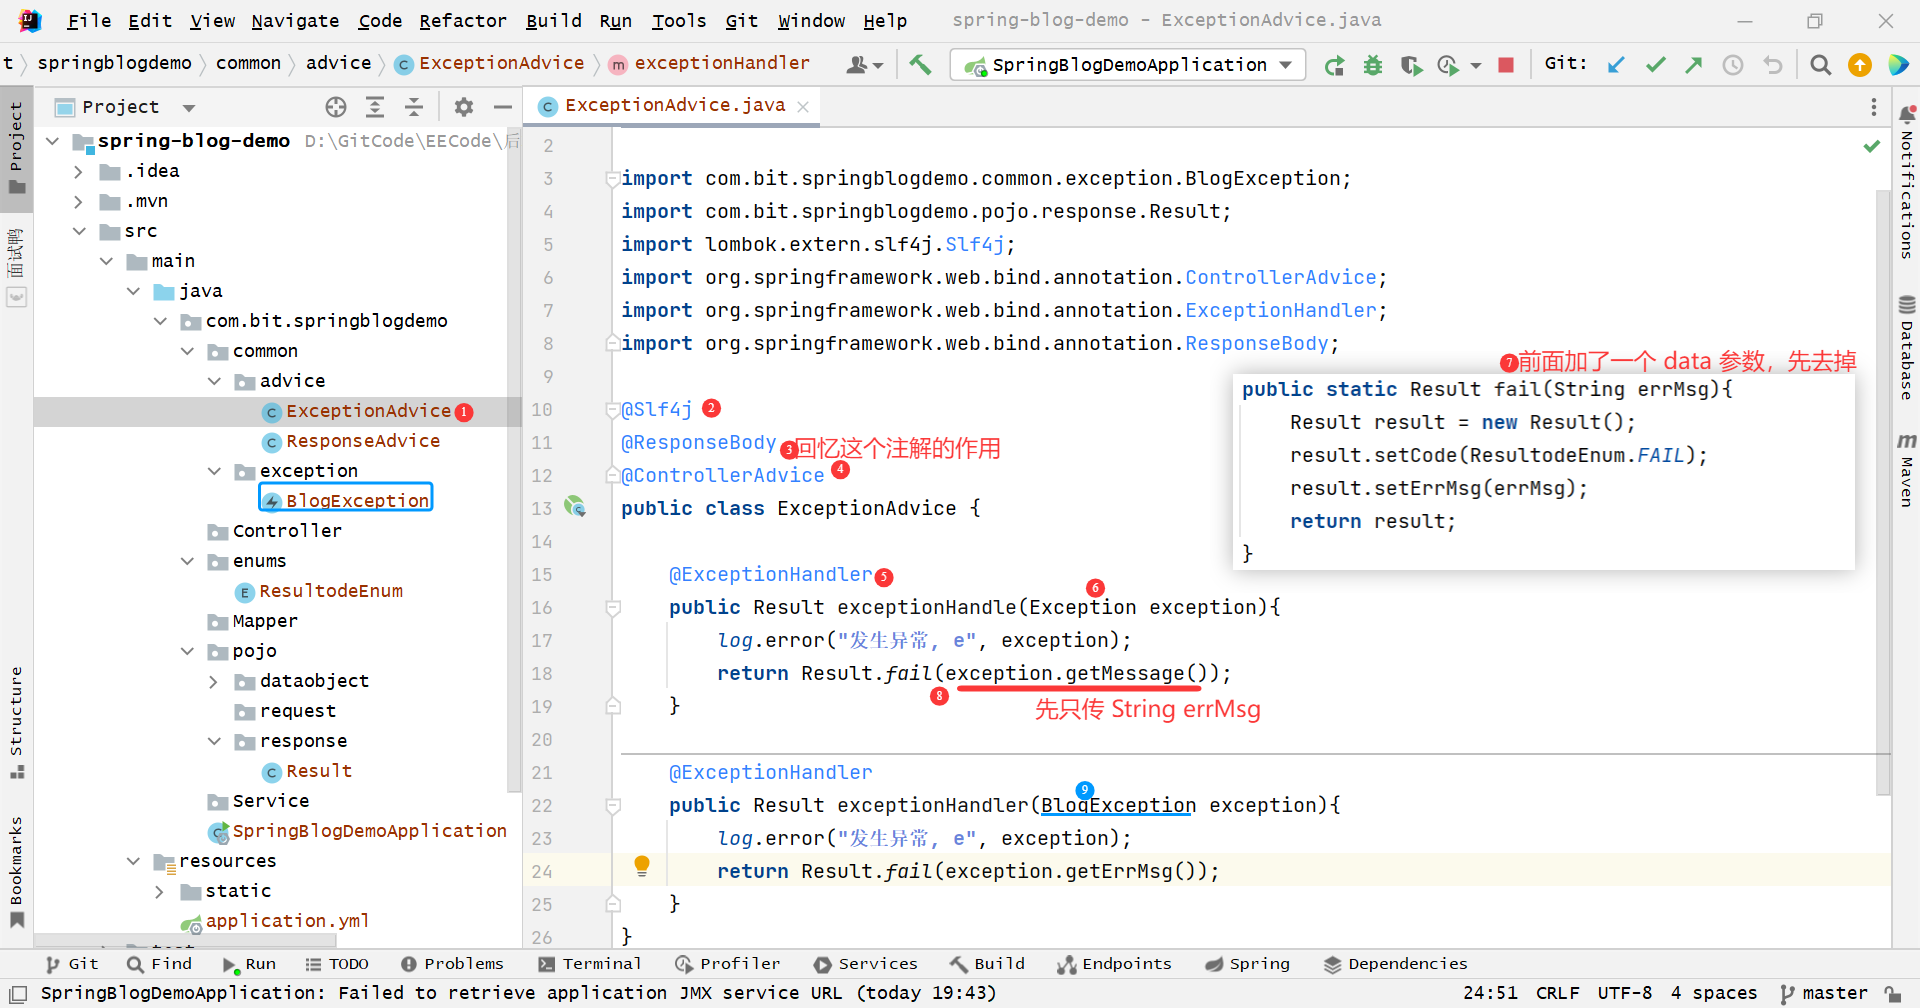
@RestController 变成 @Controller ,方法的返回值会被当成 URL,使用 @ResponseBody 会告诉 Spring 返回结果是数据而非页面
import com.bite.blog.common.pojo.response.Result;
import lombok.extern.slf4j.Slf4j;
import org.springframework.web.bind.annotation.ExceptionHandler;
import org.springframework.web.bind.annotation.RestControllerAdvice;@Slf4j
@RestControllerAdvice
public class ExceptionAdvice {@ExceptionHandlerpublic Result handler(Exception e) {log.error("发生异常, e: {}", e);return Result.fail(e.getMessage());}
}
业务代码
实体类

在数据库中,我们创建了两张表,接下来需要创建两个类,来与之对应;
对应机制:yml 驼峰自动转换/MP 依赖 ???
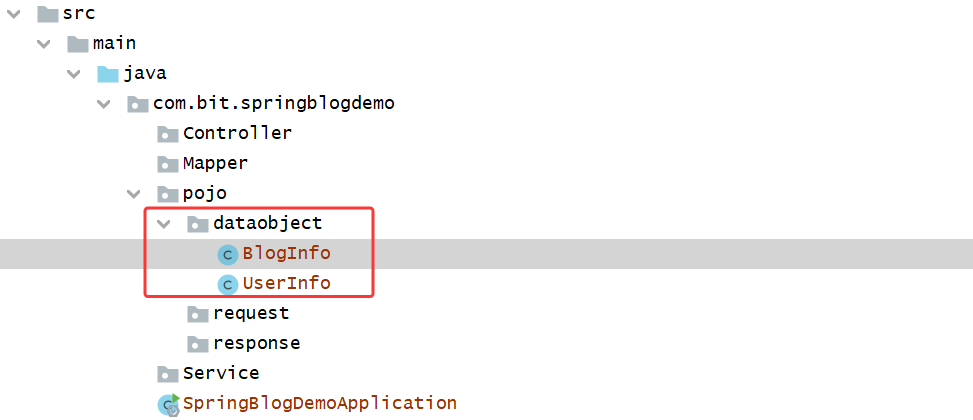
UserInfo

@Data
public class UserInfo {@TableId(type = IdType.AUTO)private Integer id;private String userName;private String password;private String githubUrl;private Integer deleteFlag;private LocalDate createTime;private LocalDate updateTime;
}
因为数据库的表名,列名都能和 MyBatis-Plus 中设置的实体类,属性对上,就不需要使用 @TableName,@TableField 来指定表和类、字段和属性;
但是需要使用 @TableId(type = IdType.AUTO) 设置主键,并且设置该主键类型为自增主键;
@TableName、@TableField、@TableId 的使用方法在这篇博客中有提及
BlogInfo

@Data
public class BlogInfo {@TableId(value = "id", type = IdType.AUTO)private Integer id;private String title;private String content;private Integer userId;private Integer deleteFlag;private LocalDateTime createTime;private LocalDateTime updateTime;
}
持久层
使用 MyBatisPlus 来完成持久层代码的开发,创建 mapper 实现 BaseMapper 即可。
Mapper
MP:依赖引入、继承 BaseMapper 接口实现单表增删改查、MP日志配置、表设计中设置主键自增值、MP 相关的 @Table系列常见注解说明_
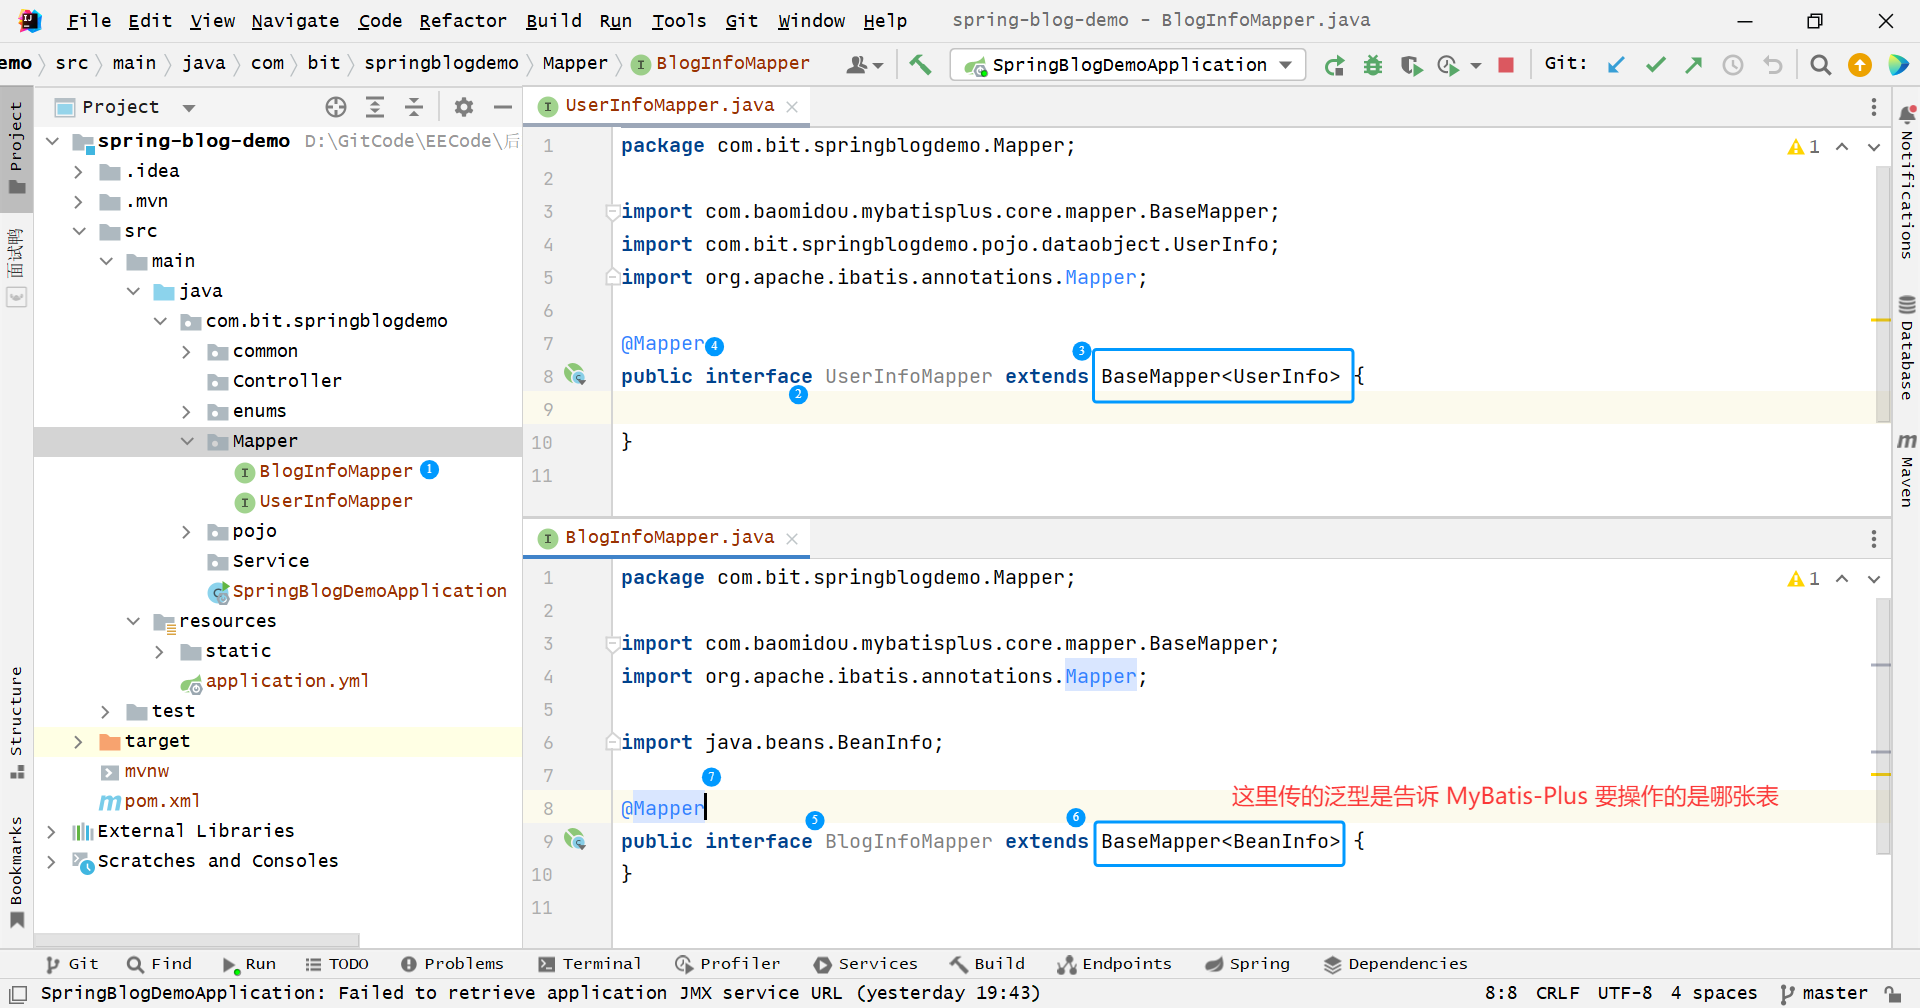

@Mapper 用于标识该接口是 MyBatis 中的 Mapper接口