接上篇,我们已经顺利地完成了服务的安装,下面就来看看如何配置并启动。
跟着我,你将学会:
- 下载并安装
- 踩坑:按照官方步骤来,可是网络条件不允许
- 获取YUM源
- 下载RPM包
- 手动解压安装
- 避坑
- 踩坑:按照官方步骤来,可是网络条件不允许
- 配置并启动(本篇)
- heplify
- heplify-server
- homer
- 配置数据库专用用户
- 初始化homer数据
- 创建配置数据库
- 创建数据数据库
- 创建数据表并修改权限
- 启动服务
- 如何使用 Homer 查询会话信息
- 登录平台
- 首页看板
- 会话详情
- 具体某条信令
- 自定义查询页面
配置并启动
配置主要有几个点,这边主要是依赖 PostgreSQL 来进行数据存储,以下主要讲 PG 数据的初始化。
heplify
Portable and Lightweight HEP Capture Agent for HOMER, Captures packets from wire and sends them to Homer
heplify 是一个终端采集工具,主要将数据推送到 heplify-server 使用
可以手动启动,也可以将其定义为一个 systemctl 的service 进行运作。官方是没有要求的,我下文会以service的形式运行。但是测试的话,可以先手动启动。
heplify-server
HEP Capture Server for HOMER
server是一个接受数据的服务,数据来自heplify,需要一个其启动的IP端口地址。
数据主要服务于前端的Homer,因此这边连接数据库,也主要是关心homer的schema、homer配置所在表、homer数据所在表,额外需要一个地址、用户。
我们来看看默认的配置文件,默认配置文件位于/opt/heplify-server/heplify-server.toml:
HEPAddr               = "0.0.0.0:9060"
HEPTCPAddr            = ""
HEPTLSAddr            = "0.0.0.0:9060"
HEPWSAddr             = "0.0.0.0:3000"
ESAddr                = ""
ESDiscovery           = true
LokiURL               = ""
LokiBulk              = 200
LokiTimer             = 4
LokiBuffer            = 100000
LokiHEPFilter         = [1,5,100]
LokiAllowOutOfOrder   = false
ForceHEPPayload	      = []
PromAddr              = ""
PromTargetIP          = ""
PromTargetName        = ""
DBShema               = "homer7"
DBDriver              = "postgres"
DBAddr                = "localhost:5432"
DBUser                = "postgres"
DBPass                = ""
DBDataTable           = "homer_data"
DBConfTable           = "homer_config"
DBBulk                = 200
DBTimer               = 4
DBBuffer              = 400000
DBWorker              = 8
DBRotate              = true
DBPartLog             = "2h"
DBPartSip             = "1h"
DBPartQos             = "6h"
DBDropDays            = 14
DBDropDaysCall        = 0
DBDropDaysRegister    = 0
DBDropDaysDefault     = 0
DBDropOnStart         = false
DBUsageProtection     = true
DBUsageScheme         = "percentage"
DBPercentageUsage     = "80%"
DBMaxSize             = "30MB"
Dedup                 = false
DiscardMethod         = []
AlegIDs               = []
CustomHeader          = []
SIPHeader             = []
LogDbg                = ""
LogLvl                = "info"
LogStd                = false
LogSys                = false
Config                = "./heplify-server.toml"
ConfigHTTPAddr        = ""# Examples:
# -------------------------------------
# ESAddr          = "http://127.0.0.1:9200"
# DBShema         = "homer7"
# DBDriver        = "postgres"
# LokiURL         = "http://localhost:3100/api/prom/push"
# LokiHEPFilter   = [1,5,100]
# PromAddr        = "0.0.0.0:8899"
# PromTargetIP    = "10.1.2.111,10.1.2.4,10.1.2.5,10.1.2.6,10.12.44.222"
# PromTargetName  = "sbc_access,sbc_core,kamailio,asterisk,pstn_gateway"
# AlegIDs         = ["X-CID","P-Charging-Vector,icid-value=\"?(.*?)(?:\"|;|$)","X-BroadWorks-Correlation-Info"]
# DiscardMethod   = ["OPTIONS","NOTIFY"]
# CustomHeader    = ["X-CustomerIP","X-Billing"]
# SIPHeader       = ["callid","callid_aleg","method","ruri_user","ruri_domain","from_user","from_domain","from_tag","to_user","to_domain","to_tag","via","contact_user"]
# LogDbg          = "hep,sql,loki"
# LogLvl          = "warning"
# ConfigHTTPAddr  = "0.0.0.0:9876"
# -------------------------------------
# To hot reload PromTargetIP and PromTargetName run:
# killall -HUP heplify-server
homer
Homer API Server and UI Webapplication
homer 的配置就是需要数据库的连接,不同的账号密码。兼容的组件和玩法也比较多,其他的配置项也是比较多的。
默认配置文件位于/usr/local/homer/etc/webapp_config.json:
{"database_data": {"LocalNode": {"help": "Settings for PGSQL Database (data)","node": "LocalNode","user": "homer_user","pass": "homer_password","name": "homer_data","keepalive": true,"host": "127.0.0.1"}},"hep_relay": {"help": "UDP socket to send HEP data on","host": "127.0.0.1","port": 9060},"database_config": {"help": "Settings for PGSQL Database (settings)","node": "LocalConfig","user": "homer_user","pass": "homer_password","name": "homer_config","keepalive": true,"host": "localhost"},"influxdb_config": {"enable": true,"help": "Settings for InfluxDB Database (optional)","user": "influx_user","pass": "influx_password","name": "homer_config","host": "http://127.0.0.1:8086","database": "homer","policy": "autogen"},"prometheus_config": {"enable": true,"help": "Settings for Prometheus Database (optional)","user": "admin","pass": "admin","host": "http://127.0.0.1:9090","api": "api/v1"},"swagger": {"enable": true,"api_json": "/usr/local/homer/etc/swagger.json","api_host": "127.0.0.1:9080"},"loki_config": {"help": "Settings for LOKI Database (optional)","user": "admin","password": "admin","param_query": "query_range","regexp": false,"host": "http://127.0.0.1:3100","template": "{job=\"heplify-server\"} |~ \"%callid%\"","external_url": "","api": "loki/api/v1","enable": true},"grafana_config": {"help": "Settings for Grafana","host": "http://127.0.0.1:3000","path": "grafana","token": "","proxy_control": false,"proxy_check": "simple","enable": true},"http_settings": {"help": "Settings for the HOMER Webapp Server. If you have gzip_static = false, please be sure that your dist directory has uncompressed .js files","host": "0.0.0.0","port": 9080,"root": "/usr/local/homer/dist","gzip": true,"path": "/","gzip_static": true,"debug": false},"transaction_settings": {"deduplicate": {"global": false}},"api_settings": {"enable_token_access": false,"add_captid_to_resolve": false},"https_settings": {"help": "SSL settings for homer-app","enable": false,"host": "0.0.0.0","port": 443,"min_tls_version": "1.2","use_mozilla_profile": true,"cert": "/usr/local/homer/tls/cert.pem","key": "/usr/local/homer/tls/key.pem"},"system_settings": {"help": "Settings for HOMER logs","logpath": "/usr/local/homer/log","logname": "homer-app.log","_loglevels": "can be: fatal, error, warn, info, debug, trace","loglevel": "error","logstdout": false},"dashboard_settings": {"_comment": "Here you can define a customs dashboards home","dashboard_home": "/usr/local/homer/etc/dashboard_home.json"},"auth_settings": {"_comment": "The type param can be internal, ldap, http_auth","type": "internal","_jwt_help": "Please generate own jwt secret using uuid or the flag generate-jwt-secret","jwt_secret": "","gravatar": false,"auth_token_header": "Auth-Token","gravatar_url": "https://www.gravatar.com/avatar/%s.jpg","token_expire": 1200,"user_groups": ["admin","user","support"]},"ldap_config": {"base": "dc=example,dc=com","host": "ldap.example.com","port": 389,"usessl": false,"skiptls": true,"binddn": "uid=readonlysuer,ou=People,dc=example,dc=com","bindpassword": "readonlypassword","userfilter": "(uid=%s)","groupfilter": "(memberUid=%s)","group_attributes": ["cn","memberOf","GroupAttribute","distinguishedName","dn","member"],"admingroup": "admin","adminmode": true,"usergroup": "HOMER_user","usermode": true,"attributes": ["dn","givenName","sn","mail","uid"],"skipverify": true,"anonymous": false,"userdn": "uid=%s,ou=People,dc=example,dc=com"},"http_auth": {"url": "http://localhost:1323","skipverify": true},"oauth2": {"enable": false,"client_id": "1234565","client_secret": "FAKE","project_id": "Homer OAuth","auth_uri": "https://accounts.google.com/o/oauth2/auth","token_uri": "https://oauth2.googleapis.com/token","auth_provider_x509_cert_url": "https://www.googleapis.com/oauth2/v1/certs","redirect_uri": "http://localhost:80/api/v3/oauth2/auth","service_redirect": "/api/v3/oauth2/redirect","profile_url": "https://www.googleapis.com/oauth2/v1/userinfo","provider_name": "google","grant_type": "authorization_code","response_type": "code","auth_style": 1,"user_token": "RandomURLSafeStringWithAMinimumLengthOf43Characters","scope": ["email","openid","profile"],"gravatar": false,"gravatar_url": "https://www.gravatar.com/avatar/%s.jpg","provider_image": ""},"decoder_shark": {"_comment": "Here you can do packet decoding using tshark application. Please define uid, gid if you run the app under root","active": false,"bin": "/usr/bin/tshark","protocols": ["1_call","1_registration","1_default"]}
}
配置数据库专用用户
对于homer服务,创建数据库专用用户。
使用管理员账户连接上PG后,执行。
create user homer with password 'homerpass';
初始化homer数据
从上面的配置就可以看到,有一个配置数据库和一个数据数据库,下面就对其进行初始化,需要用到pg的root用户。
创建配置数据库
$ homer-app -create-config-db -database-root-user=root -database-host=xx.xx.xx.xx -database-root-password=pass -database-homer-user=homerCONNECT to DB ROOT STRING: [host=192.168.5.109 user=root dbname=postgres sslmode=disable port=5432 password=root]HOMER - create db [homer_config] with [name=homer](/app/migration/migration.go:89)
[2024-08-20 18:08:30]  [148.72ms]  CREATE DATABASE "homer_config" OWNER "homer"
[0 rows affected or returned ]DONEHOMER - show usersRole name       |       Attributes
------------------------------------------------homer   |root    |       superuser, create databasetest    |DONE
登录确认:
psql (9.2.24, server 12.19)
WARNING: psql version 9.2, server version 12.0.Some psql features might not work.
Type "help" for help.postgres=# \lList of databasesName     | Owner | Encoding |  Collate   |   Ctype    | Access privileges
--------------+-------+----------+------------+------------+-------------------homer_config | homer | UTF8     | en_US.utf8 | en_US.utf8 |postgres     | root  | UTF8     | en_US.utf8 | en_US.utf8 |root         | root  | UTF8     | en_US.utf8 | en_US.utf8 |template0    | root  | UTF8     | en_US.utf8 | en_US.utf8 | =c/root          +|       |          |            |            | root=CTc/roottemplate1    | root  | UTF8     | en_US.utf8 | en_US.utf8 | =c/root          +|       |          |            |            | root=CTc/roottest         | root  | UTF8     | en_US.utf8 | en_US.utf8 | =Tc/root         +|       |          |            |            | root=CTc/root    +|       |          |            |            | test=CTc/root
(6 rows)
创建数据数据库
$ homer-app -create-data-db -database-root-user=root -database-host=xx.xx.xx.xx -database-root-password=pass -database-homer-user=homerHOMER - create db [homer_data] with [name=homer](/app/migration/migration.go:89)
[2024-08-20 18:10:25]  [115.71ms]  CREATE DATABASE "homer_data" OWNER "homer"
[0 rows affected or returned ]DONEHOMER - show usersRole name       |       Attributes
------------------------------------------------homer   |root    |       superuser, create databasetest    |DONE
登录确认:
psql (9.2.24, server 12.19)
WARNING: psql version 9.2, server version 12.0.Some psql features might not work.
Type "help" for help.postgres=# \lList of databasesName     | Owner | Encoding |  Collate   |   Ctype    | Access privileges
--------------+-------+----------+------------+------------+-------------------homer_config | homer | UTF8     | en_US.utf8 | en_US.utf8 |homer_data   | homer | UTF8     | en_US.utf8 | en_US.utf8 |postgres     | root  | UTF8     | en_US.utf8 | en_US.utf8 |root         | root  | UTF8     | en_US.utf8 | en_US.utf8 |template0    | root  | UTF8     | en_US.utf8 | en_US.utf8 | =c/root          +|       |          |            |            | root=CTc/roottemplate1    | root  | UTF8     | en_US.utf8 | en_US.utf8 | =c/root          +|       |          |            |            | root=CTc/roottest         | root  | UTF8     | en_US.utf8 | en_US.utf8 | =Tc/root         +|       |          |            |            | root=CTc/root    +|       |          |            |            | test=CTc/root
(7 rows)
创建数据表并修改权限
$ homer-app -create-table-db-configHOMER - creating tables for the config DB [dbname=homer_config]
Successful ping: 192.168.5.109, Type: config, Node: localnode
DONE$ homer-app -populate-table-db-config
Successful ping: 192.168.5.109, Type: config, Node: localnodeINFO[0000] SELECT * FROM "versions"                      module=gorm type=sqlHOMER - filling tables for the config DB [dbname=homer_config]reinstalling usersreinstalling global_settingsreinstalling auth_tokenreinstalling agent_location_sessionreinstalling hepsub_mapping_schemareinstalling user_settingsreinstalling mapping_schemareinstalling versionsDONE$ homer-app -upgrade-table-db-configHOMER - upgrading tables for the config DB [dbname=homer_config]
Successful ping: 192.168.5.109, Type: config, Node: localnode
DONE
完成以上步骤后,对应配置文件内的连接用户、地址、数据库名都做好调整,就可以准备启动服务了。
启动服务
启动heplify-server
$ systemctl start heplify-server
$ systemctl status heplify-server
● heplify-server.service - HEP Server & Switch in GoLoaded: loaded (/usr/lib/systemd/system/heplify-server.service; enabled; vendor preset: disabled)Active: active (running) since 五 2024-09-13 10:55:19 CST; 1s agoMain PID: 17504 (heplify-server)CGroup: /system.slice/heplify-server.service└─17504 /usr/local/bin/heplify-server -config=/etc/heplify-server.toml9月 13 10:55:19 192.168.5.167 systemd[1]: Started HEP Server & Switch in Go.
启动homer-app
$ systemctl start homer-app
$ systemctl status homer-app
● homer-app.service - Homer API Server and UI WebapplicationLoaded: loaded (/usr/lib/systemd/system/homer-app.service; disabled; vendor preset: disabled)Active: active (running) since 五 2024-09-13 10:55:59 CST; 1s agoMain PID: 17560 (homer-app)CGroup: /system.slice/homer-app.service└─17560 /usr/local/bin/homer-app9月 13 10:56:00 192.168.5.167 homer-app[17560]: ___ /  /::\
9月 13 10:56:00 192.168.5.167 homer-app[17560]: /__/\  /:/\:\     _____
9月 13 10:56:00 192.168.5.167 homer-app[17560]: \  \:\/:/__\/    |___  |
9月 13 10:56:00 192.168.5.167 homer-app[17560]: \  \::/            / /
9月 13 10:56:00 192.168.5.167 homer-app[17560]: \  \:\           / /
9月 13 10:56:00 192.168.5.167 homer-app[17560]: \  \:\         /_/
9月 13 10:56:00 192.168.5.167 homer-app[17560]: \__\/
9月 13 10:56:00 192.168.5.167 homer-app[17560]:
9月 13 10:56:00 192.168.5.167 homer-app[17560]:  Version: homer-app 1.5.3.
9月 13 10:56:00 192.168.5.167 homer-app[17560]: ⇨ http server started on [::]:9080
[root@192 ~]#
最终启动 heplify
/opt/heplify/heplify -i lo -hs ip:9060 -m SIP -dim REGISTER -pr 5060-5090
它的使用方法简单讲,就是基于什么网口、针对什么类型网络流量、是否需要过滤、端口范围是什么,抓到的数据推到哪里。
我上面的配置就是:针对lo网口上,端口5060-5090范围内的SIP消息,除却REGISTER消息,其他抓取的到后送到ip:9060地址。
看看它的详细用法:
$ /opt/heplify/heplify --help
Use heplify 1.66.7 like: /opt/heplify/heplify [option]-assembly_debug_logIf true, the github.com/google/gopacket/tcpassembly library will log verbose debugging information (at least one line per packet)-assembly_memuse_logIf true, the github.com/google/gopacket/tcpassembly library will log information regarding its memory use every once in a while.-b intInterface buffersize (MB) (default 32)-bpf stringCustom BPF to capture packets-collectonlysipcollect only sip-d stringEnable certain debug selectors [defrag,layer,payload,rtp,rtcp,sdp]-ddDeduplicate packets-di stringDiscard uninteresting packets by any string-didip stringDiscard uninteresting SIP packets by Destination IP(s)-diip stringDiscard uninteresting SIP packets by Source or Destination IP(s)-dim stringDiscard uninteresting SIP packets by Method [OPTIONS,NOTIFY]-disip stringDiscard uninteresting SIP packets by Source IP(s)-e	Log to stderr and disable syslog/file output-eof-exitExit on EOF of ReadFile-erspanerspan-fg uintFanout group ID for af_packet-fi stringFilter interesting packets by any string-fnum intThe total num of log files to keep (default 7)-fsize uintThe rotate size per log file based on byte (default 10485760)-fw intFanout worker count for af_packet (default 4)-hep-buffer-activateenable buffer messages if connection to HEP server broken-hep-buffer-debugenable debug buffer messages-hep-buffer-file stringfilename and location for hep-buffer file (default "HEP-Buffer.dump")-hep-buffer-max-size stringmax buffer size, can be B, KB, MB, GB, TB. By default - unlimited (default "0")-hi uintHEP node ID (default 2002)-hin stringHEP collector address [udp:127.0.0.1:9093]-hn stringHEP node Name-hp stringHEP node PW-hs stringHEP server address (default "127.0.0.1:9060")-i stringListen on interface (default "any")-keepalive uintkeep alive internal - 5 seconds by default. 0 - disable (default 5)-l stringLog level [debug, info, warning, error] (default "info")-lp intLoop count over ReadFile. Use 0 to loop forever (default 1)-m stringCapture modes [SIP, SIPDNS, SIPLOG, SIPRTCP] (default "SIPRTCP")-n stringLog filename (default "heplify.log")-nt stringNetwork types are [udp, tcp, tls] (default "udp")-o	Read packet for packet-p stringLog filepath (default "./")-pr stringPortrange to capture SIP (default "5060-5090")-prometheus stringprometheus metrics - ip:port. By default all IPs (default ":8090")-protobufUse Protobuf on wire-rf stringRead pcap file-rsUse packet timestamps with maximum pcap read speed-rt intPcap rotation time in minutes (default 60)-s intSnaplength (default 8192)-script-file stringScript file to execute on each packet-script-hep-filter stringHEP filter for script, comma separated list of HEP types (default "1")-sipassemblyIf true, sipassembly will be enabled-skipverifyskip certifcate validation-slLog to syslog-t stringCapture types are [pcap, af_packet] (default "af_packet")-tcpassemblyIf true, tcpassembly will be enabled-tcpsendretries uintNumber of retries for sending before giving up and reconnecting-versionShow heplify version-vlanvlan-wf stringPath to write pcap file-zfEnable pcap compression
命令行直接启动后,输出的东西很少,主要就是产生流量,然后去homer的页面看了。
因为命令行启动仅仅是测试,因为终端肯定还是会关掉的,那么service模式怎么配置呢?
$ cat /etc/systemd/system/heplify.service[Unit]Description=Captures packets from wire and sends them to HomerAfter=network.target[Service]WorkingDirectory=/opt/heplifyExecStart=/opt/heplify/heplify -i lo -hs ip:9060 -m SIP -dim REGISTER -pr "5060-5090"ExecStop=/bin/kill ${MAINPID}Restart=on-failureRestartSec=10sType=simple[Install]WantedBy=multi-user.target
其实就是熟悉的那条命令,只不过交由 systemctl 来管理。手动修改完指令后,reload一下,就可以尝试启动了。
$ systemctl start heplify
$ systemctl status heplify
● heplify.service - Captures packets from wire and sends them to HomerLoaded: loaded (/etc/systemd/system/heplify.service; enabled; vendor preset: disabled)Active: active (running) since 五 2024-09-13 10:53:05 CST; 2s agoProcess: 22817 ExecStop=/bin/kill ${MAINPID} (code=exited, status=0/SUCCESS)Main PID: 17288 (heplify)CGroup: /system.slice/heplify.service└─17288 /opt/heplify/heplify -i lo -hs ip:9060 -m SIP -dim REGISTER -pr 5060-50909月 13 10:53:05 ip systemd[1]: Started Captures packets from wire and sends them to Homer.
看看启动后的web页面成效:
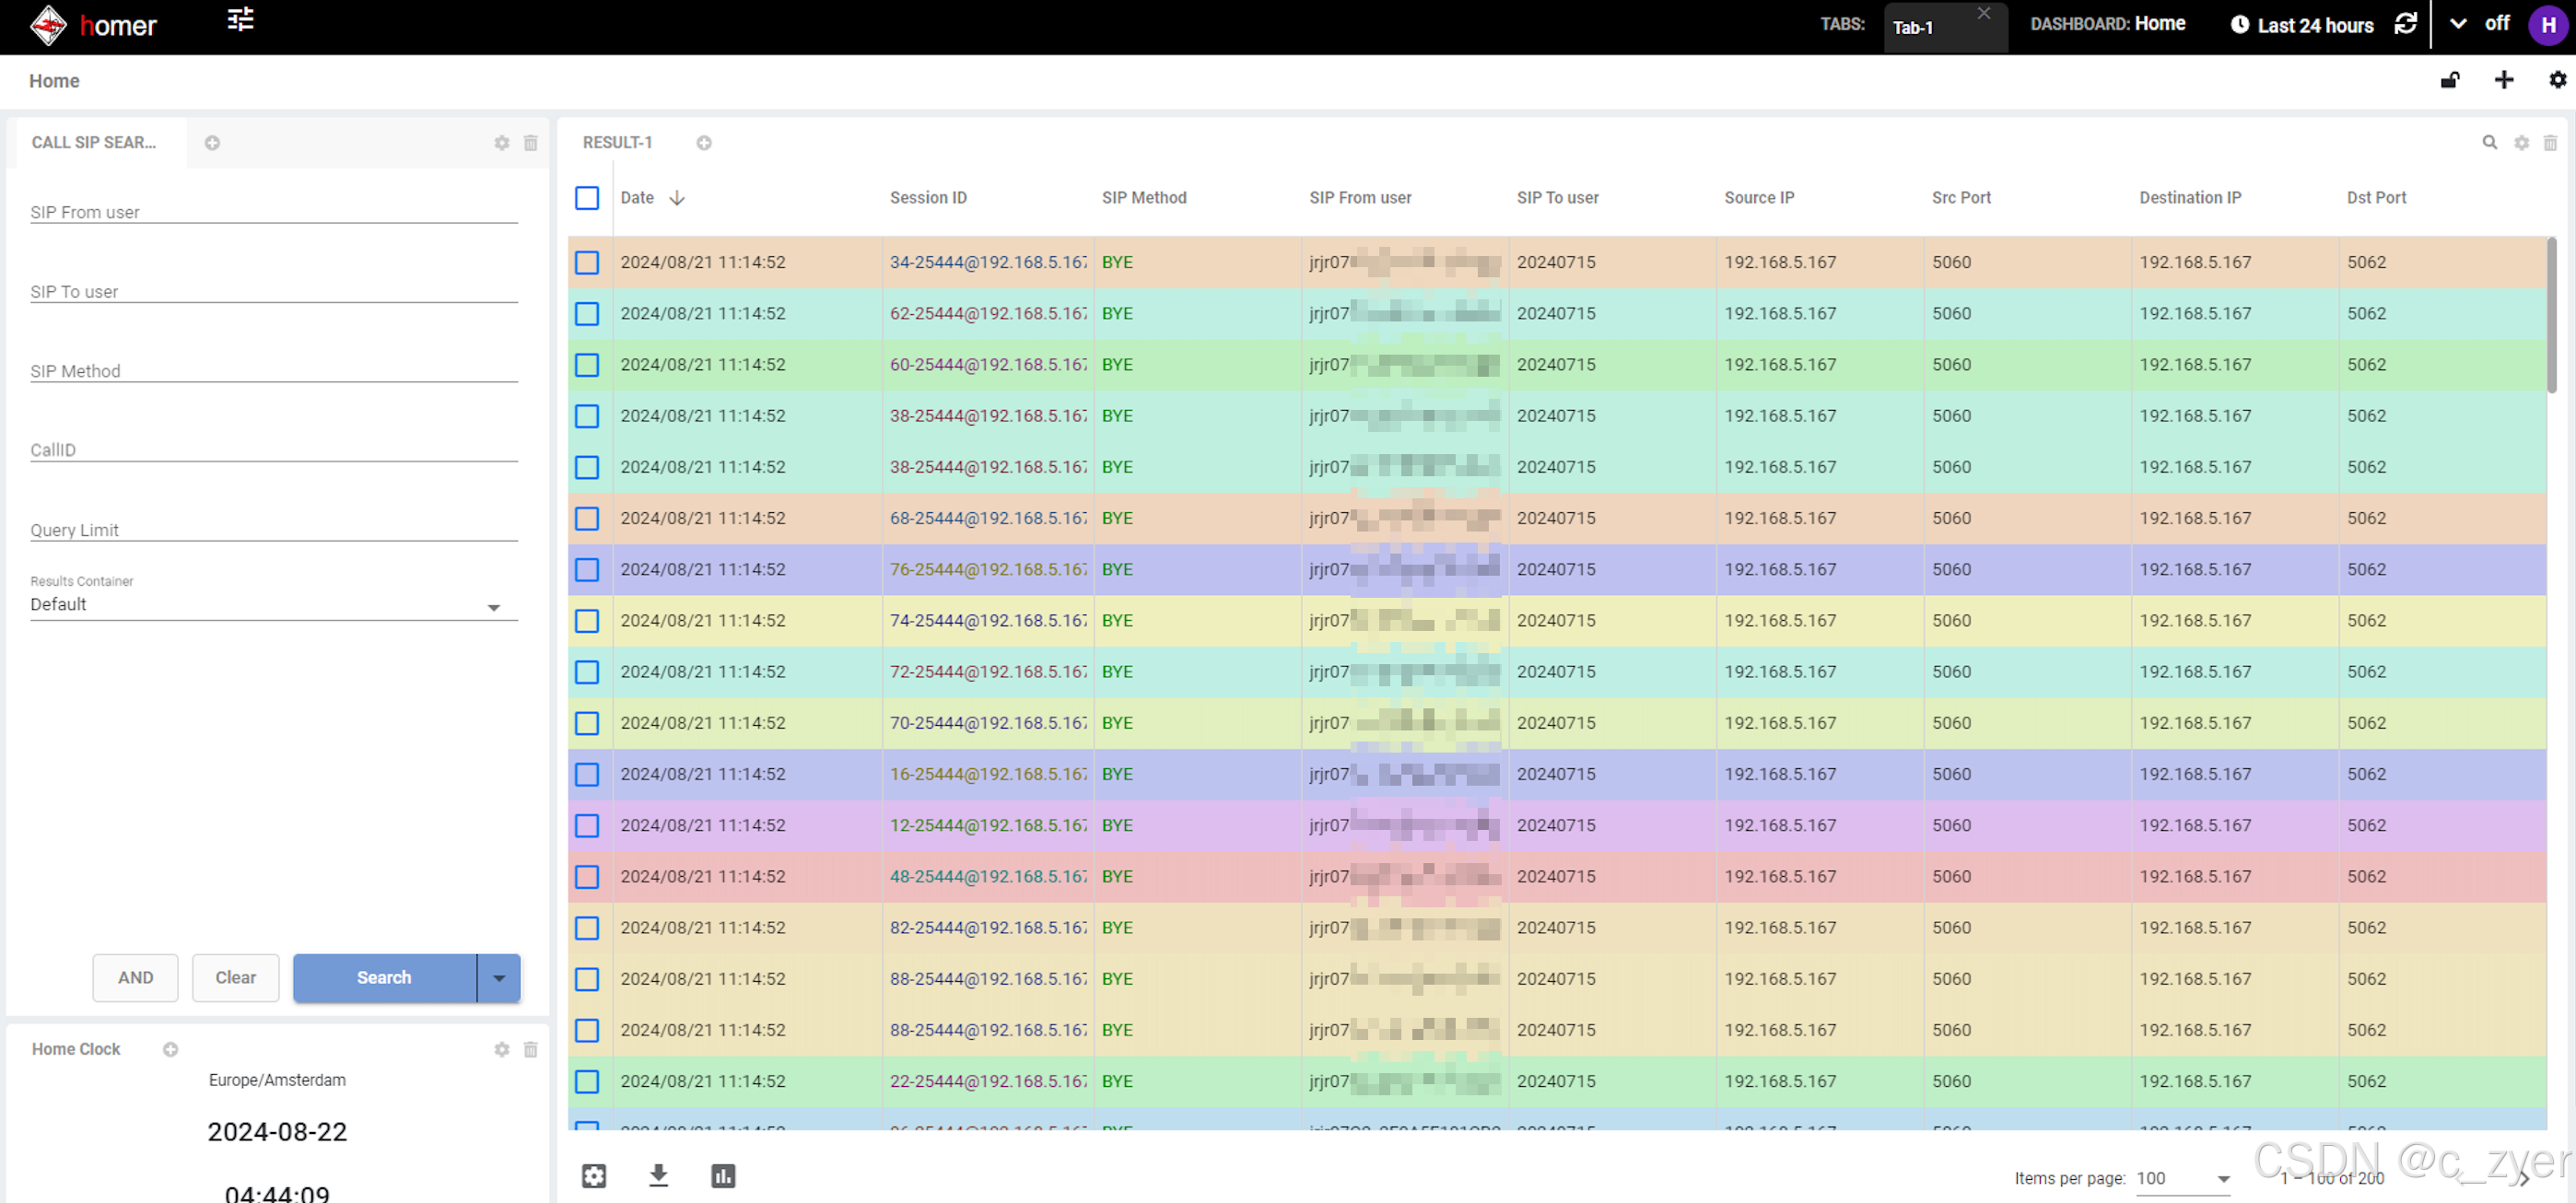
后续再介绍每一个页面的功能和使用。
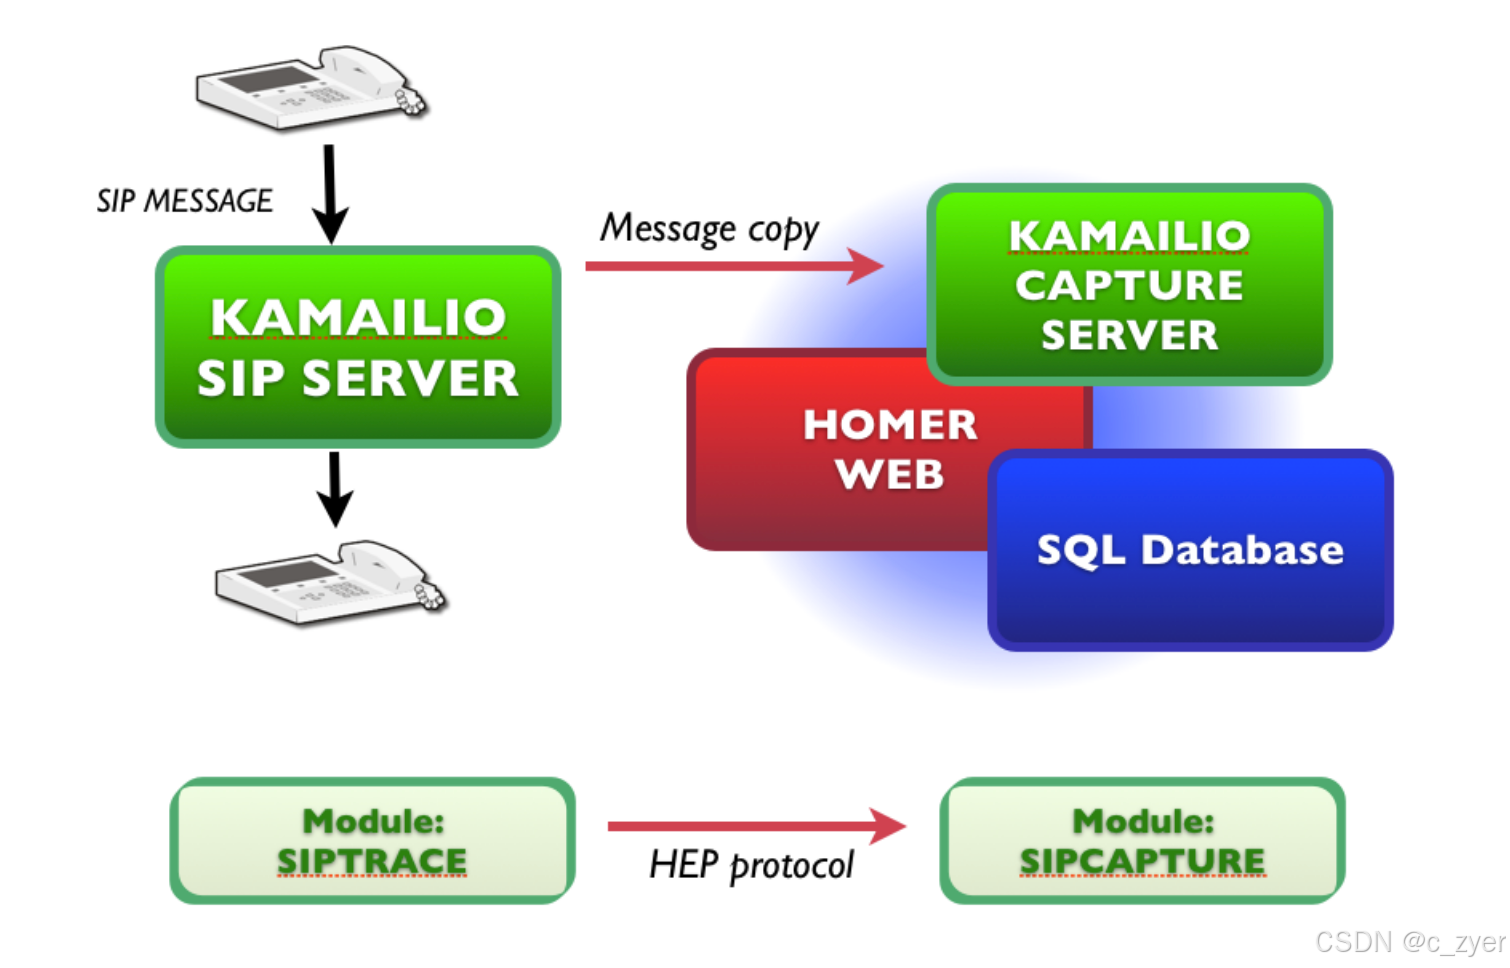
sipcapture对这块功能版图还是铺的比较大,结合kamailio也做了sipcature的模块,辅助实现更为更多会话或事务级别的功能,此外还使用过siptrace去发送hep数据。
这里有几点思考:
- 对于heplify,这个外部抓网口数据的,如果一个服务器上很多服务,各种各样的网络包数据,使用这个工具抓取并过滤,不知道是否合适。但是它的好处就是对于Kamailio没有任何影响。
- 对于siptrace,开源技术公司出品,他其实内部就是指定一个heplify-server的地址,和heplify是一样的情况,但是这个抓取就是KM的脚本可自行控制的,追或者不追都可以,模式可选,也可写入到KM自己的数据库中。相比较,KM自身发起可控,但对KM的流程需要增加一步,高并发的场景不知道效果性能如何?
- 对于sipcapture,商业化公司出品,围绕其他公司相关产品。个人觉得这个模块是取代heplify-server的,新部署一个KM使用sipcapture模块,来接受siptrace过来的数据,然后直接写到数据库中,类似于 heplify-server收到数据写入数据库的动作。介绍较少,版图太大,没搭建起来尝试,有尝试过的小伙伴可以分享一下。详见官方文档说明。