学硕热度下降,25西电数学与统计学院(考研录取情况)
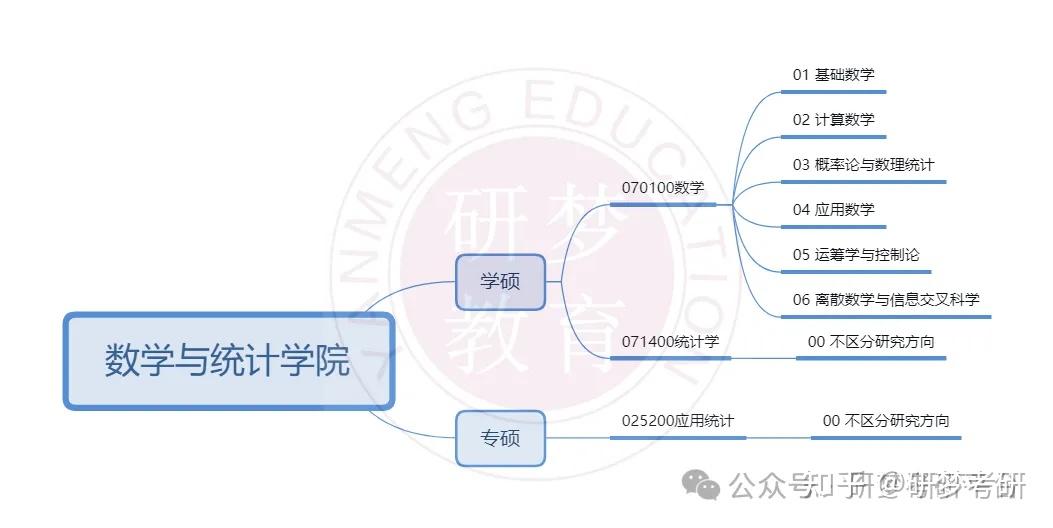
1、数学与统计学院各个方向
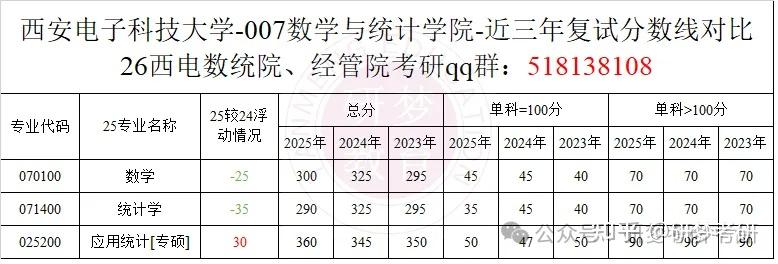
2、数学与统计学院近三年复试分数线对比
学长、学姐分析
由表可看出:
1、数学专业25年相较于24年下降25分,为300分
2、统计学专业25年相较于24年下降35分,为290分
3、应用统计(专硕)专业25年相较于24年上升30分,为360分
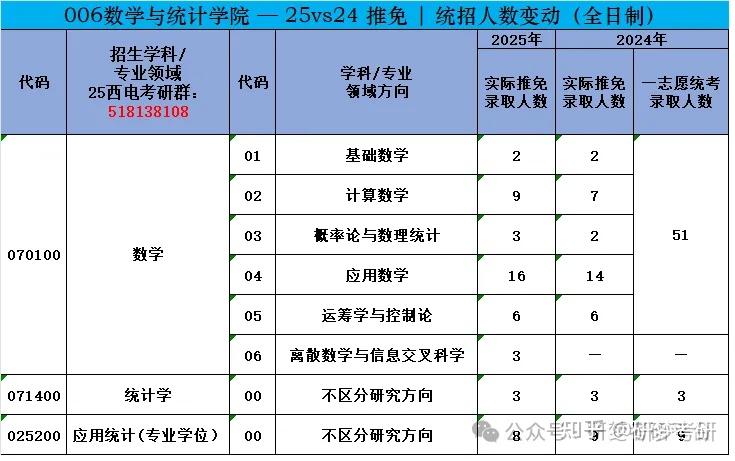
3、25vs24推免/统招人数对比
学长、学姐分析
由表可看出:
1、 数学与统计学院25年共接收了50个推免生
2、 25年 保研总名额相较于 24年基本持平,在没有扩招的情况下,可能今年录取统考人数与去年接近
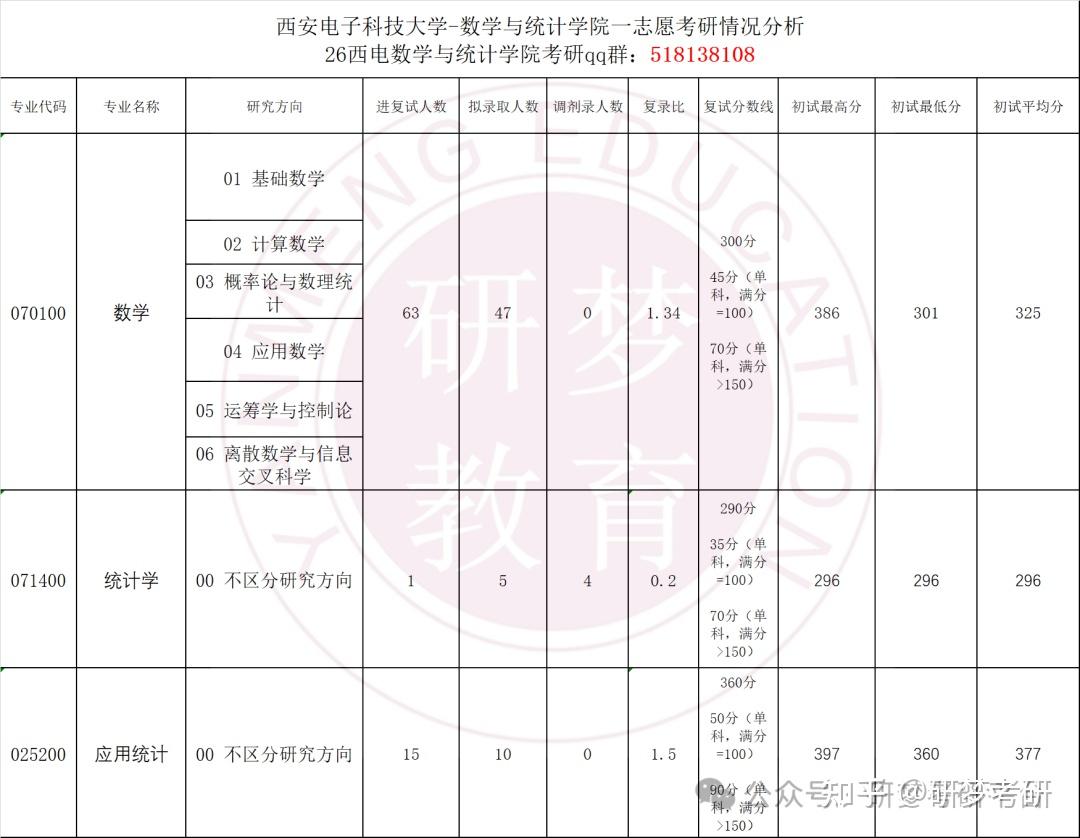
4、各个方向复录比、初试平均分统计
学长、学姐分析
由表可看出:
1、数学专业方向复录比为1.34 : 1,数学专业属于学院的王牌专业,并且招收人数多,不歧视双非、跨考生
2、统计学复专业录比为0.2 : 1,今年专业下降35分,并且缺额4人,热度大幅度下降
3、应用统计专业复录比为1.5 : 1,今年热度稍微增加,分数线上涨30分
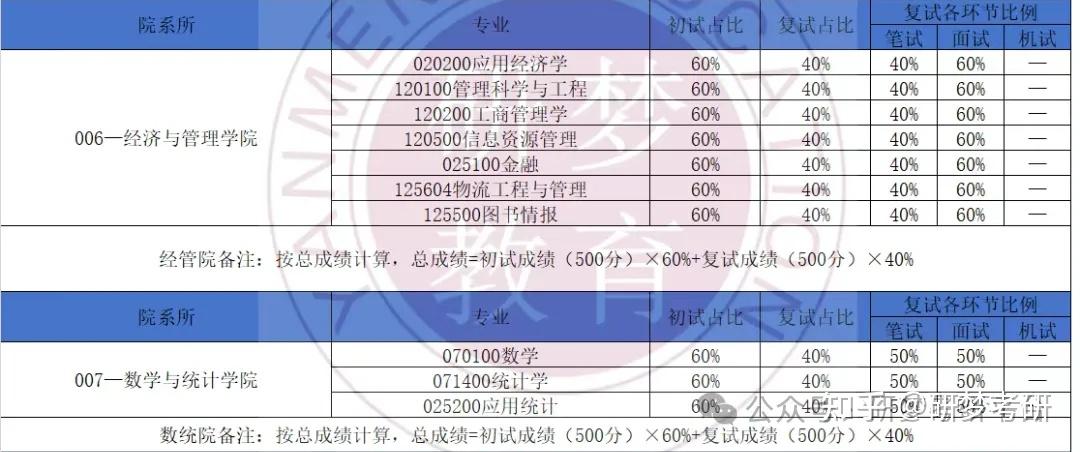
5、25考研初/复试比例
学长、学姐分析
由表可看出:
1、由表可看出:数学与统计学院初复试比例=60% :40% ,相对来说比较公平 ,更加看重初试成绩,且复试环节中笔试:面试=50% :50%
2、
(1)笔试成绩=科目一成绩 + 科目二成绩
(2)复试成绩(满分100分)=笔试成绩 × 50% + 面试成绩×50%
(3)总成绩(满分100分)=(初试成绩/本专业初试成绩最高分) × 100 × 60% + 复试成绩 × 40%
3、数学与统计学院要求复试成绩不合格者(成绩<60分,笔试成绩、面试成绩不作为复试不合格的判定标准),不予录取;
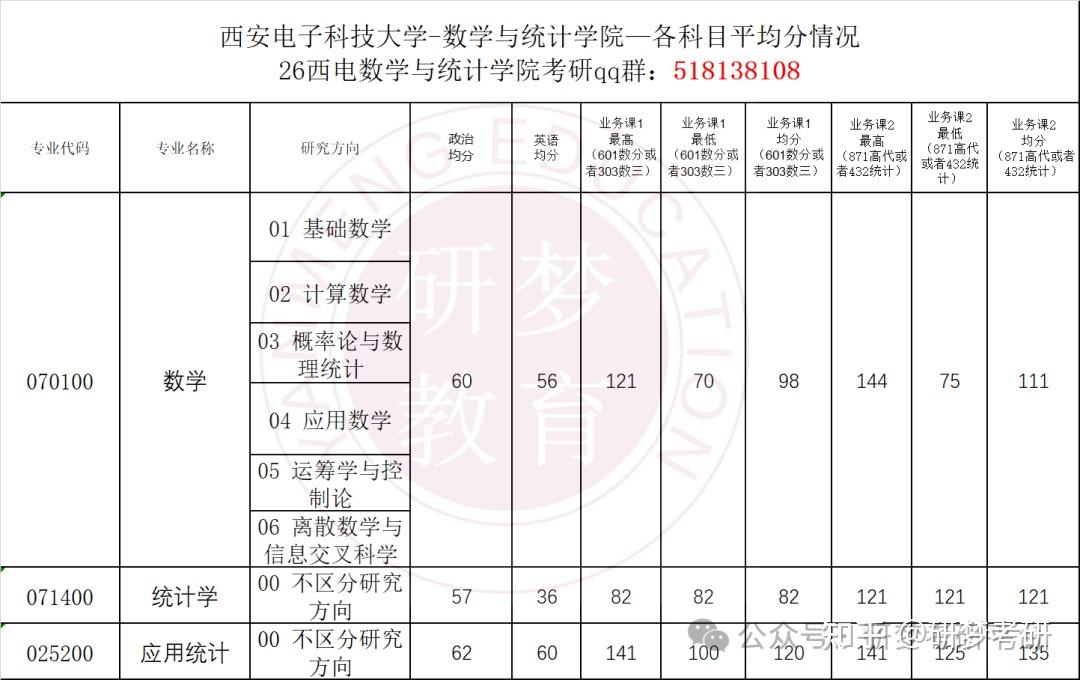
6、专业各科目初试平均分统计、复试笔试、面试成绩统计
学长、学姐分析
由表可看出:
1、今年数统院专业课属于正常水平、数学方向 601数学分析平均分98分、871高等代数平均分111分;统计学方向 601数学分析平均分82分、871高等代数平均分121分;
2、应用统计方向 303数学三平均分120分、432统计平均分135分
3、西电数学与统计学院今年专硕热度上升,学硕热度下降,咱们数统院院答疑学长学姐帮助很多学弟学妹上岸咱们西安电子科技大学。
4、今年数学与统计学院初步统计带上岸超过40人+,专业课均分分别为101、116分
5、西电位于陕西,公共课、专业课改卷比较宽松,并且不招收校外调剂,因此不存在压分现象,对于考生来说,比较公平,一定要好好学习!
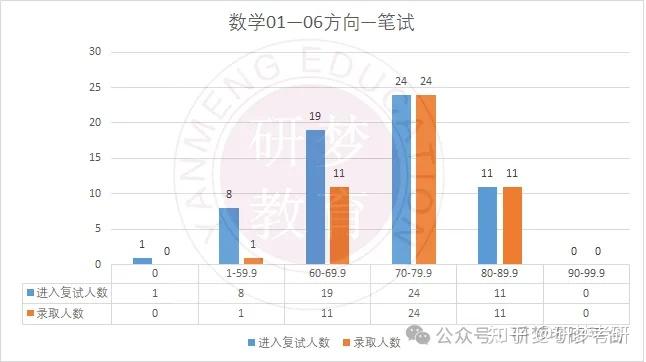
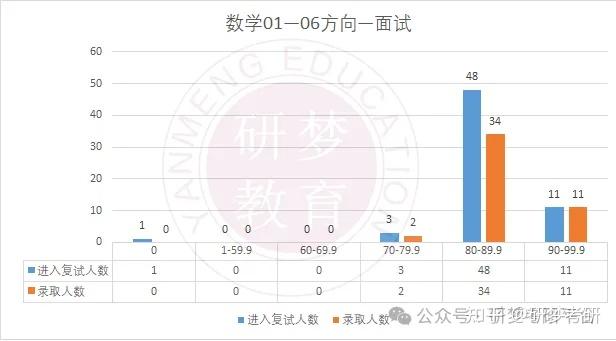
01、数学01—06方向复试笔试/面试成绩
02、统计学00不区分研究方向复试笔试/面试成绩


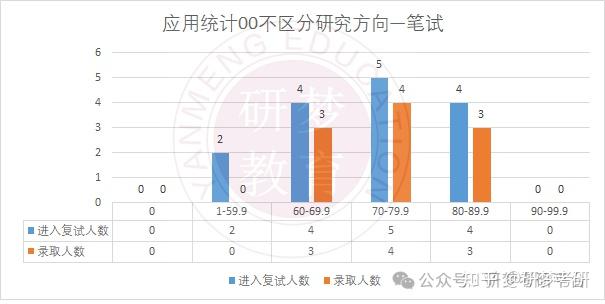
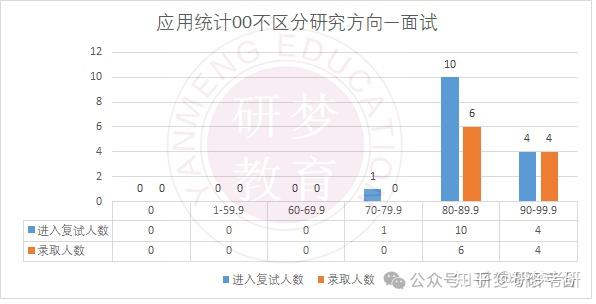
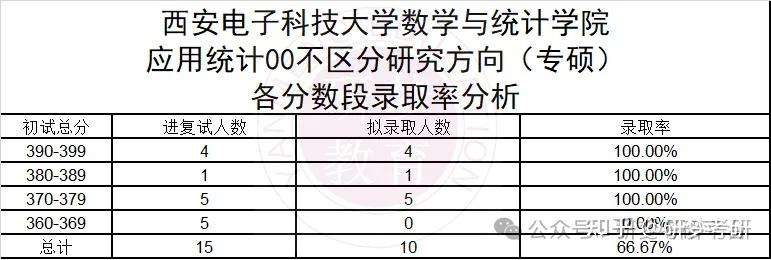
03、应用统计00不区分研究方向复试笔试/面试成绩
7、各个专业初试成绩录取率统计分析
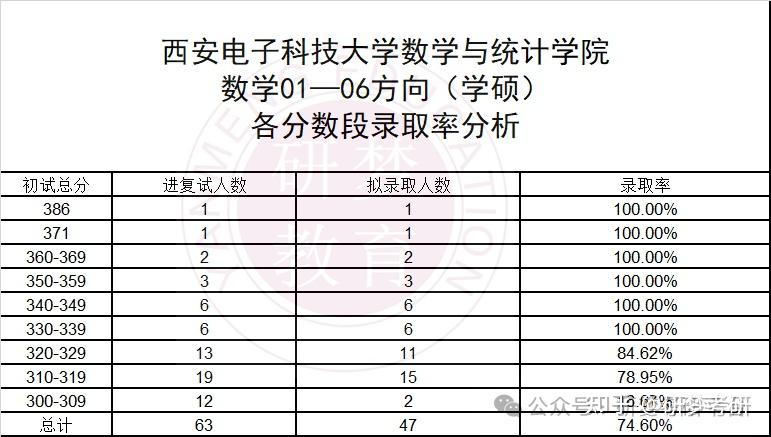
01、数学01—06方向录取率分析
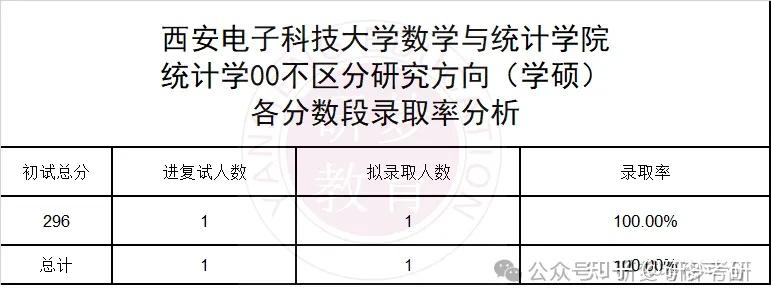
02、统计学00不区分研究方向录取率分析
03、应用统计00不区分研究方向录取率分析
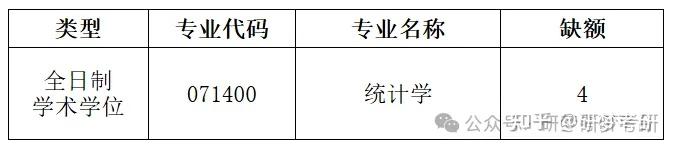
8、学院补录名额情况
学长、学姐分析
由表可看出:
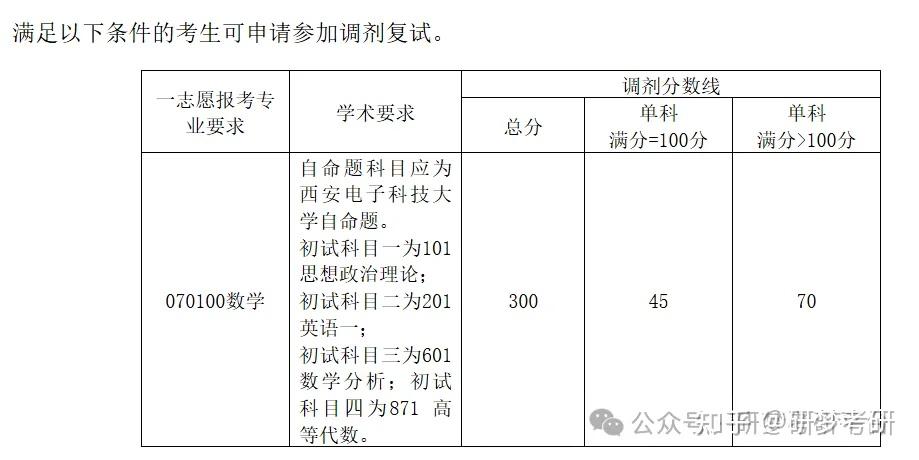
1、071400统计学方向出现缺额4人,原报集070100数学方向复试线上考生,原方向复试合格未被录取,可申请调剂。