写在前面
关于数据科学环境的建立,可以参考我的博客:
【深耕 Python】Data Science with Python 数据科学(1)环境搭建
往期数据科学博文一览:
【深耕 Python】Data Science with Python 数据科学(2)jupyter-lab和numpy数组
【深耕 Python】Data Science with Python 数据科学(3)Numpy 常量、函数和线性空间
【深耕 Python】Data Science with Python 数据科学(4)(书337页)练习题及解答
【深耕 Python】Data Science with Python 数据科学(5)Matplotlib可视化(1)
【深耕 Python】Data Science with Python 数据科学(6)Matplotlib可视化(2)
【深耕 Python】Data Science with Python 数据科学(7)书352页练习题
【深耕 Python】Data Science with Python 数据科学(8)pandas数据结构:Series和DataFrame
【深耕 Python】Data Science with Python 数据科学(9)书361页练习题
【深耕 Python】Data Science with Python 数据科学(10)pandas 数据处理(一)
【深耕 Python】Data Science with Python 数据科学(11)pandas 数据处理(二)
【深耕 Python】Data Science with Python 数据科学(12)pandas 数据处理(三)
【深耕 Python】Data Science with Python 数据科学(13)pandas 数据处理(四):书377页练习题
【深耕 Python】Data Science with Python 数据科学(14)pandas 数据处理(五):泰坦尼克号亡魂 Perished Souls on “RMS Titanic”
【深耕 Python】Data Science with Python 数据科学(15)pandas 数据处理(六):书385页练习题
【深耕 Python】Data Science with Python 数据科学(16)Scikit-learn机器学习(一)
【深耕 Python】Data Science with Python 数据科学(17)Scikit-learn机器学习(二)
【深耕 Python】Data Science with Python 数据科学(18)Scikit-learn机器学习(三)
代码说明: 由于实机运行的原因,可能省略了某些导入(import)语句。
11.7.4 Exercises
1. The RandomForestClassifier( ) function takes a keyword argument called n_estimators that represents the “number of trees in the forest”. According to the documentation, what is the default value for n_estimators? Use random_state=1.
Answer in Python:
# ex 1
from sklearn.ensemble import RandomForestClassifier
random_forest = RandomForestClassifier(random_state=1)
print(random_forest.n_estimators)  # default value of number of trees
random_forest_2 = RandomForestClassifier(random_state=1, n_estimators=10)
print(random_forest_2.n_estimators)  # set the value of number of trees
程序输出:
100  # 默认树棵数
10   # 设置值
2. By varying n_estimators in the call to RandomForestClassifier( ), determine the approximate value where the Random Forest classifier is less accurate than Decision Tree. Use random_state=1.
Answer in Python:
首先取n_estimators=50:
import numpy as np
import pandas as pd
import matplotlib.pyplot as pltURL = "https://learnenough.s3.amazonaws.com/titanic.csv"
titanic = pd.read_csv(URL)from sklearn.tree import DecisionTreeClassifier
from sklearn.ensemble import RandomForestClassifierdropped_columns = ["PassengerId", "Name", "Cabin", "Embarked", "SibSp", "Parch", "Ticket", "Fare"]
for column in dropped_columns:titanic = titanic.drop(column, axis=1)for column in ["Age", "Sex", "Pclass"]:titanic = titanic[titanic[column].notna()]sexes = {"male": 0, "female": 1}
titanic["Sex"] = titanic["Sex"].map(sexes)X = titanic.drop("Survived", axis=1)
Y = titanic["Survived"]from sklearn.model_selection import train_test_split(X_train, X_test, Y_train, Y_test) = train_test_split(X, Y, random_state=1)decision_tree = DecisionTreeClassifier(random_state=1)
decision_tree.fit(X_train, Y_train)
accuracy_decision_tree = decision_tree.score(X_test, Y_test)random_forest = RandomForestClassifier(random_state=1, n_estimators=50)
random_forest.fit(X_train, Y_train)
accuracy_random_forest = random_forest.score(X_test, Y_test)results = pd.DataFrame({"Model": ["Decision Tree", "Random Forest"],"Score": [accuracy_decision_tree, accuracy_random_forest]
})result_df = results.sort_values(by="Score", ascending=False)
result_df = result_df.set_index("Score")
print(result_df)
模型准确率排序输出:
# 准确率    模型
Score      Model
0.854749  Decision Tree
0.854749  Random Forest
此时,使用50棵树的随机森林模型和决策树模型的识别准确率恰好相等(保留至小数点后第6位)。经过多次尝试,当取n_estimators=18时两种模型的识别准确率相等:
random_forest = RandomForestClassifier(random_state=1, n_estimators=18)
random_forest.fit(X_train, Y_train)
accuracy_random_forest = random_forest.score(X_test, Y_test)
# 准确率   模型
Score     Model
0.854749  Decision Tree
0.854749  Random Forest
取n_estimators=17时,随机森林模型的识别准确率首次变为低于决策树模型。
random_forest = RandomForestClassifier(random_state=1, n_estimators=17)
random_forest.fit(X_train, Y_train)
accuracy_random_forest = random_forest.score(X_test, Y_test)
# 准确率   模型
Score     Model
0.854749  Decision Tree
0.843575  Random Forest
综上,要寻找的阈值大约为17.
3. By rerunning the steps in Section 11.7.2 using a few different values of random_state, verify that the ordering is not always the same as shown in Listing 11.25. Hint: Try values like 0, 2, 3, and 4.
Answer:
在划分数据集过程中和部分模型中,修改random_state参数的值。
random_state=0:
from sklearn.model_selection import train_test_split(X_train, X_test, Y_train, Y_test) = train_test_split(X, Y, random_state=0)
(模型参数省略)
模型识别准确率输出:
# 准确率   模型
Score     Model
0.821229  Logistic Regression  # 逻辑斯蒂回归
0.793296        Decision Tree  # 决策树
0.782123          Naive Bayes  # 朴素贝叶斯
0.776536        Random Forest  # 随机森林
0.681564           Perceptron  # 感知机
random_state=2:
from sklearn.model_selection import train_test_split(X_train, X_test, Y_train, Y_test) = train_test_split(X, Y, random_state=2)
(模型参数省略)
模型识别准确率输出:
# 准确率         模型
Score           Model
0.837989        Decision Tree  # 决策树
0.826816  Logistic Regression  # 逻辑斯蒂回归
0.821229        Random Forest  # 随机森林
0.787709           Perceptron  # 感知机
0.782123          Naive Bayes  # 朴素贝叶斯
random_state=3:
from sklearn.model_selection import train_test_split(X_train, X_test, Y_train, Y_test) = train_test_split(X, Y, random_state=3)
(模型参数省略)
模型识别准确率输出:
# 准确率        模型
Score           Model
0.810056        Decision Tree  # 决策树
0.810056        Random Forest  # 随机森林
0.782123  Logistic Regression  # 逻辑斯蒂回归
0.765363          Naive Bayes  # 朴素贝叶斯
0.402235           Perceptron  # 感知机
和random_state=1时的准确率排序相同,但整体上存在大幅度下降趋势。
random_state=4:
from sklearn.model_selection import train_test_split(X_train, X_test, Y_train, Y_test) = train_test_split(X, Y, random_state=4)
(模型参数省略)
模型识别准确率输出:
# 准确率        模型
Score           Model
0.837989        Random Forest  # 随机森林
0.798883  Logistic Regression  # 逻辑斯蒂回归
0.782123        Decision Tree  # 决策树
0.765363          Naive Bayes  # 朴素贝叶斯
0.603352           Perceptron  # 感知机
日后可以深究一下random_state参数对不同模型识别准确率的影响,本文在此不作赘述。不过显而易见的是,简单感知机的识别准确率性能确实基本上是垫底的。
4. Repeat the clustering steps in Section 11.7.3 using two clusters and eight clusters. Does the algorithm still work well in both cases?
Answer in Python:
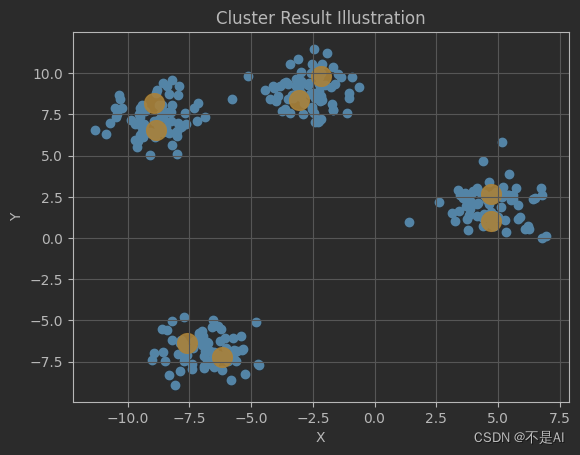
首先取KMeans算法中的n_clusters=2,输出聚类结果(聚类中心点坐标):
from sklearn.datasets import make_blobs
import matplotlib.pyplot as pltX, _ = make_blobs(n_samples=300, centers=4, random_state=42)from sklearn.cluster import KMeanskmeans = KMeans(n_clusters=2)
kmeans.fit(X)
centers = kmeans.cluster_centers_
print(centers)
程序输出:
[[-6.83235205 -6.83045748] # 中心点1[-2.26099839 6.07059051]] # 中心点2
聚类结果可视化:
fig, ax = plt.subplots()
ax.scatter(X[:, 0], X[:, 1])
ax.scatter(centers[:, 0], centers[:, 1], s=200, alpha=0.9, color="orange")
plt.title("Cluster Result Illustration")
plt.xlabel("X")
plt.ylabel("Y")
plt.grid()
plt.show()
输出的图像:

可见,上方3个簇被模型划分为1个类。
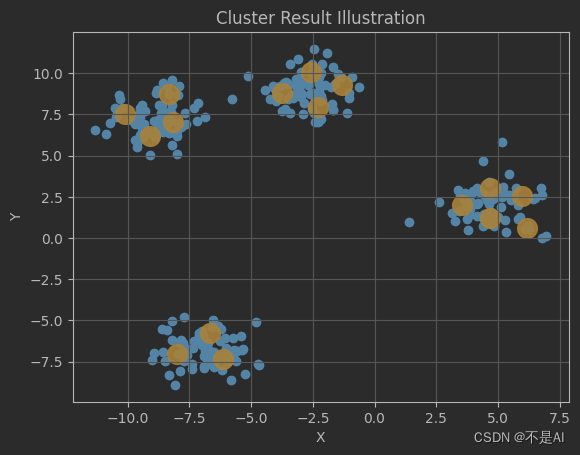
再取KMeans算法中的n_clusters=8,输出聚类结果(聚类中心点坐标):
kmeans = KMeans(n_clusters=8) # 修改的代码行
聚类结果图示:
结果比较好理解,8 = 4 * 2,模型对每一个数据簇赋了2个聚类中心。
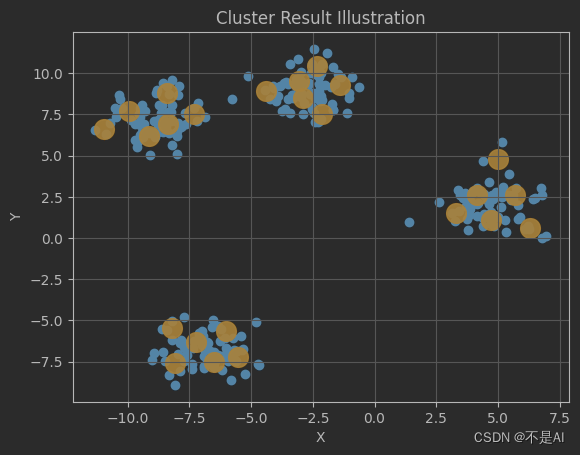
但是当n_clusters=16时,出人意料的是,模型并没有简单地按照4 * 4的方式进行“分配”,而是3 + 5 + 4 + 4:
kmeans = KMeans(n_clusters=16)
直观上,认为导致这种现象的原因可能是样本点的数量。
再分别观察n_clusters=24 和 n_clusters=32时的情形:
平均分配,6 + 6 + 6 + 6
8 + 8 + 7 + 9,“平均率”被打破。
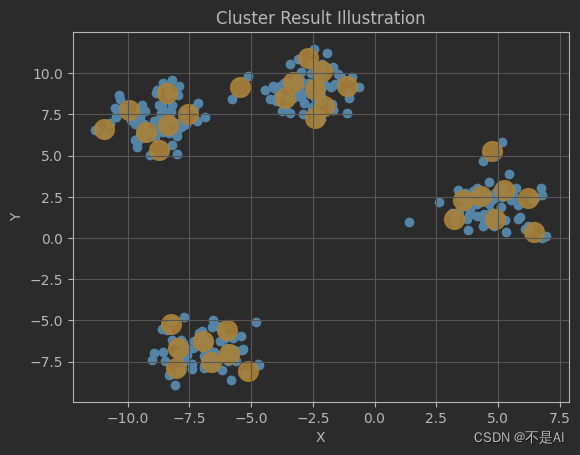
看来模型对于聚类中心的“分配”是随机的,但位置基本落在各个数据簇的边缘内,这个结果是可以令人满意的。
参考文献 Reference
《Learn Enough Python to be Dangerous——Software Development, Flask Web Apps, and Beginning Data Science with Python》, Michael Hartl, Boston, Pearson, 2023.